Note
Access to this page requires authorization. You can try signing in or changing directories.
Access to this page requires authorization. You can try changing directories.
This article explains how to install the modern report design templates in the application suite. You can use these samples to create graphically rich business documents that have flexible branding in the header and footer.
Introduction
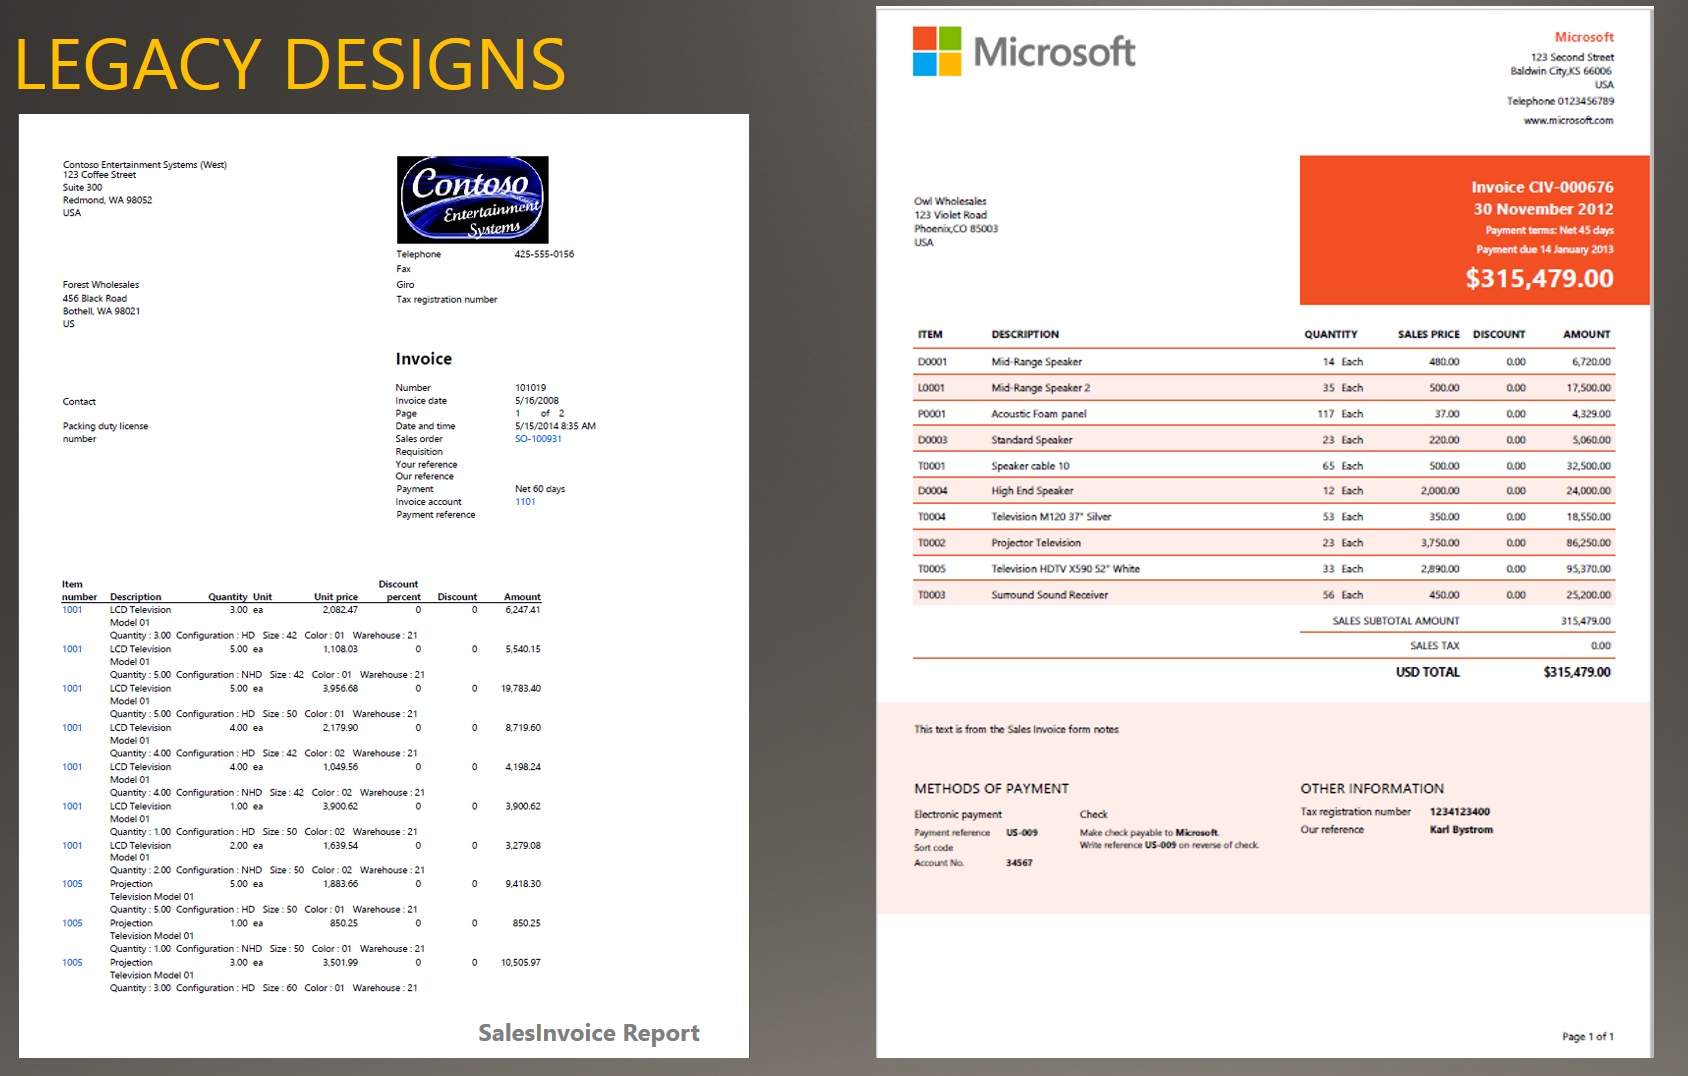
A new set of developer tools is available that takes the form of report designs for several core business documents in the application suite. These report designs have been re-imagined so that flexible branding appears in the header and footer of public-facing documents when transactions are generated in the application. The following illustration shows how an earlier design for a sales invoice differs from a modern sales invoice design.
After you complete the installation, you can use the built-in brand management tools to define brand settings that should be applied to the modern designs for application business documents. The brand management tools are available at Organization administration > Setup > Document branding > Branding details.
Why aren't these designs the default designs for the application suite reports?
We are maintaining the legacy solutions for two primary reasons:
- Modern designs don't include code. Although the legacy solutions use embedded Microsoft Visual Basic (VB) code to recognize configuration keys and honor regulatory requirements that vary by region, the modern report designs offer much less flexibility. The benefit of a simple design that has minimal code behind it comes at the expense of reusability across regions.
- Modern designs aren't available for all business documents. There is a gap between the supported business documents and the availability of modern report designs. Although the legacy designs aren't as aesthetically pleasing, they provide a sense of consistency.
Important
The simple modern designs are not recommended for all types of deployments. They are intended for cases where the customer doesn't require runtime control over the layout of the document through existing application configuration settings.
Apply the modern designs
The modern report designs have been bundled into a model file and posted to Microsoft Dynamics Lifecycle Services (LCS). Therefore, you can easily access them from your existing subscription. Use the following procedure to obtain the modern report design solutions and install them in your local development environment. You must then apply some customizations to incorporate the modern report designs into the appropriate scenarios.
Follow these steps to install the modern report designs for the application suite.
Sign in to LCS to access the deployment dashboard. Then, on the Shared asset library page, select the Model asset type, and download the ApplicationSuiteModernDesigns model file. Save the model file to a location that is accessible from the development environment.
Note
Be sure to select the appropriate model file for the version of the application that you're using.
Import the model file into your local development environment. To install a model file in a development environment, use the ModelUtil.exe tool and the -import directive. Here is an example.
ModelUtil.exe -import -metadatastorepath=[path of the metadata store] -file=[full path of the file to import]Navigate to the <AOSServiceDrive>:\AOSService\PackagesLocalDirectory\bin folder.
Run the following command.
ModelUtil.exe -import -metadatastorepath=J:\AOSService\PackagesLocalDirectory -file="E:\Test\AppSuiteModernDesigns.axmodel"For more information about how to import model files, see Export and import models. After you've imported the model file, start Microsoft Visual Studio. In Application Explorer, verify that the Application Suite - Modern Designs collection appears under the AOT node. For more information about how to use the Application Explorer, see Development tools tutorial
Now that you've successfully imported the Application Suite Modern Designs model, you must to rebuild the application suite to update the metadata elements.
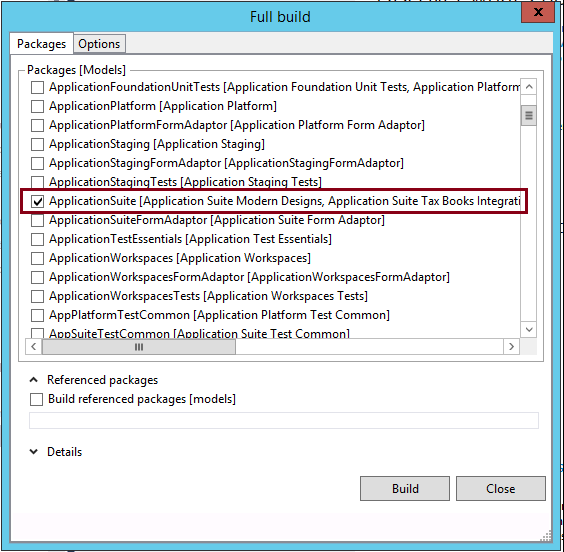
Build the application suite
The Application Suite Modern Designs model is an extension of the Application Suite model. To help guarantee that all application references are updated so that they target the model extensions, you must build the Application Suite model by using Microsoft Visual Studio.
Start Visual Studio, or use the existing instance.
On the Dynamics 365 menu, select Build models.
In the list, select the check box for the ApplicationSuite package.
Note
You will see that the Application Suite Modern Designs model is included in the package definition.
Select Build to do a full build of the application suite.
This process may take up to 20 minutes, depending on the size of your machine.
Deploy the modern designs (one-box environments)
After you've compiled the application suite that includes the modern report design templates, you should verify the changes locally. To verify the changes, you must deploy the new modern report design solutions to the instance of Microsoft SQL Server Reporting Services (SSRS) that is running locally.
Follow these steps to incorporate the modern report design into an existing application suite report.
- Create a project that contains the application suite report. In Application Explorer, under the Application Suite Modern Designs model, expand the Reports node, and then expand the Reports subnode. Select all the items in the folder, right-click, and then select Add to new project.
- Complete the New Project wizard. Accept all default values.
- In Solution Explorer, select the project, right-click, and then select Deploy reports to deploy the build and deploy the reports locally.
When you add the modern report design to an existing report, you can reuse both the parameter handling and the data provider that the out-of-box solution uses.
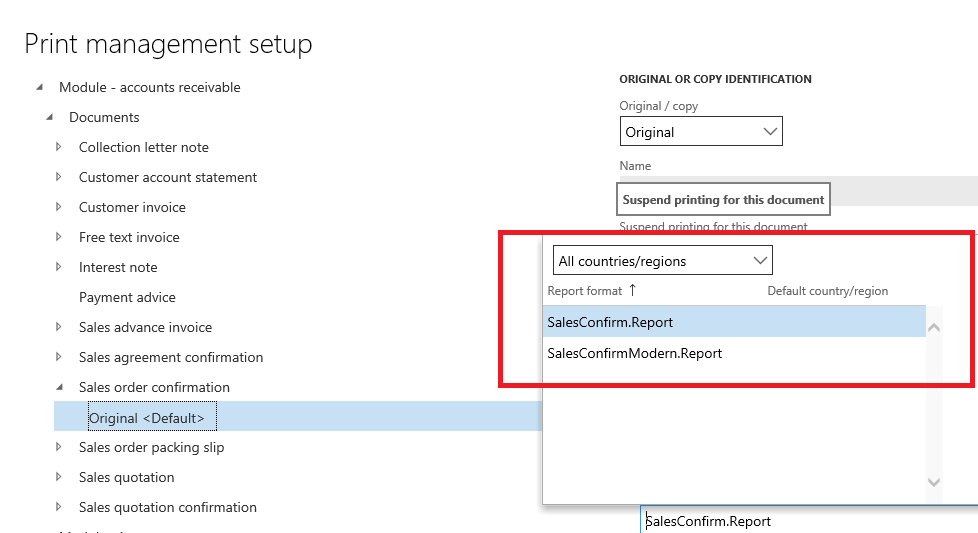
Update Print management settings
At this point, you should be able to access the modern report designs from the application. Make sure that you do thorough test validations on the modern report design templates before you deploy them to production environments. To do test validations, you must activate the modern report designs for the application business process.
Follow these steps to update the Print management settings for customer sales orders by selecting the modern report design solution as the default report design.
Open the Form setup page for the module. For example, for Accounts receivable, select Accounts receivable > Setup > Forms > Form Setup.
Select Print management to open the Print management setup page.
Expand the tree, and find the settings for the Sales order confirmation document.
Select Original <Default> to begin to modify the default document routing.
In the Report format list, select SalesConfirmModern.Report to enable the modern report design solution.
Open another page. This step forces a save operation to occur.
Post a sales order to view the modern design in the application.