Note
Access to this page requires authorization. You can try signing in or changing directories.
Access to this page requires authorization. You can try changing directories.
Note
Community interest groups have now moved from Yammer to Microsoft Viva Engage. To join a Viva Engage community and take part in the latest discussions, fill out the Request access to Finance and Operations Viva Engage Community form and choose the community you want to join.
This tutorial shows how to develop data entities in Microsoft Visual Studio and use them for data migration.
This tutorial is divided into two sections and four exercises. In the first section, you'll build a Project Category entity in Visual Studio. You then use this entity to export data. In the second section, you use Customer Groups and Customers entities to import multiple sets of files with the new Data Import/Export Framework.
Note
This tutorial is designed to be slightly more challenging than Build and consume data entities. Instead of providing a step-by-step guide, it has scenario exercises and describes the expected outcomes. The assumption is that you're already familiar with entities.
Prerequisites
This tutorial requires that you access the environment by using Remote Desktop. You need to be provisioned as an administrator on the instance.
Base URL
Throughout this tutorial, "base URL" refers to the base URL of the instance.
- In the cloud environment, you obtain the base URL from Microsoft Dynamics Lifecycle Services.
- On a local virtual machine (VM), the base URL is
https://usnconeboxax1aos.cloud.onebox.dynamics.com.
Developing an entity in Visual Studio and enabling it for data export
Business problem
You're developing a new solution for a project module. As part of your implementation, you must represent the data from project categories, so that this data can be imported into the system or exported from it. To accomplish this goal, you first build an entity for the project category and then use the export functionality to test data extraction.
Exercise 1: Build a Project Category entity
In this exercise, you build an entity, Project Category, that uses the ProjCategory table as its primary data source. This entity has the following properties.
| Property | Value |
|---|---|
| Entity AOT name | ProjectCategoryEntity |
| Label | Project Categories |
| Entity category | Reference |
| Public name | ProjectCategory |
| Collection name | ProjectCategories |
| Enable public API | Yes |
| Enable data management | Yes |
The entity also has the following fields:
- ActiveInJournals
- CategoryGroup
- Category
- TransactionType
- CategoryName
- Worker
- CustomerPaymentRetention
- IndirectCostComponent
- ItemSalesTaxGroup
- ServiceCode
- Absence
Steps
In Visual Studio, create a new application project.
In Solution Explorer, select the project, and then right-click Properties.
Specify the following project properties, and then select OK.
Property Value Model Application Suite Company USSI Synchronize Database on build True From the project, right-click Add > New item.
Select Data Model > Data Entity as your new item.
Enter a name and then select Add to start the Data Entity wizard.
On the first page of the wizard, specify the set of properties for the entity by using the table earlier in this exercise, and then select Next.

On the next page, add fields from the primary data source. Make sure that each field name reflects the public contract (see the table earlier in this exercise). To use the field's label as the field name, select the Convert label to field names option. Clear the option for any fields that aren't required for the entity.
Select Finish to complete the wizard, and to add the entity and its artifacts to the project.
Build your project so that you can start to use the entity.
Expected outcome
In Visual Studio, the following artifacts appear in the project after you complete the Data Entity wizard.

Right-click the data entity and then select Open table browser.
Note
Make sure that your company is set to USSI.
Exercise 2: Export a limited set of data by using a sample file mapping and filters
In this exercise, you use the Project Category entity that you built to export data. To export only a subset of the data, you use a sample file mapping and filters. The exported data are in XML format.
Steps
After you finish building the Project Category entity, start the client.
Change the company to USSI.
In the Data management workspace, select Export to begin data extraction.
Enter the export details, such as entity name, and target data format.
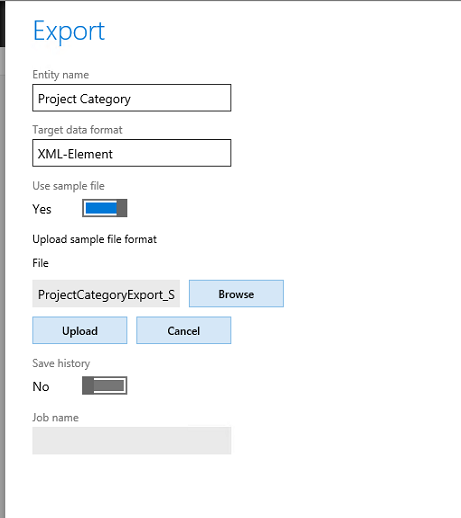
Open this file in a text editor and save it as an XML file. If the sample file mapping isn't valid, there's an incorrect field name in the entity. Fix either the entity or the sample file to continue.
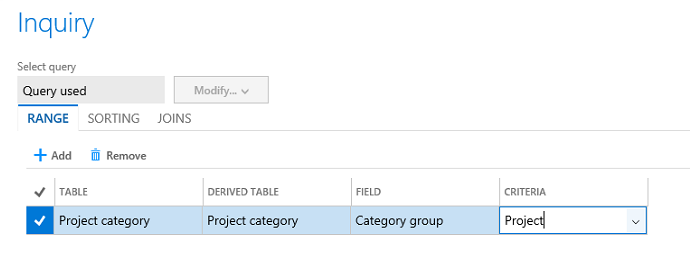
Select Filter and then specify Project as the filter criterion so that only limited data is exported.
In the Export dialog box, select OK.
Expected outcome
- Fifteen records are successfully exported.
Migrating data in multiple files by using the Data Import/Export Framework
Business problem
You're implementing a new environment. As part of this implementation, you want to migrate some legacy customer data. The data is contained in two sets of files, each of which has data for the Customers and Customer Groups entities. This migration is slightly complex, because some columns in the data files don't map directly to the entities. Additionally, the files have validation errors that you must correct during the import process.
Exercise 3: Create a data project and import multiple files
In this exercise, you import two files into the USRT company by using the new Data Import/Export Framework. You need to import these files in sequence by using a single data project. The Customers entity has a reference to the Customer Groups entity. Because the Customers1 file doesn't map correctly to the Customers entity, you get an error when you upload the file. Therefore, to complete the import process, you need to give the correct column mappings for the Customers entity.
Steps
Open the following files in Microsoft Excel, and save them as CSV files in your local directory:
In the client, change the company to USRT.
From the User dashboard, open the Data Management workspace.
Select Import to configure a new data project.
Enter the project details, like the name and file format.
For each file, select an entity, and then upload the data file.
Because the Customer1.csv file doesn't map correctly to the Customers entity, you get an error when you upload the file. After the file is uploaded, select View mappings to fix the column mappings for the Customers entity.
Tip
CustomerAccount is required in the entity during import. It's mapped from AccountNum in the source file. Address fields are optional for the import.
When you've finished, select the Back button in your browser to return to the data project.
On the Data Project page, select Import now.
Expected outcome
Four updates and 23 inserts are successfully imported, and the Execution summary page shows the results.
Exercise 4: Reimport by using an existing data project and manage data in staging
In this exercise, you use a new set of files to import data through the existing data project. Customers2 contains new and updated data for the Customers entity. CustomerGroups2 contains updated data for the Customer Groups entity. Customers2 contains some error records. You fix these errors in staging, validate the data, and then push it to the target to complete the import.
Steps
- In the Data management workspace, select the existing data project, and the select Re-import. By using the reimport functionality, you can preserve your previous settings for the data project and use new files for the import. However, if you select Reload data project and upload new files instead, the system overrides the previous mappings.
- Open the following files in Excel, and save them as CSV files in your local directory:
Upload the new files for each entity, and then select Import now.
On the Status page, select View execution log to investigate the errors.
On the Status page, select View staging to view the data in a staging table. This view also shows records with errors.
Select Edit to fix records that have errors. (The Customer Group value for records DM10221 and DM1022 isn't valid.)
Select the records you fixed, and then select Validate. Refresh the page to check that the status of the records is Validated.
Select Copy data to target.
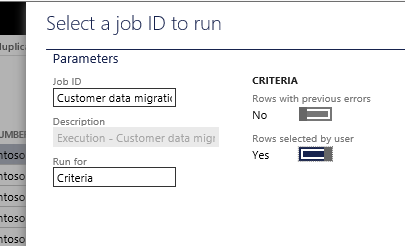
In the Select a job ID to run dialog box, in the Run for field, select Criteria and set Row selected by user to Yes. Then select OK.
On the Target data execution page, select Run.
When the run is completed, refresh the page to see the latest staging status.
Expected outcome
- On the first try, the import succeeds for the Customer Groups entity and partially succeeds for the Customers entity.
- The Execution summary page shows that five records were created, three records were updated, and two records have errors.
- In the staging view, two records have errors.
- After you fix the records and run the import again, the staging view shows that all records are completed.