Note
Access to this page requires authorization. You can try signing in or changing directories.
Access to this page requires authorization. You can try changing directories.
Note
Community interest groups have now moved from Yammer to Microsoft Viva Engage. To join a Viva Engage community and take part in the latest discussions, fill out the Request access to Finance and Operations Viva Engage Community form and choose the community you want to join.
Database movement operations are a suite of self-service actions that you can use as part of data application lifecycle management (DataALM). This tutorial shows how to export all the data and transactions from a sandbox standard user acceptance testing (UAT) environment.
In this tutorial, you learn how to:
- Refresh the UAT environment.
- Run the export to the Asset library in Microsoft Dynamics Lifecycle Services.
- Download the database backup.
- Import the database, and prepare it so that you can use it in a developer environment.
As an example of this scenario, a customer who is already live wants to load a recent copy of production transactions into the development environment. By using this approach, the customer can debug specific transactions or develop new features and reports by using realistic datasets.
Important
Database copy to a build environment isn't supported. To learn more, see build environments.
Known limitations
Because of recent restrictions by the Microsoft Azure SQL Database platform, Microsoft doesn't recommend that you export your database if it's larger than 200 gigabytes (GB). If you must export a larger database, use the legacy documentation until SQL Database can support larger exports. This recommendation applies to export operations, not refresh operations. Refresh operations can support databases that are up to 4 terabytes (TB) in size.
Prerequisites
To do a refresh operation, you must deploy your production environment, or you must have a minimum of two standard UAT environments. To complete this tutorial, you must deploy a developer environment.
Refresh the UAT environment
This refresh operation overwrites the UAT environment with the latest copy of the production database. To complete this step, follow the instructions in Refresh for training purposes.
Back up to the Asset Library
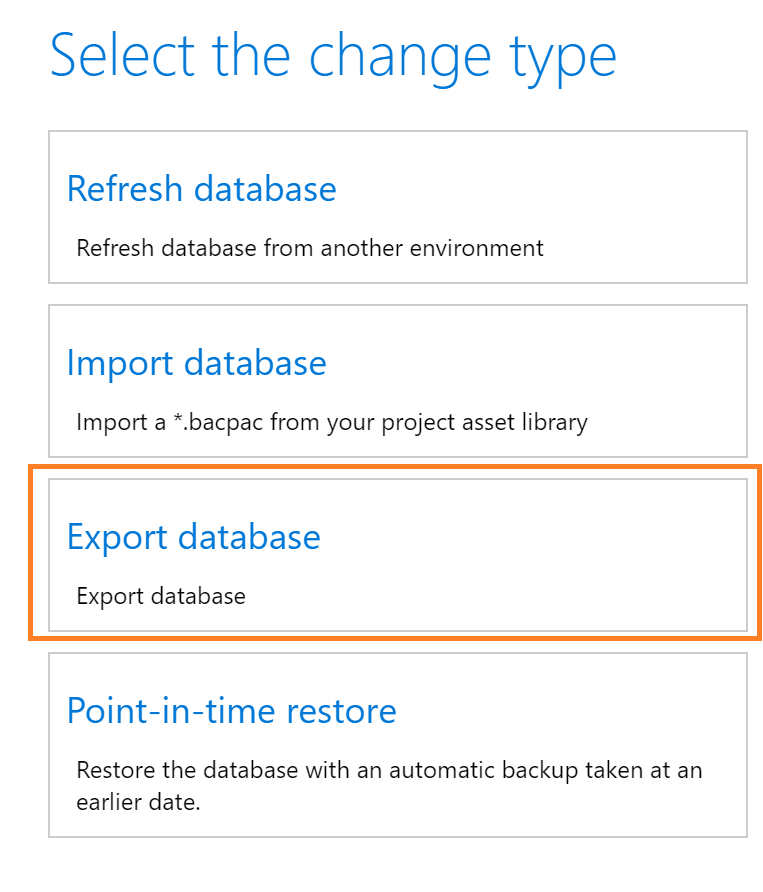
From your sandbox Environment Details page, click the Maintain menu, and then select Move database.
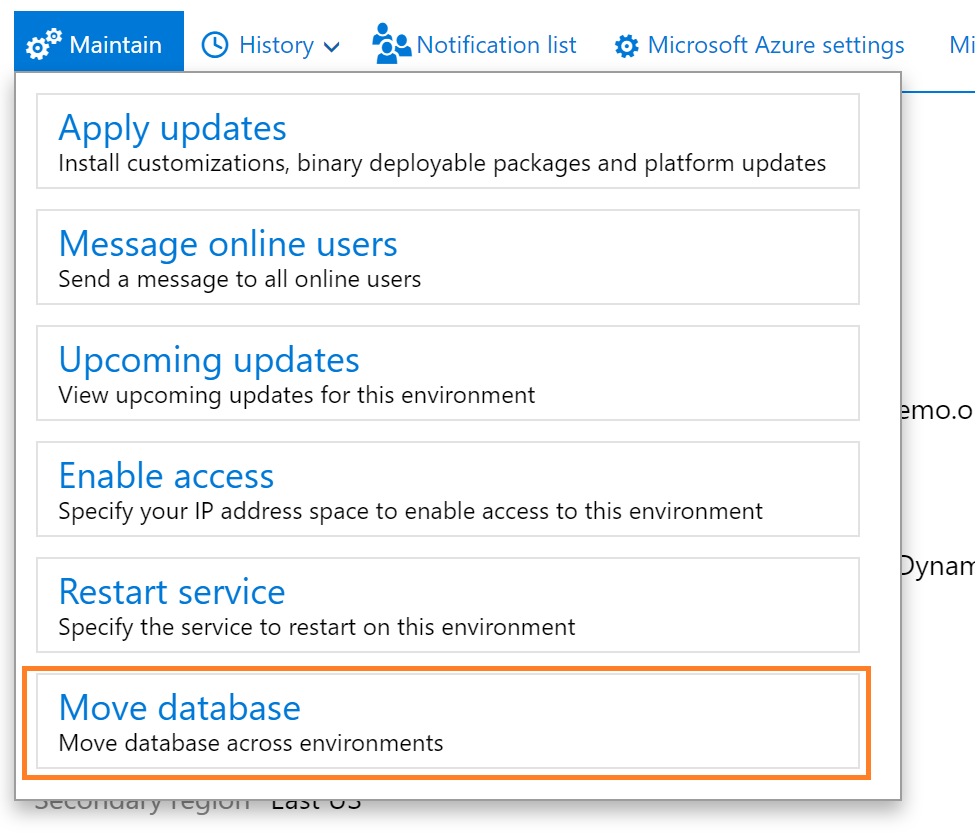
A slider pane will open on the page where you can use the Export database action.
The environment will be unavailable for other servicing operations, such as Sandbox refresh or package deployment during this time. The source environment will be usable from a Dynamics user perspective.
After the export operation completes successfully, sign out of the servicing operation on your Environment details page. You can then see the asset in your Asset Library in the Database backups section.
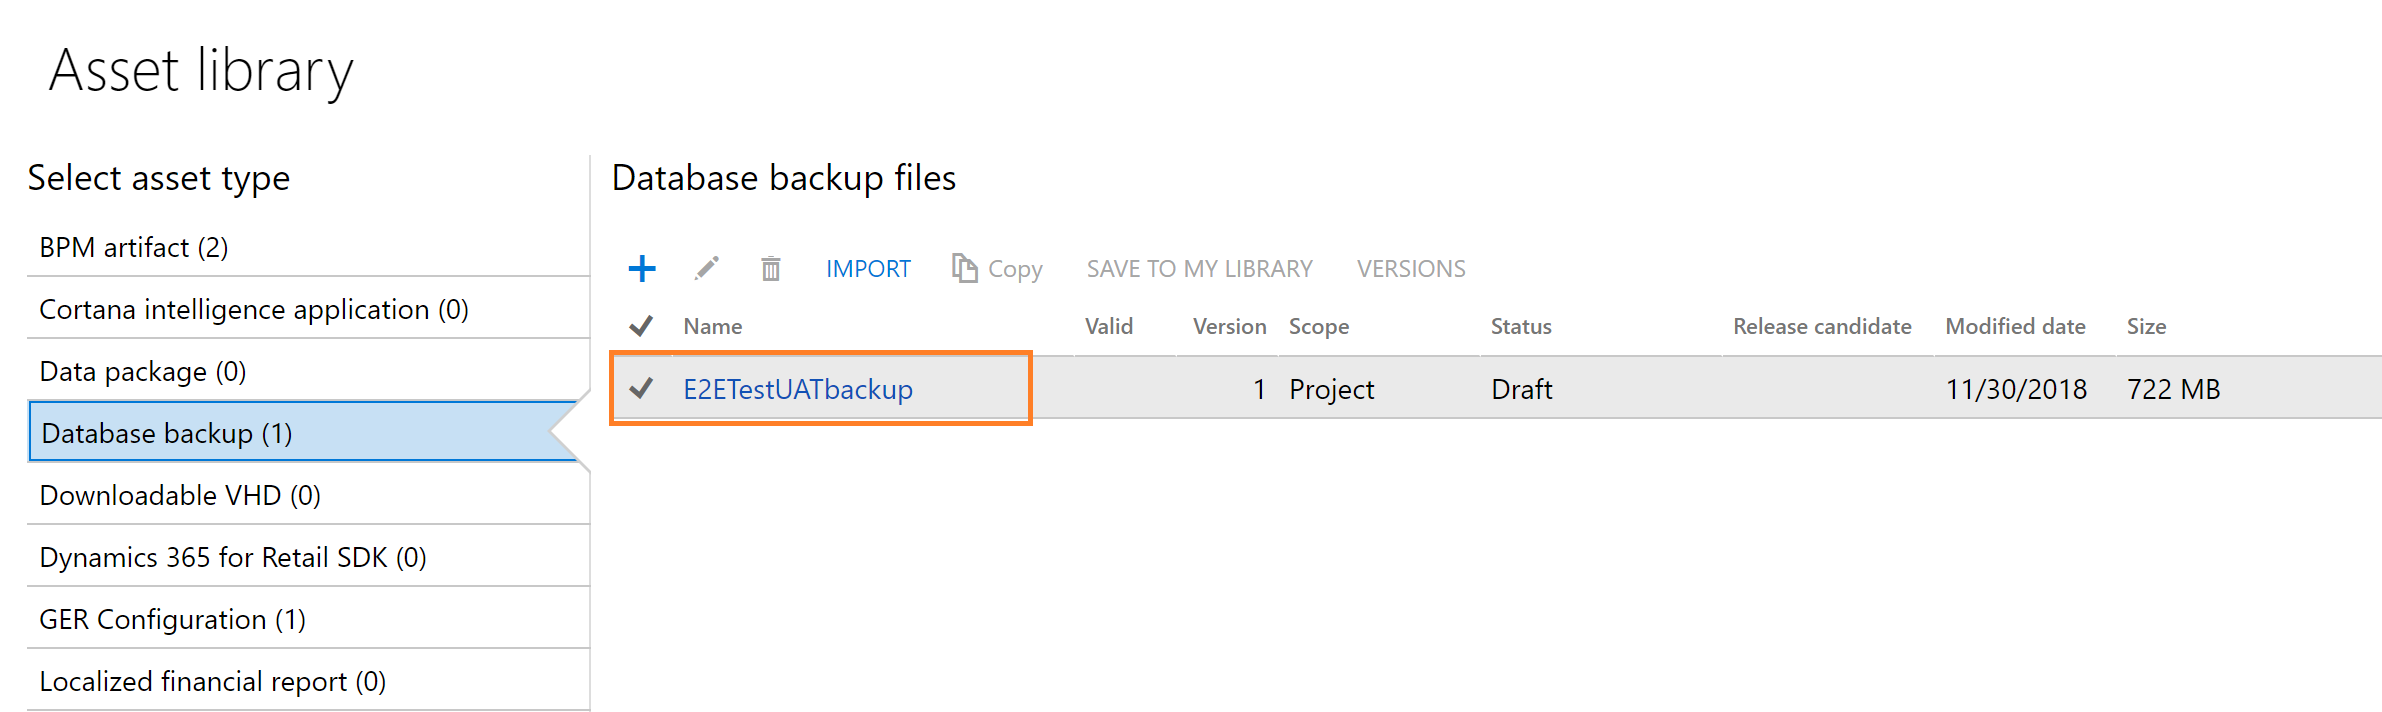
The .bacpac files are stored here and can be manually downloaded to your Tier 1 developer environments for import. In the future, Microsoft will provide APIs to trigger the export action, as well as list the available backup files in your asset library. This includes the secured URL for automatically downloading a backup asset file or copying it directly to your secure blob storage using Microsoft Azure Storage SDKs.
Import the database
After you download a database backup (.bacpac) file, you can begin the manual import operation on your Tier 1 environment. When you import the database, Microsoft recommends that you follow these guidelines:
- Keep a copy of the existing AxDB database, so that you can revert to it later if you must.
- Import the new database under a new name, such as AxDB_fromProd.
To ensure the best performance, copy the *.bacpac file to the local computer that you're importing from. Download sqlpackage .NET Core for Windows from Get sqlpackage .NET Core for Windows. Open a Command Prompt window, and run the following commands from the sqlpackage .NET Core folder.
SqlPackage.exe /a:import /sf:D:\Exportedbacpac\my.bacpac /tsn:localhost /tdn:<target database name> /p:CommandTimeout=1200 /TargetUser:"axdbadmin" /TargetPassword:"AOSWebSite@123" /TargetTrustServerCertificate:True
Here's an explanation of the parameters:
- tsn (target server name) – The name of the Microsoft SQL Server instance to import into.
- tdn (target database name) – The name of the database to import into. The database should not already exist.
- sf (source file) – The path and name of the file to import from.
Important
To ensure that imported data is compatible with the metadata, you must trigger a full database synchronization from Visual Studio.
During import, the user name and password aren't required. By default, SQL Server uses Microsoft Windows authentication for the user who is currently signed in.
Update the database
Run the following SQL script against the imported database. This script adds back the users that you deleted from the source database and correctly links them to the SQL logins for this SQL Server instance. The script also turns change tracking back on. Remember to edit the final ALTER DATABASE statement so that it uses the name of your database.
CREATE USER axdeployuser FROM LOGIN axdeployuser
EXEC sp_addrolemember 'db_owner', 'axdeployuser'

CREATE USER axdbadmin FROM LOGIN axdbadmin
EXEC sp_addrolemember 'db_owner', 'axdbadmin'

CREATE USER axmrruntimeuser FROM LOGIN axmrruntimeuser
EXEC sp_addrolemember 'db_datareader', 'axmrruntimeuser'
EXEC sp_addrolemember 'db_datawriter', 'axmrruntimeuser'

CREATE USER axretaildatasyncuser FROM LOGIN axretaildatasyncuser

CREATE USER axretailruntimeuser FROM LOGIN axretailruntimeuser

CREATE USER axdeployextuser FROM LOGIN axdeployextuser

CREATE USER [NT AUTHORITY\NETWORK SERVICE] FROM LOGIN [NT AUTHORITY\NETWORK SERVICE]
EXEC sp_addrolemember 'db_owner', 'NT AUTHORITY\NETWORK SERVICE'

UPDATE T1
SET T1.storageproviderid = 0
    , T1.accessinformation = ''
    , T1.modifiedby = 'Admin'
    , T1.modifieddatetime = getdate()
FROM docuvalue T1
WHERE T1.storageproviderid = 1 --Azure storage

DROP PROCEDURE IF EXISTS SP_ConfigureTablesForChangeTracking
DROP PROCEDURE IF EXISTS SP_ConfigureTablesForChangeTracking_V2
GO
-- Begin Refresh Retail FullText Catalogs
DECLARE @RFTXNAME NVARCHAR(MAX);
DECLARE @RFTXSQL NVARCHAR(MAX);
DECLARE retail_ftx CURSOR FOR
SELECT OBJECT_SCHEMA_NAME(object_id) + '.' + OBJECT_NAME(object_id) fullname FROM SYS.FULLTEXT_INDEXES
    WHERE FULLTEXT_CATALOG_ID = (SELECT TOP 1 FULLTEXT_CATALOG_ID FROM SYS.FULLTEXT_CATALOGS WHERE NAME = 'COMMERCEFULLTEXTCATALOG');
OPEN retail_ftx;
FETCH NEXT FROM retail_ftx INTO @RFTXNAME;

BEGIN TRY
    WHILE @@FETCH_STATUS = 0
    BEGIN
        PRINT 'Refreshing Full Text Index ' + @RFTXNAME;
        EXEC SP_FULLTEXT_TABLE @RFTXNAME, 'activate';
        SET @RFTXSQL = 'ALTER FULLTEXT INDEX ON ' + @RFTXNAME + ' START FULL POPULATION';
        EXEC SP_EXECUTESQL @RFTXSQL;
        FETCH NEXT FROM retail_ftx INTO @RFTXNAME;
    END
END TRY
BEGIN CATCH
    PRINT error_message()
END CATCH

CLOSE retail_ftx;
DEALLOCATE retail_ftx;
-- End Refresh Retail FullText Catalogs

--Begin create retail channel database record--
declare @ExpectedDatabaseName nvarchar(64) = 'Default';
declare @DefaultDataGroupRecId BIGINT;
declare @ExpectedDatabaseRecId BIGINT;
IF NOT EXISTS (select 1 from RETAILCONNDATABASEPROFILE where NAME = @ExpectedDatabaseName)
BEGIN
 select @DefaultDataGroupRecId = RECID from RETAILCDXDATAGROUP where NAME = 'Default';
 insert into RETAILCONNDATABASEPROFILE (DATAGROUP, NAME, CONNECTIONSTRING, DATASTORETYPE)
 values (@DefaultDataGroupRecId, @ExpectedDatabaseName, NULL, 0);
 select @ExpectedDatabaseRecId = RECID from RETAILCONNDATABASEPROFILE where NAME = @ExpectedDatabaseName;
 insert into RETAILCDXDATASTORECHANNEL (CHANNEL, DATABASEPROFILE)
 select RCT.RECID, @ExpectedDatabaseRecId from RETAILCHANNELTABLE RCT
 inner join RETAILCHANNELTABLEEXT RCTEX on RCTEX.CHANNEL = RCT.RECID
        update RETAILCHANNELTABLEEXT set LIVECHANNELDATABASE = @ExpectedDatabaseRecId where LIVECHANNELDATABASE = 0
END;
--End create retail channel database record
Turn on change tracking
If change tracking was turned on in the source database, be sure to turn it on in the newly provisioned database in the target environment. To turn on change tracking, use the ALTER DATABASE command.
ALTER DATABASE [your database name] SET CHANGE_TRACKING = ON (CHANGE_RETENTION = 6 DAYS, AUTO_CLEANUP = ON);
To help guarantee that the current version of the store procedure that is related to change tracking is used in the new database, you must turn change tracking on or off for a data entity in Data management. You can choose any entity. This step is required in order to trigger a refresh of the store procedure.
Start to use the new database
To switch environments and use the new database, first stop the following services:
- World Wide Web Publishing Service
- Microsoft Dynamics 365 Unified Operations: Batch Management Service
- Management Reporter 2012 Process Service
After these services are stopped, rename the AxDB database AxDB_orig, rename your newly imported database AxDB, and then restart the three services.
To switch back to the original database, reverse this process. In other words, stop the services, rename the databases, and then restart the services.
Post steps for Commerce environments
If you're using Commerce channels, when you import a database that you originally exported from a self-service sandbox to a developer environment, you must perform the following additional steps on the destination developer environment. If you don't complete these steps, Commerce channels won't function.
- To restore Commerce channels functionality, apply the latest Microsoft service update or quality update to create the channel database.
- To restore any previously deployed channel database extensions, reapply the corresponding Retail self-service deployable package.
Note
Starting with Commerce version 10.0.38, the collated/legacy channel database is no longer updated or supported. To restore Commerce channel functionality, you must set up a sealed CSU following the instructions in Install Commerce Scale Unit on a development environment.
Reprovision the target environment
Important
When a Commerce headquarters database (previously called AOS database) is migrated, the associated Commerce Scale Units (CSUs) are not moved. In several cases, depending on the features that are in use, a CSU redeployment may be required. Redeployment must then be followed by a full synchronization of data to the CSU. In extreme scenarios where data discrepancies still exist, the final action is to delete the CSU, deploy a fresh CSU to replace it, and then perform a full synchronization of data to the new CSU.
Some environment-specific records are not included in automated database movement operations and require additional steps. These include the following:
- Commerce self-service installer references.
- Commerce Scale Unit channel database configuration records.
If you copy a database between environments, Commerce capabilities in the destination environment won't be fully functional until you perform the following additional steps.
Initialize Commerce Scale Units
If you're moving a database to a sandbox user acceptance testing (UAT) or production environment, you must Initialize Commerce Scale Unit after the database movement operation is complete. The Commerce Scale Unit's association from the source environment won't copy over to the destination environment.
Synchronize Commerce self-service installers
To be able to access Commerce self-service installers in headquarters, you must Synchronize self-service installers after the database movement operation is complete.
Important
The environment reprovisioning step has now been fully automated as part of database movement operations, and no longer needs to be run manually. The environment reprovisioning tool is still available in the asset library, but is only required for restoring a database to a development environment running Commerce version 10.0.37 or earlier. For development environments running Commerce version 10.0.38 and later, the environment reprovisioning tool doesn't apply because these environments use a sealed CSU.
To run the environment reprovisioning tool on the destination environment, run the following steps:
- In your project's Asset Library, in the Software deployable packages section, select Import.
- From the list of shared assets, select the Environment Reprovisioning Tool.
- On the Environment details page for your destination environment, select Maintain > Apply updates.
- Select the Environment Reprovisioning tool that you uploaded earlier, and then select Apply to apply the package.
- Monitor the progress of the package deployment.
For more information about how to apply a deployable package, see Create deployable packages of models. For more information about how to manually apply a deployable package, see Install deployable packages from the command line.
Reactivate POS devices
If you use point of sale (POS) devices, you must activate the POS devices again after you import a database. Previously activated devices in the destination environment will no longer function. For more information, see Point of sale device activation.
Reset the Financial Reporting database
If you're using Financial Reporting, you must reset the Financial Reporting database by following the steps in Reset the Financial reporting data mart. (Financial Reporting was previously named Management Reporter.)
Reenter data from encrypted and environment-specific fields in the target database
In the client, enter the values that you documented for the encrypted and environment-specific fields. The following fields are affected. The field names are given in Table.Field format.
| Field name | Where to set the value |
|---|---|
| CreditCardAccountSetup.SecureMerchantProperties | Select Accounts receivable > Payments setup > Payment services. |
| ExchangeRateProviderConfigurationDetails.Value | Select General ledger > Currencies > Configure exchange rate providers. |
| FiscalEstablishment_BR.ConsumerEFDocCsc | Select Organization administration > Fiscal establishments > Fiscal establishments. |
| FiscalEstablishmentStaging.CSC | This field is used by the Data Import/Export Framework (DIXF). |
| HcmPersonIdentificationNumber.PersonIdentificationNumber | Select Human resources > Workers > Workers. On the Worker tab, in the Personal information group, select Identification numbers. |
| HcmWorkerActionHire.PersonIdentificationNumber | This field is obsolete since Microsoft Dynamics AX 7.0 (February 2016). It was previously in the All worker actions form (Human resources > Workers > Actions > All worker actions). |
| SysEmailSMTPPassword.Password | Select System administration > Email > Email parameters. |
| SysOAuthUserTokens.EncryptedAccessToken | This field is used internally by Application Object Server (AOS). It can be ignored. |
| SysOAuthUserTokens.EncryptedRefreshToken | This field is used internally by AOS. It can be ignored. |
Community tools
Are you looking for more tools to help you import backup files into your developer environments? Here are some other sources of information:
- D365fo.Tools provides many valuable tools created by the community.
- Community-provided open source projects on GitHub.
Known issues
The export database is in a "Preparation failed" state
If the automation from Lifecycle Services times out, the state of the export database changes to Preparation failed. The export operation to export to the Asset library is still running in SQL Database. To resolve this issue, use the Resume button to reconnect the process with SQL Database. The process should then be successfully completed.
Exporting the database takes a long time
The Azure SQL team announced that the Import/Export application programming interface (API) that Lifecycle Services uses has variable execution times for any database that is over 200 GB in size. If you encounter this issue, you can either connect your DevTest environment directly to the UAT database or follow the legacy documentation. Microsoft doesn't recommend that you export databases for backup purposes, because the point-in-time restore functionality is available and included with your environment.
The Lifecycle Services team works directly with the Azure SQL team to increase the performance of the Import/Export API to make improvements in upcoming releases of Lifecycle Services.
I can't download Management Studio installation files
When you try to download the Microsoft SQL Server Management Studio installer, you might receive the following error message:
Your current security settings do not allow this file to be downloaded.
To work around this issue, follow these steps to enable file downloads.
- In your web browser, open Internet options.
- On the Security tab, select the Internet zone, and then select Custom level.
- Scroll to Downloads, and then, under File download, select the Enable option.
Database synchronization fails
When you sync the database against the newly imported database from Visual Studio, the synchronization might fail. You might receive the following error message:
Failed to open SQL connection syncengine.exe exited with code -1.
In this case, the following message is also logged under event ID 140 in the Windows application log:
Object Server Database Synchronizer: The internal system table version number stored in the database is higher than the version supported by the kernel (141/138). Use a newer Microsoft Dynamics kernel, or start Microsoft Dynamics using the -REPAIR command line parameter to enforce synchronization.
This problem occurs when the platform build number of the current environment is lower than the platform build number of the source environment. To resolve the problem, follow one of these steps, depending on your circumstances:
Use the Updates tiles on the environment page in Lifecycle Services to upgrade the platform in the current environment so that it matches the platform in the source environment.
Run the following query to adjust the expected version in the database.
UPDATE SQLSYSTEMVARIABLES

SET VALUE = 138

WHERE PARM = 'SYSTABVERSION'
Note
The value 138 in this query comes from the event log message, where version 138 was expected in this particular environment.
Performance
The following guidelines can help you achieve optimal performance:
- Always import the .bacpac file locally to the computer that runs the SQL Server instance. Don't import it to a remote machine from Management Studio.
- Place the .bacpac file on drive D when you import it to a one-box environment that is hosted in Azure. (A one-box environment is also known as a Tier 1 environment.) For more information about the temporary drive on Azure virtual machines (VMs), see Understanding the temporary drive on Windows Azure Virtual Machines.
- Grant the account that runs the SQL Server Windows service Instance File Initialization rights. This action helps improve the speed of the import process and the speed of a restore from a *.bak file. For a developer environment, you can easily make sure that the account that runs the SQL Server service has these rights by setting SQL Server to run as the axlocaladmin account.