Note
Access to this page requires authorization. You can try signing in or changing directories.
Access to this page requires authorization. You can try changing directories.
Note
Community interest groups have now moved from Yammer to Microsoft Viva Engage. To join a Viva Engage community and take part in the latest discussions, fill out the Request access to Finance and Operations Viva Engage Community form and choose the community you want to join.
Important
Starting February 2026, new customers can't create projects in Microsoft Dynamics Lifecycle Services for Microsoft Dynamics 365 Finance, Microsoft Dynamics 365 Human Resources, Microsoft Dynamics 365 Supply Chain Management, and Microsoft Dynamics 365 Project Operations. New customers should use the Power Platform admin center instead. For more information, see Lifecycle Services project creation freeze.
Prerequisites
Before you can set up technical support, you must acquire a Microsoft Entra account. You create this account when you set up a subscription for one of the finance and operations apps.
Create an Azure DevOps project
The Support tile in a Lifecycle Services project uses Azure DevOps to store issues that are submitted through the client and issues that are manually created from the Support tile in Lifecycle Services. This functionality requires that you configure an Azure DevOps project in the Lifecycle Services project that you want to use for support. All users who need to use the Support tile to submit an issue must have access to the Azure DevOps project and must authorize Lifecycle Services to access Azure DevOps on their own behalf. Most users don't have access to Lifecycle Services or Azure DevOps. Therefore, in the Azure DevOps project, you should create a special system account that can be used to submit issues.
Create a new Azure DevOps project
- Go to https://www.visualstudio.com/.
- Select Sign in in the upper-right corner.
- Sign in by using a Microsoft Entra account that's in the tenant that your subscription is linked to. If the browser already has your credentials, you won't see the sign-in page and should instead select your name in the upper-right corner.
- On the right side of the page, under Accounts, select Create a free account now.
- Specify an account URL, then select Create Account.
- Name your project, and specify a process template. Your project is now created.
Add users to the Azure DevOps project
- In the upper-left corner, select Team Services.
- On the Users tab, select Add, and invite users who use the Support experience to the Azure DevOps organization. For each user that you invite, select either Basic or Stakeholder.
- In the upper-left corner, select Team Services.
- Select Browse, and browse to the project that you created in the previous procedure.
- In the Members section of the project home page, select Add, and add the users that you invited in step 2.
Create the support system user
- Create a new user in your Microsoft Entra tenant, and enter a descriptive name, such as LcsCpsSystemAccount.
- In the upper-left corner, select Team Services.
- On the Users tab, select Add, and invite the system user that you created in step 1. For this user, select Stakeholder.
- In the upper-left corner, select Team Services again.
- Select Browse, and browse to the project that you created earlier.
- In the Members section of the project home page, select Add, and add the system user.
Retrieve the personal access token for the support system user
- Sign out of Team Services by selecting the user name in the upper-right corner and then selecting Sign out.
- Sign in to Team Services by using the support system account that you created in the previous procedure.
- In the upper-right corner, select the user name, then select My profile.
- On the Security tab, on the Personal access tokens tab, select Add.
- Enter a description, such as Lifecycle Services Support system account.
- Select an expiration date of one year.
- Select Selected scopes, then select Work items (read and write).
- Select Create token.
- Copy the token and paste it in a safe location because it isn't accessible after you move away from the page.
Configure Lifecycle Services
Sign in to Lifecycle Services by using an account that has the Owner role for the Lifecycle Services project where you deployed the application.
Open the project in Lifecycle Services.
Select Project settings, then select the Azure DevOps link.

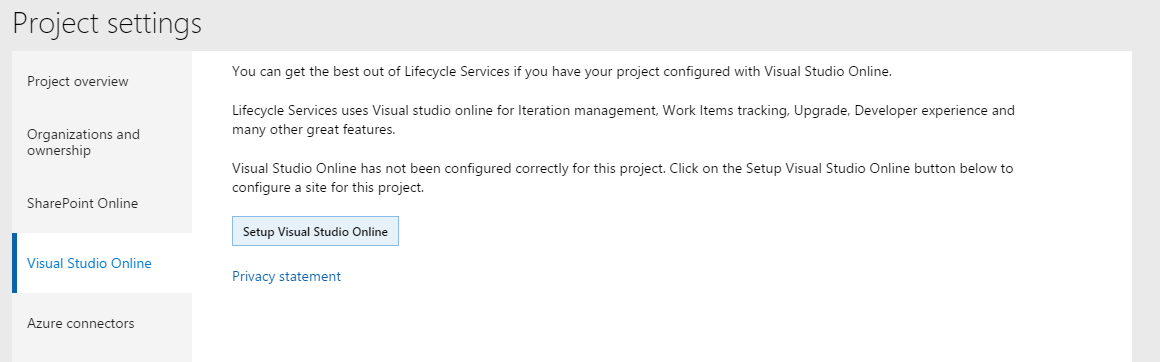
Select Setup Azure DevOps.
In the Azure DevOps site URL field, enter the URL of the Azure DevOps project that you created in the previous section.
Note
Lifecycle Services requires entering the Azure DevOps root URL in the legacy format. The legacy format is
https://ACCOUNT.visualstudio.comandhttps://contoso.visualstudio.com.In the Personal access token field, enter the personal access token that you created in the previous section.
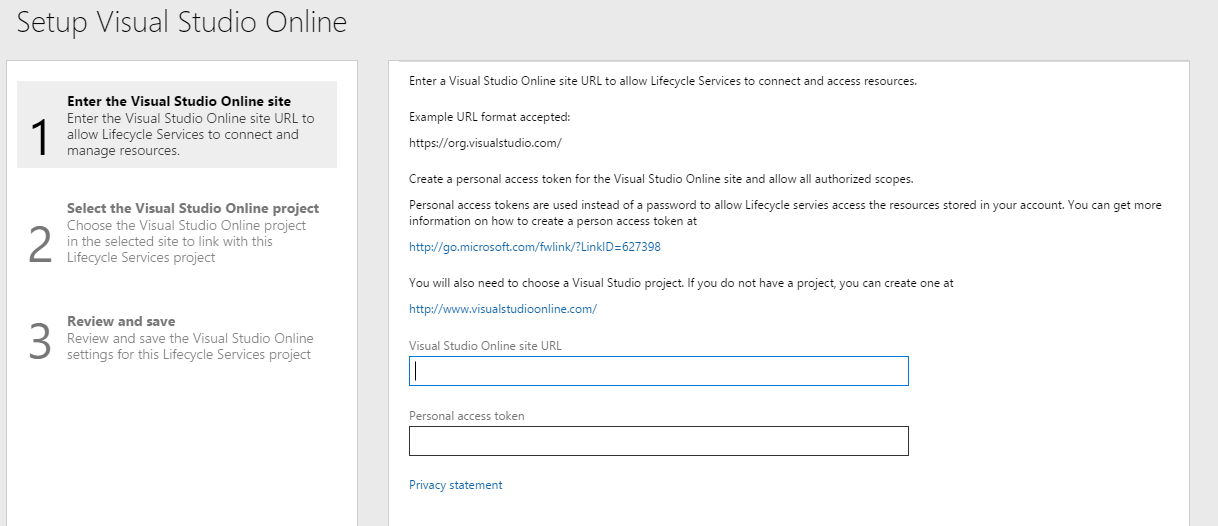
Select Continue.
Select the Visual Studio Codespaces project to use, then select Continue.
Select Save.
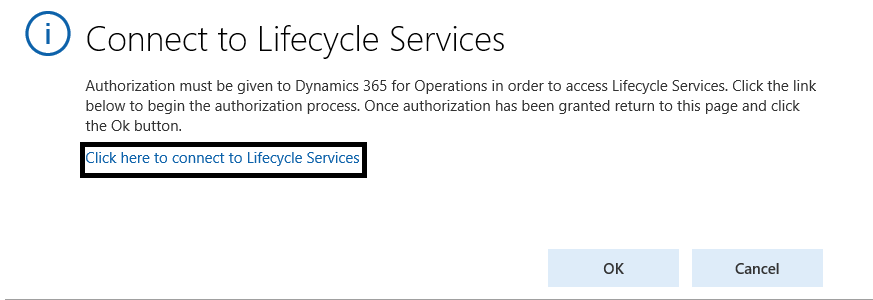
Select Authorize.
In the confirmation message box, select OK.
Sign in to Visual Studio Codespace.
Select Accept.
Create an issue
The support experience now shows updates that Microsoft publishes. In the client, on the top bar, select ?, then select Support.
Warning
If you have an on-premises deployment, you can't search for existing issues or submit a support incident from the on-premises client to your Azure DevOps project.
Note
If you don't connect to Lifecycle Services, a dialog box prompts you to connect. Select the link to connect before proceeding.
Search for a fix
After you connect to Lifecycle Services, you can search for existing Microsoft published updates and fixes. Enter your issue in the Search box and press Enter.
Note
If you don't want all users to search for existing fixes, you can remove the SearchExistingFixes duty from the System user role and add it to only those roles, which you want to have this functionality. Search results are based on the Microsoft Issue Search data that's relevant to your environment. Your search results don't include fixes that you already installed. To view a specific result, select the link to view the details.
Based on the duties assigned to you, you see either the Download view or the Request view.
Download view - By default, only system administrators see this view. From this view, you can directly download the hotfix.
Note
The duty DownloadHotfix controls the ability to directly download fixes from Lifecycle Services rather than requesting them. Only system administrators have access to it by default. If you want to assign this duty to users other than system administrators, you can do so by adding the duty to the selected roles.
Request view - By default, all users who aren't system administrators see this view. From this view, you can request to download the hotfix. After you submit your request to download the hotfix, a work item is created in the Azure DevOps project that's associated to your Lifecycle Services project. The customer IT admin can view all requested hotfixes by selecting the Support tile in Lifecycle Services and then selecting the Hotfix requests tab.
Search for project work items in Azure DevOps
The Azure DevOps administrator can publish project work items to your organization users by tagging the work items with #SearchableInFinanceAndOperations. The tagged work items are searchable for users from the client support search box. The search result includes tagged Azure DevOps work items in addition to Microsoft published updates and fixes. The following graphic shows a tagged Azure DevOps work item for publishing.
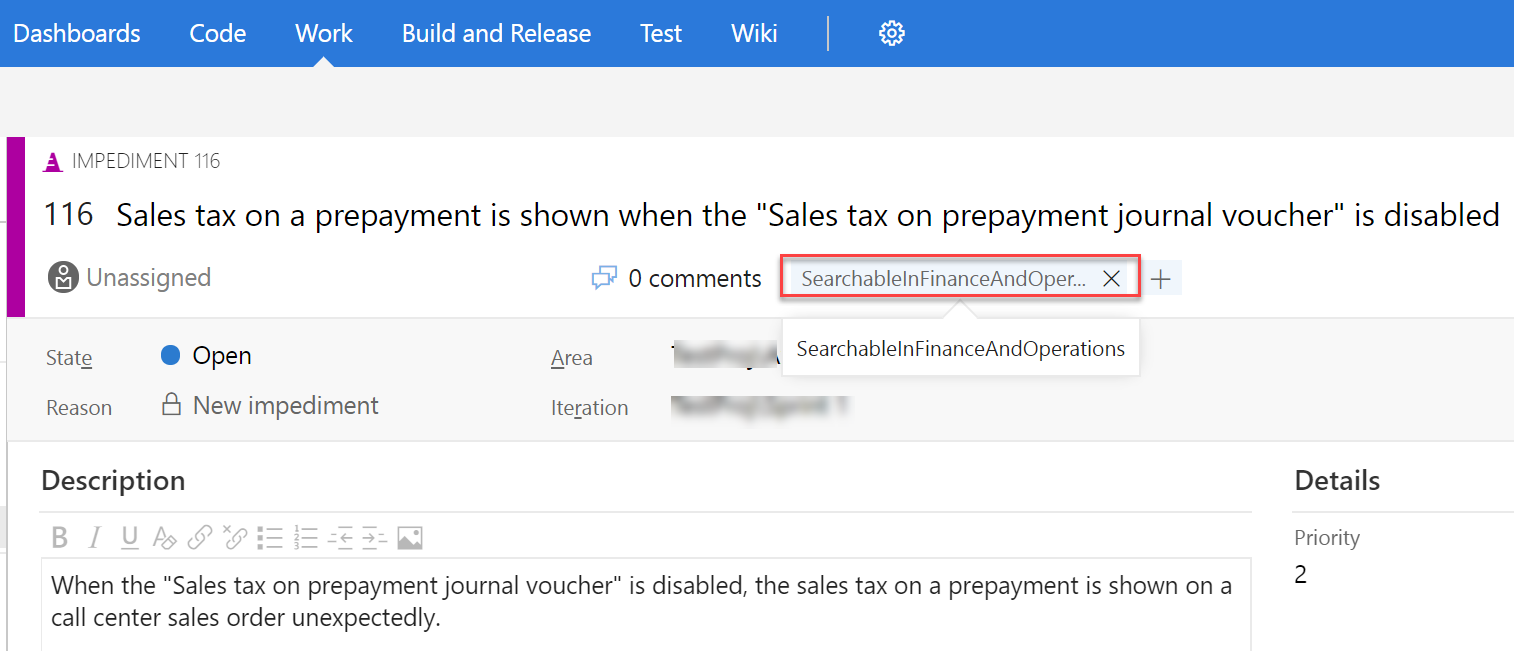
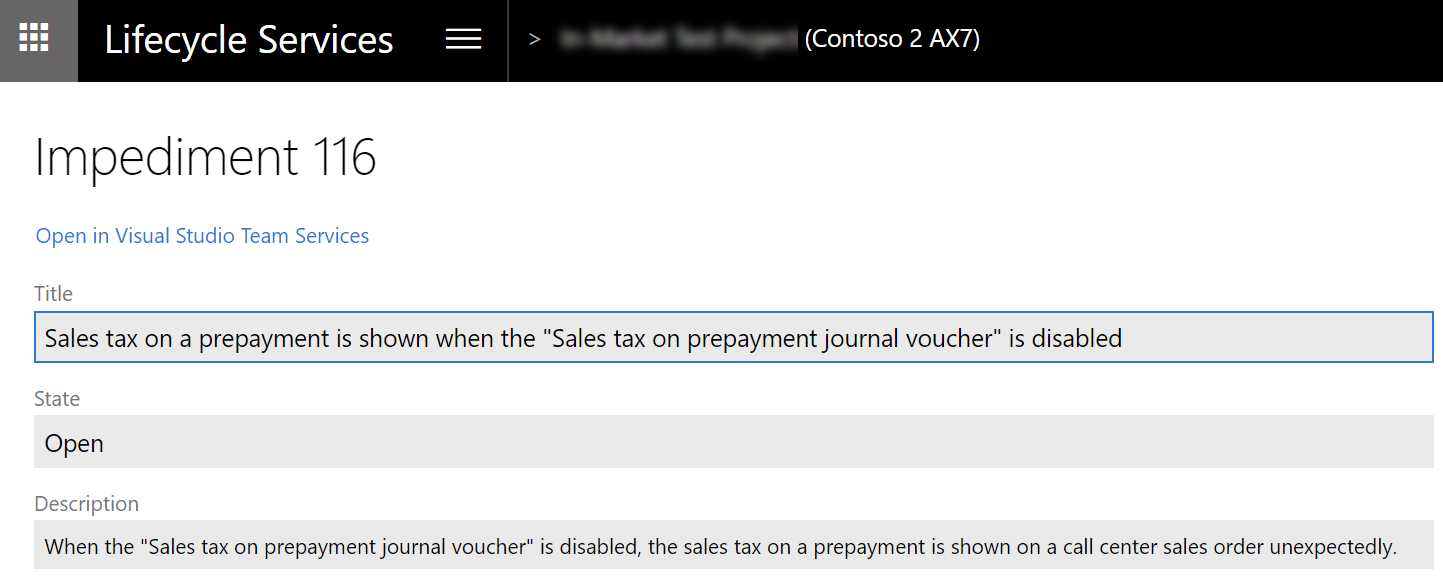
When you search for published Azure DevOps work items by using the support search box, search results show the work item's type, title, state, and description in a new browser tab with view mode. Users with proper permissions can edit the work item in Azure DevOps. The following graphic shows the search result of a published Azure DevOps work item.
Note
Your organization's users can see the published Azure DevOps work items.
Create and submit a new issue
If you don't see a fix in the search results, you can create a new issue by selecting Create. This functionality is the same functionality that's available for previous releases and is documented in earlier procedures.
Work with issues in Lifecycle Services
View issues
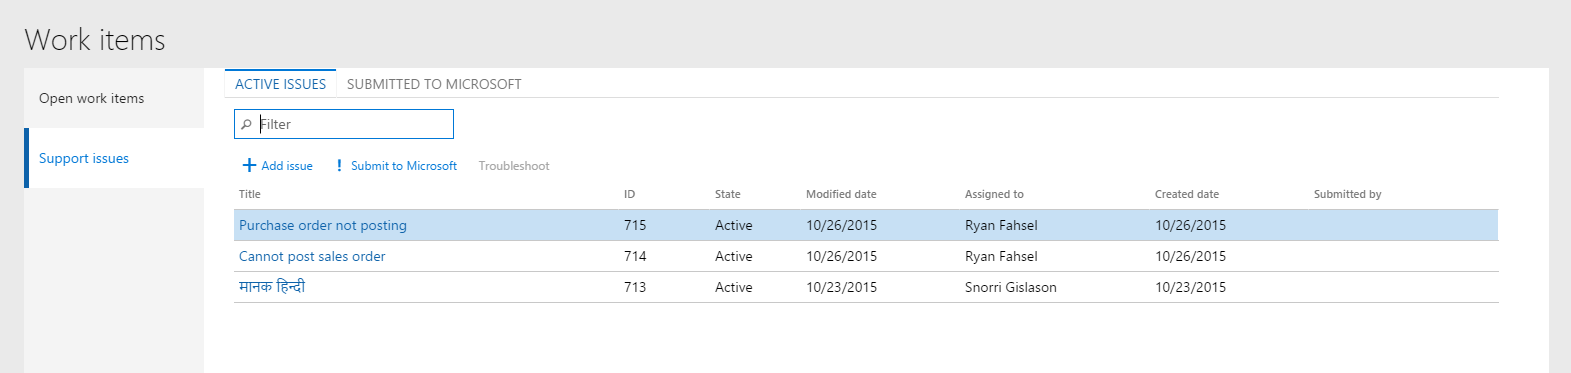
In the Lifecycle Services Support tile, the system stores issues as work items in the Azure DevOps project that's associated with the Lifecycle Services project. Specifically, the system stores issues as work items of the Issue or Impediment type, depending on the type of Azure DevOps project, in the AxAndLcsGeneratedIssues area. Every work item of one of those types in that area is included in the list of issues in the Support tile. If you modify an issue in Azure DevOps, the changes are reflected in Support issues. You can assign issues to any user in the Azure DevOps project. Users don't need to have access to Lifecycle Services to work with issues in Azure DevOps.
Go to lcs.dynamics.com, and sign in.
Open the Lifecycle Services project that's associated with the environment that you want to view issues for.
Select the Support tile. A list of the issues that you created appears.
Edit issues
In the Issues grid, select the title of an issue.
If necessary, sign in to Azure DevOps by using an account that has access to the Azure DevOps project that you set up in the first section of this article, Create an Azure DevOps project.
Note
There's an issue in Azure DevOps where the link to edit work items doesn't work correctly if sign-in is required. If you see the Assigned to me query after you sign in to Azure DevOps, go back to Lifecycle Services, and select the title of the issue in the issue grid again.
The Azure DevOps editor opens. Edit the issue, and then save your changes. The changes appear in the Support tile.
Submit an issue to Microsoft
You can submit issues to Microsoft support. When you submit an issue to Microsoft, the information and attachments in the issue can be included in the Microsoft support incident.
Lifecycle Services users must have a valid Microsoft support plan to submit issues to Microsoft. If you have trouble submitting issues to Microsoft, work with your administrator to make sure that your Lifecycle Services credentials are added to or associated with your organization's support plan with Microsoft Partner Source Business Center.
- In the Issue grid, select the issue to submit to Microsoft, then select Submit to Microsoft.
- If your account is associated with multiple support organizations, select the organization to use to create the Microsoft support incident.
- Use Issue search to verify that your issue isn't already solved.
- If Issue search doesn't provide a solution to your issue, select Create incident at the bottom of the page.
- Share diagnostic data with the Microsoft support team. By providing version information, your issues can be resolved more quickly.
- Describe your issue, provide your contact information, then select Submit.
Support settings
Note
The information in this section doesn't apply to on-premises deployments.
When you deploy your application from Lifecycle Services, you don't need to configure anything, because the Support tool automatically saves any issues to the same Lifecycle Services project that finance and operations was deployed from. To verify the Lifecycle Services project that Support uses, go to System administration > Setup > System parameters, then select Help > Support Contact.
Prevent users from creating issues from the client
By default, the System user role has the SysLCSCPSIssueEntry privilege assigned. This privilege controls access to the Contact your support team menu item on the Help menu. If you want to prevent users from creating and submitting issues from the client, remove this privilege from the System user role.