Note
Access to this page requires authorization. You can try signing in or changing directories.
Access to this page requires authorization. You can try changing directories.
This article explains how to set up the certificate that is required for certificate-based authentication for Regression suite automation tool (RSAT) 2.8.
About certificates
Digital certificates are digital "ID cards" that help establish trust online. They bind a public key to an entity's identity. That entity might be a website, an individual, or an organization. By using cryptography and ensuring secure communication across networks, certificates serve as a fundamental building block in modern security and form part of a broader public key infrastructure (PKI) that underpins secure communications across the internet. By providing a way to verify identity and establish encrypted channels, they help protect sensitive data from malicious actors.
Certificates are arranged as trees that are known as chains of trust. A chain of trust includes a root certificate (or CA certificate), an intermediate certificate, and an end-entity certificate (or user certificate), as shown in the following diagram.
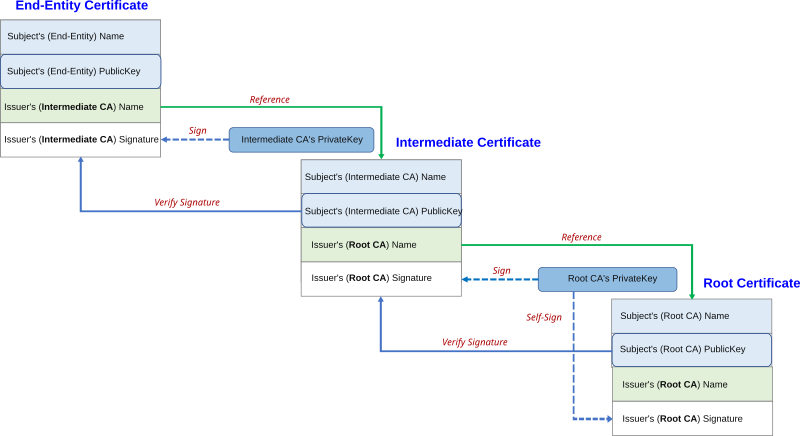
The binding of intermediate and user certificates to a securely managed root certificate helps secure the foundational trust of your PKI. In addition, it helps make certificate issuance, management, and eventual revocation more efficient and resilient to potential security breaches. This layered approach is core to modern digital security practices. It helps maintain trust at the same time that it allows for scalability and flexibility across complex environments.
Create certificates
Certificates are often generated by a certificate authority (CA) that issues certificates based on the identity of the applicant. When you submit a certificate signing request to a CA, the CA provides a Secure Sockets Layer (SSL) certificate that is signed by using the CA's root certificate and private key. The certificate has a defined life span. If you have a certificate from a CA, you can use it instead of creating a self-signed certificate. You can also generate certificates from Active Directory Certificate Services (AD CS).
This section explains how to generate a self-signed certificate that is needed to set up the RSAT system. After you create a root certificate, an intermediate certificate, and a user certificate, you upload them into Microsoft Entra and install them on the local computer that is running RSAT 2.8.
Create a root certificate
The root certificate (or CA certificate) is used to sign any number of intermediate certificates.
Use the following PowerShell script to generate a self-signed CA certificate.
\# Create a Root CA certificate (self-signed)\
\$rootCert = New-SelfSignedCertificate \`\
  -Subject \"CN=ContosoRootCA, O=Contoso, OU=IT, C=US\" \`\
  -KeyExportPolicy Exportable \`\
  -KeyUsage CertSign, CRLSign, DigitalSignature \`\
  -Type Custom \`\
  -KeyAlgorithm RSA \`\
  -KeyLength 2048 \`\
  -HashAlgorithm SHA256 \`\
  -NotAfter (Get-Date).AddYears(10) \`\
  -CertStoreLocation \"Cert:\\LocalMachine\\My\" \`\
  -TextExtension @(\"2.5.29.19={critical}{text}ca=true&pathlength=1\")

Export-Certificate -Cert \$rootCert -FilePath
\"C:\\Temp\\ContosoRootCA.cer\"
Here is an explanation of the script.
Certificate creation
\$rootCert = New-SelfSignedCertificate \`This line calls the new self-signed certificate cmdlet and assigns the generated certificate object to the
\$rootCertvariable.Subject
-Subject \"CN=ContosoRootCA, O=Contoso, OU=IT, C=US\" \`The
Subjectparameter sets the distinguished name (DN) for the certificate. The DN has the following components:- Common name (
CN) – The label for the certificate. This label is typically used as the primary identifier. In this example, the common name is ContosoRootCA. - Organization (
O) – The organization. In this example, the organization is Contoso. - Organizational unit (
OU) – A specific department or division in the organization. In this example, the organizational unit is the IT department. - Country (
C): – The country/region code. In this example, the country/region is the United States.
- Common name (
Key export policy
-KeyExportPolicy Exportable \`The
KeyExportPolicyparameter determines whether the private key can be exported. A value ofExportablespecifies that the private key can be extracted from the certificate store as it's needed.Key usage
-KeyUsage CertSign, CRLSign, DigitalSignature \`The
KeyUsageparameter specifies what the certificate's key can be used for. The following uses are typical for a CA certificate:CertSign– The key enables the certificate to sign other certificates.CRLSign- The key allows for signing certificate revocation lists (CRLs).DigitalSignature– The key enables the certificate to be used to create digital signatures.
Type
-Type Custom \`The
Typecustom setting indicates that no predefined template was used to create the certificate. Instead, the certificate was created with customized properties.Key algorithm
-KeyAlgorithm RSA \`The
KeyAlgorithmparameter defines the algorithm for creating the key pair. RSA is one of the most widely used public-key cryptographic algorithms.Key length
-KeyLength 2048 \`The
KeyLengthparameter sets the size of the cryptographic key in bits. A 2048-bit key is a common standard that offers a strong balance between security and performance.Hash algorithm
-HashAlgorithm SHA256 \`The
HashAlgorithmparameter specifies the algorithm that is used during certificate creation (when the certificate is signed). SHA256 is a secure and widely adopted hash algorithm.Validity period
-NotAfter (Get-Date).AddYears(10) \`The
NotAfterparameter sets the expiration date of the certificate. A value of(Get-Date).AddYears(10)specifies that the certificate is valid for 10 years from the current date. Root certificates that have a long validity period are common.Certificate store location
-CertStoreLocation \"Cert:\\LocalMachine\\My\" \`The
CertStoreLocationparameter indicates where the new certificate is put in the certificate store. The value\"Cert:\\LocalMachine\\My\"refers to the personal certificate store for the local computer account.Text extension
-TextExtension @(\"2.5.29.19={critical}{text}ca=true&pathlength=1\")The
TextExtensionparameter is used to add custom certificate extensions in a text-based format. In this example, the value consists of the following parts:2.5.29.19– The object identifier (OID) of the basic constraints extension.{critical}– The extension is critical. If a client doesn't understand the extension, it should not trust the certificate.{text}ca=true&pathlength=1– The certificate is a CA certificate (ca=true) that has a path length constraint of 1 (pathlength=1). The path length constraint limits the number of subordinate certificate issuers that can follow in the chain.
Certificate export
Export-Certificate -Cert \$rootCert -FilePath
\"C:\\Temp\\ContosoRootCA.cer\"
This command exports the certificate that is created to a file. The file contains the public portion of the certificate, without the private key. It's stored in C:\Temp\ContosoRootCA.cer, in a standard certificate file format (usually Base-64 encoded).
When you run this script, it creates a self-signed root CA certificate that has appropriate settings for a CA:
- An exportable key that can be used for signing operations
- A strong cryptographic setup (the RSA public-key cryptographic algorithm, a 2048-bit key, and the SHA256 hash algorithm)
- A defined validity period
Create an intermediate certificate
Use the following PowerShell script to generate an intermediate certificate that is signed by using the root certificate.
\# Create an Intermediate CA certificate (self-signed)\
\$rootSubject = \"CN=ContosoRootCA, O=Contoso, OU=IT, C=US\"

\$rootCert = Get-ChildItem -Path Cert:\\LocalMachine\\My \|\
    Where-Object { \$\_.Subject -eq \$rootSubject -and
\$\_.HasPrivateKey }

if (-not \$rootCert) {\
    Write-Error \"Root CA certificate with subject \'\$rootSubject\' not
found in LocalMachine\\My.\"\
    return\
}

\$intermediateCert = New-SelfSignedCertificate \`\
  -Subject \"CN=ContosoIntermediateCA, O=Contoso, OU=IT - Americas,
C=US\" \`\
  -KeyExportPolicy Exportable \`\
  -KeyUsage CertSign, CRLSign, DigitalSignature \`\
  -Type Custom \`\
  -KeyAlgorithm RSA \`\
  -KeyLength 2048 \`\
  -HashAlgorithm SHA256 \`\
  -NotAfter (Get-Date).AddYears(5) \`\
  -CertStoreLocation \"Cert:\\LocalMachine\\My\" \`\
  -Signer \$rootCert \`\
  -TextExtension @(\"2.5.29.19={critical}{text}ca=true&pathlength=0\")\

Export-Certificate -Cert \$intermediateCert -FilePath \"C:\\Temp\\.cer\"
Here is an explanation of the script.
Definition of the root subject
\$rootSubject = \"CN=ContosoRootCA, O=Contoso, OU=IT, C=US\"The
\$rootSubjectvariable stores the distinguished name (DN) of the root CA certificate that you previously created. The DN has the following components:- Common name (
CN) – The label for the certificate. In this example, the common name is ContosoRootCA. - Organization (
O) – The organization. In this example, the organization is Contoso. - Organizational unit (
OU) – A specific department or division in the organization. In this example, the organizational unit is the IT department. - Country (
C): – The country/region code. In this example, the country/region is the United States.
- Common name (
Retrieval of the root certificate from the certificate store
\$rootCert = Get-ChildItem -Path Cert:\\LocalMachine\\My \|\
Where-Object { \$\_.Subject -eq \$rootSubject -and \$\_.HasPrivateKey }
This command searches the personal certificate store for the local computer account (Cert:\LocalMachine\My). It looks for certificates that match the subject that is defined in the
\$rootSubjectvariable and that have an associated private key. The private key is critical because you need it to sign the intermediate certificate and therefore establish a chain of trust. The script can continue with signing only if a matching certificate is found.
Create a user certificate
Use the following PowerShell script to create a user certificate that is validated by the previously created intermediate certificate.
\# Edit the details as needed\
\$account = \"testuser\"\
\$tenant = \"Contoso\"\
\$userUPN = \"<$account@$tenant.onmicrosoft.com>\"\
\$subjectPrefix = \"\$account.\$tenant.\"\
\$subject = \"CN=\$subjectPrefix User Certificate, O=\$tenant, OU=Users,
C=US\"

\# Find the Intermediate CA in the cert store\
\$intermediateSubject = \"CN=ContosoIntermediateCA, O=Contoso, OU=IT -
Americas, C=US\"\
\$intermediateCert = Get-ChildItem -Path Cert:\\LocalMachine\\My \|\
    Where-Object { \$\_.Subject -eq \$intermediateSubject -and
\$\_.HasPrivateKey }

if (-not \$intermediateCert) {\
    Write-Error \"Intermediate CA cert not found in
Cert:\\LocalMachine\\My.\"\
    return\
}

\$userCert = New-SelfSignedCertificate \`\
  -Subject \$subject \`\
  -KeyAlgorithm RSA \`\
  -KeyLength 2048 \`\
  -HashAlgorithm SHA256 \`\
  -CertStoreLocation \"Cert:\\LocalMachine\\My\" \`\
  -Type Custom \`\
  -KeyExportPolicy Exportable \`\
  -TextExtension @(\
      \"2.5.29.19={critical}{text}ca=false\",  \# Basic Constraints (not
a CA)\
      \"2.5.29.37={text}1.3.6.1.5.5.7.3.2\",   \# EKU: Client
Authentication\
      \"2.5.29.17={text}email=\$userUPN\"       \# SAN: RFC822Name
(email)\
  ) \`\
  -Signer \$intermediateCert \`\
  -NotAfter (Get-Date).AddYears(1)\


Export-Certificate -Cert \$userCert -FilePath
\"C:\\Temp\\\$subjectPrefix-UserCert.cer\"

\$certpwd = ConvertTo-SecureString -String \'yourreqpwdhere\' -force
-AsPlainText

Export-PfxCertificate -Cert \$userCert -FilePath
\"C:\\Temp\\\$subjectPrefix-UserCert.pfx\" -password \$certpwd
Here is an explanation of the script.
User identity construction
The script builds the required identity details for a user certificate, to ensure consistent naming. Those details are the distinguished name (DN) and the user principal name (UPN). The certificate is valid for one year after the creation date.
Intermediate CA integration
The script finds an existing intermediate CA certificate in the local computer store. This step is crucial because the intermediate certificate is used to sign the new user certificate and therefore maintain a chain of trust.
Certificate creation
After the user identity and signer are in place, the script creates a new self-signed but subordinate certificate that is intended for client authentication. Custom text extensions clarify the usage and ensure that the certificate can't act as a CA certificate.
Certificate export
The script exports the certificate as both a .cer file and a .pfx file. The .cer file includes only public information and is used for distribution and validation purposes. The .pfx file includes the private key and is secured by a password. It's used for import or backup purposes.
Import the root certificate
After the certificates are generated, configure the PKI by importing the root certificate.
Sign in to the Microsoft Entra admin center.
On the Protection tab, select Show more, and then select Security center.
Select Create PKI.
In the security center, go to Manage > Public key infrastructure (Preview).
In the upper-right corner, select Create PKI.
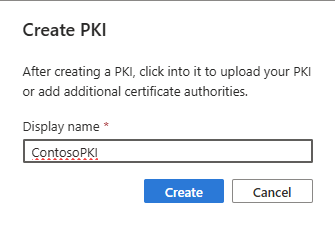
Enter a display name for the PKI, and then select Create.
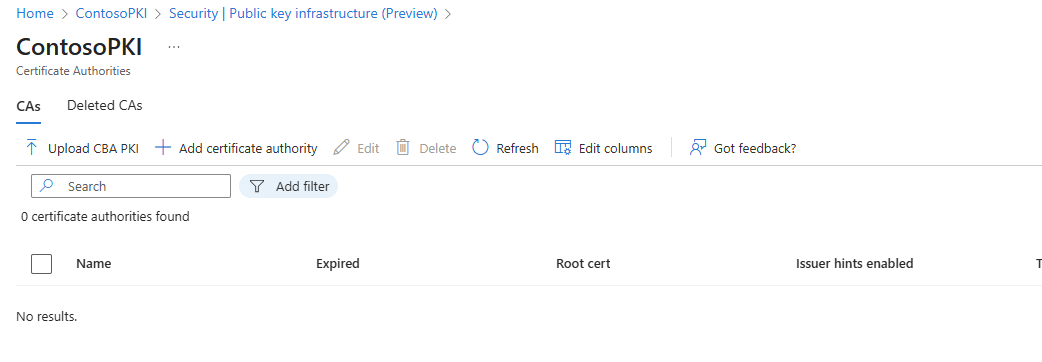
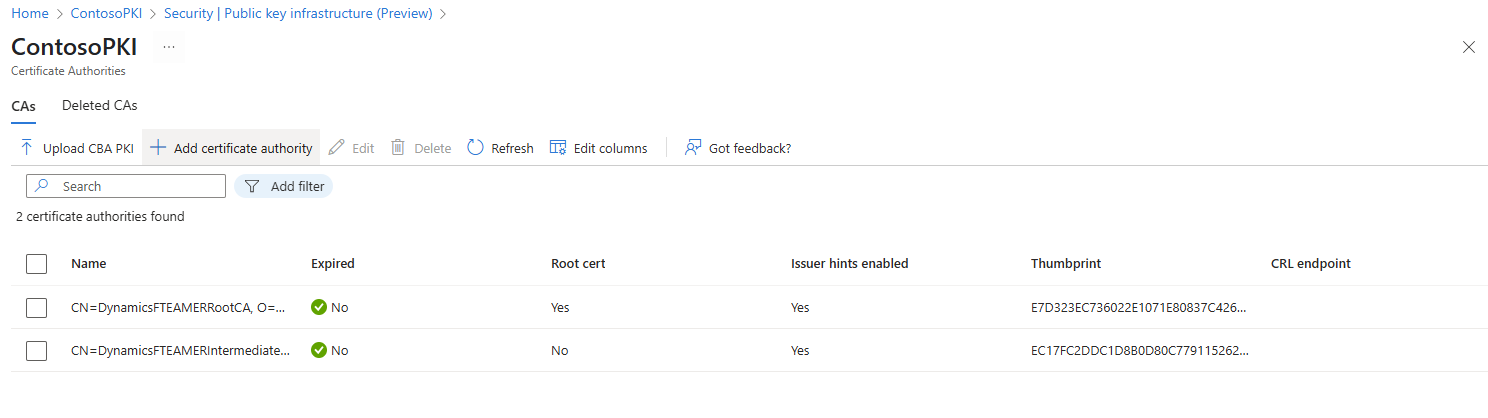
Select the new PKI. Notice that no CAs are listed for it in the grid on the CAs tab.
Add certificate authorities by following these steps:
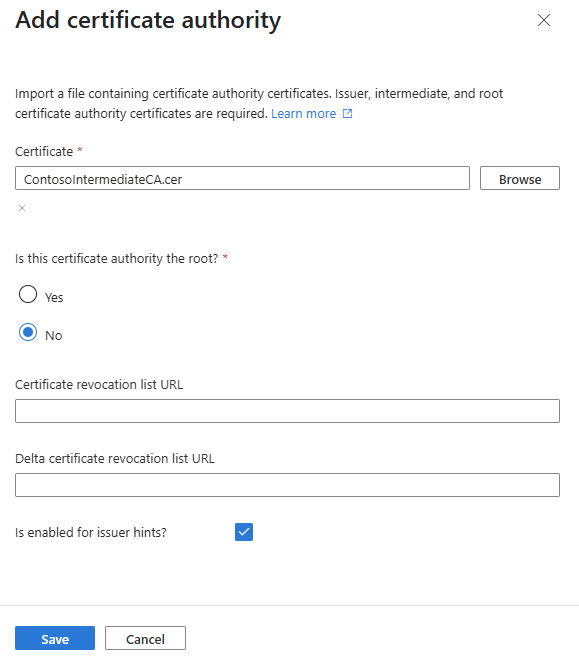
Select Add certificate authority.
In the Certificate field, select the root CA that you created earlier. Then, under Is this certificate authority the root?, select the Yes option.
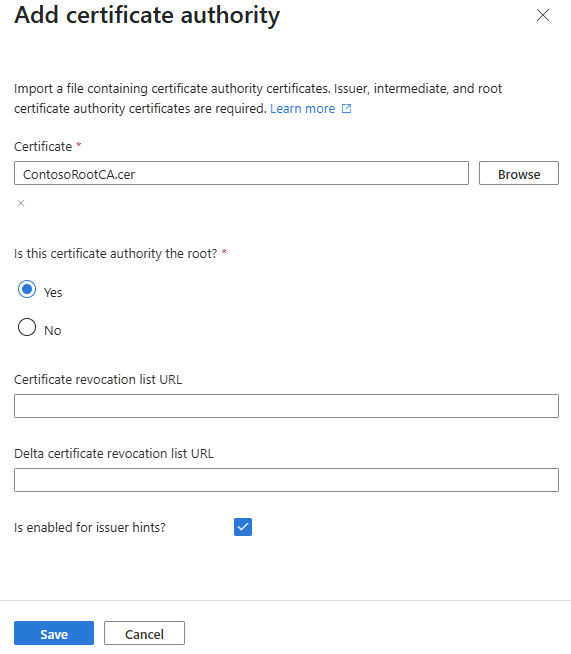
Select Save.
Select Add certificate authority again.
In the Certificate field, select the intermediate certificate that you created earlier. Then, under Is this certificate authority the root?, select the No option.
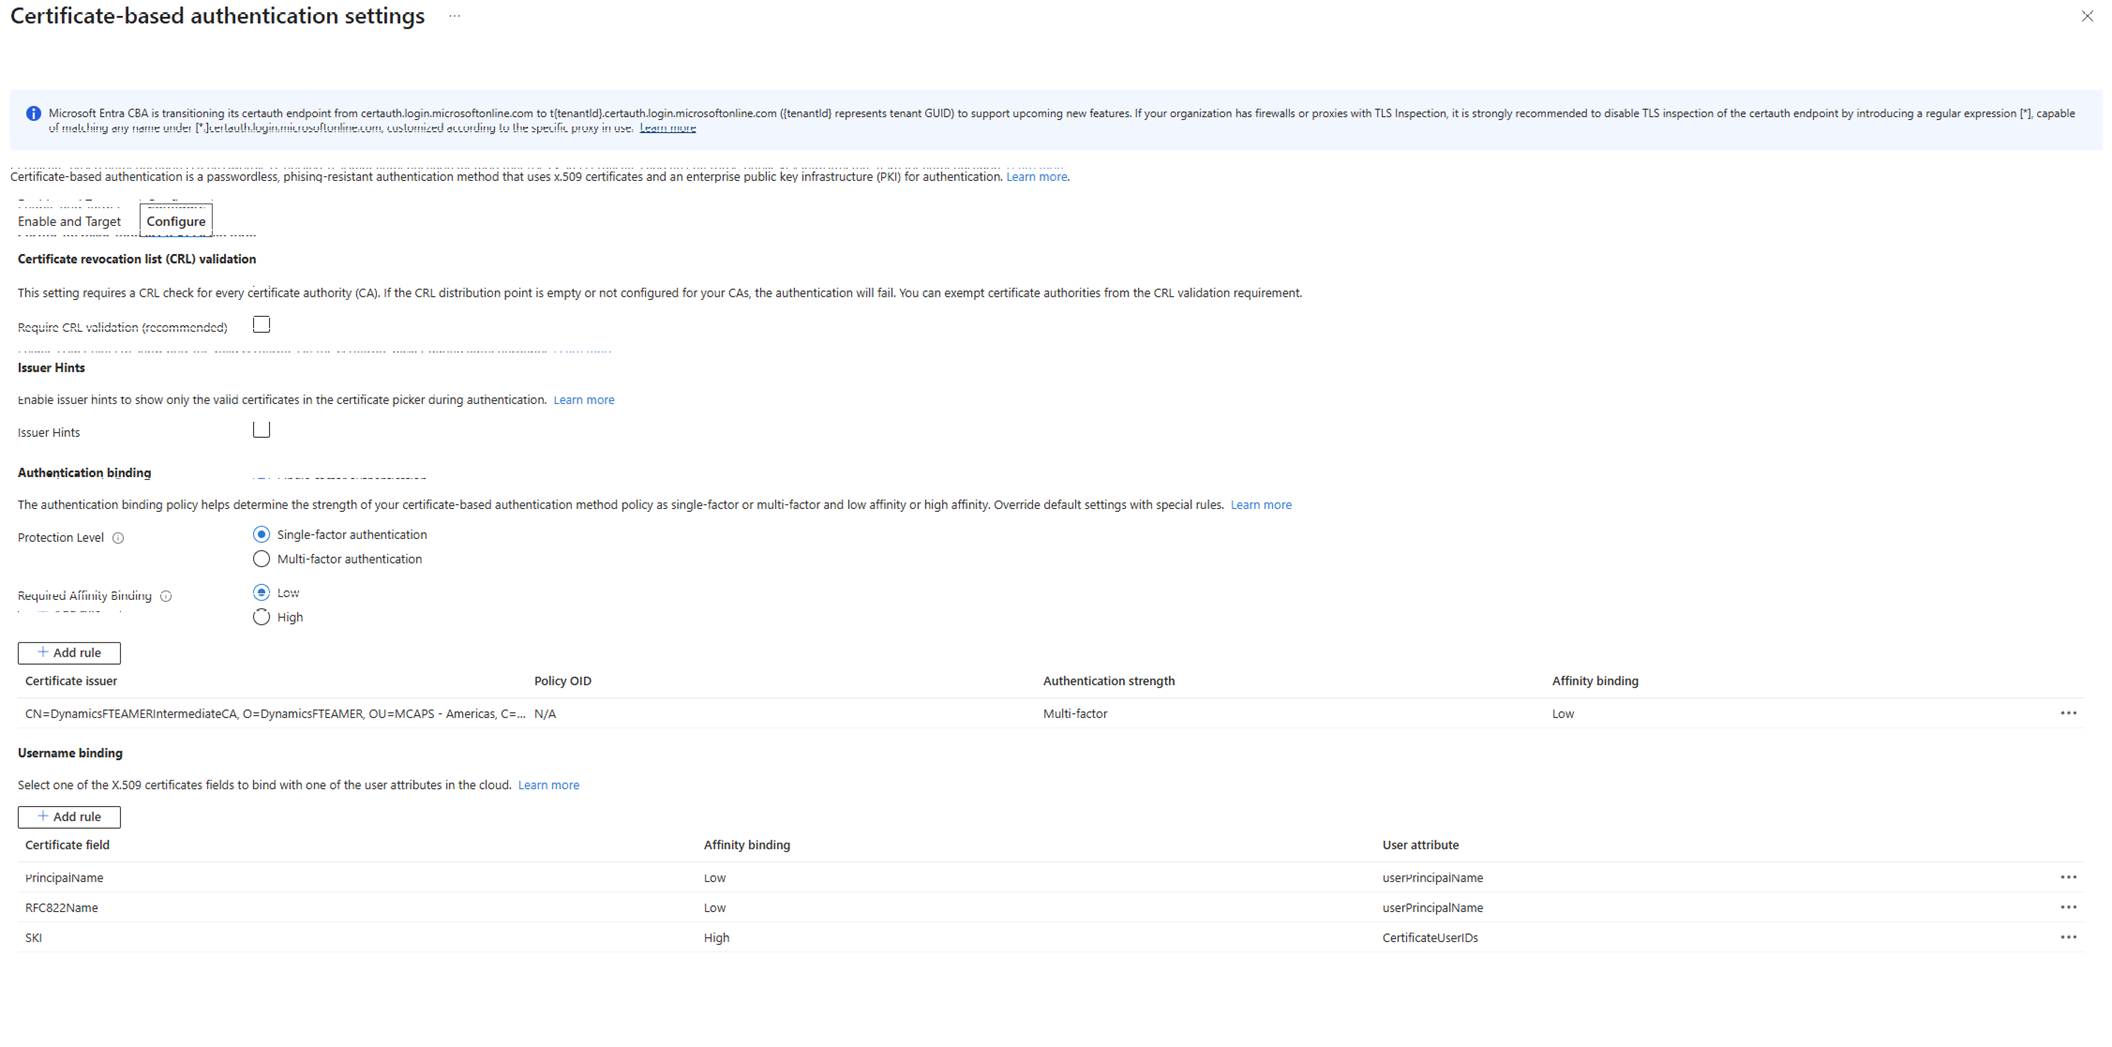
Both certificates should now be listed for the PKI.
Set up the authentication methods by following these steps:
Go to Security center > Manage > Authentication methods.
In the left pane, select Policies.
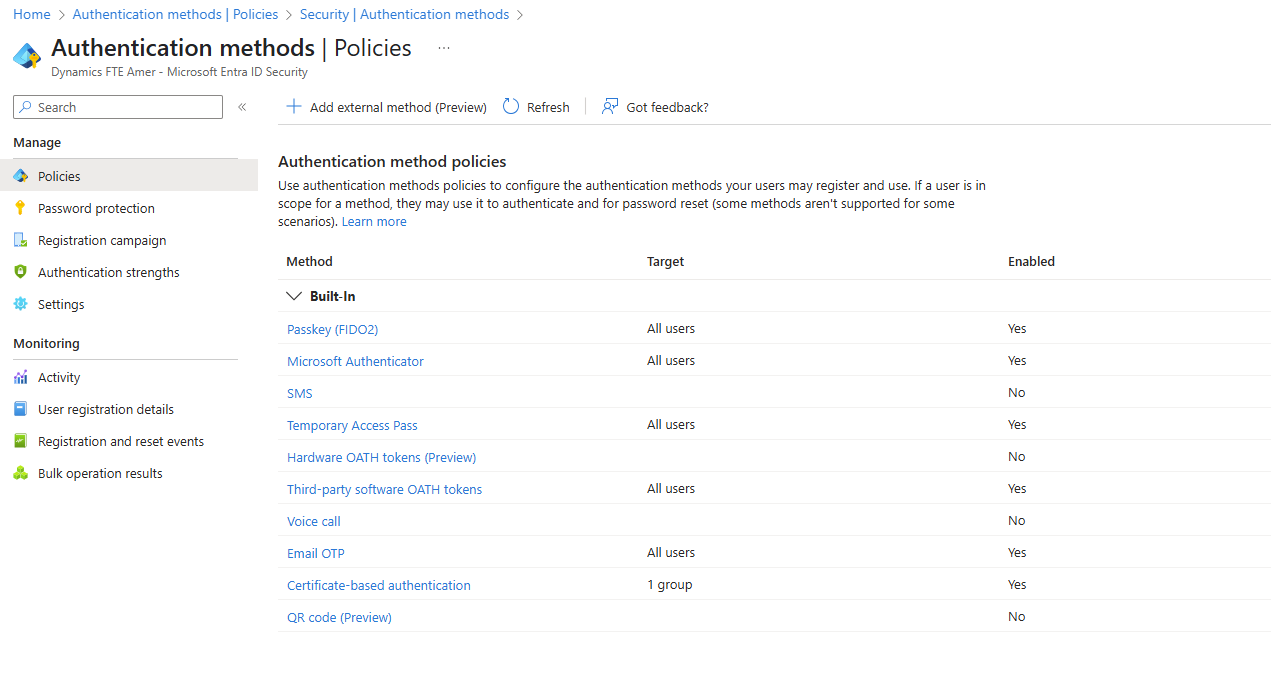
In the grid, select Certificate-based authentication.
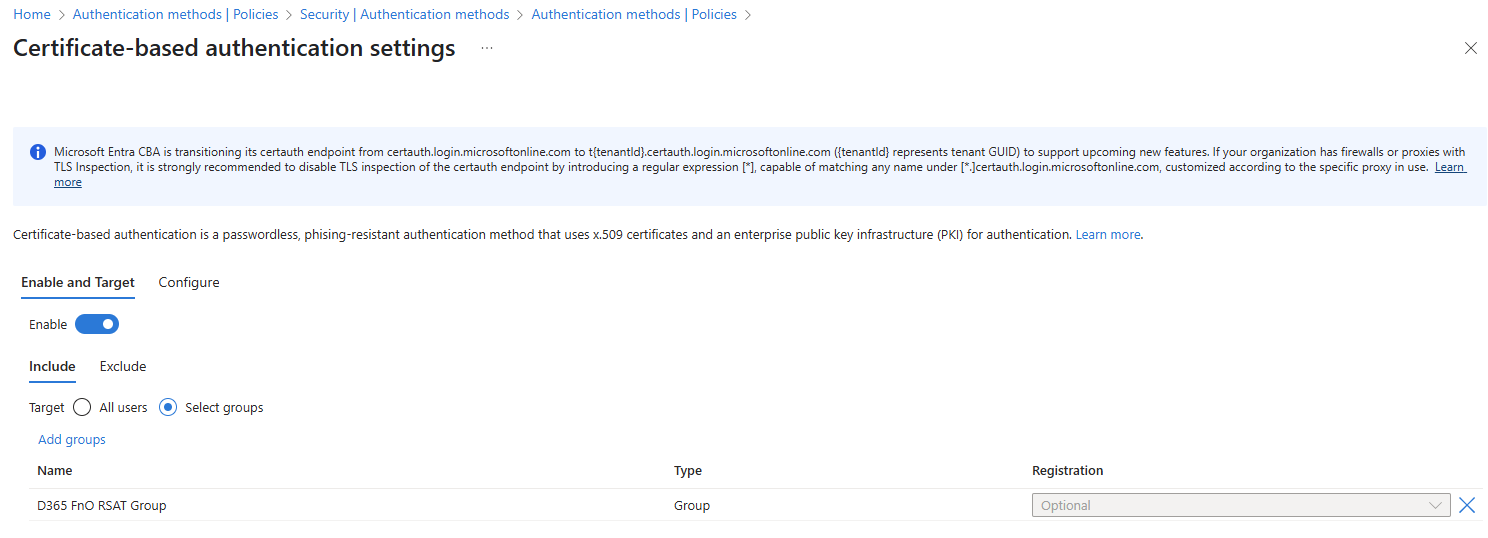
On the Enable and Target tab, turn on the Enable option.
Select Add groups to add the group to the grid.
On the Configure tab, select Add rule.
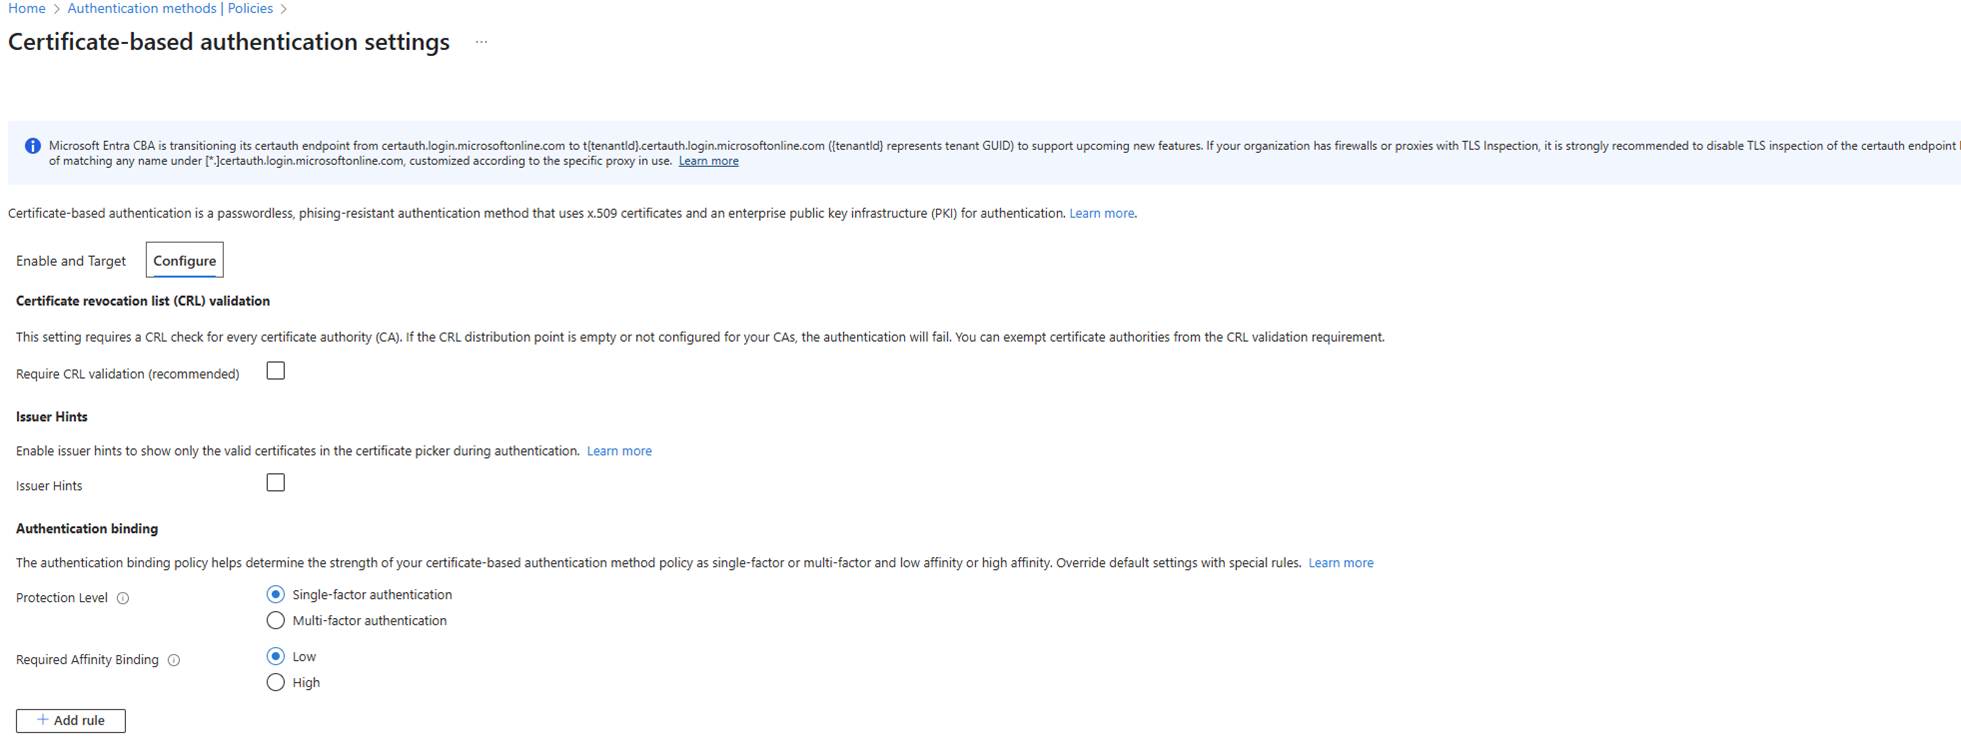
Select the Certificate issuer checkbox.
Optional: If you have many certificates, use the Filter CAs by PKI field to filter the CAs by PKI.
In the Certificate issuer field, select the intermediate certificate.
Under Authentication strength, select the Multi-factor authentication option.
Under Affinity binding, select the Low option.
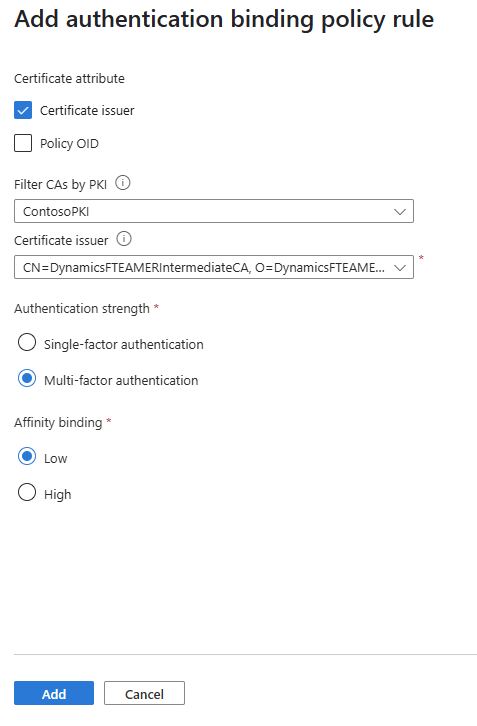
Select Add.
A message asks you to ensure that users who are enabled for certificate-based authentication (CBA) have a valid certificate. It also asks you to acknowledge that you disabled Transport Layer Security (TLS) inspection. Select I Acknowledge.

Select Save. The certificate-based authentication can now be classified as multifactor authentication (MFA).
Install the certificates on the computer that is running RSAT
Next, install the certificates on the computer where you run RSAT.
Note
Root CA certificates must be installed only if they are self-signed.
Import the root CA (.cer file) and intermediate CA (.cer file) into Local machine > Trusted Root Certification Authorities.
Import the .pfx file for the user certificate into Local user > Personal.
Enable automatic certificate sign-in for the tenant.
In the following PowerShell script, edit the parts for the tenant ID and the user certificate subject, and then run the script to create the registry entries.
New-Item -Path
\"HKLM:\\SOFTWARE\\Policies\\Microsoft\\Edge\\AutoSelectCertificateForUrls\"
-Force

New-ItemProperty -Path
\"HKLM:\\SOFTWARE\\Policies\\Microsoft\\Edge\\AutoSelectCertificateForUrls\"
\`\
-Name \"1\" \`\
-Value
\'{\"pattern\":\"\[\*.\]microsoftonline.com/f30eb649-d49c-41bc-91af-139e4fd1d9f6\",\"filter\":{\"SUBJECT\":{\"CN\":\"testuser.Contoso.
User Certificate\"}}}\' \`\
-PropertyType String -Force
Configure RSAT
In the following example, manual selection is used as the authentication method. Therefore, it's important that you provide the thumbprint from the user certificate.
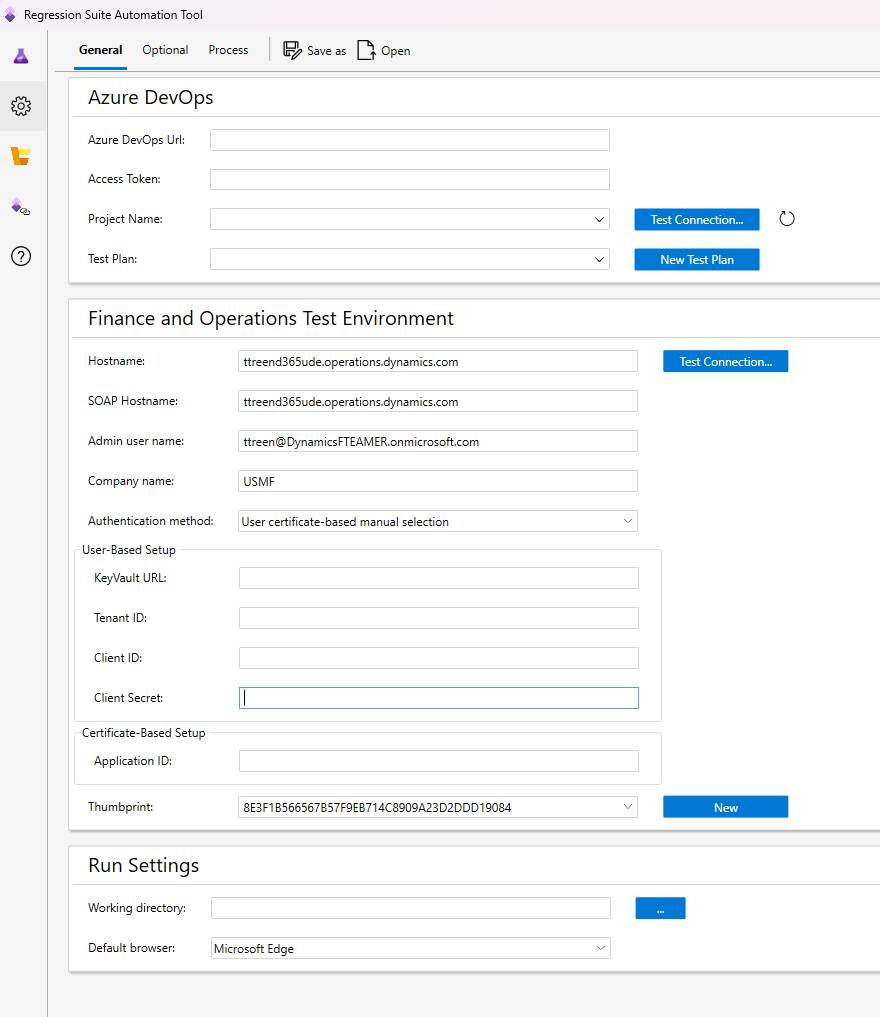
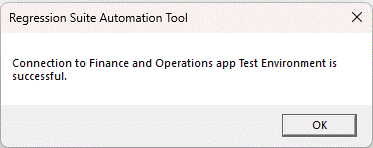
When you select Test Connection, you should receive a message that states that the connection was successful.
RSAT certification modes
- Automated – RSAT configures registry entries for the policy selection with each test case before it runs steps, so that the CBA authorization flow callback from certauth automatically selects a matching user policy. Because of the permissions that are required for local machine entries, the policies are stored only as current user entries. If you use this mode, we recommend that no local machine entries exist, for example, if someone was using a predefined, single local computer policy and manually deleted it before they ran RSAT in Automated mode.
- Predefined – Users can't use Automated mode but want to control their policies themselves. If filtering by subject from the rule in RSAT doesn't work, it's feasible to configure this filtering. It might be challenging to make a general policy work with all accounts. In Predefined mode, RSAT doesn't touch policy entries in the registry at all. Instead of configuring the policy under current users, you can configure it under the local machine. In this way, the policy can be shared between users.
- Manual – When RSAT plays back a test, it removes any policy entries that already exist, but only from the current user. Therefore, if the current user has a policy from the local machine, execution falls back on this policy. Therefore, that policy should not be mixed. Manual mode gives a window of 10 seconds for manual selection of the policy when certauth calls back for the selection of this policy.