Note
Access to this page requires authorization. You can try signing in or changing directories.
Access to this page requires authorization. You can try changing directories.
Use the information in this article to do single-user testing by using Visual Studio and the Performance software development kit (SDK) together with a performance test script that is generated by using Task recorder.
Important
As of September 2024, the Perf SDK is no longer supported. This deprecation follows the end of support for Visual Studio 2019, which was the last version to include web performance and load testing features.
Use Task recorder to define and record an end-to-end business scenario
Before you run a single-user test, you must work with your business team to define your end-to-end scenarios and then use Task recorder to create a recording of the steps in each scenario. For more information about how to create a task recording, see Task recorder resources. The scenarios that you should test depend on your customer's business requirements. In this article, you will use the "Create and confirm a sales order" sample scenario.
Sign in as a Sales persona.
Turn on Task recorder, and create and confirm a sales order that includes the following information:
- Customer account
- Item number
- Sales quantity
- Site
- Warehouse
- Sales price
When you've finished, select Save as developer recording to download the XML file.
Configure a development environment
Download the selenium-dotnet-strongnamed-3.13.1.zip and IEDriverServer_Win32_3.13.0.zip files.
Unblock and unzip the files.
In the dist folder, rename the .nupkg files as .zip files, and then unzip them.
Original file name New file name Selenium.Support.StrongNamed.3.13.1.nupkg Selenium.Support.StrongNamed.3.13.1.zip Selenium.WebDriver.StrongNamed.3.13.1.nupkg Selenium.WebDriver.StrongNamed.3.13.1.zip Under your PerfSDK folder, create a folder that is named Common\External\Selenium.
Copy the following files, and save them to the folder Common\External\Selenium that you created in the previous step:
- IEDriverServer.exe from the unzipped IEDriverServer_Win32_3.13.0.zip file
- WebDriver.dll and WebDriver.xml from the lib\net45 folder in the unzipped Selenium.WebDriver.StrongNamed.3.13.1.zip file
- WebDriver.Support.dll and WebDriver.Support.xml from the lib\net45 folder in the unzipped Selenium.Support.StrongNamed.3.13.1.zip file
Generate a C# performance test from Task recorder
When you've finished recording the end-to-end scenario, you must generate a C# performance test script that is based the task recording.
In a development environment, open Microsoft Visual Studio as an admin.
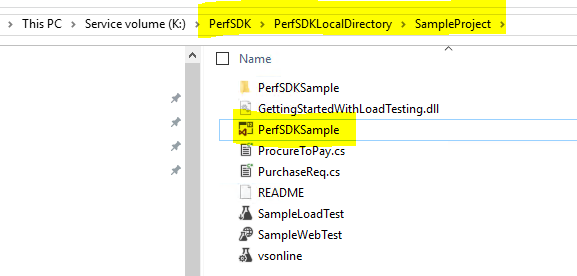
From your PerfSDK folder, open the PerfSDKSample solution. In a tier-1 sandbox or a cloud-hosted-environment, the PerfSDK folder is typically in <Service volume>:\PerfSDK\PerfSDKLocalDirectory.
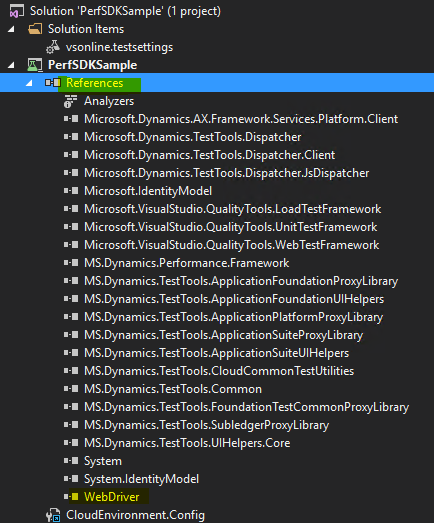
Add a reference to the WebDriver.dll file in the Common\External\Selenium folder.
On the Dynamics 365 menu, point to Addins, and then select Create C# perf test from recording.
In the Import Task Recording dialog box, enter the following required details:
- Recording path – The file location of the developer recording of your end-to-end scenario.
- Project path – The location of the PerfSDKSample project. Typically, the path is <Your_PerfSDK_Folder>\SampleProject\PerfSDKSample\PerfSDKSample.csproj.
- PerfSDK path – The location of PerfSDK. Typically, the path is <ServiceVolumeDrive>\PerfSDK\PerfSDKLocalDirectory.
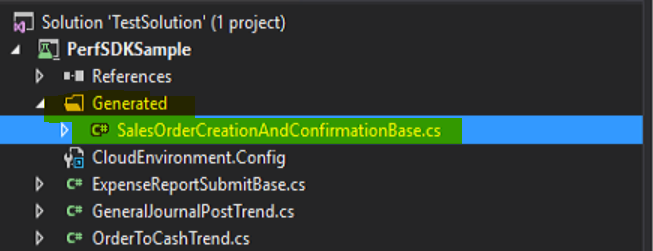
When you've finished, select Import. A new C# class is created under the Generated folder of your PerfSDKSample project.
Build the solution.
Run single-user testing by using Test Explorer in Visual Studio
Update the CloudEnvironment.config file of the PerfSDKSample project in the following ways, so that it reflects the configuration of your environment:
- Verify that the HostName and SOAPHostName match your development environment.
- Verify that the UserName for SelfMintingAdminUser matches the admin account of your development environment.
- In each AuthenticatorConfiguration element under the AuthenticatorConfigurationCollection element, replace AadAuthenticator with SelfMintedTokenAuthenticator.
- Comment out the AzureActiveDirectoryConfiguration and KeyVaultConfigurations elements.
In Visual Studio, on the Test menu, point to Windows, and then select Test Explorer.
Right-click your test case, and then select Run selected tests.
Tips and tricks
Use the following tips and tricks for single-user testing that uses Task recorder and the Performance SDK:
- Run your business end-to-end scenario first before you capture it by using Task recorder.
- When you record your scenario by using Task recorder, enter values manually instead of selecting them in drop-down lists.
- Replay your task recording to make sure that everything works as you expect.
- Restart Visual Studio if you don't see your test case after the solution is built.
Troubleshooting
For information about single-user or multi-user testing that uses the Performance SDK, see Troubleshooting guide for single-user or multi-user testing with the Performance SDK.


