Note
Access to this page requires authorization. You can try signing in or changing directories.
Access to this page requires authorization. You can try changing directories.
Note
Community interest groups have now moved from Yammer to Microsoft Viva Engage. To join a Viva Engage community and take part in the latest discussions, fill out the Request access to Finance and Operations Viva Engage Community form and choose the community you want to join.
This article explains how to create a simple security policy that secures access to customers and customer groups, based on a range for a customer group.
Add a new query
In Visual Studio, add a new query, such as XDSQCustGroup10, to your project or solution. Use the query to restrict data access from the Constraint table.
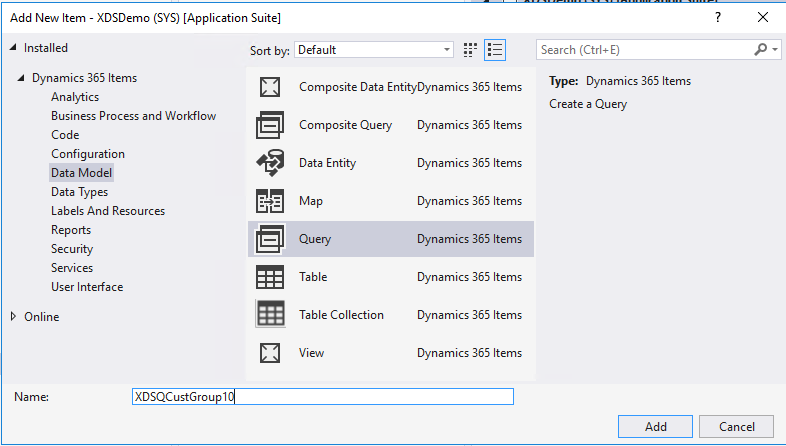
Right-click Data Sources, and then select New Data Source.
In the Table field, enter the primary table name CustGroup.
Right-click Ranges, and then select New Range.
Set the Enabled field to Yes.
In the Data Source field, enter the primary table name, in this case,
CustGroup.In the Value field, enter
10to restrict access to data whereCustGrouphas value of 10, by defining the range for theCustGroupfield.
Add a new security policy
Add a new security policy, such as
XDSCustTableOnCustGroup10.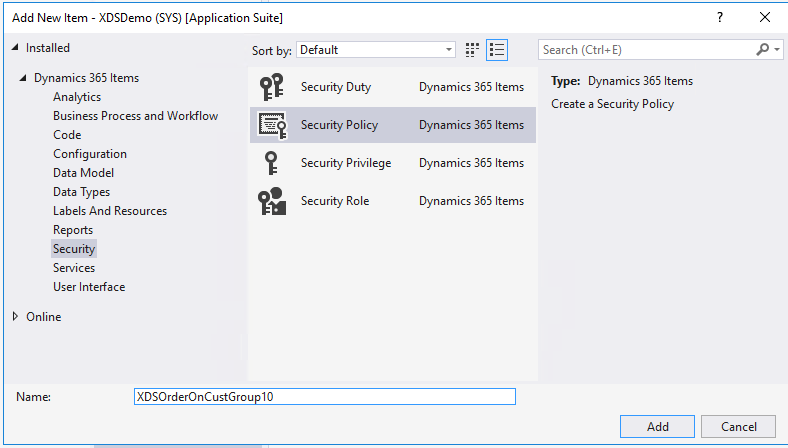
Set Constrained Table to Yes. This setting also secures access to the primary table. In this example, the primary table is CustGroup.
Set the Context Type field to RoleName.
Set the Enabled field to Yes.
Set the Operation field to AllOperations. Other available values for Operation include Select, Insert, Update, Delete, and InsertUpdateDelete.
Set Primary Table field to CustGroup.
Set the Query field to the name of the query created earlier, such as
XDSQCustGroup10.Set the Role Name field to
TradeSalesClerk. Because Context Type is set to RoleName for this policy, you need to enter the AOT name for a user role.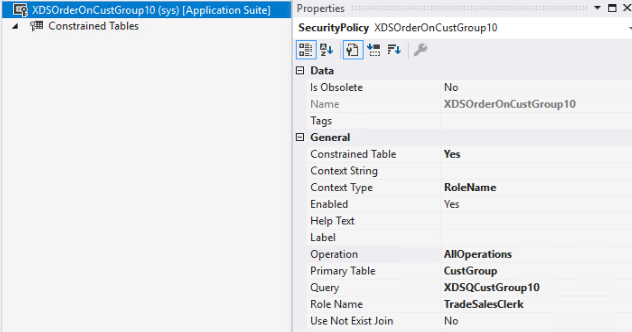
Next, add constrained tables. In this simple example, add one table.
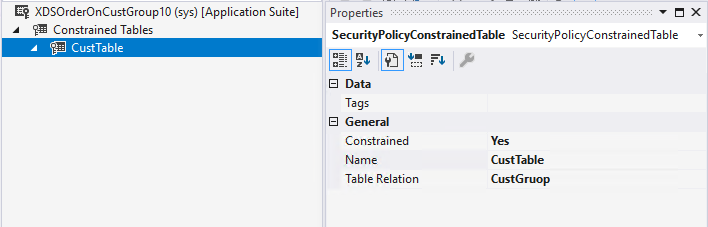
- Right-click Constrained tables, and then select New > Constrained Table.
- Set Constrained to Yes.
- In the Name field, enter the constrained table, such as
CustTable. - In the Table Relation field, enter the relationship to the primary table, in this case
CustGroup.
As a final step, build and synchronize the solution to activate the policy.