Edit

Account reconciliation

The Account reconciliation feature is available in Microsoft Dynamics 365 Finance. Use this feature to reconcile your general ledger with the accounts payable, accounts receivable, tax, and bank subledgers. It replaces the old reactive SQL Server Reporting Service (SSRS) reports.

Users can view reconciled data and automated data analysis on a defined schedule. Therefore, you can set up the processing so that it runs only in the background or during off-hours.

The workspace shows any exceptions that occur. Users can then take direct action to address each exception. If the Microsoft Copilot–powered agent is enabled, it suggests the most likely action to take. Therefore, it helps save time during the account reconciliation process at the end of each period.

Account reconciliation workspace

To open the Account reconciliation workspace, go to Workspaces > Account reconciliation. Tiles in the upper part of the workspace show summaries of open exceptions for the current period, addressed exceptions, automatically reconciled transactions, and agent-recommended actions. Use the filter options at the top of the workspace to adjust the data that is shown. For example, you can change from the current fiscal period to the previous fiscal period.

The grid in the lower part of the workspace shows details about each combination of a module (area) and a legal entity (company) that has transactional data for the selected period. If there are exceptions, the Status column shows the number of exceptions that must be addressed (in red). After all exceptions are addressed, the Status column shows a status of Fully reconciled (in green).
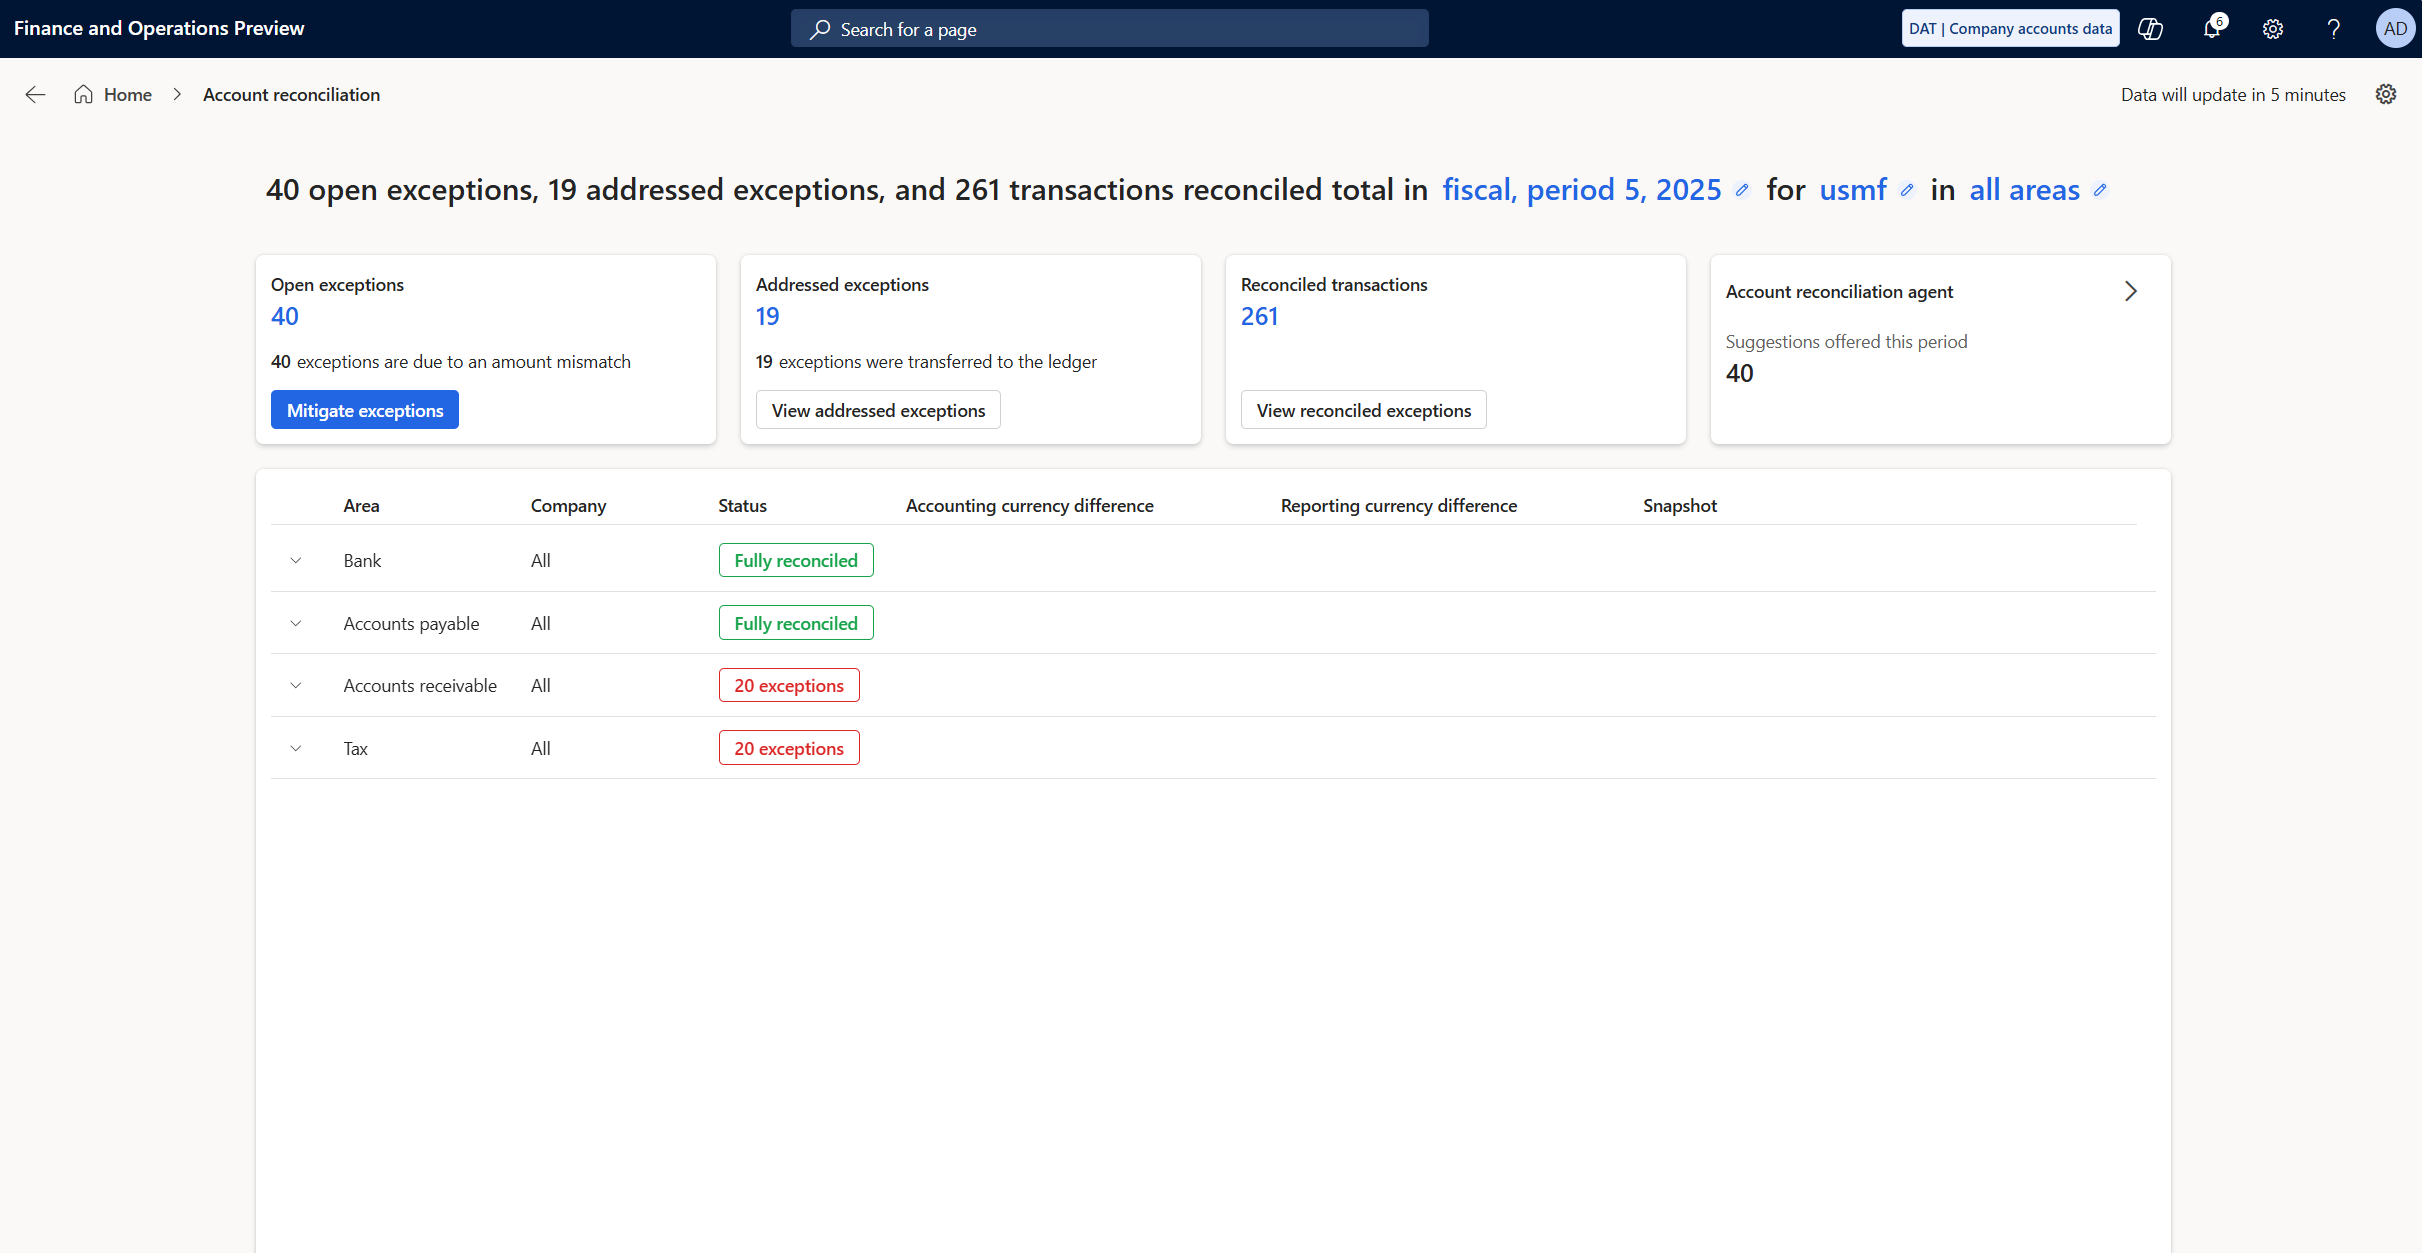
Screenshot of the Account reconciliation workspace that shows the previously described tiles, filter options, and grid.

Copilot agent for account reconciliation

For more information about how to set up and configure the Account Reconciliation Agent, see Set up and configure the Account Reconciliation Agent.

Address exceptions

Each exception contains AI-generated fields designed to help decision-making. These fields include:

  • Suggested action - recommends the most appropriate step to resolve the exception.
  • Analysis - provides context and insights derived from the underlying data.
  • Justification - explains the rationale behind the suggested action.

To address exceptions, select Mitigate exceptions on the Open exceptions tile in the upper part of the workspace. You can view all exceptions for all modules across all legal entities. To open the Mitigate exceptions page, select the number of exceptions (in red) for a specific module and legal entity.

On the Open exceptions page, you can view the details of each exception and take appropriate action to address it. The available actions vary, depending on the exception.

If the exception is In Subledger not in ledger, the following actions are available:

  • Create journal entry – Go to the general journal, where you can create an adjusting entry to address the exception. You create the journal and post it through a batch process or manually.
  • Match exceptions – Go to the Match exceptions page, where you can match exceptions that are in the subledger but not in the ledger and transactions that are in the ledger but not in the subledger. In Dynamics 365 Finance version 10.0.46, an improved matching experience is available. The Comment field is automatically populated with a short AI-generated justification for the match recommendation. This comment is also used as the Reason comment when a journal entry is created from the exception.
  • Accept without change – Accept the exception as is, and clear it. Use this action when the difference is a small amount or a rounding difference.
  • View exception history – View the history of the exception.

If the exception is In Ledger not in subledger, the following actions are available:

  • Reverse general ledger voucher – Create a reversing entry for the ledger voucher. In Finance version 10.0.46, you can reverse transactions directly from the workspace without being navigated back to the original transaction page.
  • Match exceptions – Open the Match exceptions page, where you can match exceptions. In Finance version 10.0.46, an improved matching experience is available.
  • Accept without change – Accept the exception as is, and clear it. Use this action when the difference is a small amount or a rounding difference.
  • Create adjusting journal entry – Go to the general journal, where you can create an adjusting entry to address the exception. In Finance version 10.0.46, you create the journal and post it through a batch process or manually.

If the exception is Amount mismatch, the following actions are available:

  • Accept without change – Accept the exception as is, and clear it. Use this action when the difference is a small amount or a rounding difference.
  • Create adjusting journal entry – Go to the general journal, where you can create an adjusting entry to address the exception. In Finance version 10.0.46, you create the journal and post it through a batch process or manually.

Undo an action

If you previously marked an exception as addressed but want to change how you addressed it, you can undo the last action. When you undo an addressed exception, the exception moves back to the list of open exceptions. You can then take action again.

To undo an addressed exception, select Undo. You're prompted for a reason. Enter a reason, and then select OK to continue.

Mitigate exceptions in bulk

When many exceptions share the same root cause and require the same resolution, you can address them together instead of one at a time.

To mitigate exceptions in bulk, follow these steps:

  1. On the Mitigate exceptions page, select the Group exceptions checkbox to switch from the single-exception view to a grouped view. The grouped view lets you review and submit an action for many exceptions at once.
  2. To return to the single-exception view at any time, clear the Group exceptions checkbox.

Note

The grouped view uses the suggested actions from the Account Reconciliation Agent, so groups appear only when the agent is enabled and has processed exceptions. For more information about how to set up and enable the agent, see Account Reconciliation Agent.

Review grouped exceptions

When Group exceptions is turned on, the list on the left changes from individual exceptions to Grouped exceptions. By default, each group contains the exceptions that share the same combination of the following values:

  • Legal entity (company)
  • Area (module)
  • Issue type – for example, In subledger but not in ledger, In ledger but not in subledger, or Voucher amount mismatch.
  • Suggested action – for example, Posted adjustment, Reversed transaction, or Accepted without changes.

Each entry in the list shows the number of exceptions in the group together with these values, so you can quickly identify the largest or most common issues. Select a group to load its details on the right.

Review and edit the bulk action

When you select a group, an action card appears on the right. The card header shows the action and the number of exceptions that it applies to. For example, Create journal entry · 40 exceptions. When the group is based on the agent's recommendation, the card shows an AI recommended label.

The card contains a grid that has one row per exception. Use the row checkboxes, or the Select all rows checkbox in the header, to choose which exceptions to include when you submit the action. The grid shows the following information for each exception:

  • Voucher, Area, Main account, Difference, Ledger amount, and Subledger amount – Read-only details that identify the exception and the amount that must be resolved.
  • Action – The action that is applied to the exception. The suggested action is selected by default. You can change it for an individual row by selecting Accept without change, Create journal entry, or Reverse.
  • Editable fields specific to each mitigation action, such as Name, Offset account, Comment, and Journal date.

To discard your changes and restore the suggested values for the whole group, select Reset default.

Submit a bulk action

When the rows and values are correct, select Submit. The Confirm submission dialog box opens and shows a message that resembles the following example:

You are about to submit actions to mitigate 40 exceptions. This action can be undone.

To review the affected accounts and the associated amount before you continue, expand any row in the dialog box. When you're ready, select Confirm to submit the actions, or select Cancel to go back and make more changes.

When the submission finishes, a notification confirms that the exceptions were mitigated and summarizes what was done. For example, the number of journal entries created and posted, transactions reversed, exceptions accepted without change, or mitigations undone. When a group's action is Create journal entry, the adjusting journals are created and posted as part of the submission. The mitigated exceptions move to the list of addressed exceptions. If you must change how an exception was addressed, you can undo the action later. For more information, see Undo an action.

If one or more rows can't be processed, a message bar appears above the grid for each affected action. For example, Action 'Create journal entry' failed. Select Message details to view the specific reason for each affected voucher, and select Hide details to collapse the list. Rows that fail remain in the grid so that you can correct them and submit again.

Some selections might be skipped. For example, rows whose action is Match exceptions aren't supported in bulk submission. When selections are skipped, a message reports how many were affected.

Change how exceptions are grouped

By default, the agent groups exceptions by the criteria it uses, which produces the suggested action for each group. To change the grouping, select Filter on field, and then use the Grouping criteria options to group by any combination of Area, Legal entity, Issue type, and Suggestion type. You can also use the Filters options to limit the exceptions that are shown by Period, Legal entity, Area, Suggestion types, and Issue type.

Note

When you change the grouping criteria, you create a custom grouping, and the agent summary is no longer available. A banner indicates that Agent summary is unavailable with custom grouping. To return to the default grouping and the agent's suggested actions, select Reset to AI suggestions.

Snapshots

The last column of the grid in the lower part of the workspace shows a snapshot of data for the selected combination of a module and legal entity for the selected period. The snapshot provides a final summary of all data for the period, including automatically reconciled transactions and any exceptions that you addressed. The snapshot is only available for ledger calendar fiscal periods that are marked as on hold or permanently closed, and that are fully reconciled. The snapshot is generated through the same background process and on the same schedule.

Configuration

To view the settings and configuration for the account reconciliation feature, use the Settings button (gear symbol) in the upper right of the workspace. On the Account reconciliation configuration page, you can enable or disable the reconciliation processing for each module. Use the Start date to set the date for transactions to be evaluated by the process automation. For example, if you reconciled through the month of August by using your prior process, consider setting the Start date to September 1 to evaluate only transactions in periods you have yet to reconcile. You can view the accounts that are used for each module for each legal entity, and add and remove accounts. The list of accounts is taken from the existing posting profile setup and the bank and tax account setup in each legal entity.

Frequently asked questions

What should I do if the workspace doesn't show any data?

  • A message in the upper right of the workspace indicates the time of the last processing run and the next one. The message resembles the following example:

    Data last updated 30 minutes ago, next update in 1 hour.

  • For testing purposes, you can adjust the frequency and the time of the next processing run in the process automation. Look in the background processes for the Automatic account reconciliation process process. For production use, consider the impact of the time and frequency of processing runs, and set an appropriate schedule.

  • On the Batch jobs page, confirm that the status of the Process automation polling system system batch job is Waiting, not Withhold.

  • On the Account reconciliation configuration page, confirm the Reconciliation option is set to Yes for the modules intended to be included in reconciliation.

I selected the action to create a journal, but I didn't actually create or post the journal. The voucher now appears on the page for addressed exceptions. What should I do?

Review the addressed exceptions, and select Undo to move the exception back to the list of open exceptions. You can then reprocess it.

With the release of Dynamics 365 Finance version 10.0.46, Microsoft improved the flow for creating a journal entry. When you select Create journal entry, a slider page appears. You can complete the details for the journal entry. A new parameter is added to General ledger parameters to specify a journal name as a default.

Can I adjust how often the process automation for Account reconciliation process runs?

Yes, in the background processes for process automations, you can configure the frequency of the Automatic account reconciliation process. By default, the frequency is set to run every six hours. To adjust the frequency of the process automation, select Edit and adjust the Execution details.

Note

Select View most recent results to review execution times for prior process automation runs to gauge the best cadence for the process automation to run. If users interact with the Account reconciliation workspace often throughout the day, more frequent process automation runs are preferred. If users aren't frequently working in the Account reconciliation workspace, then a less frequent cadence of once per day might be preferred.

Can I force the process automation to run now?

Yes, in the background processes for process automations, you can configure the Automatic account reconciliation process. To adjust the next run of the process automation, select Edit and adjust the Next execution date to yesterday’s date. This change causes the process automation to be picked up by the next run of the Process automation polling system.