Get started with electronic invoicing for Indonesia
This article will help you get started with Electronic invoicing for Indonesia. The article provides the configuration steps that are country/region-dependent in the Regulatory Configuration Service (RCS) and Microsoft Dynamics 365 Finance. You'll be guided through the steps you must follow in Finance to export sales invoices through the service, and to review the processing results and the status of invoices.
Prerequisites
Before you use the invoicing functionality, the following prerequisites must be met:
Become familiar with Electronic invoicing. For more information, see Electronic invoicing overview.
Sign up for RCS, and set up Electronic invoicing. For more information, see the following articles:
In Dataverse, configure virtual entities for Dynamics 365 Finance and Dynamics 365 Supply Chain Management. For more information, see Configure Dataverse virtual entities.
Enable the BusinessDocumentTaxGroupHeadingEntity and BusinessDocumentTaxTableEntity virtual entities. For more information, see Enable Microsoft Dataverse virtual entities.
Set up RCS
During RCS setup, complete the following tasks.
- Import the Electronic Invoicing features to process invoice exports and import vendor invoices.
- Review the format configurations that are required to generate and export sales invoices.
- Review or configure the actions in the processing pipeline that support the sales invoice export and import scenarios.
- Publish the Electronic Invoicing feature for export sales invoices, and import vendor invoices.
- Create a connected application to Dataverse.
Import the Electronic Invoicing feature
Sign in to your RCS account.
In the Globalization features workspace, in the Features section, select the Electronic Invoicing tile.
On the Electronic Invoicing features page, select Import to import, from the Global repository, the Indonesian electronic invoice (ID) feature that is published by the Microsoft configuration provider.
Note
If you don't see the feature in the list, select Synchronize, and then repeat step 3.
When you import the Indonesian electronic invoice (ID) feature from the Global repository, all the feature settings are imported. These settings include the configurations and actions of the processing pipeline.
Create a new version of the Indonesian electronic invoice (ID) feature
You can create a new feature version by using your configuration provider.
- In the Globalization features workspace, select the Electronic Invoicing tile.
- On the Electronic Invoicing features page, on the Versions tab, select New.
Update the configuration version
- In the Globalization features workspace, select the Electronic Invoicing tile.
- On the Electronic Invoicing features page, on the Configurations tab, select Add or Delete to manage the configuration versions.
When you create a new version, all configurations are inherited from the imported version of the Electronic Invoicing feature. The following configurations are required to process invoices:
- Invoices issued (ID)
- eInvoice import (ID)
In the list, select a configuration version, and then select Edit or View to open the Format designer page, where you can edit or view the configuration.
You can review the configuration and customize it as you require. Use the Format designer page to edit and view the Electronic reporting (ER) format file configurations. For more information, see Create electronic document configurations.
Create a connected application for Dataverse
Sign in to your RCS account.
On the RCS home page, select Electronic reporting.
On the Related links FastTab, select Connected application.
Select New to create a connected application, and set the following fields:
- Name – Enter the name of the Dataverse instance. For example, enter UAT Dataverse.
- Type – Select Dataverse.
- Application – Enter the Dataverse endpoint URL. You can find this URL on the customers Microsoft Dynamics Lifecycle Services (LCS) application page.
- Tenant – Enter the customer tenant.
- Custom URL – Enter the Dataverse endpoint URL followed by api/data/v9.1/. For example, enter
https://operations-dgxtest-uat.crm.dynamics.com/api/data/v9.1/.
Select Save.
On the Action Pane, select Check connection to test the connection with the environment. Then close the page.
Configure the application-specific parameters
Note
When you set up application-specific parameters, check the connection on the Connected applications page. Go to the RCS home page, and select Electronic reporting. At the bottom of the page, select Connected application > Check connection.
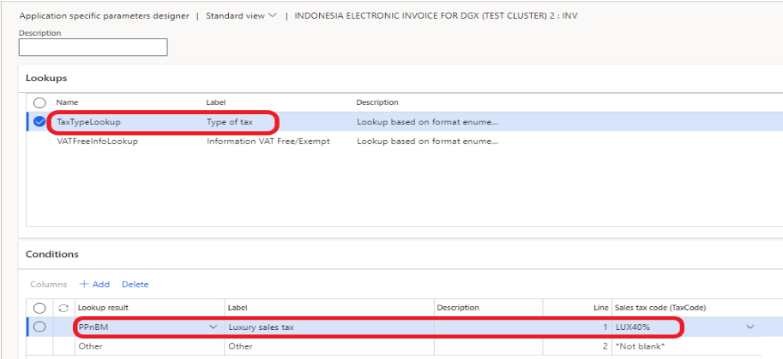
To enable the system to determine which sales tax code in Finance corresponds to the tax code for luxury goods (PPnBM) when invoices are exported, follow these steps to set the application-specific parameters for the luxury sales tax.
In the Lookups grid, select the row for TaxTypeLookup.
In the Conditions grid, on the first line, set the Lookup result field to PPnBM and the Sales tax code (TaxCode) field to the sales tax code that is used for luxury tax in Finance.
Note
You can set up several sales tax codes for PPnBM and have several lines for them in the Conditions grid.
On the last line, set the Lookup result field to Other and the Sales tax code (TaxCode) field to *Not blank*. These settings specify that all other sales tax codes should not be considered luxury tax by the system.
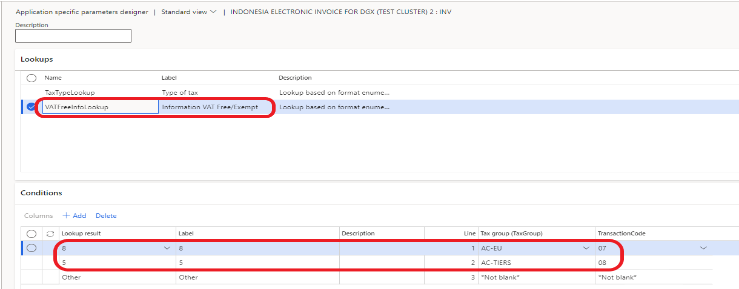
To enable the system to determine which sales tax group in Finance corresponds to VAT-free reasons (transaction code 07, reasons 1 through 8) or VAT-exempt reasons (transaction code 08, reasons 1 through 5) when invoices are exported, follow these steps to set the application specific parameters for those reasons.
In the Lookups grid, select the row for VATFreeInfoLookup.
In the Conditions grid, on the first line, set the Lookup result field from 1 through 8 for transaction code 07 and from 1 through 5 for transaction code 08.
Set the Tax group (TaxGroup) field to the sales group that is used for exemption operations in Finance.
On the last line, set the Lookup result field to Other and the Tax group (TaxGroup) field to *Not blank*. These settings specify that all other sales tax groups should not be considered exemption groups by the system.
Manage the Electronic Invoicing feature setup
- In the Globalization features workspace, select the Electronic Invoicing tile.
- On the Electronic Invoicing features page, on the Setups tab, select Add, Delete, or Edit to manage the Electronic Invoicing feature setup.
Configure the Sales invoice feature setup
To generate the comma-separated values (CSV) file for a sales invoice, you must set up the Sales invoice feature.
On the Electronic Invoicing features page, on the Setups tab, in the Feature setup column, select Invoice issued.
Select Edit to review or configure the actions, applicability rules, and variables.
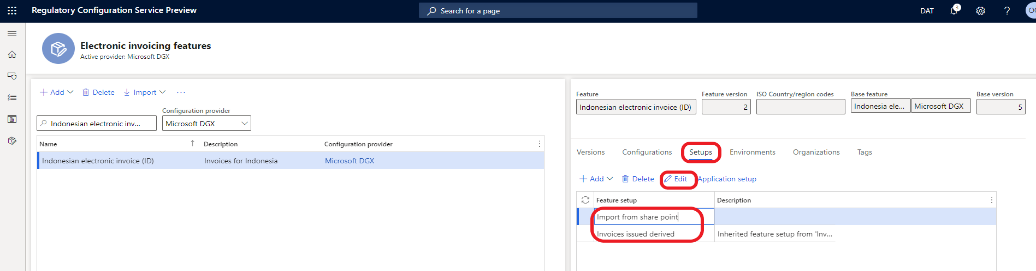
Configure the Vendor invoice feature setup
To configure the Vendor invoice feature setup, you should already have created a draft version of the feature that you will work with for this procedure.
On the Electronic Invoicing features page, on the Setups tab, in the Feature setup column, select the Import from share point record.
Select Edit to review or configure the actions, applicability rules, and variables.
On the Feature version setup page, on the Data channel tab, in the Parameters list, in the Data channel record, in the Value field, enter $Context Channel from the derived configuration.
Set the other parameters for SharePoint.
In the Custom file name record, set up a filter for the file names of vendor invoices.
On the Applicability rules tab, in the record that has a Channel field, in the Value field, enter $Context Channel from the derived configuration.
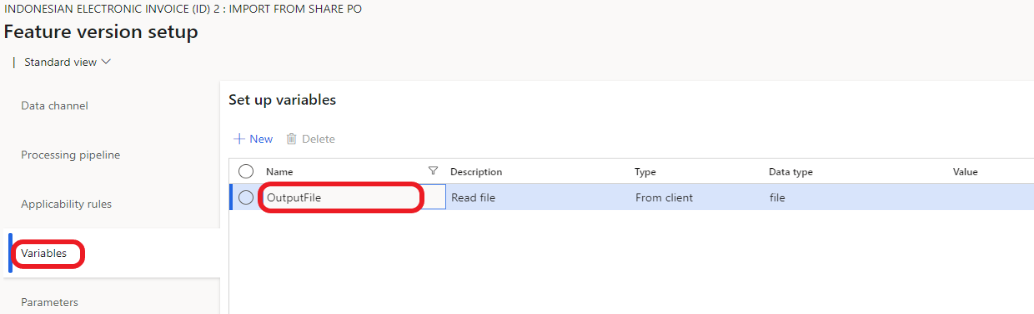
On the Variables tab, create or validate the record.
Assign the draft version to an e-Invoicing environment
- On the Electronic Invoicing features page, on the Environments tab, select Enable.
- In the Environment field, select the environment.
- In the Effective from field, select the date when the environment should become effective.
- Select Enable.
Change the version status
- On the Electronic Invoicing features page, on the Versions tab, select the version of the Electronic Invoicing feature that has a status of Draft.
- Select Change status > Complete.
- Select Change status > Publish.
Set up Electronic invoicing integration in Finance
Import the ER data model, ER data model mapping, and context configurations for invoices
Sign in to your Finance environment.
In the Electronic reporting workspace, in the Configuration providers section, select the Microsoft tile. Make sure that this configuration provider is set to Active. For information about how to mark a provider as active, see Create configuration providers and mark them as active.
Select Repositories.
Select Global resource > Open.
Import the following configurations:
- Customer invoice context model
- Invoices Communication Model
- Vendor invoice Mapping to destination
- Vendor invoice import (ID), Vendor invoice import XML (ID)
Turn on the feature for processing Indonesian electronic invoices
In the Feature management workspace, disable the Electronic Invoicing integration using Microsoft Dataverse feature if it's enabled. Then enable the Electronic document batch submission feature.
Important
The Electronic document batch submission feature can't be enabled if the Electronic Invoicing integration using Microsoft Dataverse feature is already enabled.
If you want to be able to configure Electronic document parameters on a legal entity basis, enable the Electronic documents configuration per legal entities in Electronic Invoicing feature.
To enable electronic invoice integration for Indonesia, go to Organization administration > Setup > Electronic document parameters, and then, on the Features tab, in the row for the Indonesian electronic invoice feature, select the Enable checkbox.
Set up the processing for Indonesian electronic sales invoices
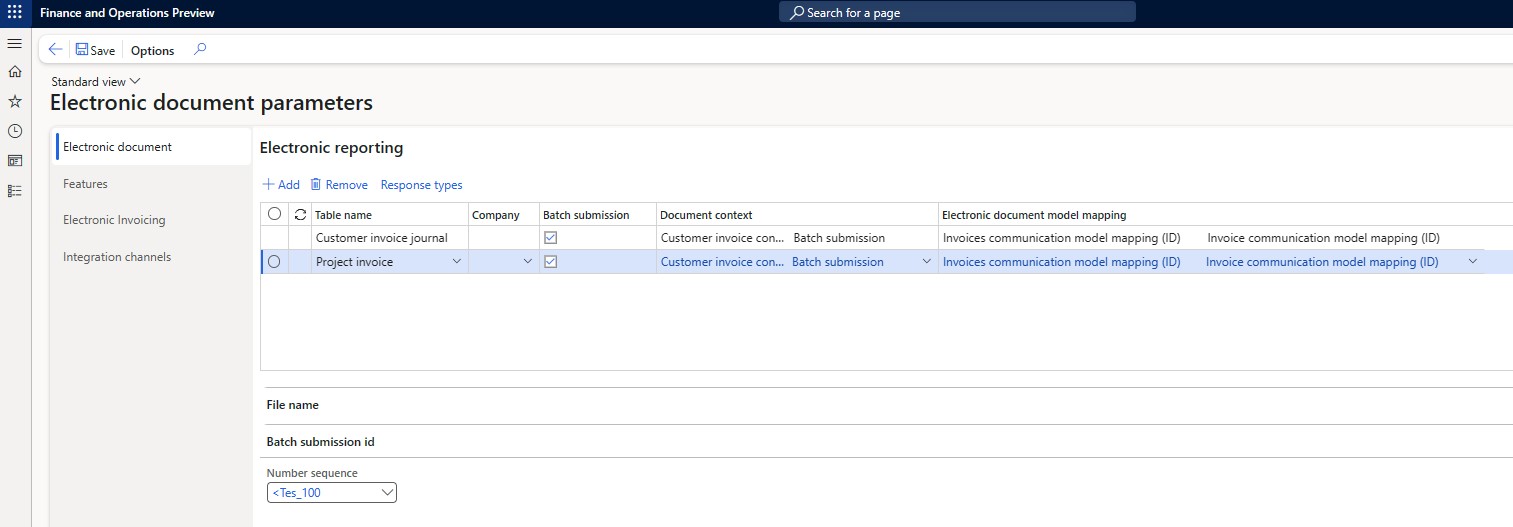
Go to Organization administration > Setup\ > Electronic document parameters.
On the Electronic document tab, select Add, and enter the customer invoice journal.
Optional: Select Add again, and enter the project invoice journal.
Select the Batch submission checkbox.
In the Batch submission ID section, add a number sequence. The selected number sequence should be continuous. This number sequence is used to number the invoice batches when the system exports them.
Select Save.
Set up the processing for Indonesian electronic vendor invoices
- In the Electronic reporting workspace, select Reporting configurations.
- Select Customer invoice context model, and then select Create configuration.
- Select Derive from Name: Customer invoice context model, Microsoft to create a derived configuration.
- In the Draft version, select Designer.
- In the Data model tree, select Map model to datasource.
- In the Definitions tree, select DataChannel, and then select Designer.
- In the Data sources tree, expand the $Context_Channel container.
- In the Value field, select Edit, and enter the name of the data channel. The name should have a maximum of 10 characters. It's the name of the channel that is given in the configuration of the data channel for the Electronic Invoicing feature in RCS.
- Select Save, and close the page.
- Close the page.
- Select the derived configuration that you just created from Customer invoice context model, and then, on the Versions FastTab, select Change Status > Completed.
Note
You can create several derived configurations that have different $Context Channel values. In this way, you can import vendor invoices from different sources. For example, you might want to import vendor invoices for different legal entities.
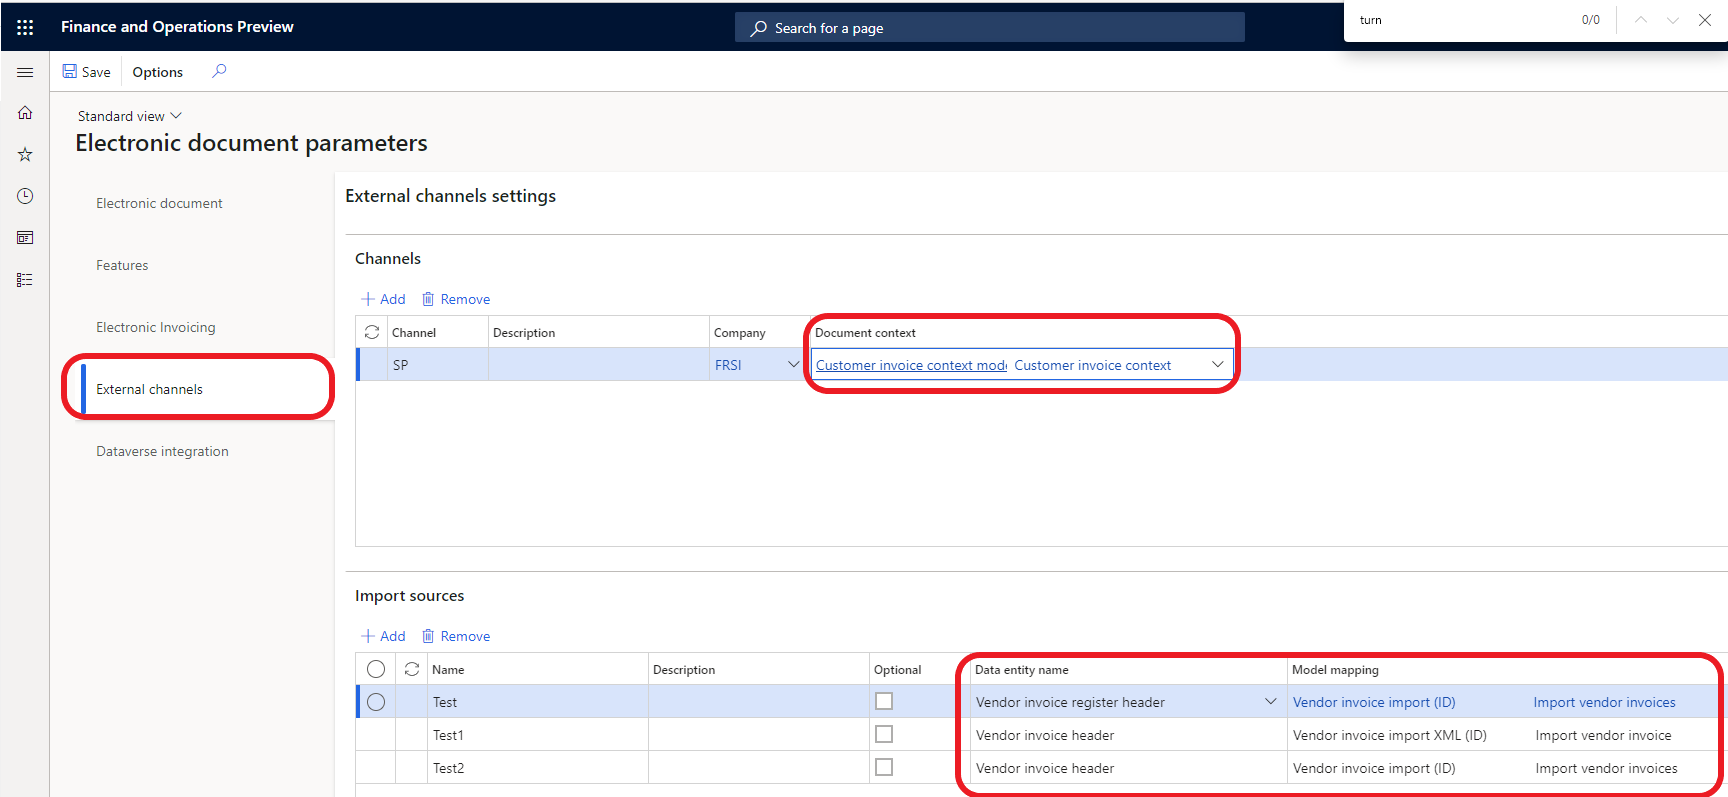
Go to Organization administration > Setup > Electronic document parameters.
On the External channels tab, set up the import of vendor invoices.
On the Channels FastTab, select Add.
In the Channel field, enter $Context Channel.
Enter a value in the Description and Company fields.
In the Document context field, select the new configuration that you derived from Customer invoice context model. The mapping description should be Data channel context.
On the Import sources FastTab, select Add.
In the Name field, enter the value from the Variables tab on the Feature version setup page.
Enter a value in the Description field.
In Data entity name field, select Vendor Invoice register header if you want to import vendor invoices into the Invoice register. If you want to import them into pending vendor invoices, select Vendor invoice journal. You can have only one import source, Vendor Invoice register header or Vendor invoice journal.
In the Model mapping field, select Vendor invoice import (ID) to import the invoice header into the Invoice register or pending vendor invoices. Select Vendor invoice import XML (ID) to import the invoice header and lines into pending vendor invoices.
Note
Before you import vendor invoices from XML files, you must set up an external item description for vendors. The system can then match an item name in the XML file with line items in sales orders.
If you must import vendor invoices into, for example, a different legal entity, create a new channel record that has the new document context.
Process electronic invoices in Finance
When issued invoices or imported vendor invoices are processed through Electronic invoicing, you can complete the following tasks:
- Submit or export issued invoices, and import vendor invoices.
- View the electronic document submission and receipt logs.
Submit or export issued invoices
- Go to Organization administration > Periodic > Electronic documents > Submit electronic documents.
- To export invoices in a batch, set the Submit document batch option to Yes. The first time that you submit a document, always set the Resubmit documents option to No. If you must resubmit a document through the service, set this option to Yes.
- On the Records to include FastTab, select Filter to open the Inquiry dialog box, where you can build a query to select documents for export.
View submission logs
You can view the submission logs for all exported documents.
Go to Organization administration > Periodic > Electronic documents\ > Electronic document submission log.
Select Update status. An invoice batch can have the following statuses:
- Scheduled
- Completed
- Failed
On the Action Pane, select Inquiries > Submission details to view the details of the submission execution logs. The information in the logs is divided among three FastTabs:
- Processing actions – This FastTab shows the execution log for the actions that are configured in the feature version that was set up in RCS. The Status column shows whether the action was successfully run.
- Action files – This FastTab shows the intermediate files that were generated during execution of the actions. Select View to download and view the file.
- Processing action log – This FastTab shows the results of the submission of electronic invoices.
On the Action Pane, select Inquiries > Batch submission invoices to view invoices that were submitted in one batch.
Import vendor invoices and view the electronic document receipt log
Go to Organization administration > Periodic > Electronic documents > Receive electronic documents.
Note
For the first receipt of any document, always set the Re-import documents option to No. If you must re-import a document through the service, set this option to Yes. This job can be run in batch mode.
Go to Organization administration > Periodic > Electronic documents > Electronic document receipt log.
On the Action Pane, select Inquiries > Submission details to view the details of the submission execution logs.
Privacy notice
Enabling the Indonesian electronic invoice feature might require that limited data be sent. This data includes the organization's tax registration ID. An administrator can enable or turn off the Indonesian electronic invoice feature by going to Organization administration > Setup > Electronic document parameters, and then, on the Features tab, selecting the rows that contain the Indonesian electronic invoice feature and making the appropriate selection. Data that is imported from these external systems into this Dynamics 365 online service are subject to our privacy statement. For more information, see the "Privacy notice" section in country/region-specific feature documentation.
Additional resources
Feedback
Coming soon: Throughout 2024 we will be phasing out GitHub Issues as the feedback mechanism for content and replacing it with a new feedback system. For more information see: https://aka.ms/ContentUserFeedback.
Submit and view feedback for