Note
Access to this page requires authorization. You can try signing in or changing directories.
Access to this page requires authorization. You can try changing directories.
Address formats determine how address data will appear when it's printed. In the system, you can set up address formats for every country or region where business is done. In Russia, addresses have a standardized form. However, additional information can be included, such as the district, street code, building complement, building, apartment, group of houses, group of flats, and land plot.
The Federal Informational Address System (or FIAS) address database might be required for businesses in the Russian Federation. You can use specialized tools to import FIAS into your system and keep it up to date. This article explains how to set up and use the FIAS import mechanisms.
Note
The Federal Tax Service (FTS) stopped updating files with address information in the FIAS format in August 2021. The new format was approved by an order of the FTS that was dated May 13, 2020: No. ED-7-6 / 329 @ FIAS (old format that contains information about addresses in the structure of the administrative-territorial division); State address register (GAR, a new format that contains information about addresses in the municipal division).
For more information about how to import addresses in the GAR format, see Import from GAR
Set up Russian address formats
Set up the address format, country or region, state or province, county, city and postal code
- Go to Organization administration > Global address book > Addresses > Address setup to open the Address setup page.
- On the Address format, Country/region, State/province, County, City and ZIP/postal codes tabs, you can set up the address format, country or region, state or province, county, city, and postal code.
Set up a new district
On the Address setup page, on the District tab, select the country or region, state or province, county code, and city code.
Select New to create a new district for the selected country or region, state or province, county, and city.
In the District field, enter the unique code for the district.
In the Description field, enter the official name of the district.
In the ZIP/postal code field, select the postal code.
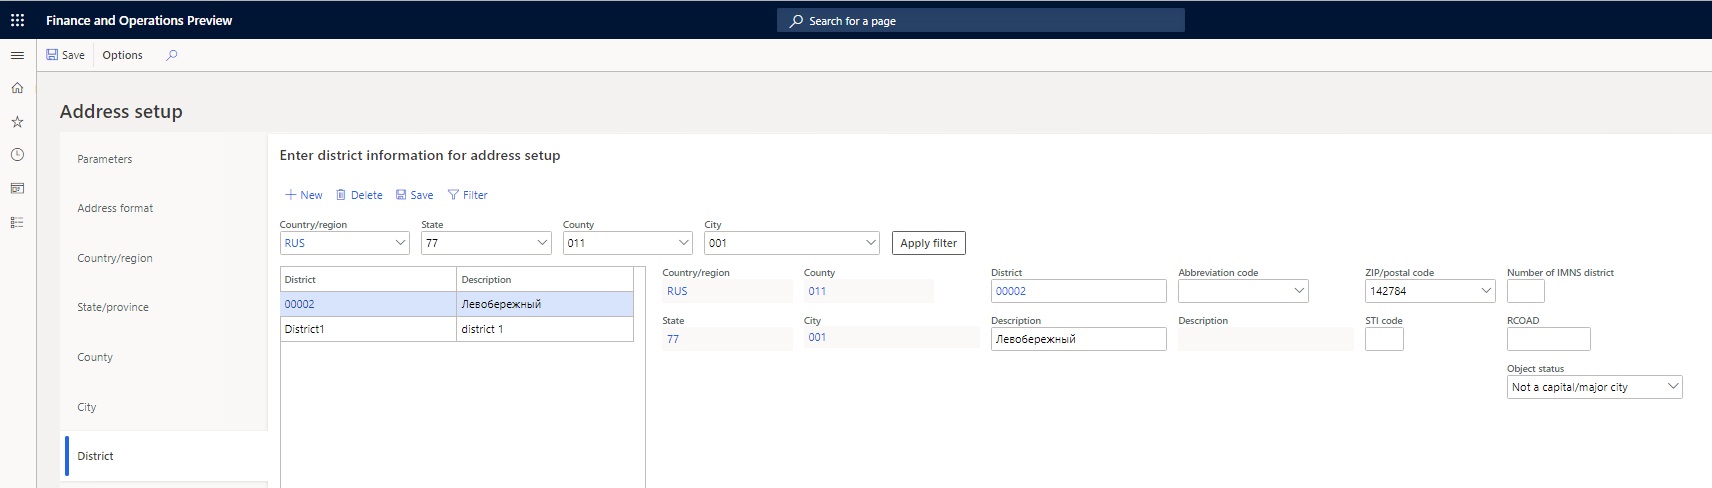
Select Save.
Set up a street code
On the Address setup page, on the Street tab, verify that RUS is selected in the Country/region field.
Select the state or province, county code, city code, and district code.
Select New to create a new street for the selected country or region, state or province, county, city, and district.
In the Street code field, enter the unique code for the street.
In the Street field, enter the official name of the street.
In the ZIP/postal code field, select the postal code.
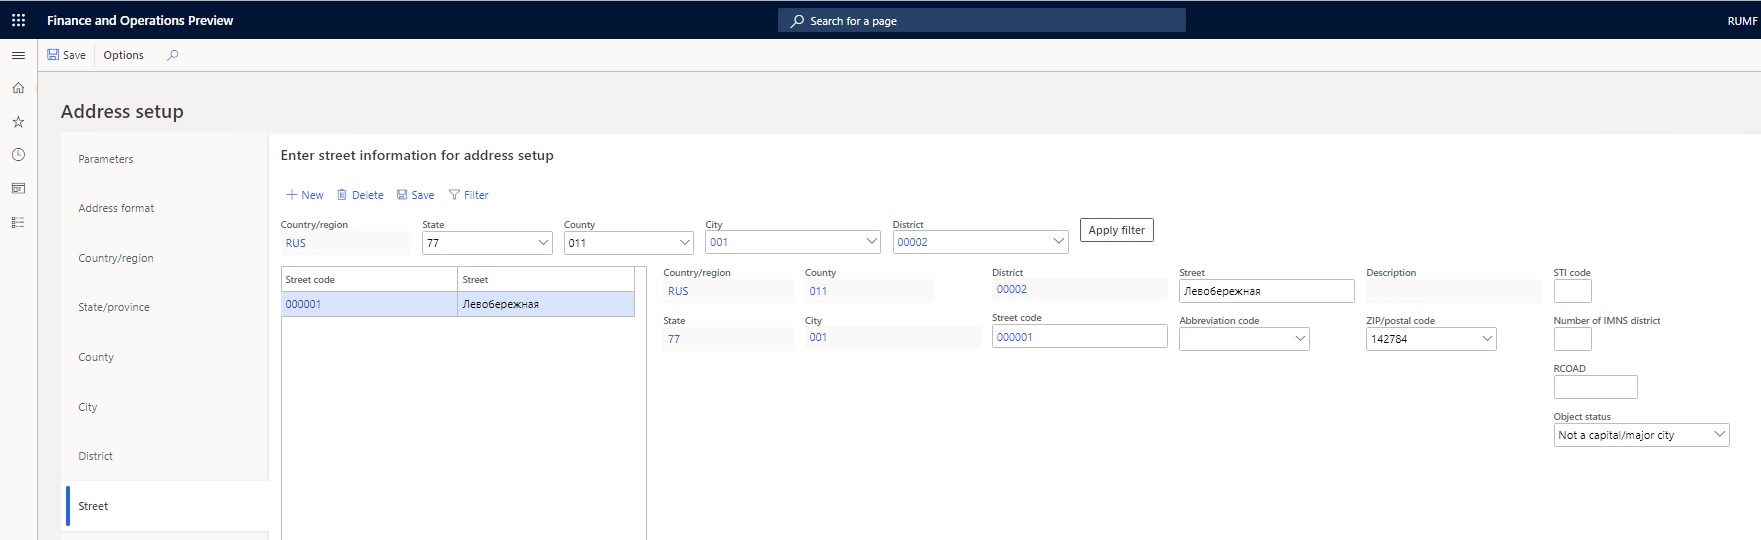
Select Save.
Set up a group of houses
On the Address setup page, on the Group of houses tab, verify that RUS is selected in the Country/region field.
Select the state or province, county code, city code, district code, and street code.
Select New to create a new group of houses for the selected country or region, state or province, county, city, district, and street.
In the Group of houses code field, enter the unique code for the group of houses.
In the Numbers of buildings field, enter a comma-separated list of the building numbers of the houses in the group.
In the ZIP/postal code field, select the postal code.
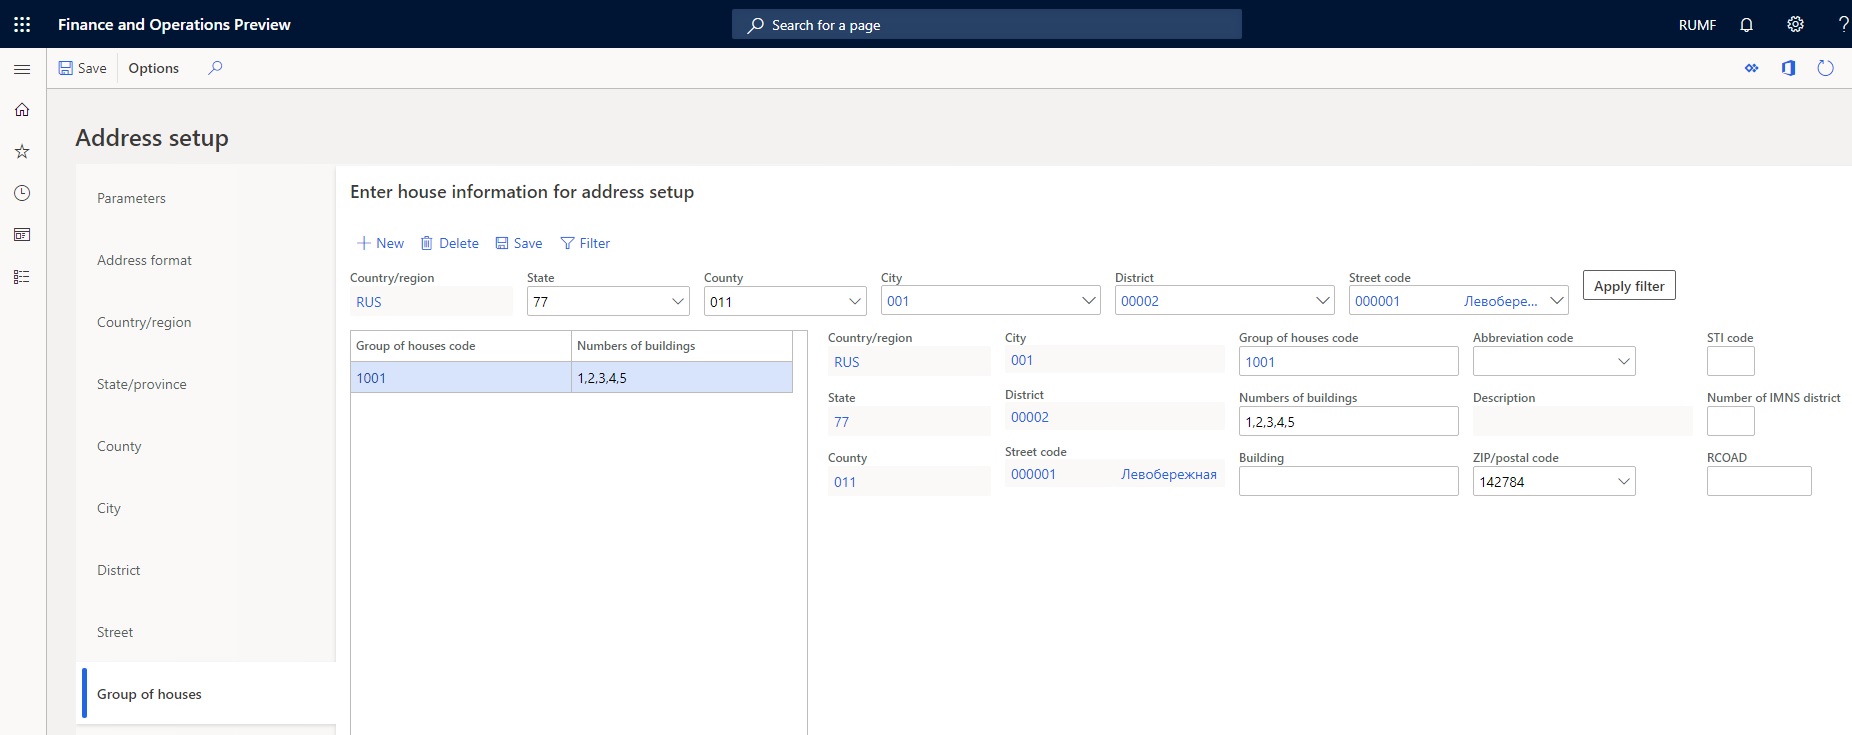
Select Save.
Set up a group of flats
On the Address setup page, on the Group of flats tab, verify that RUS is selected in the Country/region field.
Select the state or province, county code, city code, district code, street code, and group of houses code.
Select New to create a new group of flats for the selected country or region, state or province, county, city, district, street, and group of houses.
In the Group of flats code field, enter the unique code for the group of flats.
In the Group of flats field, enter a comma-separate list of the flat numbers of the flats in the group.
In the ZIP/postal code field, select the postal code.
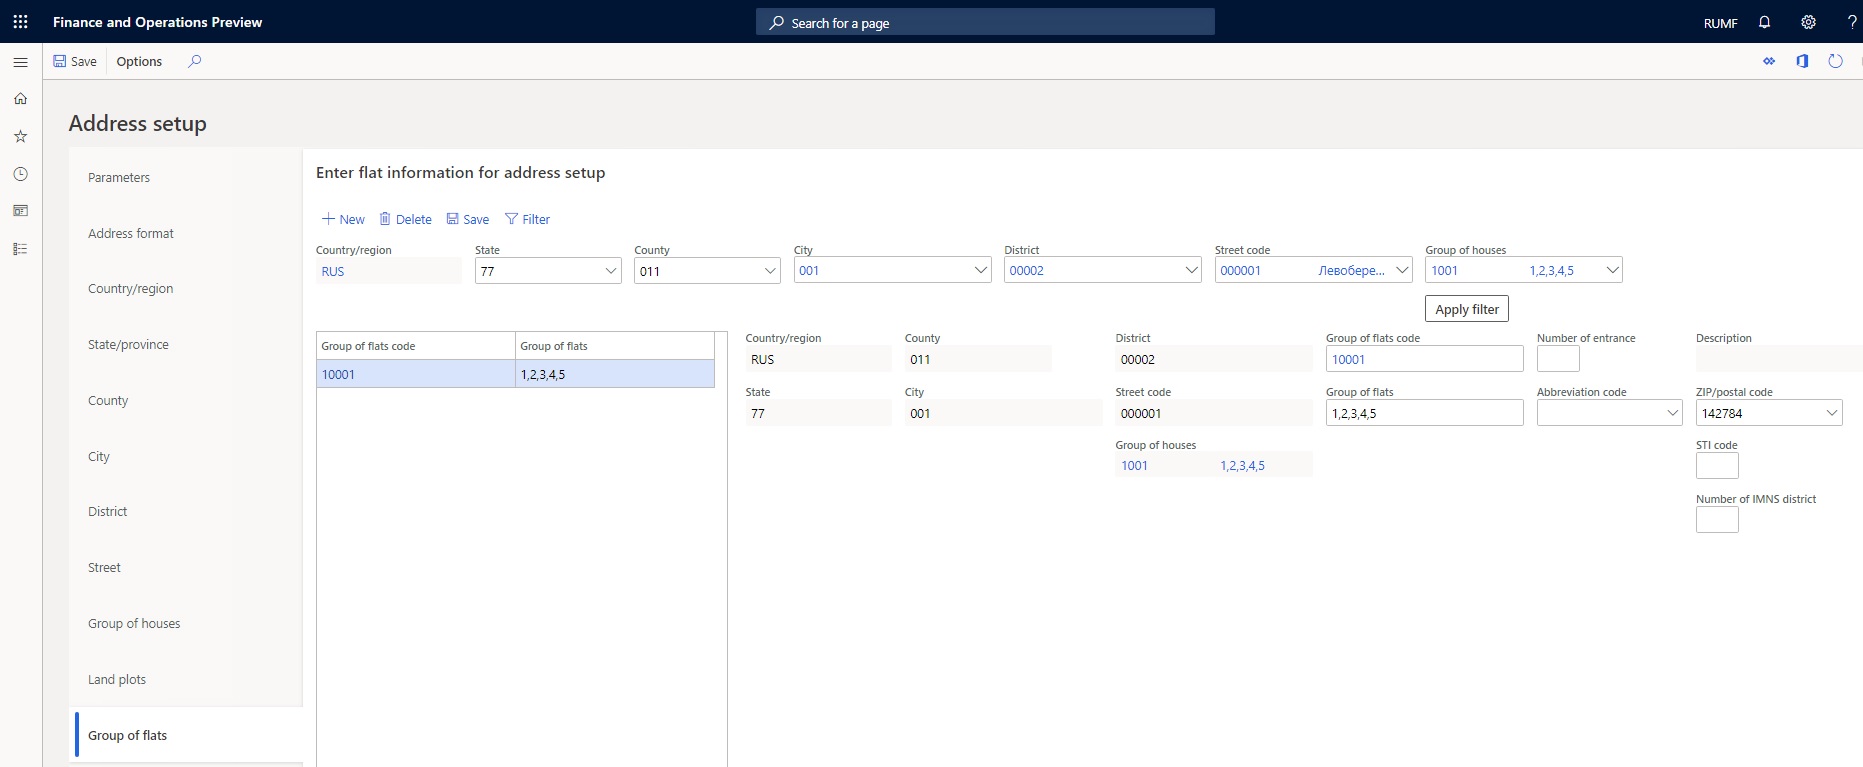
Select Save.
Set up land plots
On the Address setup page, on the Land plots tab, verify that RUS is selected in the Country/region field.
Select the state or province, county code, city code, district code, and street code.
Select New to create a new land plot for the selected country or region, state or province, county, city, district, and street.
In the Land plot code field, enter the unique code for the land plot.
In the Numbers of land plots field, enter a comma-separated list of the numbers of the land plots.
In the ZIP/postal code field, select the postal code.
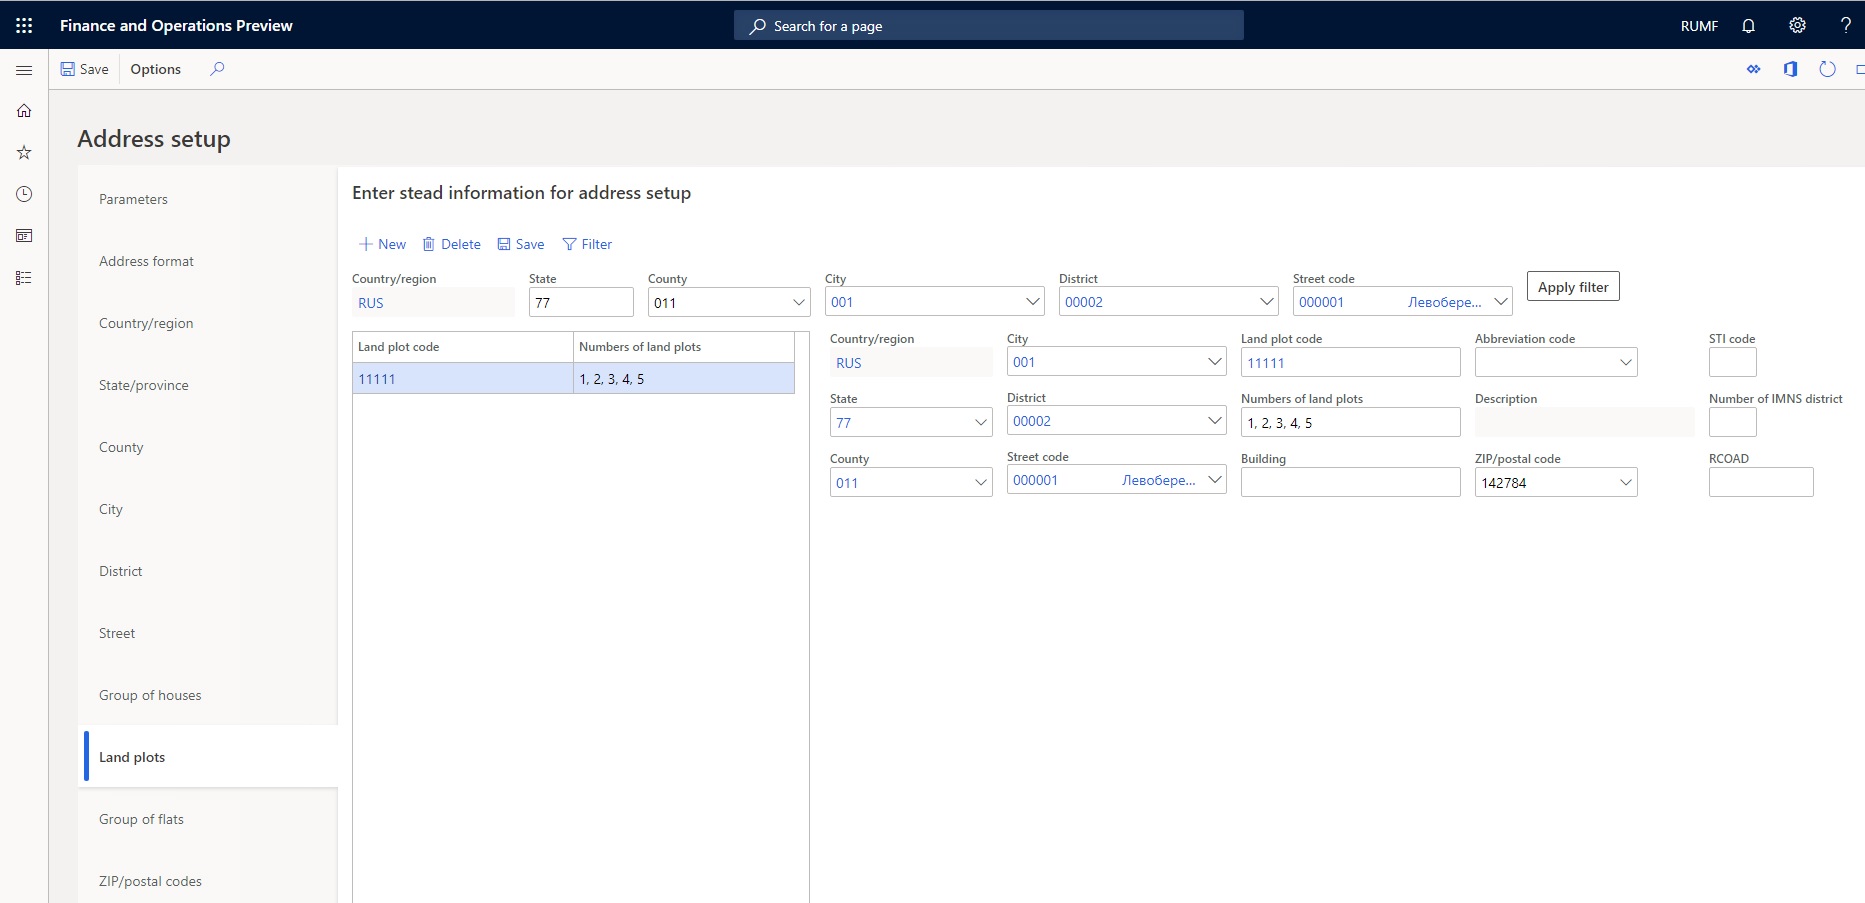
Select Save.
Create an address for a customer
Go to Accounts receivable > Customers > All customers.
Open a customer record, and then, on the Addresses FastTab, select More options > Advanced to open the Manage addresses page.
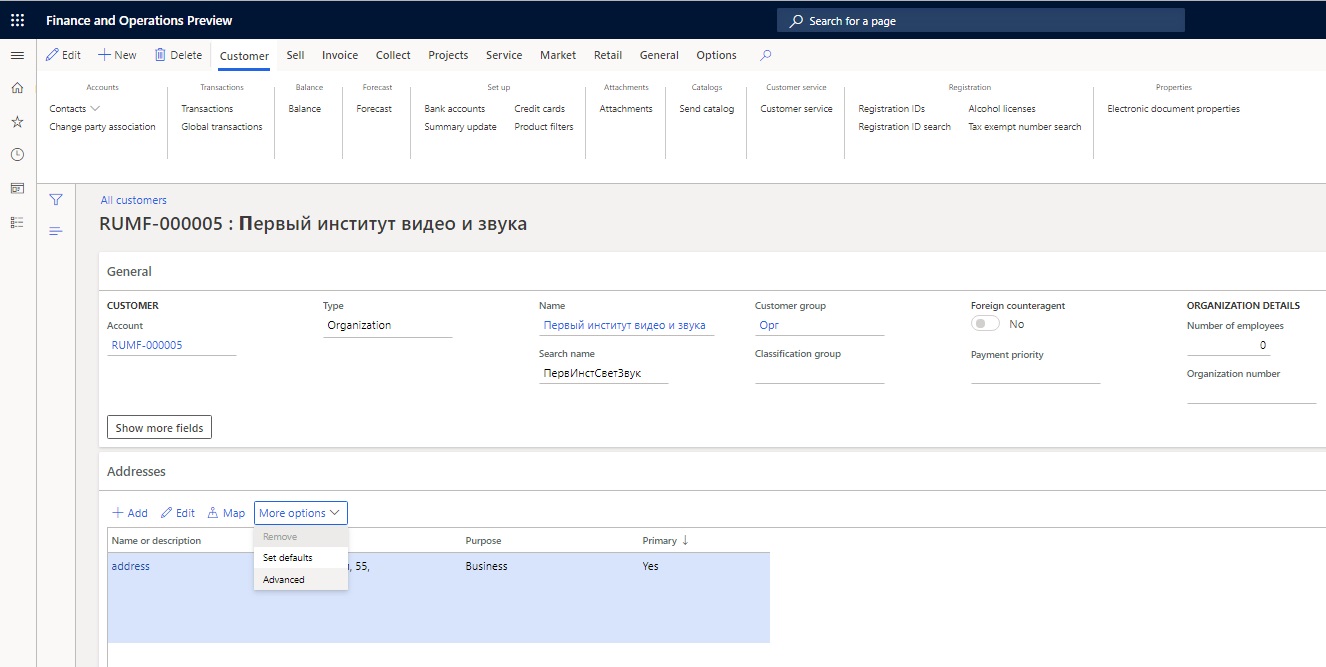
On the Address FastTab, in the Country/region field, select RUS.
In the ZIP/postal code field, select the postal code. After you select a postal code, the District field shows the district code and name.
In the Street code field, select the street code. The street name is shown on the right side of the Street code field and is also entered in the Street field.
In the Building complement field, enter the name of the building. The building name is also entered in the Street field.
In the Building field, enter the building number. The building number is also entered in the Street field.
In the Apartment field, enter the apartment number. The apartment number is also entered in the Street field.
In the Group of houses field, select the group of houses code. The corresponding building numbers are shown.
In the Group of flats field, select the group of flats code. The corresponding flat numbers are shown.
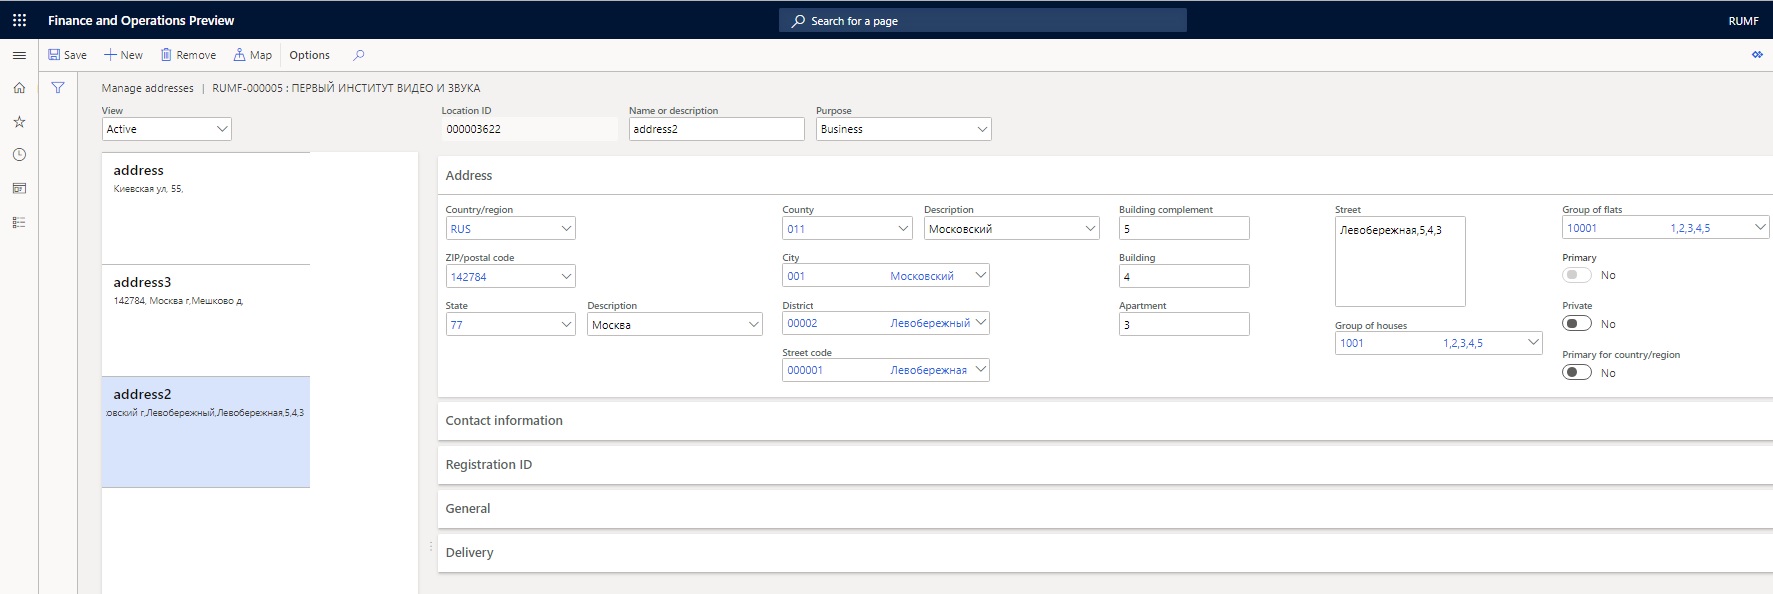
Select Save.
Import from FIAS
Import an FIAS metadata package
Download the RU FIAS – FiasMetadataPackage file from the Data package tab of the Shared asset library in Microsoft Dynamics Lifecycle Services (LCS). This package file contains the required data for the import jobs runtime.
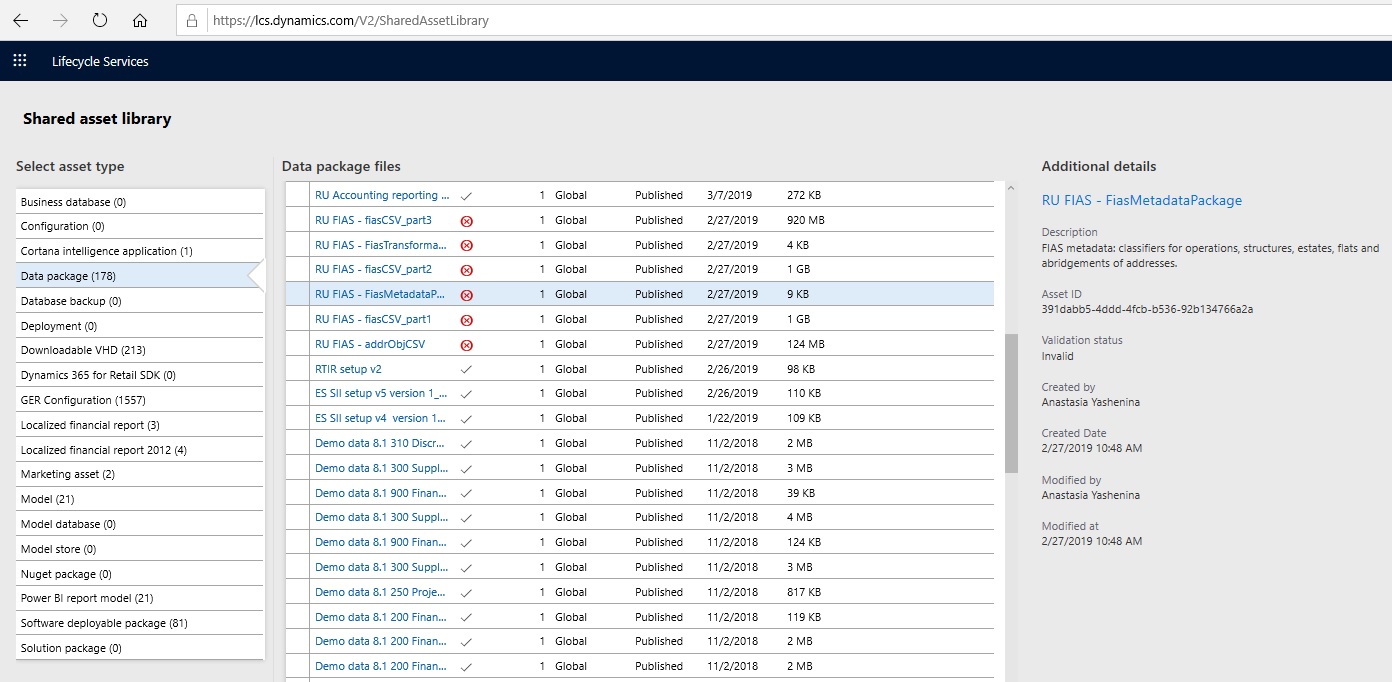
Go to System administration > Workspaces > Data management.
In the Import / Export section, select the Import tile to create a new import job.
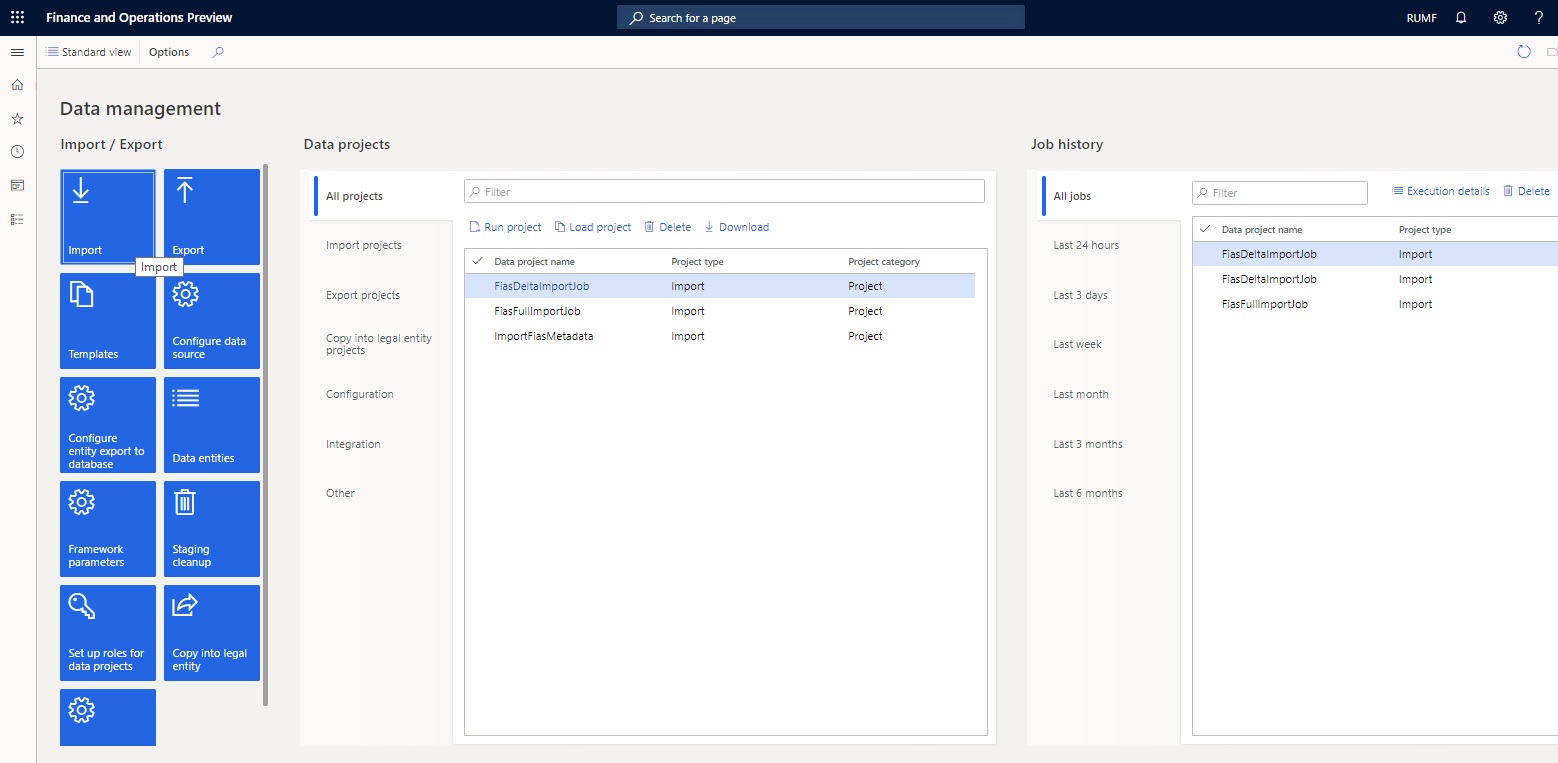
In the Group name field, enter ImportFiasMetadata.
In the Description field, enter a description.
On the Selected entities FastTab, select Add file to add the following files from the package file that you downloaded earlier:
- Abridgements of addresses
- FiasEstateStatusEntity
- FiasFlatTypeEntity
- FIASOperationStatusesEntity
- FiasStructureStatusEntity
After you select each file, select Upload and add.
Select Save.
Set up a template to import FIAS data
Go to System administration > Workspaces > Data management.
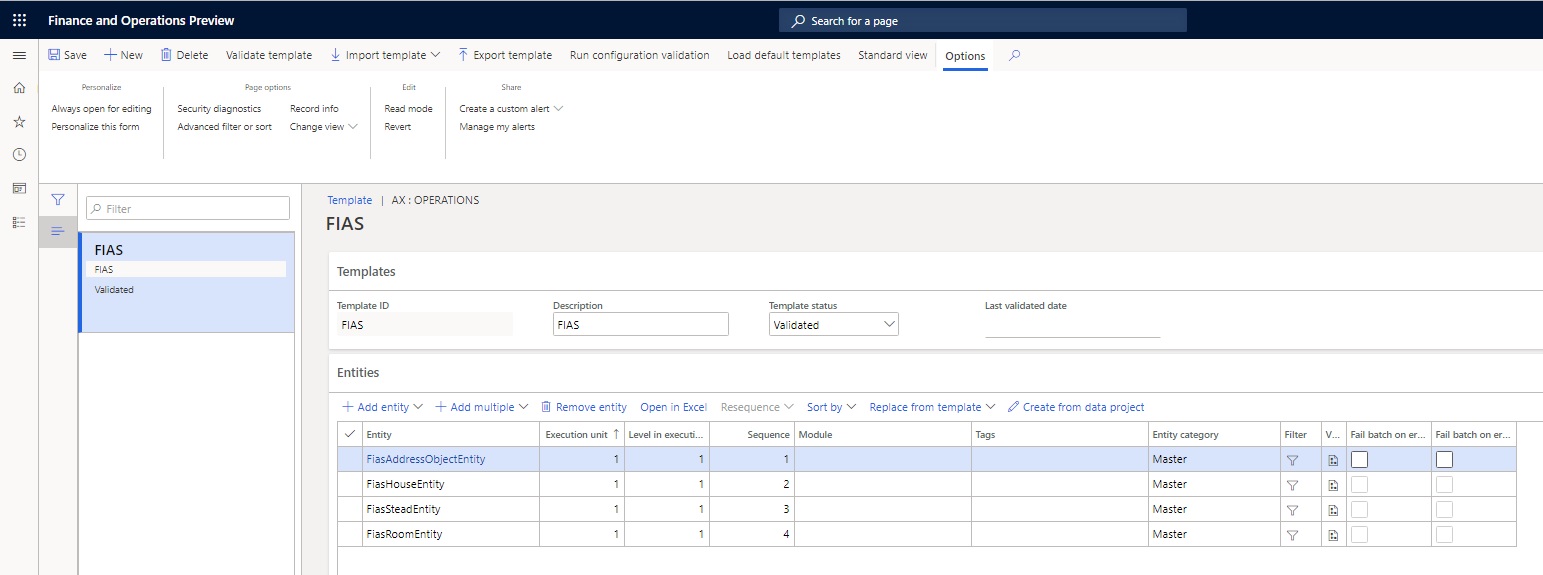
In the Import / Export section, select the Templates tile to open the Template page.
Select New to create a new template.
In the Template ID field, enter the identification number of the template.
In the Description field, enter a description.
In the Template status field, select Validated.
On the Entities FastTab, select Add entity to add the following data entities:
- FiasAddressObjectEntity
- FiasHouseEntity
- FiasSteadEntity
- FiasRoomEntity
After you select each entity in the Entity name field, select Add entity.
Select Save.
Set up a job for a full FIAS import
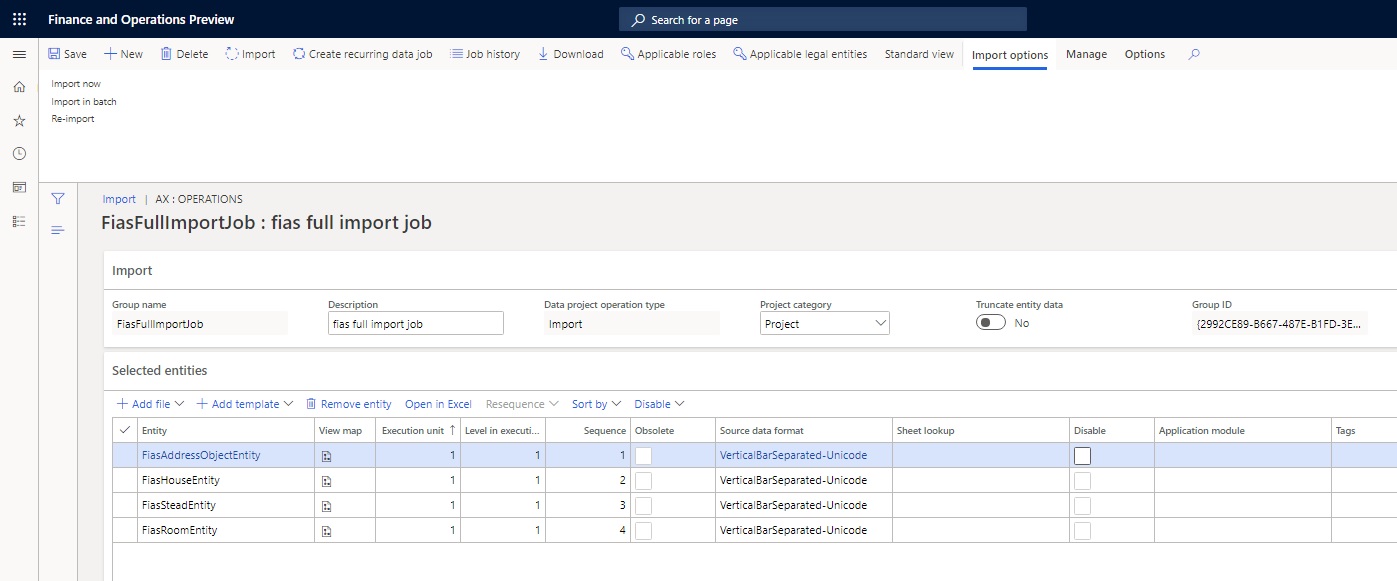
When you import FIAS data into the system the first time, you should create a job for a full FIAS import.
Go to System administration > Workspaces > Data management.
In the Import / Export section, select the Import tile to create a new import job.
In the Group name field, enter FiasFullImportJob.
In the Description field, enter a description.
On the Selected entities FastTab, select Add template to add the template that you created earlier.
In the Entity replace or merge field group, select Merge.
In the Source data format field, select VerticalBarSeparated-Unicode.
Select OK, and then select Save.
Set up a job to import FIAS delta
To update existing address data, you should create a job to import FIAS delta.
Download the RU FIAS – FiasTransformations file from the Data package tab of the Shared asset library in LCS.
Go to System administration > Workspaces > Data management.
In the Import / Export section, select the Import tile to create a new import job.
In the Group name field, enter FiasDeltaImportJob.
In the Description field, enter a description.
On the Selected entities FastTab, select Add template to add the template that you created earlier.
In the Entity replace or merge field group, select Merge.
In the Source data format field, select XML-Attribute.
Select OK.
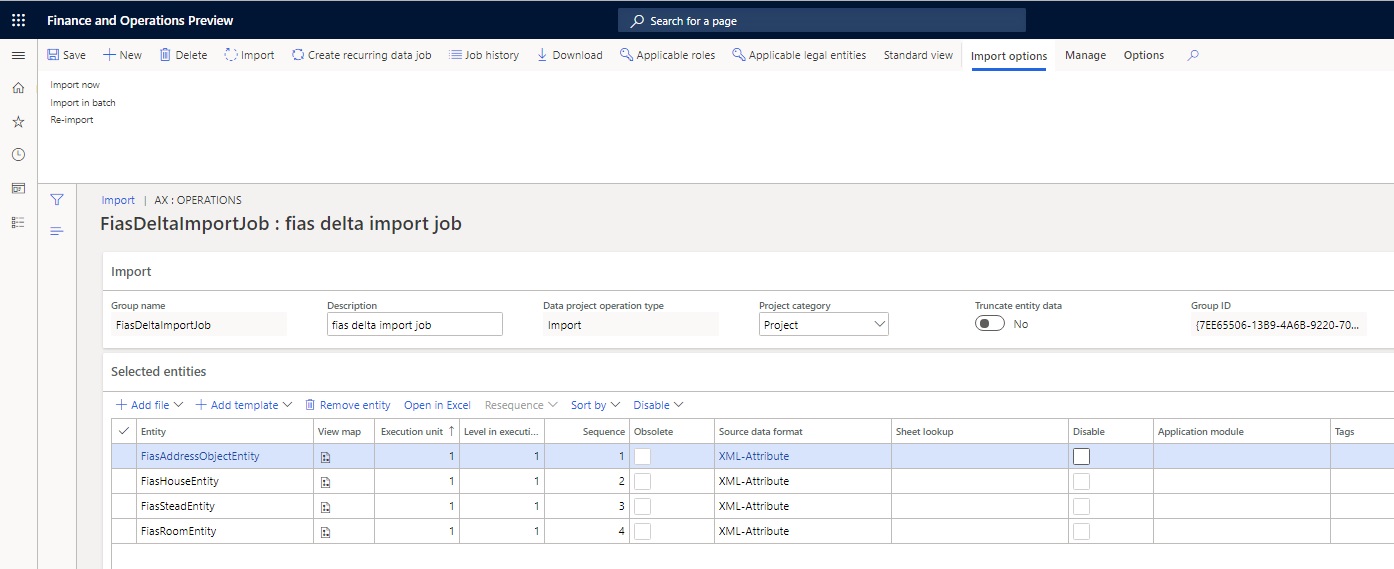
For each entity, select the button in the View map column to open the Map source to staging page.
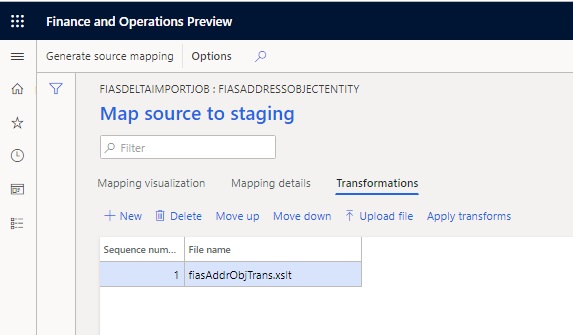
On the Transformations tab, select New, and then select Upload file to open the Select a file dialog box.
Select Browse, and select the following transformations:
- For the FiasAddressObjectEntity entity, select the fiasAddrObjTrans transformation.
- For the FiasHouseEntity entity, select the fiasHousesTrans transformation.
- For the FiasSteadEntity entity, select the fiasSteadsTrans transformation.
- For the FiasRoomEntity entity, select the fiasRoomsTrans transformation.
FIAS import
Do a full FIAS import to an empty database
Because the full FIAS database contains a very large number of records, some performance issues might occur during import. To help prevent these issues, the first time that you do an import, you should use the FIAS database file in TXT format. You can find this file in the Shared asset library in LCS. It contains the FIAS database on December 1, 2018.
Download the RU FIAS - addrObjCSV file from the Data package tab of the Shared asset library in LCS. Verify that the file contains the AS_ADDROBJ_20181216_<number of state>.txt file and, optionally, House, Stead, and Room files.
Create a zip archive that contains the files from the downloaded package for one or more states.
Go to Organization administration > Global address book > Import from FIAS.
Select Import FIAS to open the Import of data dialog box.
On the Parameters FastTab, select Browse to select the zip archive that you created earlier.
Set the Full import option to Yes.
If you intend to import houses and steads, set the Does include houses option to Yes.
If you intend to import rooms, set the Does include rooms option to Yes.
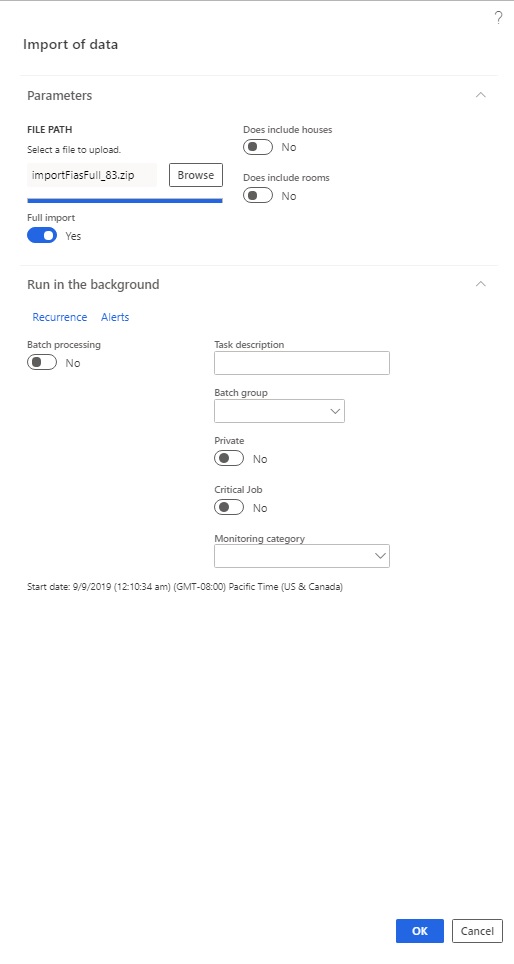
Select OK to start the import.
Select Refresh in the upper right of the page to view the line together with the results of the full import.
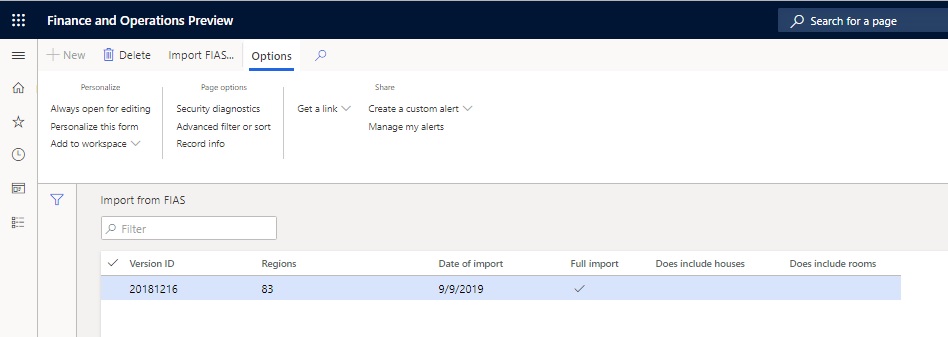
Update addresses from FIAS
- Download the database from the last update date from https://fias.nalog.ru/.
- Select the downloaded database in ZIP format, and do the import just as you did in the previous section. However, in the Import of data dialog box, set the Full import option to No.
Tips for speeding up the import process
The time that is required to import FIAS data depends on the amount of data that is being imported and the system setup. Here are some tips that might help speed up the import process.
Try the following procedure:
Go to System administration > Workspaces > Data management.
In the Import / Export section, select the Framework parameters tile to open the Data import/export framework parameters page.
On the Entity settings tab, select Configure entity execution parameters to open the Entity import execution parameters page.
Set the following fields to configure multithreading for FIAS entities that are used in import jobs:
In the Entity field, select the FIAS entity.
In the Import threshold record count field, enter the threshold record count for import.
In the Import task count field, enter the count of import tasks.
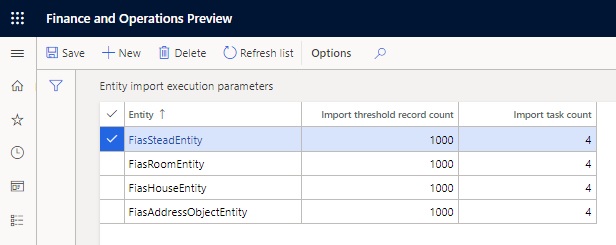
When you run a full import job, provide several regions, but not all regions, at the same time.