Note
Access to this page requires authorization. You can try signing in or changing directories.
Access to this page requires authorization. You can try changing directories.
This article provides a step-by-step guide for creating your own Azure Logic App to ingest FHIR data into Dataverse healthcare APIs, Azure Health Data Services, or both. This Logic App, configured with an HTTP trigger, acts as a relay between Azure Health Data Services and Dataverse healthcare APIs.
Note
This example is provided as an entry point for inbound Electronic Health Record (EHR) data, ensuring that FHIR data is posted to the correct services. It isn't intended as a final solution in its current state.
The configuration includes the following steps:
- Review requirements
- Set up authentication
- Create Logic App
- Configure Logic App
- Call FHIR API
- Evaluate FHIR response
- Send JSON bundle to the Logic App URL
- Secure Logic App
This logic app service provides an entry point for FHIR bundle messages that are first posted to the Azure Health Data Services endpoint. After a successful post, the message is routed to the Dataverse healthcare API endpoint. This sample ensures that when the FHIR bundles are posted to Azure Health Data Services, the Dataverse healthcare APIs also receive the message.
Note
An Azure Logic App isn't required to post FHIR data to the Dataverse healthcare API endpoints. You can build your own solution to relay data from your EHR to the APIs and handle the responses.
The sample logic app uses Microsoft Entra ID managed identities to authenticate between the logic app instance and the two services.
Review requirements
You need to ensure you have the following requirements before you can create a logic app:
- An Azure account and subscription. If you don't have a subscription, sign up for a free Azure account before you begin.
- An Azure resource group configured with the appropriate resources to create logic apps.
- Access within the resource group to create and edit logic apps and managed identities.
- Adherence to security guidelines outlined by Azure administrators and organization policy.
Set up authentication
Before creating and configuring the logic app, you need to set up a managed identity so the external services can authenticate with the logic app. Using managed identities is one approach to configuring authentication. Ensure that you follow best practices and organization policies while setting up authentication.
Managed identities in Azure allow authentication between services without persisting credentials within the logic app. This logic app uses a user-assigned managed identity for authentication between services. Azure administrators typically restrict this configuration. If access is available, you can use the following steps to create a managed identity that can connect to both Azure Health Data Services and Dataverse healthcare API endpoints.
For more information about managed identities, go to What are managed identities for Azure resources?
To set up authentication with a managed identity, perform the following steps:
- Create a managed identity
- Grant access to Azure Health Data Services
- Grant access to Dataverse healthcare APIs
Create a managed identity
Create a user-assigned managed identity using the following steps:
From the Azure portal menu, select Create a resource and search for Managed Identity. In the options provided, select User Assigned Managed Identity, and then select Create.
Select the correct Subscription, Resource group, and Region values. The region should be the same as the logic app.
In the Name field, select FHIRRelayManagedIdentity or any other name unique to the resource group. The rest of this article refers to the name FHIRRelayManagedIdentity for the managed identity.
Select Create.
After the deployment completes, open the managed identity resource.
Grant access to Azure Health Data Services
Accessing Azure Health Data Services from the logic app requires the FHIR Data Contributor role assignment, which allows posting new data to the service. You should add this Azure role assignment to the managed identity used by the logic app.
Go to the Azure Health Data Service instance, select Access Control (IAM), and then select Add role assignment.
In the Role tab, select the FHIR Data Contributor role.
Select the Members tab. Select Managed identity, and then select + Select members. Add the managed identity that you created in Create a managed identity.
The assignment might take a few minutes to reflect on the managed identity. You can view the role assignment on the managed identity by selecting Azure role assignments.
Grant access to Dataverse healthcare APIs
The same managed identity is used in the logic app to access the Dataverse healthcare APIs by connecting it to an application user in the target Dataverse instance. For more information about application users, go to Manage application users in the Power Platform admin center.
You need the managed identity's Azure Client ID to configure the application user. To retrieve the Client ID, open the FHIRRelayManagedIdentity managed identity and copy the Client ID value from the Overview area.
In the Power Platform admin center, open the target Microsoft Cloud for Healthcare environment. In the Access section, select S2S Apps, and then select New app user.
In the Create a new app user pane, select the appropriate Business unit, and then select Add an app.
In the Add an app from Microsoft Entra ID pane, search for the Client ID you copied from the managed identity. Select FHIRRelayManagedIdentity from the list, select Add, and then edit the security roles.
Select the Sync admin for FHIR App Reg User role, and then select Save. Select Create to create the new application user.
Create Logic App
From the Azure portal menu, select Create a resource, search for Logic App, and then select the item from the search results.
Select Create.
In the Create Logic App pane, provide the relevant information for the logic app. Review the plan type, security, and network details with Azure administrators based on the expected processing load.
The following settings are examples for a simple logic app orchestrator to test connectivity that you would use in later sections of this article. If a setting isn't specified, assume that default values are used.
Setting Value Logic App name FhirRelaySample Publish Workflow Region East US Plan type Consumption Select Create. It might take a few minutes to provision the new logic app.
Configure Logic App
After you create the logic app, open the logic app resource to open the Logic App Designer under Development Tools. Follow these steps to configure the logic app:
Configure identity
Now that the logic app and the managed identity are both created, you need to link them.
Select Identity from the logic app menu, select the User assigned tab, and then select + Add.
In the opened pane, select the created managed identity, and then select Add.
The logic app should now link to the new managed identity. It can be used for processing steps and actions.
Configure trigger
The first step in configuring a logic app workflow is to define the entry point or trigger. The trigger When an HTTP request is received allows external systems to post data via HTTP requests to the logic app for processing. This trigger allows the FHIR relay logic app to receive an HTTP request with a JSON payload. For more information about how to create a trigger, go to Add a Request trigger.
This logic app expects an inbound request containing a standard FHIR bundle. The Request Body JSON Schema is left empty, because each incoming bundle can be unique. This configuration allows the logic app to receive various JSON payloads instead of binding it to a specific data contract.

Save the settings to generate the HTTP Post URL. Use this URL later to test the logic app.
Configure parameters
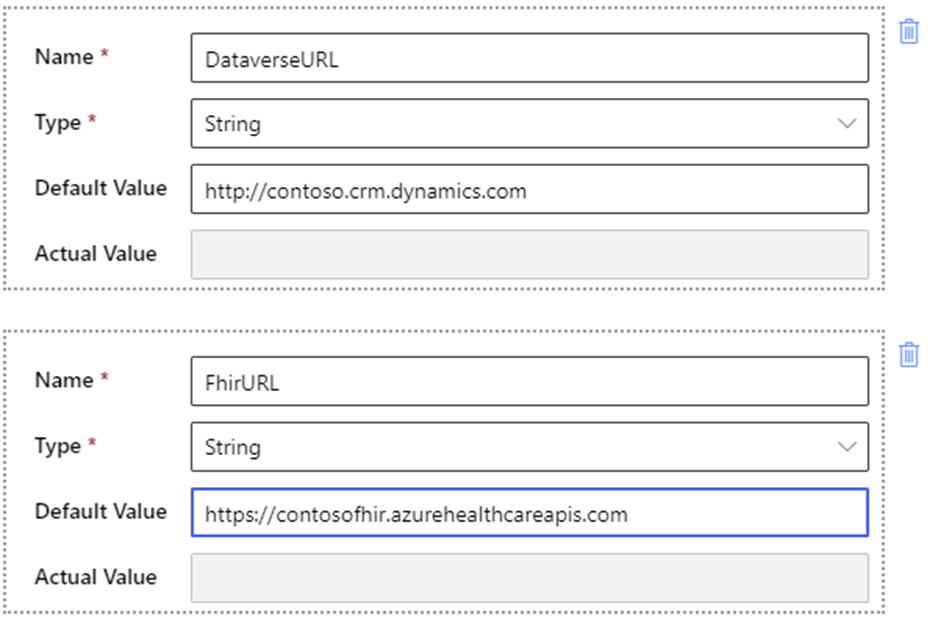
Parameters allow flexibility in building and deploying logic apps via Azure Resource Manager templates. In this sample, add the following two parameters in the logic app actions:
- DataverseURL: The fully qualified URL to the Dataverse instance hosting the Dataverse healthcare APIs.
- FhirURL: The fully qualified URL to the Azure Health Data Services.
To create a new parameter, select Parameters from the toolbar to open the parameters pane.
For each new parameter, follow these steps:
Select Add Parameter.
Enter a Name for the parameter. For Type, select String, and enter the default value for each parameter based on the organization configuration.
Select Save from the toolbar to save the new parameters with the logic app.

Call FHIR API
You need a new action to post the inbound request payload to the Azure Health Data Services endpoint via an HTTP POST method.
In the Logic App Designer, select New step to add a new HTTP POST action. The HTTP action is common and might be shown as a recommended action. If it appears, select HTTP as the operation for this step.
If the recommendation isn't present, search for HTTP, and then select HTTP from the list of available actions.
Name this action Call FHIR API. In the HTTP action settings, update the following settings:
Setting Value Method POST URI FhirURL Headers Add a new value for each of the following headers:
Content-Type: application/json
OData-Version: 4.0Body Body The URI and Body fields require dynamic content. The URI uses the FhirURL parameter value, and the Body field uses the body of the inbound request handled by the trigger.
Select Save to ensure that you save the current settings before moving to the next step.
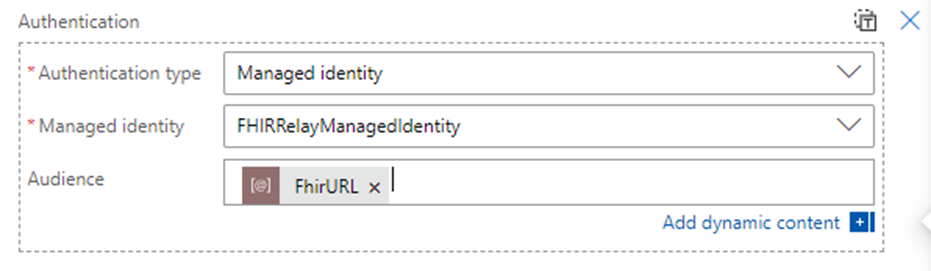
Select Add a new parameter, and then select Authentication.
- For the Authentication type field, select Managed identity.
- For the Managed identity field, select the managed identity previously created and linked to the Azure Health Data Services resource.
- Select the parameter value FhirURL for the Audience field.

The HTTP call now has access to POST the FHIR data to the service endpoint.
Evaluate FHIR response
After the FHIR data posts, use a condition action to evaluate the response from the Azure Health Data Services endpoint.
Select New step.
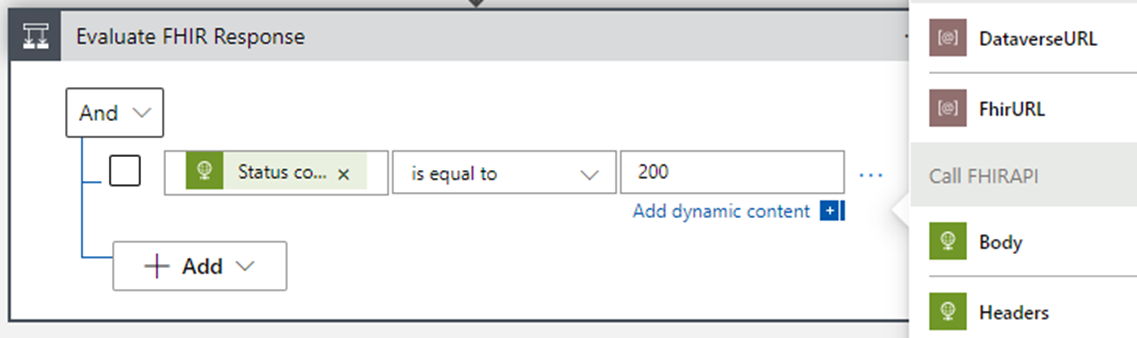
In the Action dialog, select the Built-in tab and the Control icon, and then select Condition for the action. Name this action Evaluate FHIR Response.
In the Condition parameter, select the dynamic value of the Status code returned by the previous HTTP action. Set the condition operator to is equal to and the result value of 200 for the success code.
If this condition is met, the True branch is evaluated.
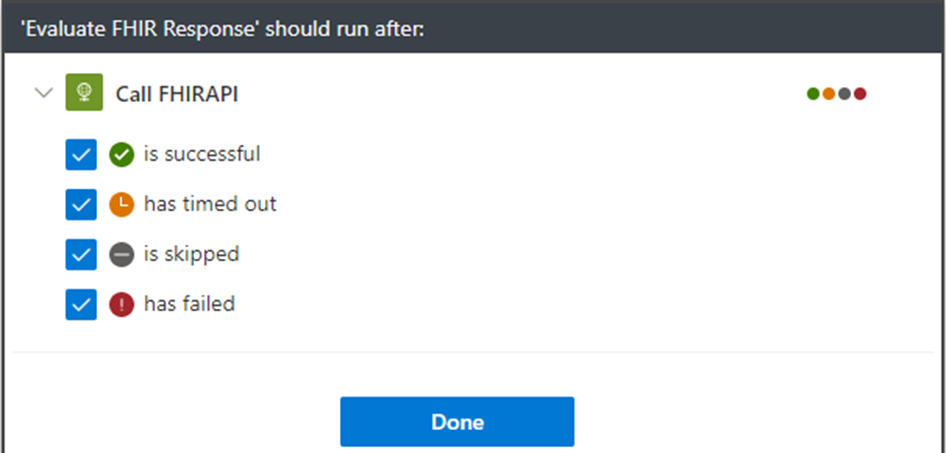
To ensure that the Evaluate FHIR Response action runs, select the ellipsis at the top of the action card, and then select Configure run after. Select all the listed options so the logic app can provide a response to the caller. These updates ensure that the action runs even if the previous step encounters a failure condition.


Condition: Successful response
If the Azure Health Data Services POST succeeds, the request body is then posted to the Dataverse healthcare APIs.
Build Dataverse request body
Within the True branch, select Add an action, and then select Built-in.
Search for Compose. Under Data Operations, select the Compose action.
For the Inputs field, add the following JSON snippet:
  {
   "msind_BundleTag": "",
   "msind_JSON": ""
  }
In the empty quotes for the
msind_JSONnode, add the dynamic content for the trigger body value.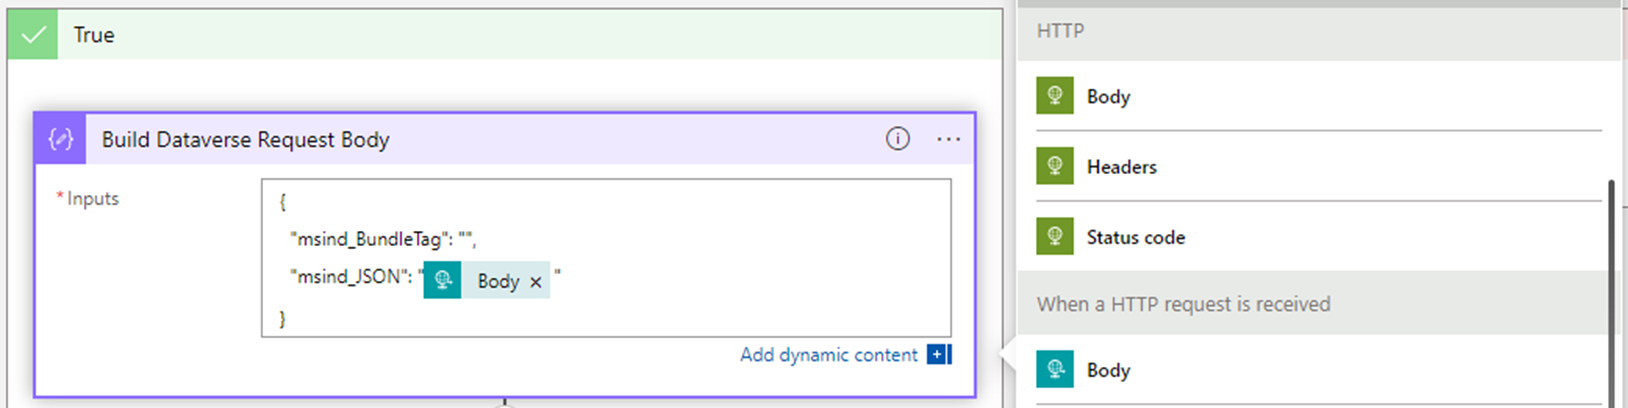
This step adds the trigger body JSON values as a parameter to the Dataverse healthcare API call. Name this step Build Dataverse request body.

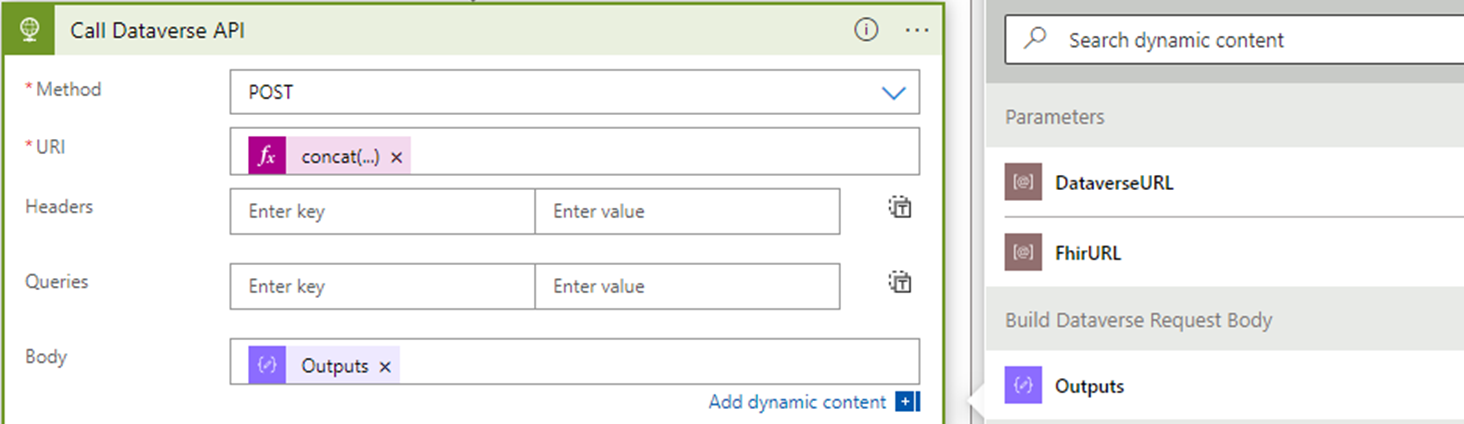
Call Dataverse API
The next step posts this new JSON to the Dataverse healthcare APIs endpoint.
Select Add an action and create another HTTP action. Name this step Call Dataverse API.
In the HTTP action settings, update the following settings:
Setting Value Method POST URI (expression) Headers Add a new value for each of the following headers:
Content-Type: application/json
OData-Version: 4.0Body (Compose step output) The URI field is a dynamic expression value that combines the DataverseURL parameter and the endpoint custom API name. The full expression should be as follows:
concat(parameters('DataverseURL'), '/api/data/v9.1/msind_UpsertBundle')
The Body field is a dynamic value capturing the output of the Compose step.
Select Add a new parameter, and then select Authentication. Under Authentication type, select Managed identity.
Select the managed identity previously created and linked to the Azure Health Data Services resource. For this action, select the parameter value DataverseURL for the Audience field.
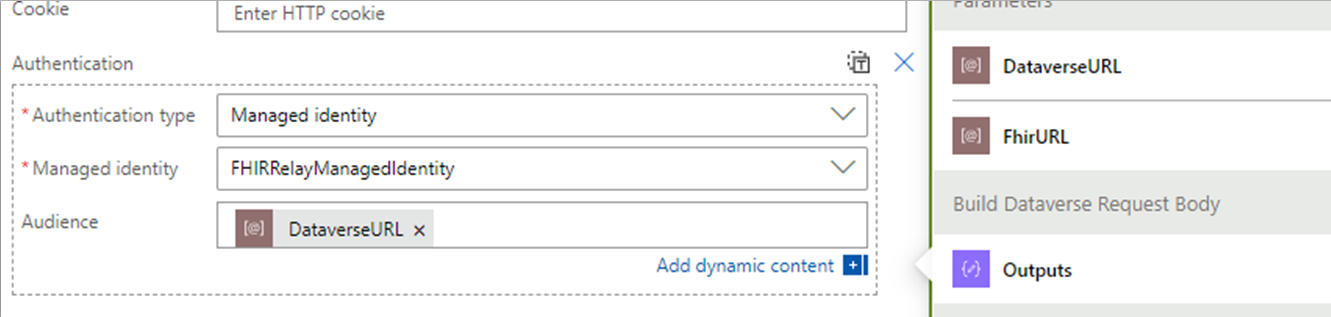


The HTTP call now has access to POST to the Dataverse healthcare APIs service endpoint.
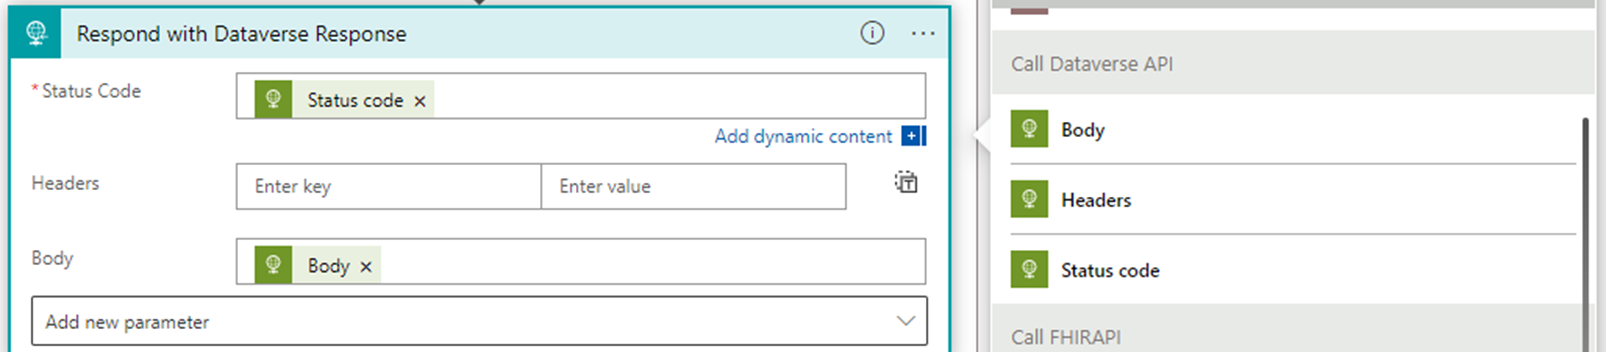
Respond with Dataverse response
After posting the data to Dataverse, compose the response for the logic app call using the response from the Call Dataverse API action.
Select Add an action, and then select Built-in.
Select Response from the list of available actions. Name this new action Respond with Dataverse response.
In this action, the return values from the Dataverse healthcare APIs are returned as the response for the logic app by using dynamic values in the corresponding fields.
To ensure that the Respond with Dataverse Response action executes, select the ellipsis at the top of the action card, and then select Configure run after. Select all the listed options so that the logic app can provide a response to the caller even if the Call Dataverse API Action fails.

Condition: Failed response
If the call to the Azure Health Data Services endpoint fails, the logic app returns the values of the Call FHIR API action as the response.
Respond with FHIR failure response
Select Add an action in the False branch of the condition, and then select Built-in.
Select Response from the list of available actions. Name this new action Respond with FHIR failure response.
In this action, the return values from the Azure Health Data Services are returned as the response for the logic app by using dynamic values in the corresponding fields.
Send JSON bundle to the Logic App URL
To test the logic app with the designer, select Run Trigger and then select the Run with payload option. This action simulates calling the logic app URL and allows you to debug any issues.
For the Body field, provide a valid FHIR bundle. This step assumes that the rest of the Microsoft Cloud for Healthcare configuration is completed and the Dataverse healthcare APIs are ready to receive an inbound message.
Executing the current version with incorrect URLs for the service endpoints results in a successful run of the logic app even though the Call FHIR API action failed. You can view the results of the run on the main page for the logic app under Run history.
When you update all the parameter values correctly, the run history successfully tracks the logic app run.

Secure Logic App
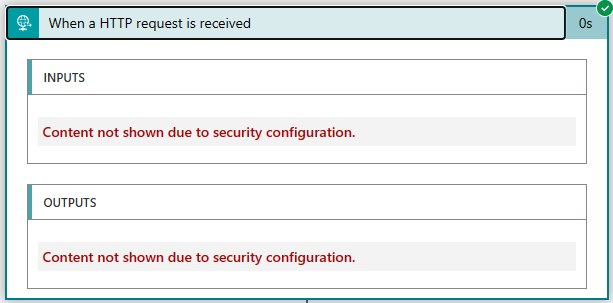
After you complete and test the logic app setup, you can lock down the tracing by securing the inputs and outputs actions.
Select the ellipsis in the upper-right corner of the action card, and then select Settings.
Set the value toggles to On for both Secure Inputs and Secure Outputs.
All the subsequent logic app executions restrict viewing the data when viewing the run logs. The results for the trigger should now provide a restricted view of the data as follows:
You can apply these settings to each action that supports this feature. For more information, see Secure access and data for workflows in Azure Logic Apps.
Alternate setup: Design an Azure Blob Storage Logic App trigger
As an alternate approach, you can configure a Logic App to use Azure Blob Storage triggers for processing inbound FHIR bundles. This setup acts as a relay between Azure Health Data Services and Dataverse healthcare APIs, and manages retry logic and exception handling. The design uses an Azure Blob Storage trigger to initiate asynchronous processing of bundles posted to a configurable storage location. It can handle heavier loads for enterprise use-cases and include extra exception handling steps. However, we recommend you to thoroughly test it with your expected daily loads.
The following diagram illustrates the proposed design and flow:

The setup includes several modular Logic Apps, such as:
| Logic App | Description |
|---|---|
| Process FHIR Bundle | Triggers when a bundle is uploaded to the blob storage. It determines whether to post the bundle to FHIR or directly to Dataverse. |
| Send Bundle to FHIR | Triggers from the Process FHIR Bundle logic app when you choose to post the bundle to FHIR. It processes the request bundle, posts it to the FHIR server, and then relays the bundle to Send Bundle to Dataverse for further processing. |
| Send Bundle to Dataverse | Triggers either from the Process FHIR Bundle or Send Bundle to FHIR logic app. It processes the request bundle and posts the bundle to Dataverse. It also manages the bundles container clean-up by moving the request bundle to either the bundleserror or bundlesarchive container. |
Manage errors and retries
This design enhances exception handling flexibility. If a Logic App run encounters an error, you can post a file named originalblobname_response.json to the bundleserror container in the storage account. Review this file to identify the error's root cause, fix it, and resubmit the bundle with the failed resources.
Secure Logic Apps
The proposed design uses managed identities for security and supports simple FHIR bundle ingestion. You can extend the Logic Apps to meet system-specific requirements. You can also enhance security by locking down the tracing. For more information, see Secure Logic App.