Note
Access to this page requires authorization. You can try signing in or changing directories.
Access to this page requires authorization. You can try changing directories.
Important
This article only applies to outbound marketing, which is gradually being removed from Customer Insights - Journeys. To avoid interruptions, stop using outbound marketing and transition to real-time journeys. Learn more: Transition overview.
The marketing calendar is supplied as a standard control that you can add to any entity or form. The following subsections explain how to customize the settings of any calendar, and how to add a calendar display to an entity or form.
Types and locations of marketing calendars
There are two basic types of marketing calendars:
- Entity-level calendars: Entity-level calendars appear when you first open an entity from the main navigator, such as events, customer journeys, or the main marketing calendar. They appear where you'd normally see a list view, and when present, you can switch between the calendar view and list view. Here you'll see relevant records plotted on the calendar according to their scheduled dates, and you can open any listed record from here. This type of calendar can show several types of entities and provides a system view selector for filtering the records shown.
- Form-level calendars: Form-level calendars appear while you're viewing a specific record, such as a specific event. They're integrated into the form view. These might appear in their own tab on the form, or as a section on a tab with other sections of settings also available. This type of calendar can only show and create records of one type of entity and they don't provide a system-view selector. They're often configured to show information that is related to the specific record where they appear.
Other than the differences noted here, both types of calendars look the same and work in similar ways.
Add a marketing calendar to an entity
When you add the calendar control at the entity level, it becomes available on that entity's list view either by default or via the Show as button (as described in Work with marketing calendars).
Important
You can only add entity-level calendars to entities that have start and end dates. (However, you can add form-level calendars to any entity.)
To add an entity-level calendar to an entity:
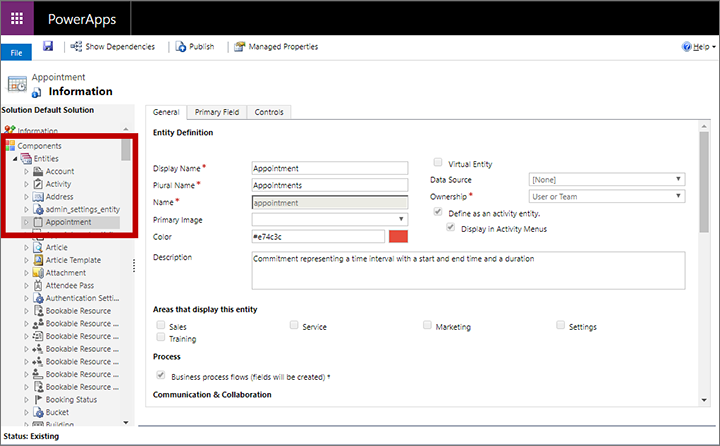
Open a Power Apps customization window. In the left panel, expand Components > Entities to see a list of all entities. Then select the entity where you want to add the calendar.
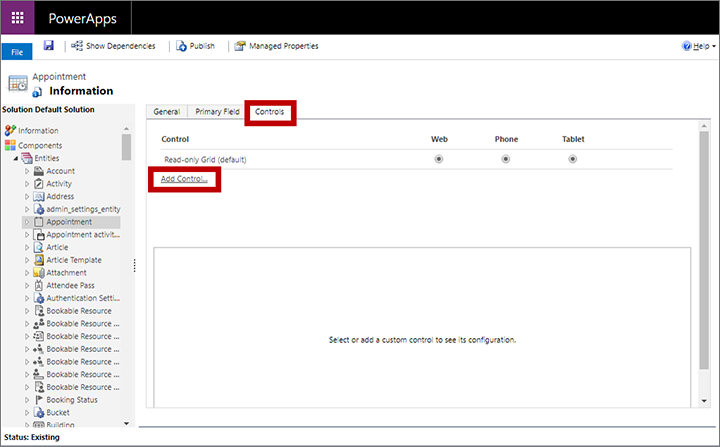
Go to the Controls tab and choose Add control.
The Add Control dialog box opens. Use it to find and add the control called Marketing Calendar.
The Controls tab updates to show configuration settings for the new calendar.
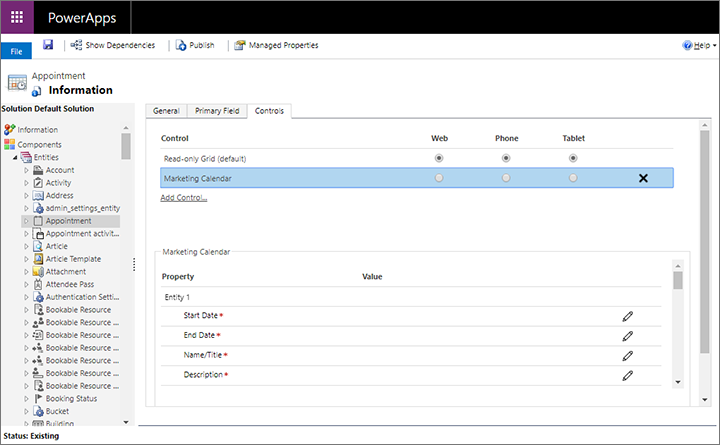
Do the following:
- Select the Marketing Calendar in the Control section and then configure the mappings and quick-view form IDs for each entity you'd like to include in this calendar, plus other configuration settings. For details about these settings, see Configure the entities available to a calendar.
- Make the calendar the default view for any or all the available form factors (web, phone, and tablet) by using the radio buttons at the top, as required.
Save and publish your settings.
Add a marketing calendar to a form
You can add a marketing calendar to any form where you think it could be useful. You can position it as a new section for any existing form tab or create a tab that's dedicated to showing the calendar by itself. Calendars that you add at the form level can only show one type of entity (such as events, appointments, or sessions).
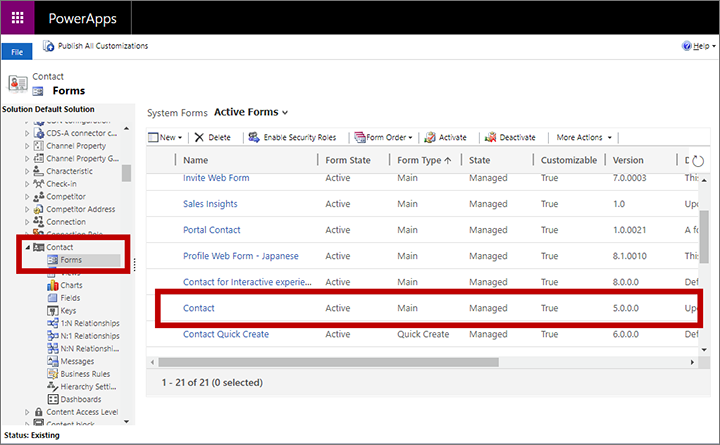
Open a Power Apps customization window.. In the left panel, expand Components > Entities to see a list of all entities. Then expand the entity where you want to add the calendar and choose Forms to see a list of forms currently available to that entity. Select or create the form where you want to add the calendar.
In the form editor, go to the Insert tab and add a container to host the calendar (such as a tab or a section):
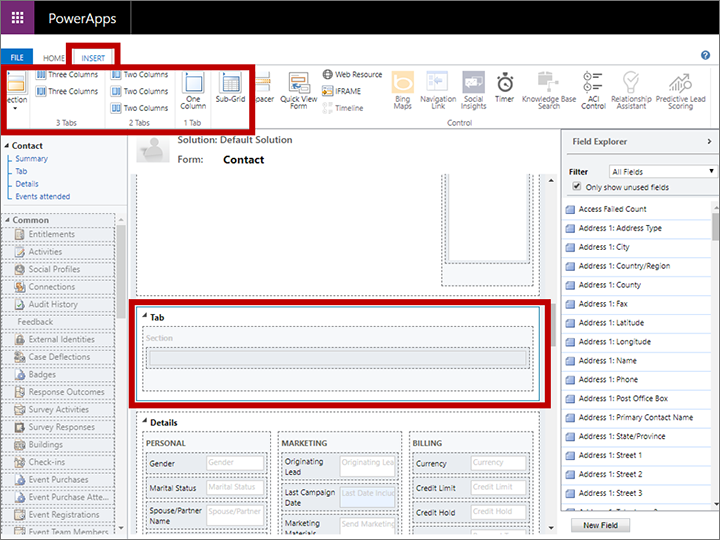
With the newly created tab or section selected, choose Insert > Sub-Grid.
The Set Properties window opens. On the Display tab, give the sub-grid a Name and Label.
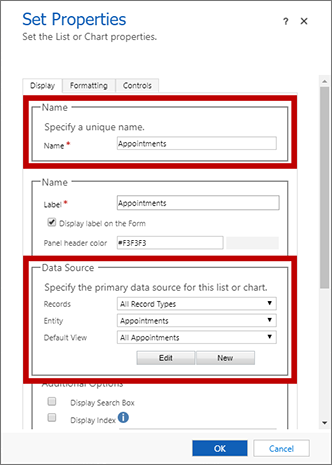
In the Data Source section, choose the type of entity that you want to show in your calendar. Make the following settings:
- Records: Choose All record types to show any type of record, or choose Only related records to show only records that have a relation to a currently shown record (such as rooms reserved for a displayed event, or engagements assigned to a displayed speaker).
- Entity: Choose the type of entity you want to show in the calendar. The entity you choose must include fields for a start date and end date, and must also have a quick-create form available.
- Default view: Choose a system view defined for your selected entity. This setting filters the collection of records shown on the calendar.
Go to the Controls tab and select Add control.
The Add Control dialog box opens. Use it to find and add the control called Marketing Calendar.
Note
There could be several types of calendar controls available. Be sure to check the name carefully.
The Controls tab updates to show configuration settings for the new calendar.
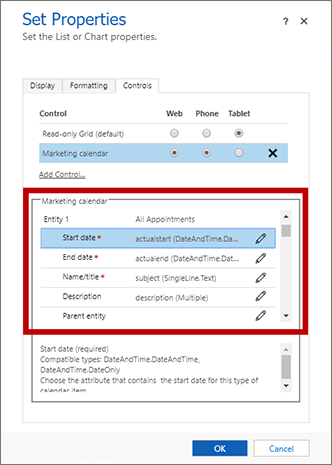
Do the following:
- Select the Marketing Calendar in the Control section and then configure the mappings and quick-view form IDs for the entity you chose to include in this calendar, plus other configuration settings. For details about these settings, see Configure the entities available to a calendar.
- Make the calendar the default view for any or all the available form factors (web, phone, and tablet) by using the radio buttons at the top, as required.
Save and publish your settings.
Configure the entities available to a calendar
After you have added a marketing calendar to an entity or form, you must configure it with the collection of entities that it should display and create. The settings are the same in each case.
Open a Power Apps customization window and go to the entity or form where you're creating or editing the calendar.
- For entity-level calendars, go to the Controls tab for the entity. More information: Add a marketing calendar to an entity
- For form-level calendars, open the properties for the sub-grid that is positioning the calendar and then open the Controls tab on the Set properties page. More information: Add a marketing calendar to a form
From this point on, the procedure is the same whether you're creating or editing an entity-level or form-level calendar.

Select Marketing Calendar in the Control section to open its configuration settings in the bottom section of the window.
You can add up to five entities to show in entity-level calendars, or just one for form-level calendars. Note the following:
- Entity 1 is fixed. For an entity-level calendar, this is always the entity itself. For form-level calendars, this is the entity selected for the sub-grid that hosts the calendar.
- Form-level calendars can only display the entity set for Entity 1. You can add more entities to enable users to create those types of records from the calendar, but the calendar won't display them so doing so is likely to confuse users.
- Entity-level calendars can display up to five entities of any type that has a start date, end date, and quick-create form.
Use the Configure property buttons
 to make each of the following settings for Entity 1:
Start Date: Select the field from the target entity where the start date is defined for each record.
End Date: Select the field from the target entity where the end date is defined for each record.
Name/Title: Select the field that defines the record name for the target entity. This value is shown on the calendar to identify the record.
Description: Select the field that describes the record name for the target entity. This value is shown for calendar items when in day or week view.
Color: Select the field that holds a custom background-color value for the target entity (optional). If you don't assign a field here (or if the assigned field has no value for a given record), then the default color for the entity will be used. Some additional customizations are also required to enable this feature for any entity. More information: Set up record-level custom colors
Parent entity: Select a parent entity (optional). In the future, this is used to group child items under parent items when they're displayed in the calendar, but in the current version this setting has no effect. This will eventually be useful, for example, for sessions, which have events as a parent entity.
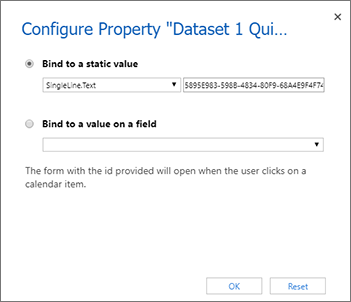
Entity 1 quick view form ID: When users select an item in the calendar, it displays a quick-view form with information about the selected record that includes a button for opening the full record for editing. You can choose any form for this purpose—you might create a custom one, but many people simply use the existing quick-create form. If you don't provide a value here, then users who select this type of calendar item go straight to the edit form. To set this, choose the Configure property button for this setting, then choose the Bind to a static value radio button and paste the ID in the field provided here. For details about how to find the ID for a quick-view form, see Find the form ID for a quick-view form.
If you're creating an entity-level calendar and want to add another entity to the current calendar, then choose an entity for Entity 2 and repeat the previous step for that entity. You can add up to five entities to entity-level calendars.
Make the following general settings as required (they're optional). They appear after the Entity settings and apply to the calendar as a whole:
- Default duration for new items: Specify the default duration (in minutes) applied to new items created by this calendar. When a user creates a new item (for example, an appointment), they'll select a start date and time. The end date and time for that item will then automatically be set this number of minutes later, but the user is free to change it as needed.
- Default view: Choose which calendar view to show when the calendar is first opened (day, month, year, or agenda).
- Default view date: Usually, you'll leave this blank to show the current date, but you could instead specify a static date. Don't choose the Bind to a value on a field option because it doesn't work in the current version of the calendar.
Save and publish your settings.
Find the form ID for a quick-view form
Part of the calendar configuration gives you the option of choosing a quick-view form for each entity displayed by the calendar. When a user selects a calendar item, the content of this form is displayed in a read-only pop-up dialog box. You can choose any form for this purpose—you might create a custom one, but many people simply use the existing quick-create form. More information: Configure the entities available to a calendar
When specifying the form, you must use the ID of the form you want to use. Here's how to find the required ID:
Open a Power Apps customization window and expand Components > Entities to see a list of all entities. Then expand the entity you're adding to your calendar and choose Forms to see a list of forms currently available to that entity.
Select the form you want to use as a quick-view form. The form opens in a new window.
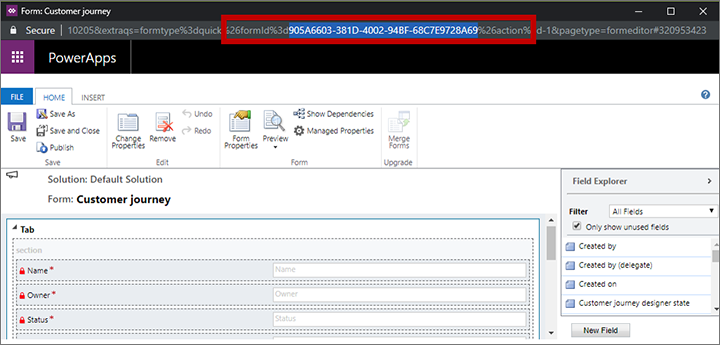
Inspect the URL at the top of the new window and find the part that looks something like the following:
… formId%3d5895E983-598B-4834-80F9-68A4E9F4F744%26 …Copy the value shown between formId%3d and %26 ("5895E983-598B-4834-80F9-68A4E9F4F744" in the previous example).
Paste this value into the Entity <n> quick-view form ID setting described in Configure the entities available to a calendar.
Set the default color used for each type of entity shown in the calendar
Each item displayed on the calendar uses a background color to indicate which type of item it is. By default, events are green, sessions are blue, and appointments are red. Entities with no color configured show as gray. To customize the color for any entity:
Open a Power Apps customization window. In the left panel, expand Components > Entities to see a list of all entities. Then select the entity you want to assign a color to.
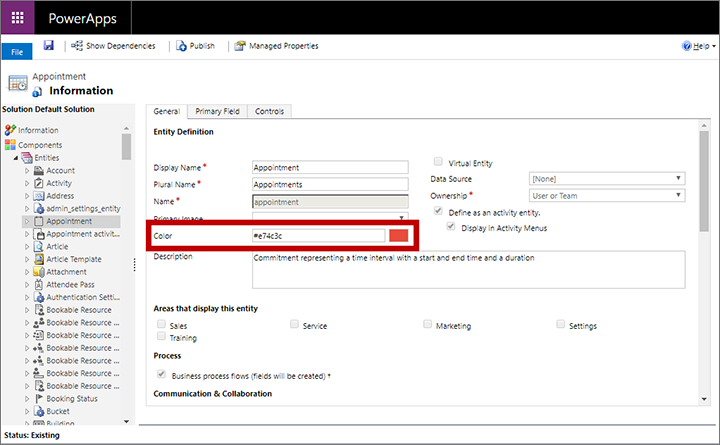
Use the Color setting on the General tab to set a color for the entity.
Save and publish your settings.
Set up record-level custom colors
In addition to the default entity color, you can also customize a calendar to enable users to select a custom color for each record as they add it. If no custom color is selected for a new record, the default color for the entity will be used.
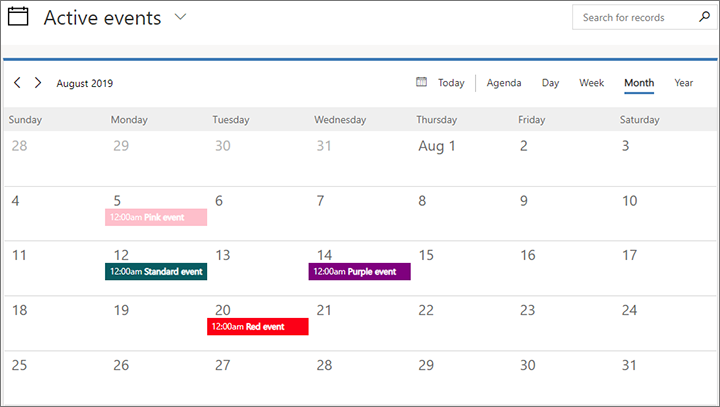
To set up record-level custom colors using a free text field:
Add a custom field to the entity where you want to enable for record-level custom colors. This is the target entity (such as Event) to be displayed by the calendar you're customizing. This field holds the custom color value assigned to each record, so give it a name such as "Calendar color". The field must be of type Single line of text.
Customize the quick-create form of the target entity to include the new color field. This enables users to choose a color while they create a record from the calendar. Be sure to use the same quick-create form that you have configured for use with your calendar. You might also consider adding the color field to other forms where users may want to view or edit it (possibly including the main form).
Configure your calendar to identify the color field for the target entity.
Publish your customizations.
Users can choose any of the available HTML standards when entering color values, including:
- Color name (such as
red) - Hex value (must start with #) (such as
#FF0000) - Short hex value (for colors that support it) (such as
#F00) - RGB value (such as
rgb(255,0,0))
To set up record-level custom colors using an option set:
Choose an option set field from the entity under which you would like to change the color of the record. This is the target entity (such as an event) that will display by the calender you're customizing.
Ensure that the option set for the field has the colors you like for the options. These colors are displayed for the record on the calendar when that option is set for the field.
Users can choose any of the available HTML standards when entering color values, including:
- Color name (such as
red) - Hex value (must start with #) (such as
#FF0000) - Short hex value (for colors that support it) (such as
#F00) - RGB value (such as
rgb(255,0,0))
Configure your calendar to identify the color field for the target entity.
Publish your customizations.