Integrate a custom captcha service with Customer Insights - Journeys forms
Customer Insights - Journeys forms allow you to use custom captcha bot protection to validate form submissions. This article gives an example of how to integrate Google reCAPTCHA. The flow is similar for other captcha services.
Note
In the current app version, only one captcha implementation can be active. If you use your own captcha provider (as outlined below), existing forms that use the out-of-the-box captcha will stop working. A custom captcha implementation requires at least basic knowledge of writing and debugging dataverse plugins.
The process consists of these steps:
- Add reCAPTCHA to the form.
- Add the captcha text value to the form submission once the form is submitted.
- Create a plugin in the CRM that validates the captcha.
Step-by-step example: Integrate Google reCAPTCHA
1. Add reCAPTCHA to the form
Create a form in the Customer Insights - Journeys form editor.
Add a
data-validate-submission="true"attribute to the<form>element, which enables custom validation on the form submission: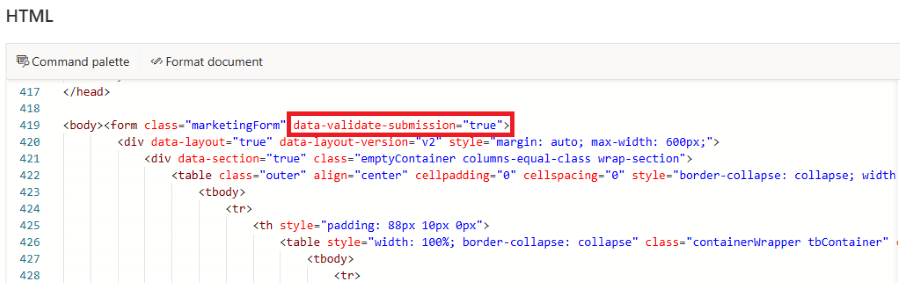
Add a
<div id="g-recaptcha">in the form as placeholder for reCAPTCHA. This div ID is used as a reference later. It's recommended to put the placeholder between the last field and submit button.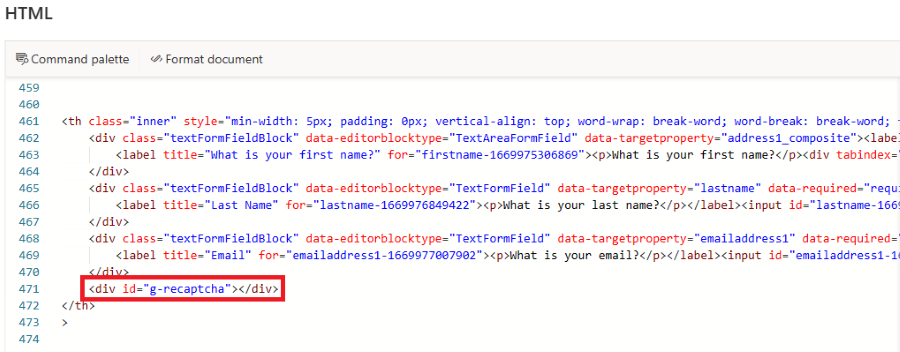
Publish the form and embed the form into your website.
Edit the page where the form was embedded. Add the script provided by Google into the page header. This script loads the reCAPTCHA with the
onLoadcallback parameter. This callback is called as soon as the captcha is loaded.<script src="https://www.google.com/recaptcha/api.js?onload=onloadCallback" async defer></script>Add the onLoadCallback function:
function onloadCallback() {
    grecaptcha.render('g-recaptcha',
    {
      sitekey: '{sitekey}',
    });
}
Replace the
{sitekey}placeholder with the one provided by Google. This callback function renders the reCAPTCHA inside the placeholder<div id="g-recaptcha">you created earlier.Register the onloadCallback function to be called by the form loader:
document.addEventListener("d365mkt-afterformload", onloadCallback);
2. Add the captcha text value to the form submission
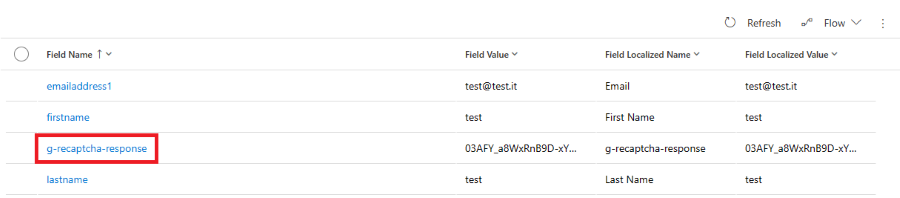
Once the form is submitted, the g-recaptcha-response parameter is added automatically to the form submission. In the next steps, you'll build a plugin that hides this value, as it will be added to the ValidationOnlyFields list in the response object returned by the plugin code.
3. Create a plugin
3.1 Create a Visual Studio Project for the plugin
- Open Visual Studio and create a new Class Library project using .NET Framework 4.6.2.
- In Solution Explorer, select Manage NuGet Packages and install
Microsoft.CrmSdk.CoreAssemblies.
3.2 Create the plugin class
Rename
Class1.cstoCustomValidationPlugin.cs.Make the CustomValidationPlugin class inherit from the IPlugin interface and add the Execute method.
public class CustomValidationPlugin : IPlugin
{
   public void Execute(IServiceProvider serviceProvider)
   {

   }
}
Add the following code into the execute method to retrieve context and tracing service.
public void Execute(IServiceProvider serviceProvider)
{
   // get tracing service
   ITracingService tracingService =
   (ITracingService)serviceProvider.GetService(typeof(ITracingService));

   // get plugin execution context
   IPluginExecutionContext context = (IPluginExecutionContext)
   serviceProvider.GetService(typeof(IPluginExecutionContext));
}
Add this code to retrieve the form submission parameter string. It's a JSON encoded string representing the fields that the user submitted in the form. This process retrieves this string and deserializes it using a Deserialize helper method and FormSubmissionRequest class that is defined later. This checks that the Fields array contains a key for g-recaptcha-response. If the reCAPTCHA key isn't found, it returns skipping validation as the form that's processing didn't contain a Google recaptcha element.
var requestString = (string)context.InputParameters["msdynmkt_formsubmissionrequest"];
var requestObject = Deserialize<FormSubmissionRequest>(requestString);
if (!requestObject.Fields.TryGetValue("g-recaptcha-response", out string recaptchaToken))
{
   tracingService.Trace("g-recaptcha-response was not present in form submission");
   return;
}
Add the following code to return if
g-recaptcha-tokenvalue is null or empty.if (String.IsNullOrEmpty(recaptchaToken)) { tracingService.Trace($"g-recaptcha-response value not found"); return; }Add the following code to validate the Google captcha token against Google APIs.
string url = "https://www.google.com/recaptcha/api/siteverify";
using (HttpClient client = new HttpClient())
{
   var content = new FormUrlEncodedContent(new Dictionary<string, string>
   {
      {"secret", "your_secret_key"},
      {"response", recaptchaToken}
   });

   try
   {
      var response = client.PostAsync(url, content).Result;
      if (!response.IsSuccessStatusCode)
      {
         tracingService.Trace($"Request Failed: ({response.StatusCode}){response.Content}");
         return;
      }

      var responseString = response.Content.ReadAsStringAsync().Result;

      gRecaptchaResponse = Deserialize<GRecaptchaResponse>(responseString);

      var resp = new ValidateFormSubmissionResponse()
      {
         IsValid = isValid,
         ValidationOnlyFields = new List<string>() { "g-recaptcha-response" }
      };
      context.OutputParameters["msdynmkt_validationresponse"] = Serialize(resp);
    }
    catch (Exception e)
    {
       tracingService.Trace($"{e.Message}");
    }
}
First, the URL is defined, then an instance of
HttpClientis created. AFormUrlEncodedContentobject is created containing therecaptchaTokenretrieved in previous steps and the secret key that is provided by Google. Then aPOSTrequest is sent and the status code is checked, if not successful it returns. If successful, it deserializes the response using the Deserialize helper method andGRecaptchaResponsethat's defined later. It then creates a newValidateFormSubmissionResponseobject, serializes it, and sets it as the value of the output parametermsdynmkt_validationresponse, which is the one Microsoft service it uses to accept or reject the submission. Adding theg-recaptcha-responsestring to theValidationOnlyFieldslist hides this field from the form submission in the UI.Add the following code to define Serialize and Deserialize helper methods.
private T Deserialize<T>(string jsonString)
{
   serializer = new DataContractJsonSerializer(typeof(T));
   T result;
   using (MemoryStream stream = new MemoryStream(Encoding.UTF8.GetBytes(jsonString)))
   {
      result = (T)serializer.ReadObject(stream);
   }
   return result;
}

private string Serialize<T>(T obj)
{
    string result;
    serializer = new DataContractJsonSerializer(typeof(T));
    using (MemoryStream memoryStream = new MemoryStream())
    {
       serializer.WriteObject(memoryStream, obj);
       result = Encoding.Default.GetString(memoryStream.ToArray());
    }
    return result;
}
Add the following code to define the classes needed to Serialize/Deserialize JSON strings objects.
public class FormSubmissionRequest
 {
     public Dictionary<string, string> Fields { get; set; }
 }

 public class GRecaptchaResponse
 {
     public bool success { get; set; }
 }

 public class ValidateFormSubmissionResponse
 {
     public bool IsValid { get; set; }
     public List<string> ValidationOnlyFields { get; set; }
 }
3.3 Sign and build the plugin
- Right click on the project and select Properties in the Solution Explorer.
- Select the Signing tab and check the Sign the assembly checkbox.
- Select
<New...>. - Enter a key file name and deselect Protect my key file with a password.
- Build the project.
- You can find the plugin assembly
CustomValidationPlugin.dllin\bin\Debug.
3.4 Register plugin
- Open
PluginRegistration.exe. - Select Create new connection.
- Choose Office 365.
- Select Login.
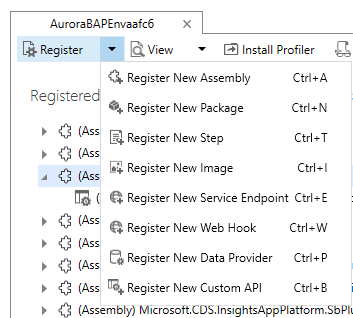
- Select Register and then Register new assembly.
- Select the (...) button in step 1 and select the dll built in previous steps.
- Select Register selected plugin.
3.4 Register Step
- Select CustomValidationPlugin from the list of the registered assemblies.
- Select Register New Step.
- Enter
msdynmkt_validateformsubmissioninto Message text field. - Make sure Execution Mode is set as Synchronous.
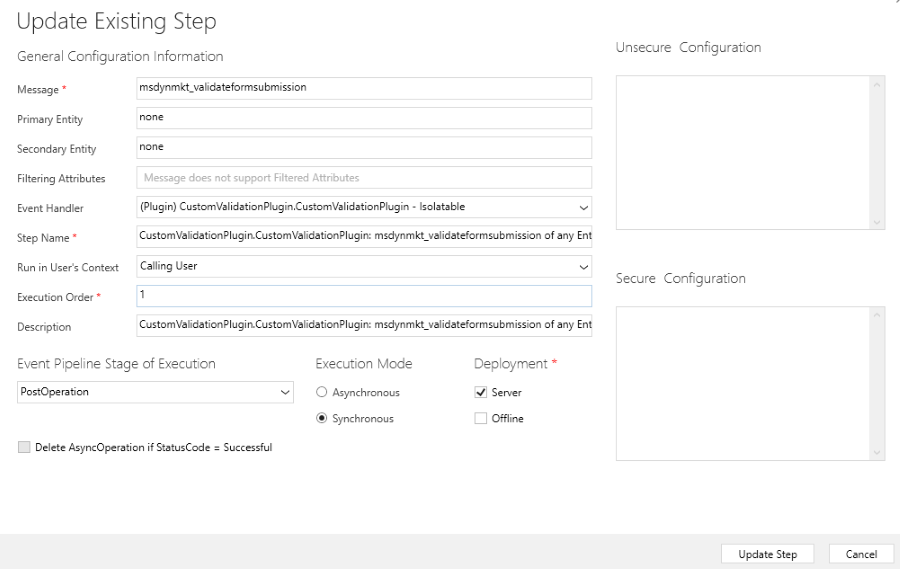
- Make sure Execution order is set to
10. - Make sure Event Pipeline Stage Of Execution is set as Post Operation.
- Select Register New Step.
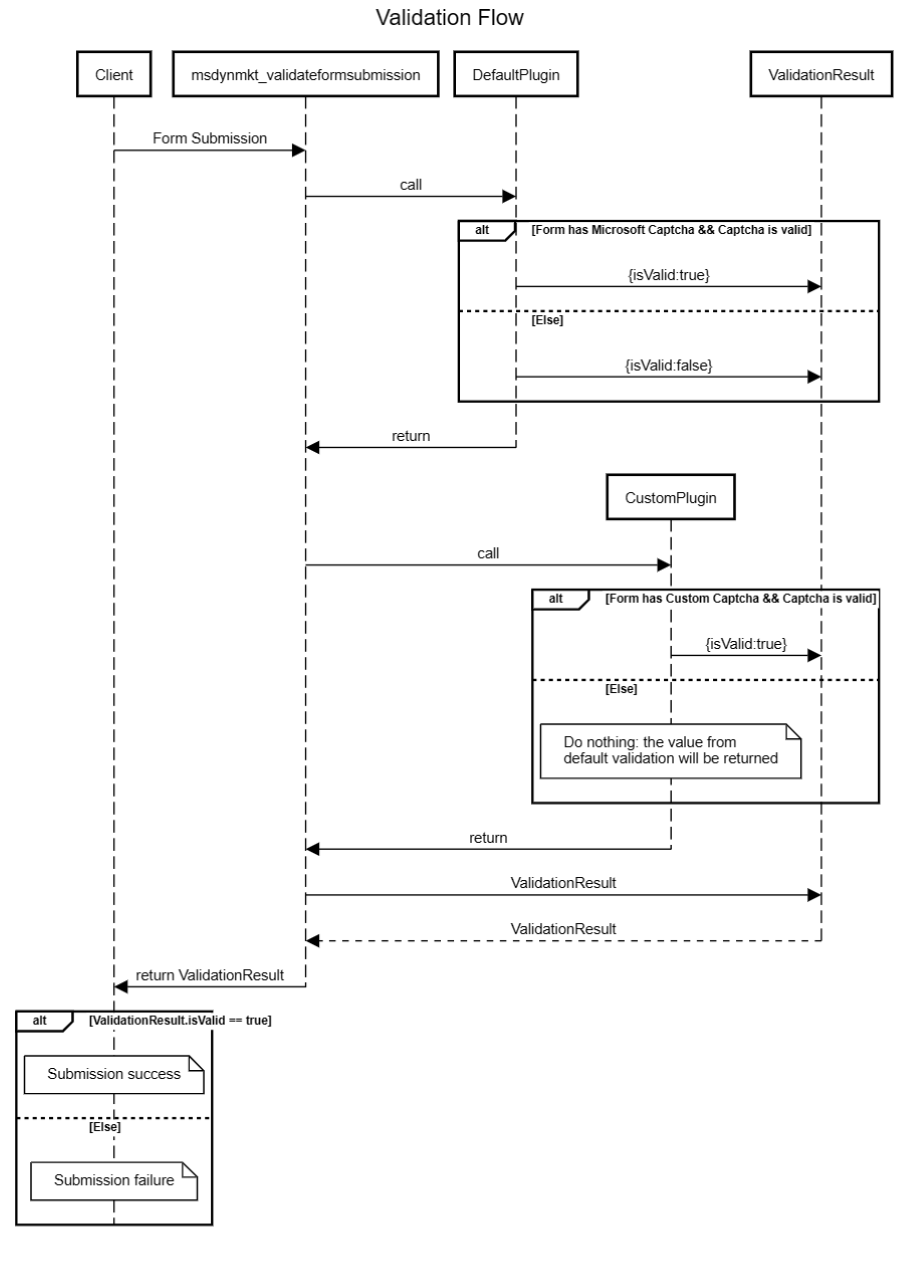
Conclusion
When a form with the data-validate-submission attribute is submitted, your custom plugin runs and validates the reCAPTCHA response with Google services. The custom plugin will run after the default Microsoft validation plugin. If there are no Microsoft captcha fields in the form, the Microsoft plugin sets IsValid:false and the submission fails unless you overwrite it with IsValid:true.