Note
Access to this page requires authorization. You can try signing in or changing directories.
Access to this page requires authorization. You can try changing directories.
Applies To: Project Operations Integrated with ERP, Project Operations Core
This article describes a sample flow that shows how to create a complete project plan by using Microsoft Power Automate, how to create an Operation Set, and how to update an entity. The example shows how to create a project, project team member, Operation Sets, project tasks, and resource assignments. This article also explains how to update an entity and run an Operation Set.
The example in this article uses the PssCreateV2 API. For an example that uses the PssCreateV1 API, see Use V1 Project schedule APIs with Power Automate.
Here's a complete list of the steps that are documented in the sample flow in this article:
- Create a PowerApps trigger
- Create a project
- Initialize a variable for the team member
- Create a generic team member
- Create an Operation Set
- Create a project bucket
- Initialize a variable for the number of tasks
- Initialize a variable for the project task ID
- Initialize an array
- Do until
- Set a project task
- Add a task to the array
- Create a resource assignment
- Decrement a variable
- Add Tasks and Assignments to the Operation Set
- Run an Operation Set
Assumptions
This article assumes that you have a basic knowledge of the Dataverse platform, cloud flows, and the Project Schedule API. For more information, see the References section later in this article.
Create a flow
Select an environment
You can create the Power Automate flow in your environment.
- Go to https://flow.microsoft.com, and use your administrator credentials to sign in.
- In the upper-right corner, select Environments.
- In the list, select the environment where Dynamics 365 Project Operations is installed.
Create a solution
Follow these steps to create a solution-aware flow. By creating a solution-aware flow, you can more easily export the flow to use it later.
- On the navigation pane, select Solutions.
- On the Solutions page, select New solution.
- In the New solution dialog box, set the required fields, and then select Create.
Step 1: Create a PowerApps trigger
- On the Solutions page, select the solution that you created, and then select New.
- In the left pane, select Cloud flows > Automation > Cloud flow > Instant.
- In the Flow name field, enter Schedule API Demo Flow.
- In the Choose how to trigger this flow list, select Power Apps. When you create a Power Apps trigger, the logic is up to you as the author. For the example in this article, leave the input parameters blank for testing purposes.
- Select Create.
Step 2: Create a project
Follow these steps to create a sample project.
In the flow that you created, select New step.

In the Choose an operation dialog box, in the search field, enter perform unbound action. Then, on the Actions tab, select the operation in the list of results.

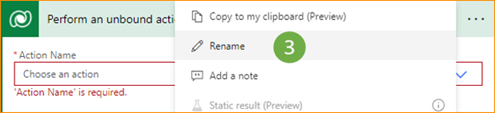
In the new step, select the ellipsis (…), and then select Rename.
Rename the step Create Project.
In the Action Name field, select msdyn_CreateProjectV1.
Under the msdyn_subject field, select Add dynamic content.
On the Expression tab, in the function field, enter concat('Project name - ',utcNow()).
Select OK.
Step 3: Initialize a variable for the team member
- In the flow, select New step.
- In the Choose an operation dialog box, in the search field, enter initialize variable. Then, on the Actions tab, select the operation in the list of results.
- In the new step, select the ellipsis (…), and then select Rename.
- Rename the step Init team member.
- In the Name field, enter TeamMemberAction.
- In the Type field, select String.
- In the Value field, enter msdyn_CreateTeamMemberV1.
Step 4: Create a generic team member
In the flow, select New step.
In the Choose an operation dialog box, in the search field, enter perform unbound action. Then, on the Actions tab, select the operation in the list of results.
In the new step, select the ellipsis (…), and then select Rename.
Rename the step Create Team Member.
For the Action Name field, select TeamMemberAction in the Dynamic content dialog box.
In the Action Parameters field, enter the following parameter information.
{
    "TeamMember": {
        "@@odata.type": "Microsoft.Dynamics.CRM.msdyn_projectteam",
        "msdyn_projectteamid": "@{guid()}",
        "msdyn_project@odata.bind": "/msdyn_projects(@{outputs('Create_Project')?['body/ProjectId']})",
        "msdyn_name": "ScheduleAPIDemoTM1"
    }
}
Here's an explanation of the parameters:
- @@odata.type – The entity name. For example, enter "Microsoft.Dynamics.CRM.msdyn_projectteam".
- msdyn_projectteamid – The primary key of the project team ID. The value is a globally unique identifier (GUID) expression. The ID is generated from the Expression tab.
- msdyn_project@odata.bind – The project ID of the owning project. The value is dynamic content that comes from the response of the "Create Project" step. Make sure that you enter the full path and add dynamic content between the parentheses. Quotation marks are required. For example, enter "/msdyn_projects(ADD DYNAMIC CONTENT)".
- msdyn_name – The name of the team member. For example, enter "ScheduleAPIDemoTM1".
Step 5: Create an Operation Set
- In the flow, select New step.
- In the Choose an operation dialog box, in the search field, enter perform unbound action. Then, on the Actions tab, select the operation in the list of results.
- In the new step, select the ellipsis (…), and then select Rename.
- Rename the step Create Operation Set.
- In the Action Name field, select the msdyn_CreateOperationSetV1 Dataverse custom action.
- In the Description field, enter ScheduleAPIDemoOperationSet.
- For the Project field, select msdyn_CreateProjectV1Response ProjectId in the Dynamic content dialog box.
Step 6: Create a project bucket
- In the flow, select New step.
- In the Choose an operation dialog box, in the search field, enter add new row. Then, on the Actions tab, select the operation in the list of results.
- In the new step, select the ellipsis (…), and then select Rename.
- Rename the step Create Bucket.
- In the Table Name field, select Project Buckets.
- In the Name field, enter ScheduleAPIDemoBucket1.
- In the Project field, enter /msdyn_projects(.
- In the Dynamic content dialog box, select msdyn_CreateProjectV1Response ProjectId.
- In the Project field, enter ).
Step 7: Initialize a variable for the number of tasks
- In the flow, select New step.
- In the Choose an operation dialog box, in the search field, enter initialize variable. Then, on the Actions tab, select the operation in the list of results.
- In the new step, select the ellipsis (…), and then select Rename.
- Rename the step Init Number of tasks.
- In the Name field, enter number of tasks.
- In the Type field, select Integer.
- In the Value field, enter 5.
Step 8: Initialize a variable for the project task ID
- In the flow, select New step.
- In the Choose an operation dialog box, in the search field, enter initialize variable. Then, on the Actions tab, select the operation in the list of results.
- In the new step, select the ellipsis (…), and then select Rename.
- Rename the step Init ProjectTaskID.
- In the Name field, enter msdyn_projecttaskid.
- In the Type field, select String.
- For the Value field, enter guid() in the expression builder.
Step 9: Initialize an array
- In the flow, select New step.
- In the Choose an operation dialog box, in the search field, enter initialize variable. Then, on the Actions tab, select the operation in the list of results.
- In the new step, select the ellipsis (…), and then select Rename.
- Rename the step Init Array.
- In the Name field, enter Tasks and Assignments.
- In the Type field, select Array.
Step 10: Do until
- In the flow, select New step.
- In the Choose an operation dialog box, in the search field, enter do until. Then, on the Actions tab, select the operation in the list of results.
- Set the first value in the conditional statement to the number of tasks variable from the Dynamic content dialog box.
- Set the condition to less than equal to.
- Set the second value in the conditional statement to 0.
Step 11: Set a project task
- In the flow, select Add an action.
- In the Choose an operation dialog box, in the search field, enter set variable. Then, on the Actions tab, select the operation in the list of results.
- In the new step, select the ellipsis (…), and then select Rename.
- Rename the step Set Project Task.
- In the Name field, select msdyn_projecttaskid.
- For the Value field, enter guid() in the expression builder.
Step 12: Add a task to the array
In the flow, select Add an action.
In the Choose an operation dialog box, in the search field, enter Append to array.
In the step, select the ellipsis (…), and then select Rename.
Rename the step Add Task to Array.
In the Name field, select Tasks and Assignments.
In the Value field, enter the following parameter information.
{
    "@@odata.type": "Microsoft.Dynamics.CRM.msdyn_projecttask",
    "msdyn_projecttaskid": "@{variables('msdyn_projecttaskid')}",
    "msdyn_project@odata.bind": "/msdyn_projects(@{outputs('Create_Project')?['body/ProjectId']})",
    "msdyn_subject": "ScheduleAPIDemoTask1",
    "msdyn_projectbucket@odata.bind": "/msdyn_projectbuckets(@{outputs('Create_Bucket')?['body/msdyn_projectbucketid']})",
    "msdyn_start": "@{addDays(utcNow(), 1)}",
    "msdyn_scheduledstart": "@{utcNow()}",
    "msdyn_scheduledend": "@{addDays(utcNow(), 5)}",
    "msdyn_LinkStatus": "192350000"
}
Here's an explanation of the parameters:
- @@odata.type – The entity name. For example, enter "Microsoft.Dynamics.CRM.msdyn_projecttask".
- msdyn_projecttaskid – The unique ID of the task. The value should be set to a dynamic variable from msdyn_projecttaskid.
- msdyn_project@odata.bind – The project ID of the owning project. The value is dynamic content that comes from the response of the "Create Project" step. Make sure that you enter the full path and add dynamic content between the parentheses. Quotation marks are required. For example, enter "/msdyn_projects(ADD DYNAMIC CONTENT)".
- msdyn_subject – Any task name.
- msdyn_projectbucket@odata.bind – The project bucket that contains the tasks. The value is dynamic content that comes from the response of the "Create Bucket" step. Make sure that you enter the full path and add dynamic content between the parentheses. Quotation marks are required. For example, enter "/msdyn_projectbuckets(ADD DYNAMIC CONTENT)".
- msdyn_start – Dynamic content for the start date. For example, tomorrow is represented as "addDays(utcNow(), 1)".
- msdyn_scheduledstart – The scheduled start date. For example, tomorrow is represented as "addDays(utcNow(), 1)".
- msdyn_scheduleend – The scheduled end date. Select a date in the future. For example, specify "addDays(utcNow(), 5)".
- msdyn_LinkStatus – The link to the billing setup. For example, enter "192350000" if there's no link to the billing setup or "192350001" if the billing setup is linked.
Step 13: Create a resource assignment
In the flow, select Add an action.
In the Choose an operation dialog box, in the search field, enter Append to Array.
In the step, select the ellipsis (…), and then select Rename.
Rename the step Add Assignment to Array.
In the Name field, select Tasks and Assignments.
In the Value field, enter the following parameter information.
{
    "@@odata.type": "Microsoft.Dynamics.CRM.msdyn_resourceassignment",
    "msdyn_resourceassignmentid": "@{guid()}",
    "msdyn_name": "ScheduleAPIDemoAssign1",
    "msdyn_taskid@odata.bind": "/msdyn_projecttasks(@{variables('msdyn_projecttaskid')})",
    "msdyn_projectteamid@odata.bind": "/msdyn_projectteams(@{outputs('Create_Team_Member')?['body/TeamMemberId']})",
    "msdyn_projectid@odata.bind": "/msdyn_projects(@{outputs('Create_Project')?['body/ProjectId']})"
}
Step 14: Decrement a variable
- In the flow, select Add an action.
- In the Choose an operation dialog box, in the search field, enter decrement variable. Then, on the Actions tab, select the operation in the list of results.
- In the Name field, select number of tasks.
- In the Value field, enter 1.
Step 15: Add Tasks and Assignments to the Operation Set
- In the flow, select New step.
- In the Choose an operation dialog box, in the search field, enter perform unbound action. Then, on the Actions tab, select the operation in the list of results.
- In the step, select the ellipsis (…), and then select Rename.
- Rename the step Add Tasks and Assignments to Operation Set.
- In the Action Name field, select msdyn_PssCreateV2.
- For the OperationSetId field, select msdyn_CreateOperationSetV1Response OperationSetId in the Dynamic content dialog box.
- In the EntityCollection field, select Switch Input to Entire Array.
- For the EntityCollection field, select Tasks and Assignments in the Dynamic content dialog box.
Step 16: Run an Operation Set
- In the flow, select New step.
- In the Choose an operation dialog box, in the search field, enter perform unbound action. Then, on the Actions tab, select the operation in the list of results.
- In the step, select the ellipsis (…), and then select Rename.
- Rename the step Execute Operation Set.
- In the Action Name field, select msdyn_ExecuteOperationSetV1.
- For the OperationSetId field, select msdyn_CreateOperationSetV1Response OperationSetId in the Dynamic content dialog box.