Note
Access to this page requires authorization. You can try signing in or changing directories.
Access to this page requires authorization. You can try changing directories.
Applies To: Project Operations Integrated with ERP, Project Operations Core
This article describes a sample flow that shows how to use schedule API V3 version to create a complete project plan by using Microsoft Power Automate, and how to create, update, and delete schedulable entities. The example shows how to create a project, project team members, project tasks, and resource assignments, update project record, and delete existing resource assignments. This article shows how to use V3 API to perform multiple operations in a single step.
Schedule API V3 Functioning and Capabilities
The V3 version of the Schedule API serves as a wrapper for the existing V2 APIs. Instead of requiring users to create an operation set, load data, and execute the operation set through separate APIs, V3 consolidates these steps into a single API call to reduce multiple network requests. This version supports create, update, and delete operations within one request. Internally, the API creates an operation set, stages the specified changes, and executes the operation set. Delete operations are processed first, followed by create operations, and finally update operations.
Assumptions
This article assumes that you have a basic knowledge of the Microsoft Dataverse platform, cloud flows, and the Project Schedule API.
Here's a complete list of the steps to create the sample flow in this article:
- Create a PowerApps trigger
- Create a project
- Retrieve default bucket
- Create generic team members
- Initialize required variables
- Prepare task and assignment payload
- Create tasks and assignments using Schedule API V3
- Add delay for operation set to complete
- Initialize variables for the next operation
- Delete assignments
- Create new assignments
- Update tasks
- Reassign tasks from team member A to team member B and update task names using Schedule API V3
Create a flow
Select an environment
To create the Power Automate flow in your environment, follow these steps:
- Go to https://flow.microsoft.com, and use your administrator credentials to sign in.
- In the upper-right corner, select Environments.
- In the list, select the environment where Dynamics 365 Project Operations is installed.
Create a solution
Follow these steps to create a solution-aware flow. By creating a solution-aware flow, you can more easily export the flow to use it later.
To create a solution, follow these steps:
- On the navigation pane, select Solutions.
- On the Solutions page, select New solution.
- In the New solution dialog box, set the required fields, and then select Create.
Step 1: Create a PowerApps trigger
To create a PowerApps trigger, follow these steps:
- On the Solutions page, select the solution that you created, and then select New.
- In the left pane, select Cloud flows > Automation > Cloud flow > Instant.
- In the Flow name field, enter Schedule API Demo Flow.
- In the Choose how to trigger this flow list, select Microsoft Power Apps. When you create a Power Apps trigger, you define the logic. For the example in this article, leave the input parameters blank for testing purposes.
- Select Create.
Step 2: Create a project
To create a sample project, follow these steps:
In the flow that you created, select New step.
In the Choose an operation dialog box, enter perform unbound action in the search field. On the Actions tab, select the operation in the list of results.
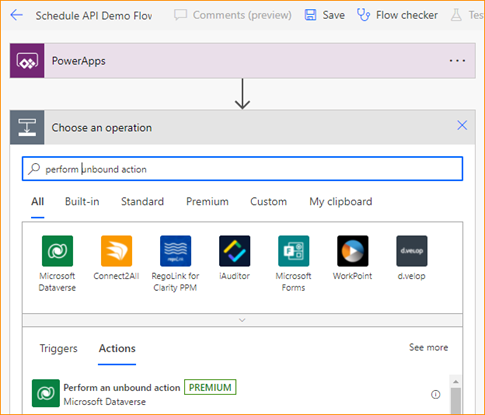
In the new step, select the ellipsis (…), and then select Rename.
Rename the step Create Project.
In the Action Name field, select msdyn_CreateProjectV1.
Under the msdyn_subject field, select Add dynamic content.
On the Expression tab, in the function field, enter concat('Project name - ',utcNow()).
Select OK.
Step 3: Retrieve default bucket
To retrieve the default bucket, follow these steps:
In the flow, select New step.
In the Choose an operation dialog box, in the search field, enter List rows. Then, on the Actions tab, select the operation in the list of results.
In the new step, select the ellipsis (…), and then select Rename.
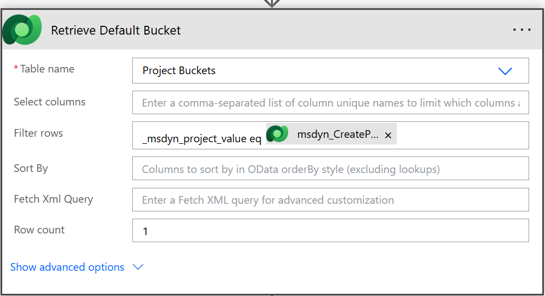
Rename the step Retrieve Default Bucket.
In the Table name field, select Project Buckets.
In the Filter rows field, enter _msdyn_project_value eq @{outputs('Create_Project')?['body/ProjectId']}.
In the Row count field, enter 1.
Step 4: Create generic team members
To create generic team members, follow the steps in each of the following sections:
- Step 4.1: Init Team Member Create Action Name
- Step 4.2: Create a generic team member A
- Step 4.3: Create a generic team member B
Step 4.1: Init Team Member Create Action Name
To initialize the team member create action name, follow these steps:
- In the flow, select New step.
- In the Choose an operation dialog box, in the search field, enter Initialize variable. Then, on the Actions tab, select the operation in the list of results.
- In the new step, select the ellipsis (…), and then select Rename.
- Rename the step Init Team Member Create Action Name.
- In the Name field, enter TeamMemberAction.
- In the Type field, select String.
- In the Value field, enter msdyn_CreateTeamMemberV1.
Step 4.2: Create a generic team member A
To create a generic team member A, follow these steps:
- In the flow, select New step.
- In Choose an operation, enter perform unbound action in the search field. Then, on the Actions tab, select the operation in the list of results.
- In the new step, select the ellipsis (…), and then select Rename.
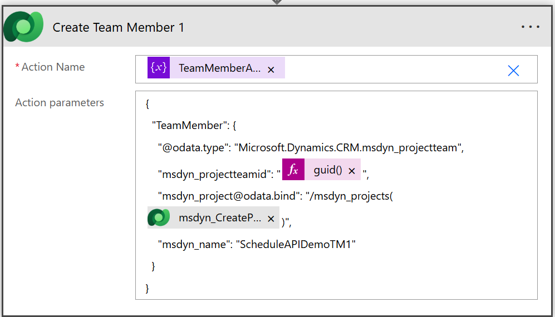
- Rename the step Create Team Member A.
- For the Action Name field, select TeamMemberAction in the Dynamic content dialog box.
- In the Action Parameters field, enter the following parameter information.
{
  "TeamMember": {
    "@@odata.type": "Microsoft.Dynamics.CRM.msdyn_projectteam",
    "msdyn_projectteamid": "@{guid()}",
    "msdyn_project@odata.bind": "/msdyn_projects(@{outputs('Create_Project')?['body/ProjectId']})",
    "msdyn_name": "ScheduleAPIDemoTM1"
  }
}
Step 4.3: Create a generic team member B
To create a generic team member B, follow these steps:
- In the flow, select New step.
- In Choose an operation, enter perform unbound action in the search field. Then, on the Actions tab, select the operation in the list of results.
- In the new step, select the ellipsis (…), and then select Rename.
- Rename the step Create Team Member B.
- For the Action Name field, select TeamMemberAction in the Dynamic content dialog box.
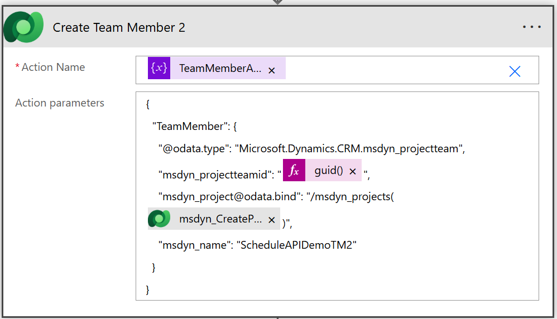
- In the Action Parameters field, enter the following parameter information.
{
  "TeamMember": {
    "@@odata.type": "Microsoft.Dynamics.CRM.msdyn_projectteam",
    "msdyn_projectteamid": "@{guid()}",
    "msdyn_project@odata.bind": "/msdyn_projects(@{outputs('Create_Project')?['body/ProjectId']})",
    "msdyn_name": "ScheduleAPIDemoTM2"
  }
}
Step 5: Initialize required variables
To initialize required fields, follow the steps in each of the following sections:
- Step 5.1: Initialize the task ID
- Step 5.2: Initialize the assignment ID
- Step 5.3: Initialize the payload array
- Step 5.4: Initialize the task IDs
- Step 5.5: Initialize the assignment IDs
- Step 5.6: Initialize the number of tasks
Step 5.1: Initialize the task ID
To initialize the task ID, follow these steps:
- In the flow, select New step.
- In the Choose an operation dialog box, enter Initialize variable in the search field. Then, on the Actions tab, select the operation in the list of results.
- In the new step, select the ellipsis (…), and then select Rename.
- Rename the step Init Task Id.
- In the Name field, enter task id.
- In the Type field, select String.
- For the Value field, enter guid() in the expression builder.
Step 5.2: Initialize the assignment ID
To initialize the assignment ID, follow these steps:
- In the flow, select New step.
- In the Choose an operation dialog box, enter Initialize variable in the search field. Then, on the Actions tab, select the operation in the list of results.
- In the new step, select the ellipsis (…), and then select Rename.
- Rename the step Init Assignment Id.
- In the Name field, enter assignment id.
- In the Type field, select String.
- For the Value field, enter guid() in the expression builder.
Step 5.3: Initialize the payload array
To initialize the payload array, follow these steps:
- In the flow, select New step.
- In the Choose an operation dialog box, enter Initialize variable in the search field. Then, on the Actions tab, select the operation in the list of results.
- In the new step, select the ellipsis (…), and then select Rename.
- Rename the step Init Payload Array.
- In the Name field, enter tasks and assignments.
- In the Type field, select Array.
- For the Value field, enter empty in the expression builder.
Step 5.4: Initialize the task IDs
To initialize the task IDs, follow these steps:
- In the flow, select New step.
- In the Choose an operation dialog box, enter Initialize variable in the search field. Then, on the Actions tab, select the operation in the list of results.
- In the new step, select the ellipsis (…), and then select Rename.
- Rename the step Init Task Ids.
- In the Name field, enter task ids.
- In the Type field, select Array.
- For the Value field, enter empty in the expression builder.
Step 5.5: Initialize the assignment IDs
To initialize the assignment IDs, follow these steps:
- In the flow, select New step.
- In the Choose an operation dialog box, enter Initialize variable in the search field. Then, on the Actions tab, select the operation in the list of results.
- In the new step, select the ellipsis (…), and then select Rename.
- Rename the step Init Assignment Ids.
- In the Name field, enter assignment ids.
- In the Type field, select Array.
- For the Value field, enter empty in the expression builder.
Step 5.6: Initialize the number of tasks
To initialize the number of tasks, follow these steps:
- In the flow, select New step.
- In the Choose an operation dialog box, enter Initialize variable in the search field. Then, on the Actions tab, select the operation in the list of results.
- In the new step, select the ellipsis (…), and then select Rename.
- Rename the step Init Number of Tasks.
- In the Name field, enter number of tasks.
- In the Type field, select Integer.
- For the Value field, enter 5 in the expression builder.
Step 6: Prepare the task and assignment payload
To prepare the task and assignment payload, follow the steps in each of the following sections:
- Step 6.1: Add the do until loop
- Step 6.2: Set the task ID
- Step 6.3: Add a task ID to the list
- Step 6.4: Set the assignment ID
- Step 6.5: Add an assignment ID to the list
- Step 6.6: Add a task to the payload array
- Step 6.7: Add assignments to the payload array
- Step 6.8: Create a decrement variable
Step 6.1: Add the do until loop
To add the do until loop, follow these steps:
In the flow, select New step.
In the Choose an operation dialog box, in the search field, enter do until. Then, on the Actions tab, select the operation in the list of results.
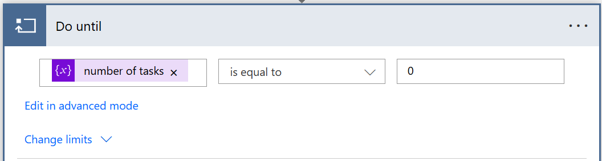
Set the first value in the conditional statement to the number of tasks variable from the Dynamic content dialog box.
Set the condition to less than or equal to*.
Set the second value in the conditional statement to 0.
Step 6.2: Set the task ID
To set the task ID, follow these steps:
- In the flow, select New step.
- In the Choose an operation dialog box, in the search field, enter set variable. Then, on the Actions tab, select the operation in the list of results.
- In the new step, select the ellipsis (…), and then select Rename.
- Rename the step Set Task ID.
- In the Name field, select task id.
- For the Value field, enter guid() in the expression builder.
Step 6.3: Add a task ID to the list
To add a task ID to the list, follow these steps:
- In the flow, select New step.
- In the Choose an operation dialog box, in the search field, enter Append to array variable. Then, on the Actions tab, select the operation in the list of results.
- In the new step, select the ellipsis (…), and then select Rename.
- Rename the step Add Task ID to List.
- In the Name field, select task ids.
- For the Value field, enter task id from the Dynamic content dialog box.
Step 6.4: Set the assignment ID
To set the assignment ID, follow these steps:
- In the flow, select New step.
- In the Choose an operation dialog box, in the search field, enter set variable. Then, on the Actions tab, select the operation in the list of results.
- In the new step, select the ellipsis (…), and then select Rename.
- Rename the step Set Assignment ID.
- In the Name field, select assignment id.
- For the Value field, enter guid() in the expression builder.
Step 6.5: Add an assignment ID to the list
To add an assignment ID to the list, follow these steps:
- In the flow, select New step.
- In the Choose an operation dialog box, in the search field, enter Append to array variable. Then, on the Actions tab, select the operation in the list of results.
- In the new step, select the ellipsis (…), and then select Rename.
- Rename the step Add Assignment ID to List.
- In the Name field, select assignment ids.
- For the Value field, enter assignment id from the Dynamic content dialog box.
Step 6.6: Add a task to the payload array
To add a task to the payload array, follow these steps:
- In the flow, select New step.
- In the Choose an operation dialog box, in the search field, enter Append to array variable. Then, on the Actions tab, select the operation in the list of results.
- In the new step, select the ellipsis (…), and then select Rename.
- Rename the step Add Task to Payload Array.
- In the Name field, select tasks and assignments.
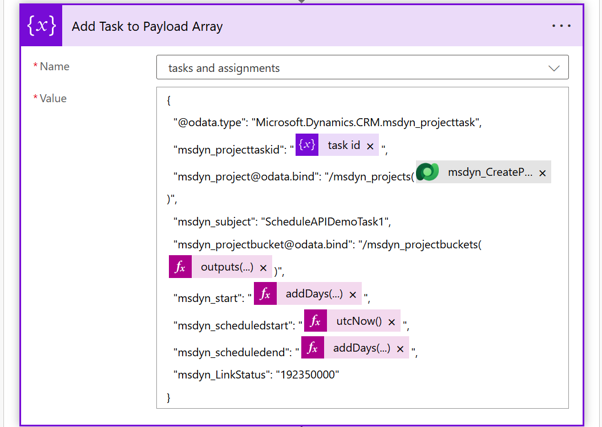
- For the Value field, enter.
{
  "@@odata.type": "Microsoft.Dynamics.CRM.msdyn_projecttask",
  "msdyn_projecttaskid": "@{variables('task id')}",
  "msdyn_project@odata.bind": "/msdyn_projects(@{outputs('Create_Project')?['body/ProjectId']})",
  "msdyn_subject": "ScheduleAPIDemoTask1",
  "msdyn_projectbucket@odata.bind": "/msdyn_projectbuckets(@{outputs('Retrieve_Default_Bucket')?['body/value'][0]['msdyn_projectbucketid']})",
  "msdyn_start": "@{addDays(utcNow(), 1)}",
  "msdyn_scheduledstart": "@{utcNow()}",
  "msdyn_scheduledend": "@{addDays(utcNow(), 5)}",
  "msdyn_LinkStatus": "192350000"
}
Step 6.7: Add assignments to the payload array
To add assignments to the payload array, follow these steps:
- In the flow, select New step.
- In the Choose an operation dialog box, in the search field, enter Append to array variable. Then, on the Actions tab, select the operation in the list of results.
- In the new step, select the ellipsis (…), and then select Rename.
- Rename the step Add Assignment to Payload Array.
- In the Name field, select tasks and assignments.
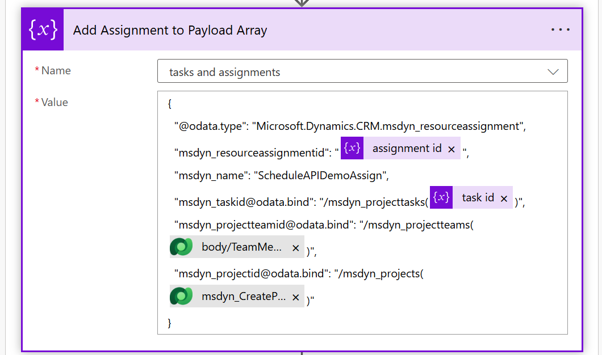
- For the Value field, enter.
{
  "@@odata.type": "Microsoft.Dynamics.CRM.msdyn_resourceassignment",
  "msdyn_resourceassignmentid": "@{variables('assignment id')}",
  "msdyn_name": "ScheduleAPIDemoAssign",
  "msdyn_taskid@odata.bind": "/msdyn_projecttasks(@{variables('task id')})",
  "msdyn_projectteamid@odata.bind": "/msdyn_projectteams(@{outputs('Create_Team_Member_1')?['body/TeamMemberId']})",
  "msdyn_projectid@odata.bind": "/msdyn_projects(@{outputs('Create_Project')?['body/ProjectId']})"
}
Step 6.8: Create a decrement variable
To create a decrement variable, follow these steps:
- In the flow, select New step.
- In the Choose an operation dialog box, in the search field, enter decrement variable. Then, on the Actions tab, select the operation in the list of results.
- In the new step, select the ellipsis (…), and then select Rename.
- Rename the step Decrement Variable.
- In the Name field, select number of tasks.
- For the Value field, enter 1.
Step 7: Create tasks and assignments with schedule API V3
To create tasks and assignments with schedule API V3, follow these steps:
In the flow, select New step.
In the Choose an operation dialog box, in the search field, enter Perform unbound action. Then, on the Actions tab, select the operation in the list of results.
In the new step, select the ellipsis (…), and then select Rename.
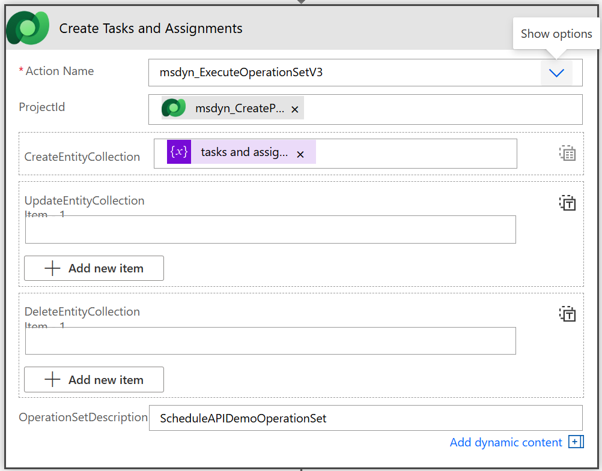
Rename the step Create Tasks and Assignments.
For the Action Name field, select msdyn_ExecuteOperationSetV3.
In the ProjectId field, enter @outputs('Create_Project')?['body/ProjectId'] from Expression dialog box.
In the OperationSetDescription field, enter ScheduleAPIDemoOperationSet.
In the CreateEntityCollection field, select Switch Input to Entire Array.
For the CreateEntityCollection field, select tasks and assignments in the Dynamic content dialog box.
Step 8: Add delay for operation set to complete
To add delay for operation set to complete, follow these steps:
- In the flow, select New step.
- In the Choose an operation dialog box, in the search field, enter Delay. Then, on the Actions tab, select the operation in the list of results.
- In the new step, select the ellipsis (…), and then select Rename.
- Rename the step Add Delay For Operation Set to Complete.
- In the Count field, enter 20.
- In the Unit field, select Second.
Step 9: Initialize the variables for the next operation
To initialize the variables for the next operation, follow the steps in each of the following sections:
- Step 9.1: Initialize create records
- Step 9.2: Initialize update records
- Step 9.3: Initialize delete records
Step 9.1: Initialize create records
To initialize create records, follow these steps:
- In the flow, select New step.
- In the Choose an operation dialog box, enter Initialize variable in the search field. Then, on the Actions tab, select the operation in the list of results.
- In the new step, select the ellipsis (…), and then select Rename.
- Rename the step Init Create Records.
- In the Name field, enter create records.
- In the Type field, select Array.
- Keep the Value field empty.
Step 9.2: Initialize update records
To initialize update records, follow these steps:
- In the flow, select New step.
- In the Choose an operation dialog box, enter Initialize variable in the search field. Then, on the Actions tab, select the operation in the list of results.
- In the new step, select the ellipsis (…), and then select Rename.
- Rename the step Init Update Records.
- In the Name field, enter update records.
- In the Type field, select Array.
- Keep the Value field empty.
Step 9.3: Initialize delete records
To initialize delete records, follow these steps:
- In the flow, select New step.
- In the Choose an operation dialog box, enter Initialize variable in the search field. Then, on the Actions tab, select the operation in the list of results.
- In the new step, select the ellipsis (…), and then select Rename.
- Rename the step Init Delete Records.
- In the Name field, enter delete records.
- In the Type field, select Array.
- Keep the Value field empty.
Step 10: Delete assignments
To delete assignments, follow the steps in each of the following sections:
- Step 10.1: Prepare the assignments to delete
- Step 10.2: Add the assignments to delete
Step 10.1: Prepare the assignments to delete
To prepare the assignments to delete, follow these steps:
- In the flow, select New step.
- In the Choose an operation dialog box, in the search field, enter Apply to each. Then, on the Actions tab, select the operation in the list of results.
- In the new step, select the ellipsis (…), and then select Rename.
- Rename the step Prepare assignments to delete.
- In the “Select an output from previous steps” field, select assignment ids from the Dynamic content dialog box.
Step 10.2: Add the assignments to delete
To add the assignments to delete, follow these steps:
- In the flow, select New step.
- In the Choose an operation dialog box, in the search field, enter Append to array. Then, on the Actions tab, select the operation in the list of results.
- In the new step, select the ellipsis (…), and then select Rename.
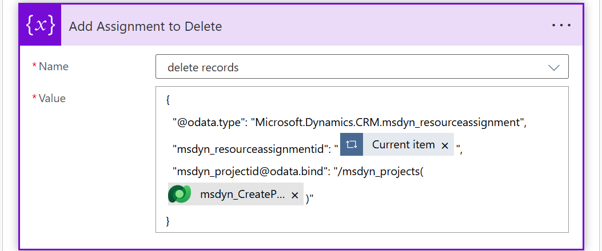
- Rename the step Add Assignments to Delete.
- In the Name field, select delete records.
- For the Value field, enter.
{
  "@@odata.type": "Microsoft.Dynamics.CRM.msdyn_resourceassignment",
  "msdyn_resourceassignmentid": "@{items('Prepare_Assignments_to_Delete')}",
  "msdyn_projectid@odata.bind": "/msdyn_projects(@{outputs('Create_Project')?['body/ProjectId']})"
}
Step 11: Create new assignments
To create new assignments, follow the steps in each of the following sections:
- Step 11.1: Prepare the new assignments to create
- Step 11.2: Add the new assignments to create
Step 11.1: Prepare the new assignments to create
To prepare the new assignments to create, follow these steps:
- In the flow, select New step.
- In the Choose an operation dialog box, in the search field, enter Apply to each. Then, on the Actions tab, select the operation in the list of results.
- In the new step, select the ellipsis (…), and then select Rename.
- Rename the step Prepare New Assignments to Create.
- In the “Select an output from previous steps” field, select task ids from the Dynamic content dialog box.
Step 11.2: Add the new assignments to create
To add the new assignments to create, follow these steps:
- In the flow, select New step.
- In the Choose an operation dialog box, in the search field, enter Append to array. Then, on the Actions tab, select the operation in the list of results.
- In the new step, select the ellipsis (…), and then select Rename.
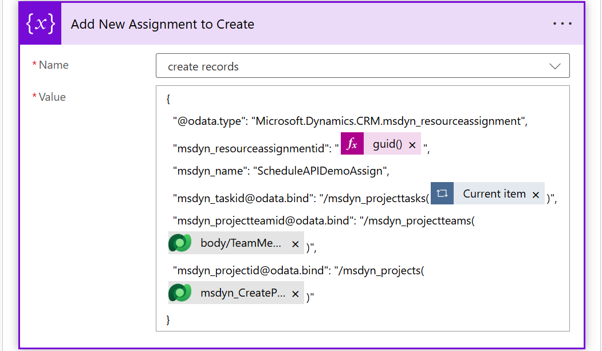
- Rename the step Add New Assignments to Create.
- In the Name field, select create records.
- For the Value field, enter.
{
  "@@odata.type": "Microsoft.Dynamics.CRM.msdyn_resourceassignment",
  "msdyn_resourceassignmentid": "@{guid()}",
  "msdyn_name": "ScheduleAPIDemoAssign",
  "msdyn_taskid@odata.bind": "/msdyn_projecttasks(@{items('Prepare_New_Assignments_to_Create')})",
  "msdyn_projectteamid@odata.bind": "/msdyn_projectteams(@{outputs('Create_Team_Member_2')?['body/TeamMemberId']})",
  "msdyn_projectid@odata.bind": "/msdyn_projects(@{outputs('Create_Project')?['body/ProjectId']})"
}
Step 12: Update the tasks
To update the tasks, follow the steps in each of the following sections:
- Step 12.1: Prepare the tasks to update
- Step 12.2: Add the tasks to update
Step 12.1: Prepare the tasks to update
To prepare the tasks to update, follow these steps:
- In the flow, select New step.
- In the Choose an operation dialog box, in the search field, enter Apply to each. Then, on the Actions tab, select the operation in the list of results.
- In the new step, select the ellipsis (…), and then select Rename.
- Rename the step Prepare Tasks to Update.
- In the “Select an output from previous steps” field, select task ids from the Dynamic content dialog box.
Step 12.2: Add the tasks to update
To add the tasks to update, follow these steps:
- In the flow, select New step.
- In the Choose an operation dialog box, in the search field, enter Append to array. Then, on the Actions tab, select the operation in the list of results.
- In the new step, select the ellipsis (…), and then select Rename.
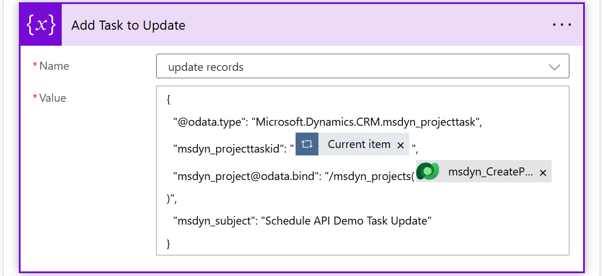
- Rename the step Add Tasks to Update.
- In the Name field, select update records.
- For the Value field, enter.
{
  "@@odata.type": "Microsoft.Dynamics.CRM.msdyn_projecttask",
  "msdyn_projecttaskid": "@{items('Prepare_Tasks_to_Update')}",
  "msdyn_project@odata.bind": "/msdyn_projects(@{outputs('Create_Project')?['body/ProjectId']})",
  "msdyn_subject": "Schedule API Demo Task Update"
}
Step 13: Reassign the tasks from team member A to team member B and update the task names by using Schedule API V3
To reassign the tasks from team member A to team member B and update the task names by using Schedule API V3, follow these steps:
In the flow, select New step.
In Choose an operation, enter perform unbound action in the search field. Then, on the Actions tab, select the operation in the list of results.
In the new step, select the ellipsis (…), and then select Rename.
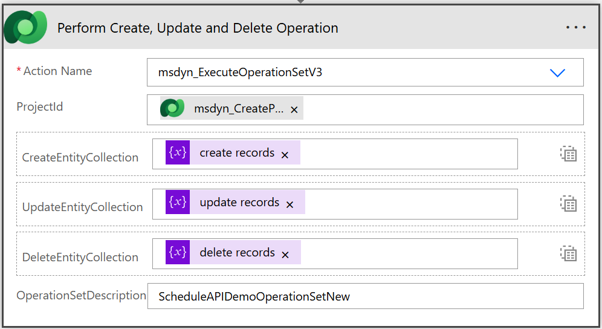
Rename the step Perform Create, Update and Delete Operation.
For the Action Name field, select msdyn_ExecuteOperationSetV3.
In the ProjectId field, enter @outputs('Create_Project')?['body/ProjectId'] from Expression dialog box.
In the OperationSetDescription field, enter ScheduleAPIDemoOperationSetNew.
In the CreateEntityCollection field, select Switch Input to Entire Array.
For the CreateEntityCollection field, select create records in the Dynamic content dialog box.
In the UpdateEntityCollection field, select Switch Input to Entire Array.
For the UpdateEntityCollection field, select update records in the Dynamic content dialog box.
In the DeleteEntityCollection field, select Switch Input to Entire Array.
For the DeleteEntityCollection field, select delete records in the Dynamic content dialog box.