Note
Access to this page requires authorization. You can try signing in or changing directories.
Access to this page requires authorization. You can try changing directories.
Customize the Add products dialog so that your sellers can see important product details while adding products to opportunity, quote, order, or invoice records in Dynamics 365 Sales.
What can you customize?
You can customize the following components of the Add product dialog to help sellers identify and add products quickly:
Add more columns to the products grid. More information: Add or remove columns in the grid
Add more attributes to the Product column. More information: Add or edit attributes in the Product column
Note
Attributes in the Product column help sellers get more information before choosing a product. So, if you want to add a category or product ID to help distinguish products from each other, add it to the Product column. On the other hand, if sellers need to perform an action after selecting a product—for example, choosing delivery priority (a custom attribute)—add that attribute to the grid.
Customize the fields to search. More information: Customize the fields to search
Add or remove columns in the grid
By default, the Add products dialog displays the following columns in the grid:
- Product name
- Unit
- Price per unit
- Quantity
You can add other columns that are relevant to your business by customizing the add products view. Depending on the Dynamics 365 Sales license you have, select one of the following tabs for specific information:
If you have the Sales Hub app, follow the instructions in this tab. Otherwise, follow the instructions in the Sales Professional tab to configure the option in Power Apps.
To add or remove columns in the grid
In the Sales Hub app, select the Change area icon
 in the lower-left corner of the page and then select App Settings.
Under Product Catalog, select Product Catalog Settings.
Turn on the Enhanced experience for adding products option, if you haven't already.
You see more options to customize the Add products dialog for opportunity, quote, invoice, and order.Select the add products view of the entity that you want to customize. For example, select Quote 'add products' view to customize the Add products dialog for quotes.
You're redirected to the corresponding view in Power Apps.Select View Column and then select the columns you want to add to the grid. Or, just drag-and-drop the columns into the grid.
To remove a column, select the column in the grid and select Remove.
Note
Though you can add filters to the view, they won't be applied to the Add products dialog. The dialog will always display all products.
Select Publish to save and publish the customizations. The changes are applicable to the Add products dialog of the selected entity.
Open the entity you customized. If you customized the add products view for quotes, open a quote and then select Add products. Verify whether the customizations to the grid are reflected in the dialog.
Add or edit attributes in the Product column
By default, the Product column in the Add product dialog includes the product name and ID. You can customize this column to add other attributes to help you better distinguish the products. For example, you can add the product category to differentiate products as shown in the following image:

Note: The Product column can display up to three attributes, apart from the product name.
Depending on the Dynamics 365 Sales license you have, select one of the following tabs for specific information:
If you have the Sales Hub app, follow the instructions in this tab. Otherwise, follow the instructions in the Sales Professional tab to configure the option in Power Apps.
To add or edit product attributes:
In the Sales Hub app, select the Change area icon
in the lower-left corner of the page and then select App Settings.Under Product Catalog, select Product Catalog Settings.
Turn on Enhanced experience for adding products, if you haven't already. You see more options for customizing the Add products dialog.
Select Customize Product lookup view. You're redirected to the Product Lookup View in Power Apps.
Select + View Column and then select the attributes you want to add. Or, just drag-and-drop the attributes into the grid.
To remove an attribute, select the attribute in the grid and select Remove.
Select Publish to save and publish the customizations. The changes are applicable to the Add products dialog of opportunity, quote, order, and invoice.
To verify the changes, open an opportunity and select Add products.
You see updated attributes in the Product column.
Customize the fields to search
By default, the search field in the Add products dialog searches the product name, ID, and description. You can expand the search to include other text-based fields too. For example, you can add the hierarchy path field to the search scope.
To customize the fields to search:
Open Power Apps and navigate to Tables in the left pane.
Search for the Product entity and open it.
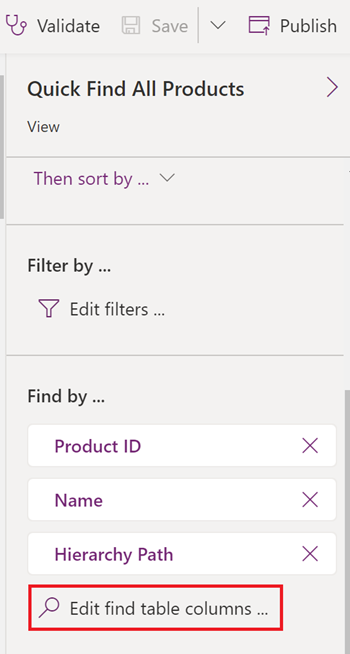
Select the Views tab and open the Quick Find All Products view.
In the right pane, go to the Find by section and select Edit find table columns. Select the fields you want to include in search.
Note
Select only the text-based fields.
Select Publish to save and publish changes to the view. The changes are applicable to the product search in the Add products dialog of opportunity, quote, order, and invoice.
To verify the changes, open an opportunity and select Add products.
Search for a keyword and verify whether the search is returning matches from the newly added fields.
Can't find the feature in your app?
There are a few possibilities:
- You don't have the necessary license to use this feature. Check out the comparison table and the licensing guide to see which features are available with your license.
- You don't have the necessary security role to use this feature.
- To configure or setup a feature, you need to have the Administration and customization roles
- To use sales-related features, you need to have the Primary sales roles
- Some tasks require specific Functional roles.
- Your administrator hasn't turned on the feature.
- Your organization is using a custom app. Check with your administrator for exact steps. The steps described in this article are specific to the out-of-the-box Sales Hub and Sales Professional apps.
Related information
Create a solution
Choose and configure columns in model-driven app views
Add products to an opportunity by using the enhanced experience
Add products to quotes, orders, or invoices