Customize column headers in the forecast grid
You can customize column headers in the forecast grid using Power Apps code components. For example, you can translate the column name or add a tooltip for additional context.
License and role requirements
| Requirement type | You must have |
|---|---|
| License | Dynamics 365 Sales Premium or Dynamics 365 Sales Enterprise More information: Dynamics 365 Sales pricing |
| Security roles | System administrator or customizer More information: Predefined security roles for Sales |
How to customize the header
Let's understand the customizations with an example. We'll add the French translation for the column names Forecast and Won in the forecast grid.
- Create a code component with the name
ColumnHeader - Create a resource file and add translations
- Implement the manifest
- Implement the component logic
- Build and package the component
Create a resource file and add translations
After you create the code component, the ColumnHeader folder is created in the path you've specified. Let's create a resource file and add the French translations in the resource file.
Create a folder named
stringsunder theColumnHeaderfolder.Copy the following code to a new file, ColumnHeader.1036.resx.
Note
The number 1036 in the file name is the language code for French. For a list of language codes, see this article.
<?xml version="1.0" encoding="utf-8"?>
<root>

  <xsd:schema id="root" xmlns="" xmlns:xsd="http://www.w3.org/2001/XMLSchema" xmlns:msdata="urn:schemas-microsoft-com:xml-msdata">
    <xsd:import namespace="http://www.w3.org/XML/1998/namespace" />
    <xsd:element name="root" msdata:IsDataSet="true">
      <xsd:complexType>
        <xsd:choice maxOccurs="unbounded">
          <xsd:element name="metadata">
            <xsd:complexType>
              <xsd:sequence>
                <xsd:element name="value" type="xsd:string" minOccurs="0" />
              </xsd:sequence>
              <xsd:attribute name="name" use="required" type="xsd:string" />
              <xsd:attribute name="type" type="xsd:string" />
              <xsd:attribute name="mimetype" type="xsd:string" />
              <xsd:attribute ref="xml:space" />
            </xsd:complexType>
          </xsd:element>
          <xsd:element name="assembly">
            <xsd:complexType>
              <xsd:attribute name="alias" type="xsd:string" />
              <xsd:attribute name="name" type="xsd:string" />
            </xsd:complexType>
          </xsd:element>
          <xsd:element name="data">
            <xsd:complexType>
              <xsd:sequence>
                <xsd:element name="value" type="xsd:string" minOccurs="0" msdata:Ordinal="1" />
                <xsd:element name="comment" type="xsd:string" minOccurs="0" msdata:Ordinal="2" />
              </xsd:sequence>
              <xsd:attribute name="name" type="xsd:string" use="required" msdata:Ordinal="1" />
              <xsd:attribute name="type" type="xsd:string" msdata:Ordinal="3" />
              <xsd:attribute name="mimetype" type="xsd:string" msdata:Ordinal="4" />
              <xsd:attribute ref="xml:space" />
            </xsd:complexType>
          </xsd:element>
          <xsd:element name="resheader">
            <xsd:complexType>
              <xsd:sequence>
                <xsd:element name="value" type="xsd:string" minOccurs="0" msdata:Ordinal="1" />
              </xsd:sequence>
              <xsd:attribute name="name" type="xsd:string" use="required" />
            </xsd:complexType>
          </xsd:element>
        </xsd:choice>
      </xsd:complexType>
    </xsd:element>
  </xsd:schema>
  <resheader name="resmimetype">
    <value>text/microsoft-resx</value>
  </resheader>
  <resheader name="version">
    <value>2.0</value>
  </resheader>
  <resheader name="reader">
    <value>System.Resources.ResXResourceReader, System.Windows.Forms, Version=4.0.0.0, Culture=neutral, PublicKeyToken=b77a5c561934e089</value>
  </resheader>
  <resheader name="writer">
    <value>System.Resources.ResXResourceWriter, System.Windows.Forms, Version=4.0.0.0, Culture=neutral, PublicKeyToken=b77a5c561934e089</value>
  </resheader>
  <data name="Forecast" xml:space="preserve">
    <value>Prévision</value>
  </data>
  <data name="Won" xml:space="preserve">
    <value>Gagné</value>
  </data>
</root>
In the above code sample, the column names for Forecast and Won are overridden with the French translations Prévision and Gagné respectively in the
<data>node.Note
In the
nameparameter, specify the exact column name that you've configured in the Layout step of the forecast.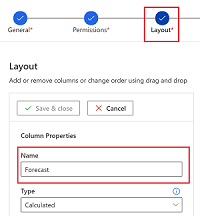
If you want to translate the column name into additional languages, create a resource file for each language that you want to translate into. Make sure that the resource file name uses the following naming convention:
filename.languagecode.resx
**Example file name for German:** ColumnHeader.1031.resx
Implement the manifest
Next, we'll modify the manifest file to specify the property that we're overriding. In our example, we're overriding the ColumnName property. We'll also specify the path to the resource file that contains the translated text.
Open the
ControlManifest.Input.XMLfile.Search for the
propertynode and replace it with the following code as-is:<property name="columnName" display-name-key="Property_Display_Key" description-key="Property_Desc_Key" of-type="SingleLine.Text" usage="bound" required="true" />Update the
<resources>node to specify the path to the resource file that includes the French translations:<resources> <code path="index.ts" order="1"/> <!-- UNCOMMENT TO ADD MORE RESOURCES <css path="css/ColumnHeader.css" order="1" /> --> <resx path="strings/ColumnHeader.1036.resx" version="1.0.0" /> </resources>The
<resx path>node contains the resource file path. In the preceding code sample, we've added the resource file for the French language. If you have translations for other languages, add the resource file path for those languages as well.
Implement the component logic
Let's add the code to implement the component logic in the index.ts file.
Open the
index.tsfile.Add the following lines in the
updateViewmethod:public updateView(context: ComponentFramework.Context<IInputs>): void { // Add code to update control view const colName = (context.parameters.columnName && context.parameters.columnName.raw) || ""; this._container.innerHTML = context.resources.getString(colName); }