Note
Access to this page requires authorization. You can try signing in or changing directories.
Access to this page requires authorization. You can try changing directories.
Activities in Dynamics 365 Sales help you build stronger customer relationships by creating a complete record of every interaction. When you log emails, phone calls, meetings, and tasks, your team can see the full context of your customer relationships, avoid duplicating efforts, and follow up more effectively.
For example, when you record a phone call with a prospect about pricing, that information is automatically attached to their record. Later, when a colleague opens the same prospect's account, they'll see that conversation and won't waste time covering the same ground again. The system automatically timestamps each activity and shows who created it, so your team always knows the latest status.
By tracking all your customer interactions—every email, phone call, task, and appointment—you create a complete history that your entire team can reference. This builds trust with customers and ensures no opportunity falls through the cracks.
Find your activities
Find your activities under My Work > Activities in the site map.
See activities in Kanban, Calendar, Focused, or Read-only Grid view
Note
- The Save As option is available only when your administrator adds one or more view types to the Activity grid through system customizations.
- To add the Kanban view to the Activity grid, see Add the Kanban control to Opportunity or Activity entities. By following the steps in the article, you can add other views such as Calendar and Pipeline view.
In the site map, select Activities.
On the command bar, select Show As and then choose the view type you want to see: Focused, Calendar, Kanban, or Read Only Grid.
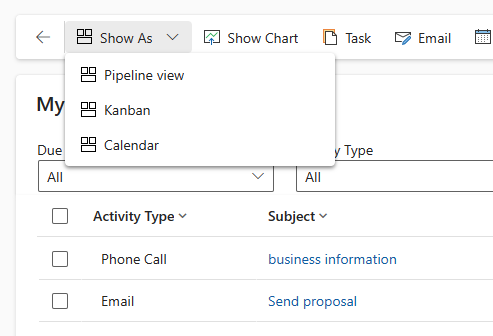
The following view types are supported for the Activity grid:
- Read Only Grid. Shows a list of all activities.
- Calendar. Shows a calendar with a list of the day's scheduled activities and the associated deals.
- Focused. Shows a filtered list of activities that are most relevant to you.
- Kanban. Shows a visual representation of your sales activities in their different states. This view lets you see the status of every activity in your pipeline and drag them to move from one status to another (for example, Open, Completed, Canceled, Scheduled). More information: Work with activities in the Kanban view
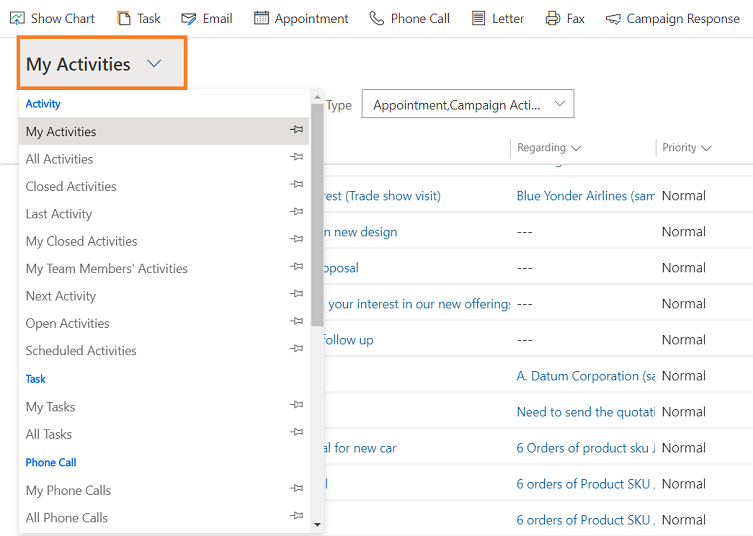
Change your activities view
Switch between different views to focus on the activities that matter most. You can view your own activities, your team's activities, or filter by other criteria.
In the site map, under My Work, select Activities.
From the Views dropdown, select the view you want to switch to.
Filter the list of activities
Filter the list of activities to see only the ones you're interested in. For example, you can further limit the activities you're seeing in a view by using the activity type filter. The activity type filter allows you to filter activities based on the type, such as email, task, phone call, and so on.
You can also use the Due filter to see the activities that are due in a specified time, such as activities that are due today or earlier or activities that are due in the next seven days or earlier.
Create or edit a new activity
You can create independent activities that aren't associated with any customer or sales record. To do so, in the site map, select Activities and then on the command bar, select Email, Phone Call, or Task, depending on which activity you want to create.
To edit an existing activity record, open the activity by selecting its title.
Add a new activity for a customer
Most often, you add an activity associated with a contact, opportunity, account, or other type of record to help you keep track of all the communication history you have with a customer. You can also add an activity for yourself.
As your organization's relationship with a customer builds over time, you and other people on your team can look through the activity feed as you work with the customer, and see the history of your interactions. You can also include activities in reports to track your ongoing progress.
To add an activity for a customer:
- Open the account record of the customer. Use Quick Search on the navigation bar to find a record quickly.
- Select Related > Activities.
- On the Activities page, select New Activity > Activity type.
- On the Quick Create pane, enter the necessary information and then select Save and Close.
Add an activity for yourself
Add a task or note for yourself when you want a reminder to do something personal, like schedule a doctor's appointment or attend a sporting event.
Otherwise, to keep a history of your interactions with a customer, add new activities that are associated with a customer's record, so those activities become part of the history that other people on your team can view.
To add an activity for yourself:
- In the site map, under My Work, select Activities.
- On the command bar, select the type of activity you want to add, such as Task or Email.
- Fill in the fields and then select Save and Close.
Attach a document
You can attach documents, spreadsheets, pictures, and just about any type of file to emails and notes.
To attach a document to an email:
- Open the email form.
- On the command bar, select Attach File.
- Browse to and then select the file that you want to attach.
The selected file appears in the Attachment pane.
To attach a document to a note:
- In the Timeline pane, select + and then select Note.
- Add the note and select the attachment icon before the Add note button.
- Browse to and then select the file that you want to attach.
The selected file appears above the Add note button.
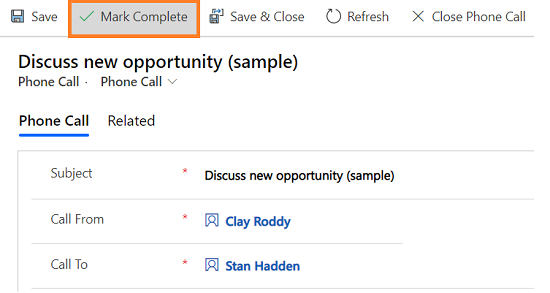
Mark an activity complete
After you call someone, complete a task, send an email, or go to an appointment, mark the activity for that action as completed.
Open the activity.
On the command bar, select Mark Complete.
Mark several activities complete at the same time
- On the list of activities, select all the activities that you want to mark complete.
- On the command bar, select Mark Complete.
Best practices for activities
Here are some suggestions about how to use activities to your organization's best advantage:
Add an activity for every customer interaction. Make sure a customer's history includes a record of every communication you have with them.
Use the right activity type for the action. It might be tempting to enter a new note that says, "Sent an email to confirm pricing," or "Called the customer to discuss their service case." However, you should add an email or phone call activity to track those types of actions, and use notes for more general text.
Add activities for yourself, too. You can keep track of your own assignments, events, and notes without associating these activities with a customer.
Use the Create command on the navigation bar. Find these activities in the list by sorting on the Regarding column, which is blank to let you know that the activity isn't associated with a customer record.
Keep in mind that activities "roll up" under their associated records. Let's say you want to remind yourself to follow up with Cecil Langer, a contact who's associated with the account, Wingtip Toys. You need to add the task activity to the contact record for Cecil (not for the account, Wingtip Toys).
That way, your task automatically "rolls up" under the account, and you and other people on your team see the task when they're looking at the contact and when they're looking at the account for Wingtip Toys. (And they know you've got it handled.)
Can't find the feature in your app?
There are a few possibilities:
- You don't have the necessary license to use this feature. Check out the comparison table and the licensing guide to see which features are available with your license.
- You don't have the necessary security role to use this feature.
- To configure or setup a feature, you need to have the Administration and customization roles
- To use sales-related features, you need to have the Primary sales roles
- Some tasks require specific Functional roles.
- Your administrator hasn't turned on the feature.
- Your organization is using a custom app. Check with your administrator for exact steps. The steps described in this article are specific to the out-of-the-box Sales Hub and Sales Professional apps.