Set seller attributes and capacity
Assignment rules can assign new leads, opportunities, and insights to your sellers based on their availability, capacity, and personal or organizational attributes.
This article covers how to define your sales team's attributes and capacity. If you turn on seller availability, sellers can set their own work hours. You can also set their availability yourself.
Segments and assignment rules are part of the work assignment feature. Work assignment is available in sales accelerator version 9.1.23074.10021 and is rolling out in phases in different regions. Learn more about work assignment.
License and role requirements
| Requirement type | You must have |
|---|---|
| License | Dynamics 365 Sales Premium, Dynamics 365 Sales Enterprise, or Microsoft Relationship Sales |
| Security roles | System Administrator, Sequence Manager, or Sales Manager |
Prerequisites
Make sure the sellers whose attributes and capacity you intend to set are in the security roles that assignment rules can automatically assign records to.
Seller attributes
Define the attributes that you want your assignment rules to consider when they evaluate sellers to assign to new leads and opportunities. For example, you might want to create an attribute that lets you assign sellers based on the languages they speak.
Create an attribute
You can set the value of an attribute either by getting it from Dynamics 365 or by entering it manually.
Sign in to your Sales Hub app.
In the lower-left corner of the page, select Change area > Sales Insights settings.
Under Sales accelerator, select Work assignment.
Select Settings.
In the Seller attributes section, select Manage
If this attribute is the first one you're creating, select Add attribute. If you already have at least one attribute defined, select + New seller attribute.
Enter a meaningful Seller attribute name.
Under Set attribute values, select whether to get the values from Dynamics 365 or enter them manually.
To get the values from Dynamics 365, select Pull from a data field.
Select a field that's associated with leads, opportunities, or both leads and opportunities (mutual fields).
The possible values of the field are listed under the field name. To remove one from consideration, select the X to the right of the value. If you remove one accidentally, select the field again to reset the list.
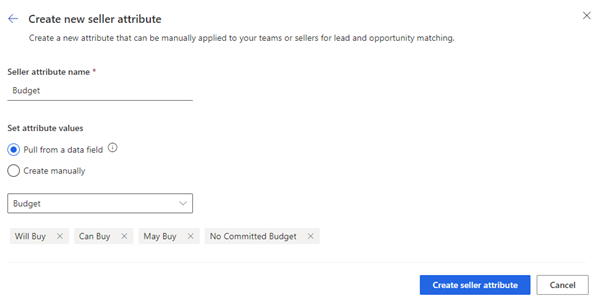
To enter the attribute values yourself, select Create manually.
Type each value separately, pressing Enter after each one.
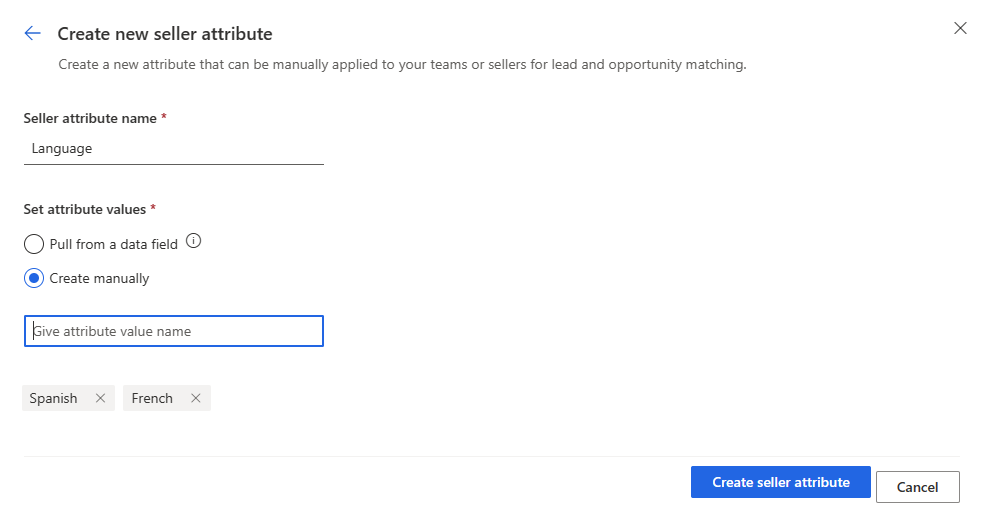
Select Create seller attribute.
Edit an attribute
You can't change where an attribute gets its values. To change an attribute with manually entered values to one that gets its values from Dynamics 365 or vice versa, or to change which field the values are pulled from, you need to delete it and create it again. However, you can change an attribute's values and its name.
Sign in to your Sales Hub app.
In the lower-left corner of the page, select Change area > Sales Insights settings.
Under Sales accelerator, select Work assignment.
Select Settings.
In the Seller attributes section, select Manage
Select the pencil icon next to the attribute you want to edit.
Change what you need to. You can always rename an attribute. The changes you can make to its values depend on how the attribute was created.
If the Pull from a data field option is selected (although you can't change this), you can only remove values or restore the field's original values. You can't select a different field.
- To remove a value, select the X to the right of it.
- To reset the list of values, select the field again.
If the Create manually option is selected (although you can't change this), you can remove values and enter new ones.
- To remove a value, select the X to the right of it.
- To add a value, type it in the box and press Enter.
Select Update seller attribute.
Delete an attribute
Sign in to your Sales Hub app.
In the lower-left corner of the page, select Change area > Sales Insights settings.
Under Sales accelerator, select Work assignment.
Select Settings.
In the Seller attributes section, select Manage
Select the trashcan icon next to the attribute you want to delete, and then select Delete permanently.
Assign attributes and capacity to sellers
After you define the attributes you want your assignment rules to consider, you need to assign them to your sellers and sales teams. You can also instruct assignment rules to consider sellers' workload by setting their capacity.
In Dynamics 365 Sales, capacity is the number of leads and opportunities that a seller or a sales team can work on at one time. You can set a maximum capacity for each seller or sales team in your organization. Each seller's or sales team's available capacity is calculated by subtracting from their maximum capacity the number of leads and opportunity records that are assigned to them.
You can assign attributes and capacity to sellers one at a time or in groups.
Sign in to your Sales Hub app.
In the lower-left corner of the page, select Change area > Sales Insights settings.
Under Sales accelerator, select Work assignment.
Select Settings.
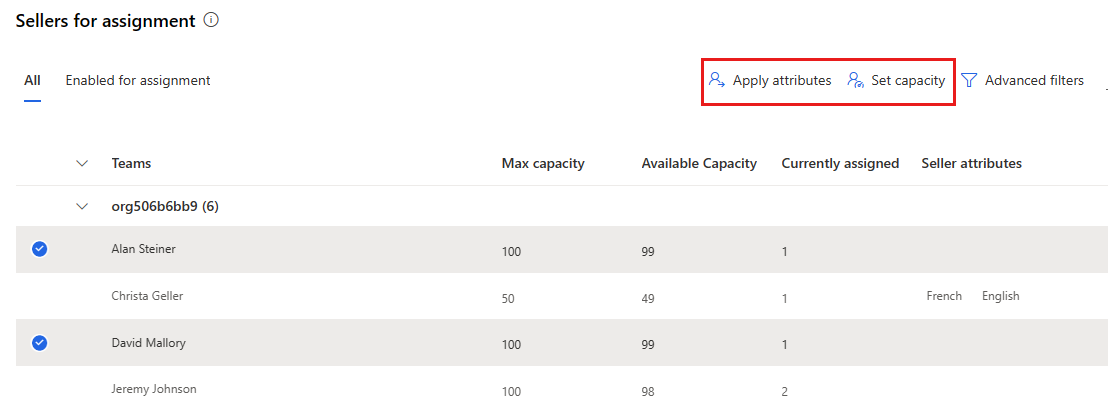
(Optional) If the list of sellers is long, use filters to focus on the ones you want.
Continue to set attributes and capacity for individual sellers or for groups of sellers.
Set attributes and capacity for individual sellers
Select the seller's name in the Sellers for assignment list.
Under Set maximum capacity of leads and opportunities for this seller, enter a number.
Although you can enter any number, you should enter a reasonable number of records the seller can work on at one time.
Under Apply attributes to this seller, select + Add attribute.
Select an attribute and the value or values to assign to the seller.
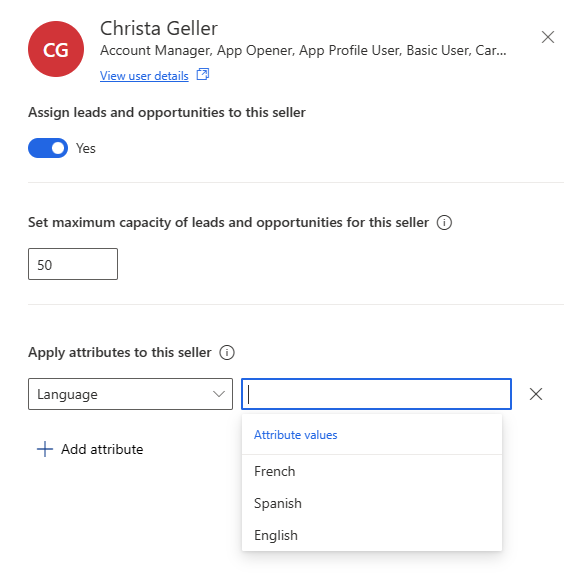
Select Save changes.
Set attributes and capacity for groups of sellers
Unlike with individual sellers, you apply attributes and set the maximum capacity for groups of sellers separately.
Apply attributes to a group of sellers
Select the sellers in the Sellers for assignment list.
Select Apply attributes.
Select + Add attribute, and then select an attribute and the value or values to assign.
Repeat for each attribute that applies to the selected sellers.
When you're finished, select Apply.
Set capacity for a group of sellers
Select the sellers in the Sellers for assignment list.
Select Set capacity.
Under Set the maximum capacity of leads and opportunities for these sellers, enter a number.
Although you can enter any number, you should enter a reasonable number of records the sellers can work on at one time.
Select Apply.
If the sellers previously had a different maximum capacity set, you're prompted to override the previous settings.
Shortlist sellers using search and advanced filters
If your organization has a large sales team, filter the list to make it easier to select the sellers you're interested in. You can perform a quick search to find a specific seller or a group of sellers, or use advanced filters to perform more complex searches.
Your filters last only as long as you're signed in to Sales Hub. You can't save them for reuse later.
Sign in to your Sales Hub app.
In the lower-left corner of the page, select Change area > Sales Insights settings.
Under Sales accelerator, select Work assignment.
Select Settings.
To quickly search for specific sellers, type a name or part of a name in the search box. For instance, al finds both Alan Steiner and David Mallory.
To further narrow the list or build more complex search criteria, select Advanced filters.
If you started with a quick search, the first row is filled in for you, as in the following example:
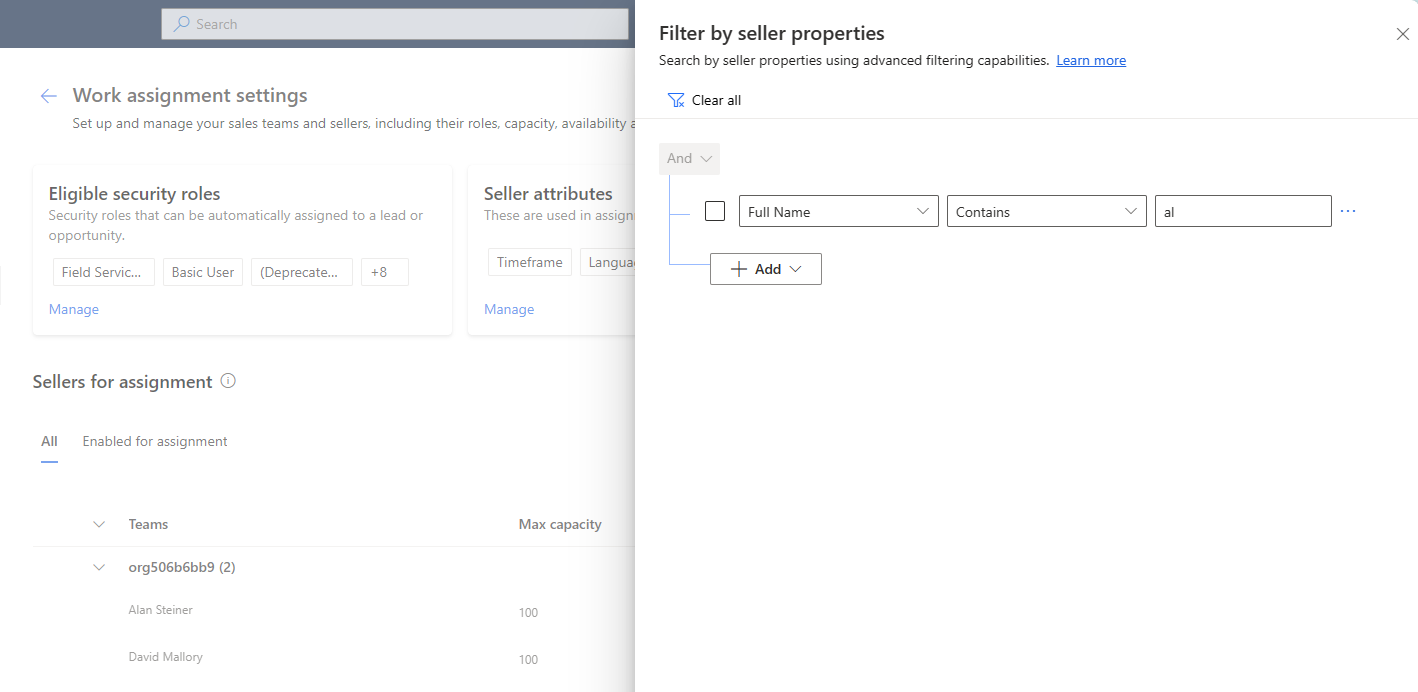
You can keep, change, or delete this row, as needed.
Select + Add, and then use the following options to build the conditions of the filter:
Add row: Add a condition. Select an attribute, an operator, and a value; for example, City Equals Seattle.
Add group: Add a group of conditions to filter the seller list using multiple attributes that are combined by And or Or. If you select And, sellers must meet all the conditions in the group. If you select Or, they can meet any condition in the group.
Add related entity: Add a condition that's based on the attributes of related tables. Select an attribute in the Related Entity list, then select Contains data or Does not contain data, and then define the condition.
Learn more about creating filters with grouped and nested conditions.
After you define all the filter criteria, select Apply.
Can't find the options in your app?
There are three possibilities:
- You don't have the necessary license or role.
- Your administrator hasn't turned on the feature.
- Your organization is using a custom app. Check with your administrator for exact steps. The steps described in this article are specific to the out-of-the-box Sales Hub and Sales Professional apps.
See also
Feedback
Coming soon: Throughout 2024 we will be phasing out GitHub Issues as the feedback mechanism for content and replacing it with a new feedback system. For more information see: https://aka.ms/ContentUserFeedback.
Submit and view feedback for