Note
Access to this page requires authorization. You can try signing in or changing directories.
Access to this page requires authorization. You can try changing directories.
This article describes how to enable and set up Supply risk assessment.
Configure thresholds
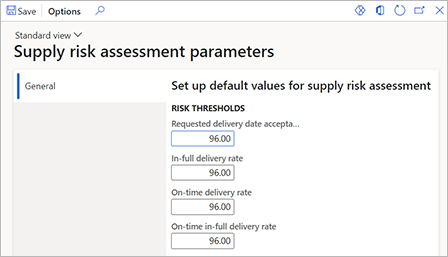
Use the following procedure to configure the feature by selecting the minimum rates that you want the system to apply when it calculates your supply risks.
Go to Procurement and sourcing > Setup > Supply risk assessment parameters.
On the General tab, set the following fields:
- Requested receipt date acceptance rate – Enter the minimum percentage of orders where vendors are expected to return a confirmed receipt date (CRD) that meets your requested receipt date (RRD).
- In-full delivery rate – Enter the minimum percentage of deliveries that are expected to arrive in full (IF).
- On-Time delivery rate – Enter the minimum percentage of deliveries that are expected to arrive on time (OT).
- On-time in-full delivery rate – Enter the minimum percentage of deliveries that are expected to arrive on time and in full (OTIF).
Each of these metrics is calculated as a rate within the relevant scope of analysis. Set the rates that you consider a risk for your business. By default, each rate threshold is set to 96 percent.

On the Action Pane, select Save.
Initialize workspace data and configure refresh options
When you first turn on and set up the feature, the Supply risk assessment workspace won't show any data. However, because the system periodically updates the data, the workspace will eventually show data. Alternatively, you can manually initialize or refresh the data as described in the following procedure.
Go to Procurement and sourcing > Workspaces > Supply risk assessment.
Note
You don't have to do anything the Supply risk assessment workspace right now. However, you must visit it at least once after you enable the feature, to make the required data cache configuration available.
Go to System administration > Setup > Data cache > Data set cache configuration.
On the Action Pane, select Edit.
In the grid, select the row where the Consumer field is set to VendSupplyRiskCacheDataSet, and set the following fields for it:
- Enabled – Select this checkbox to enable the system to keep the data in the Supply risk assessment workspace up to date. If you clear this checkbox, the data will never be updated.
- Refresh frequency (seconds) – Specify how often (in seconds) the system should refresh the data in the Supply risk assessment workspace.
- Manual refresh – Select this checkbox to enable the Refresh data button on the Data refresh status tile on the Supply risk assessment page. If you clear this checkbox, the button will still be shown, but it won't do anything.
On the Action Pane, select Save.
If you selected the Manual refresh checkbox and want to initialize or refresh the data in the Supply risk assessment workspace now, follow these steps:
- Go to Procurement and sourcing > Workspaces > Supply risk assessment.
- On the Overview tab, on the Data refresh status tile, select Refresh data.
Refresh the analytics entity store data used by Power BI reports
If you haven't been using purchase data for Power BI up to now, you might have to refresh this data and/or set it up so that it's automatically updated from now on. If this data hasn't been refreshed, your Power BI reports for supply risk assessment will show errors.
- Go to System administration > Setup > Entity store.
- In the list pane, find and select the record that is named Purchase cube.
- On the Action Pane, select Edit.
- Select Refresh to start the refresh process, which will take about 15 minutes.
- If you want to set up a scheduled refresh (recommended), set the Automatic refresh enabled option to Yes, and then set the Recurrence field to the desired refresh interval.