Note
Access to this page requires authorization. You can try signing in or changing directories.
Access to this page requires authorization. You can try changing directories.
[This article is prerelease documentation and is subject to change.]
After you install the Power Platform components, you must configure Supply Chain Management to expose the feature set, support approvals, and keep reporting and workflows running. These tasks connect the operational side of Supplier Engagement to the app and portal experiences. Completing them helps you avoid workflow failures, missing permissions, and incomplete supplier synchronization.
Prerequisites
Before you configure Supply Chain Management for Supplier Engagement, complete the prerequisites listed in Supplier Engagement deployment overview, prerequisites, and licensing.
Enable the Supplier Engagement feature
Turn on the feature in Feature management before you try to use Supplier Engagement capabilities in Supply Chain Management.
- Go to Workspaces > Feature management.
- If you don't see Supplier Engagement, select Check for updates.
- Select the Supplier Engagement feature, and then select Enable now.
Learn more in Feature management overview.
Enable batch processing for the user approval workflow
Workflow batch jobs must be active so that approval, notification, and due-date processing can continue in the background.
Go to System administration > Inquiries > Batch jobs.
Use the filter in the Job description column to find rows that contain Workflow.
Select the check box for each of the following jobs:
- Workflow message processing
- Workflow line-item notifications
- Workflow Maintenance
- Workflow due date processing
On the Action Pane, select Change status, and then change the status to Waiting.
Configure security roles
Supply Chain Management includes two standard security roles that support purchasers: Purchasing manager and Purchasing agent. The default versions of these roles might not include all the duties you need after you install Supplier Engagement. Affected functionality includes the abilities to:
- Create global vendors from Supply Chain Management and view party details
- Create replenishment orders
- Create inventory ownership change journals
- Create replenishment order product receipts
- Create purchase orders
To make the required functionality available, add the duties specified in the following lists to the respective roles. If you're using custom security roles, add some or all of these duties to your roles as needed.
Purchasing manager:
- Maintain global address book master
- Maintain consignment replenishment orders
- Maintain inventory ownership change journals
- Maintain consignment product receipt
- Maintain purchase orders
Purchasing agent:
- Maintain consignment replenishment orders
- Maintain inventory ownership change journals
- Maintain consignment product receipt
Learn more in Role-based security.
Configure the supply risk assessment report
The supply risk assessment report is a Power BI report built on data stores that stage aggregate measurements for reporting. In Supply Chain Management, this data store is called an entity store.
To see the data refreshed on the supply risk assessment report, you must enable the automated refresh of the entity stores that the report uses. To enable the automated entity store refresh, follow these steps.
- Go to System administration > Set up > Entity store.
- Use Filter to find PurchaseCube and VRMPurchaseCube.
- Select Edit on the Action Pane. 1.Select the PurchaseCube record and expand the General FastTab. Set Automatic refresh enabled to Yes and choose a Recurrence interval (for example, Every hour). Then select Refresh to schedule the batch job.
- Repeat the previous step for VRMPurchaseCube.
Configure B2B collaboration for vendor user requests
To provision supplier portal users as Microsoft Entra B2B guest users from the Supply Chain Management user workflow, first create an application registration in Microsoft Entra ID and then enter that application information in Supply Chain Management. You need this configuration before you can use the Provision Microsoft Entra B2B user workflow task.
The one-time setup comprises the following steps.
- Set up a B2B invitation service application in Microsoft Entra ID.
- Configure the B2B invitation service settings in Supply Chain Management.
Learn more in Export business-to-business (B2B) users to Microsoft Entra ID.
Note
This setup is mandatory when your environment requires cross-domain user access. If cross-domain access isn't required, you can skip it.
Set up the vendor user request workflow
The Vendor user request (new user or modify user) workflow is a standard workflow included with Supply Chain Management. You can set it up to automatically approve portal user requests (new vendor user requests that are routed from the supplier portal), or you can assign the approvals to a particular role or set of users.
Open the Vendor user request (new user or modify user) workflow in the workflow editor
To start editing the workflow, follow these steps:
- Go to System administration > Workflow > User workflows.
- Open the Vendor user request (new user or modify user) workflow. The system suggests downloading and opening the workflow editor. You must use the Microsoft Edge browser to download and run the app.
- The app opens, showing the default workflow. You can now edit the workflow to modify its behavior as needed, as described in the following sections. Choose which functionality to enable based on your business needs.
Auto-approve supplier portal user requests (optional)
If you want to approve supplier portal user requests automatically, follow these steps:
Open the Vendor user request (new user or modify user) workflow in the workflow editor. In this procedure, you must edit each of the steps highlighted in the following screenshot.
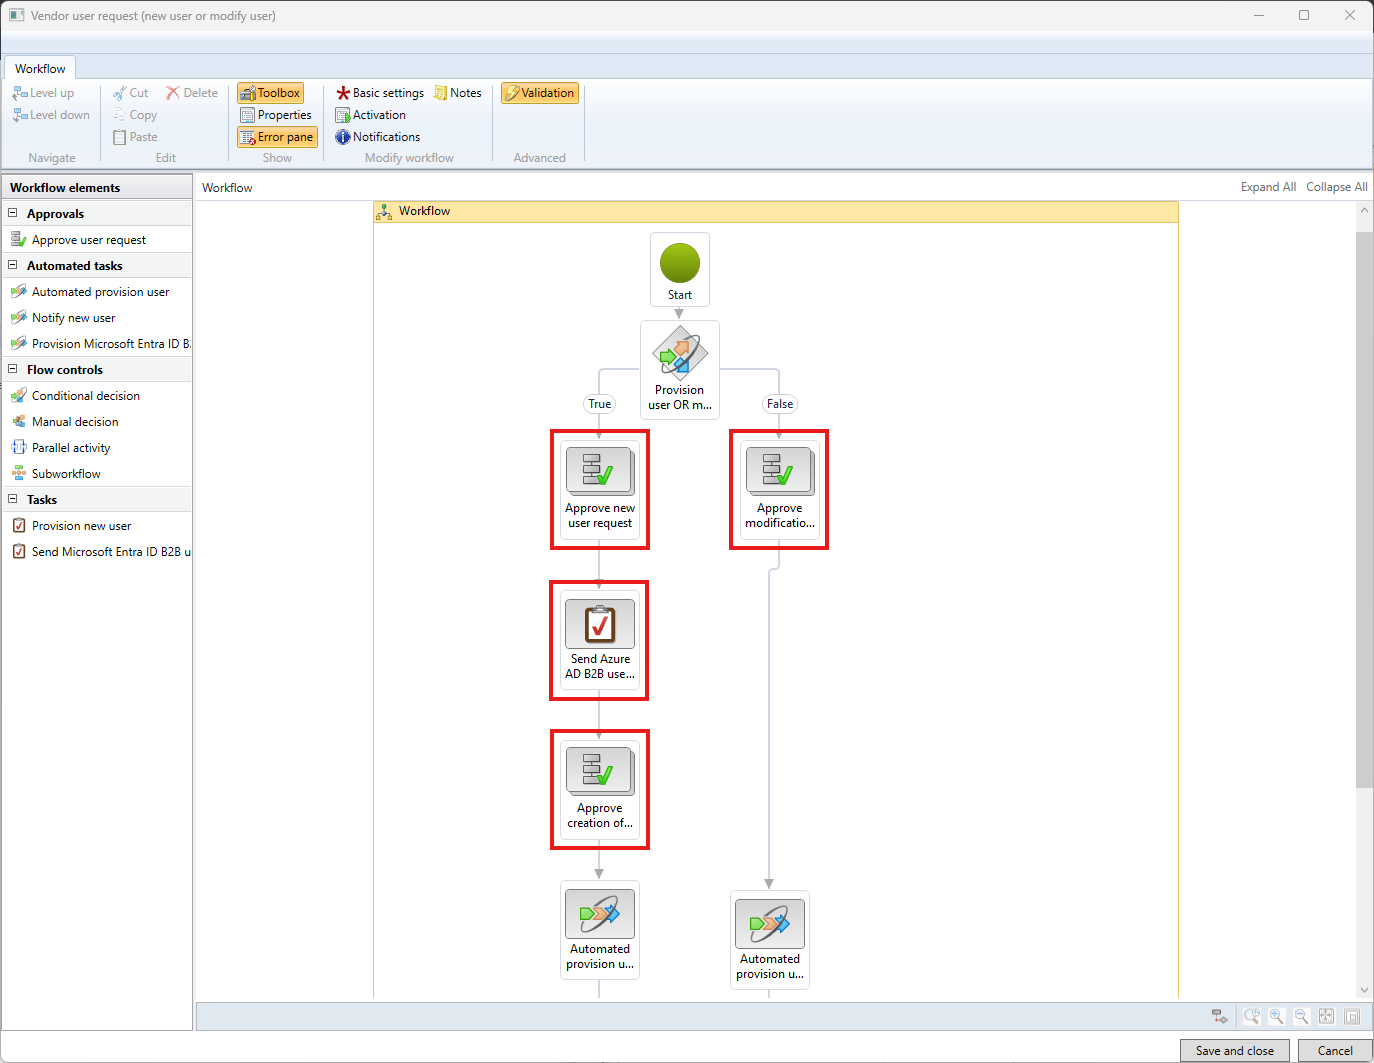
Select the first step highlighted in the previous screenshot, and then select Automatic actions on the ribbon.
Select Add condition and set Condition to Where User requests.Request type is Value Supplier Portal user request.
The following screenshot shows an example of the automatic actions settings.
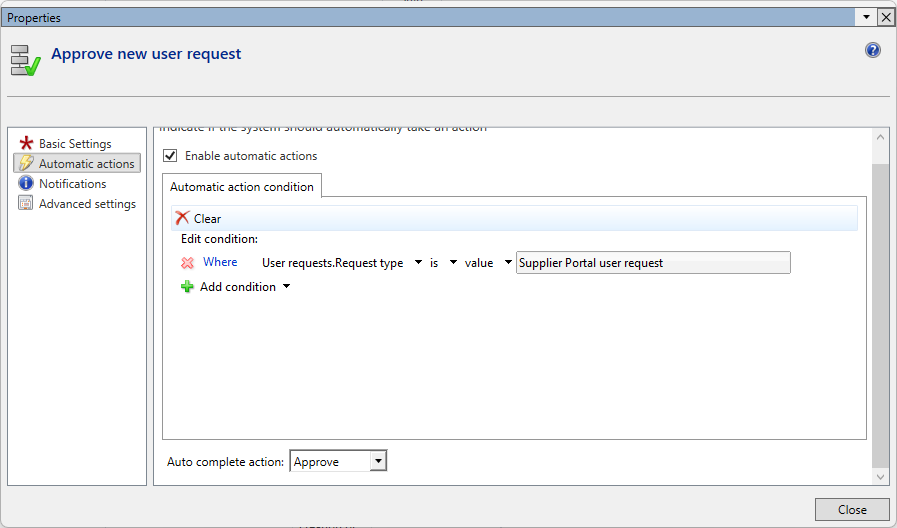
Set Auto complete action to Approve or Complete (depending on which kind of step you are editing). Then select Close.
Repeat the previous five steps for each of the other three approval steps in the workflow.
Select Save and close to save your changes to the workflow as a new version.
In Supply Chain Management, go back to System administration > Workflow > User workflows and select the Vendor user request (new user or modify user) workflow. On the Action Pane, open the Workflow tab and select Versions. Use the Workflow versions dialog to set the new version of the workflow as the active version.
Require internal users to approve supplier portal user requests (optional)
If you want to require internal users (such as the purchasing manager) to approve supplier portal user requests, follow these steps:
Open the Vendor user request (new user or modify user) workflow in the workflow editor. In this procedure, you must edit each of the steps highlighted in the following screenshot.
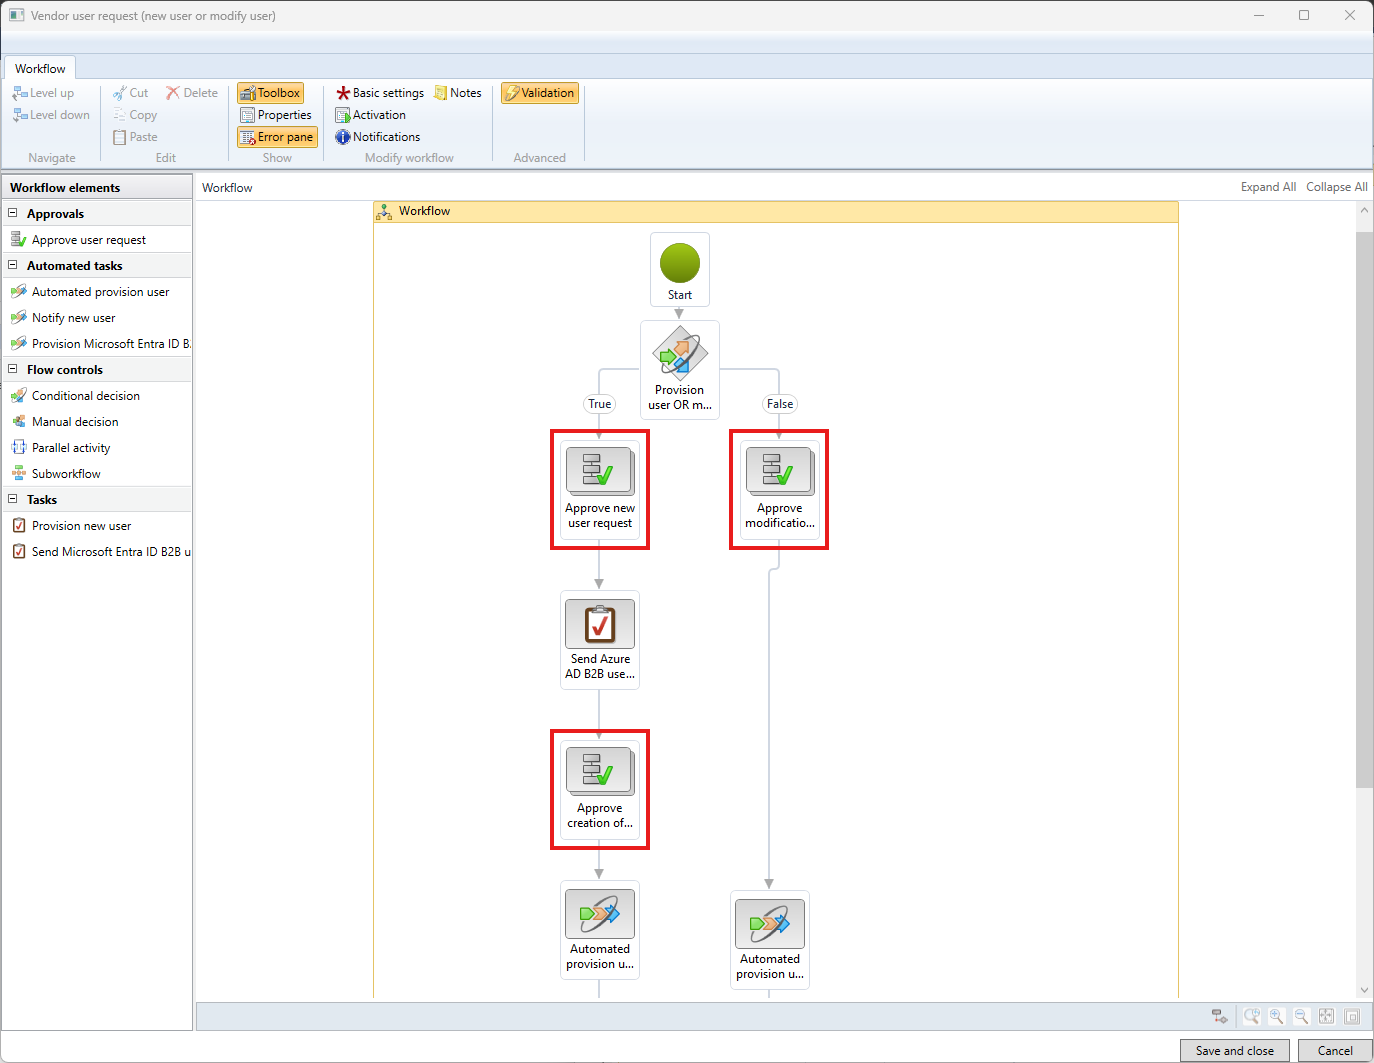
Select the first step highlighted in the preceding screenshot, and then select Advanced on the ribbon.
Select the Use final approver check box.
Select the user who should approve the user request.
Select Save and close to save your changes to the workflow as a new version.
In Supply Chain Management, go back to System administration > Workflow > User workflows and select the Vendor user request (new user or modify user) workflow. On the Action Pane, open the Workflow tab and select Versions. Use the Workflow versions dialog to set the new version of the workflow as the active version.
Automate guest supplier user provisioning in Microsoft Entra (optional)
To automate guest supplier user provisioning in Microsoft Entra, add a conditional workflow step that verifies whether the request pertains to a portal user. If so, the workflow bypasses all subsequent approval steps and proceeds directly to user creation. If you want to implement this functionality, follow these steps:
Open the Vendor user request (new user or modify user) workflow in the workflow editor.
Add a new Conditional decision step immediately after the Start step.
- Move the output of the Start step to the input of the new conditional step.
- Link the True outcome of the new conditional step to the Automated provision user step.
- Link the False outcome of the new conditional step to the Provision user OR modify user step.
Select the new conditional step, and then select Basic settings on the ribbon.
Set Name to Is portal user request?.
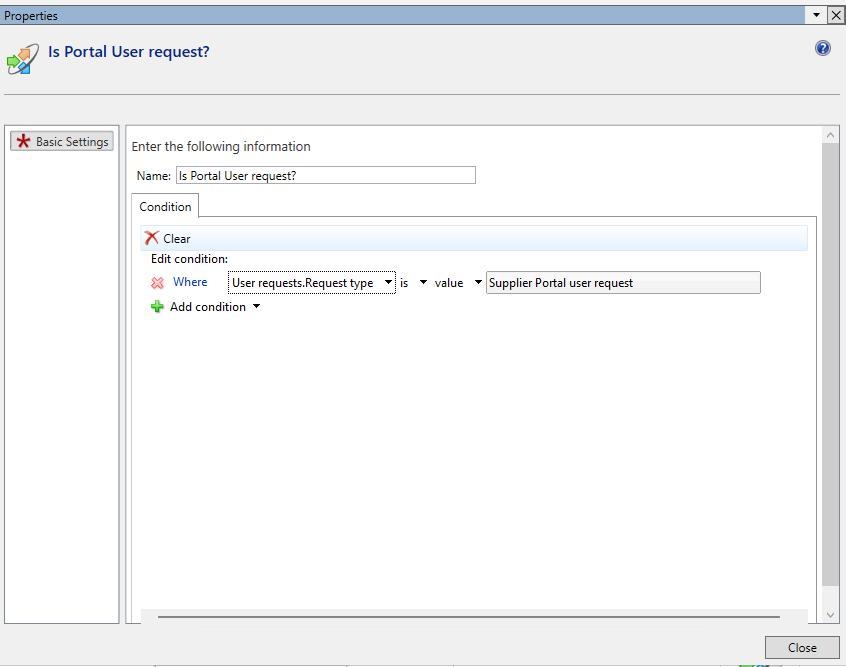
Select Add condition and set Condition to Where User requests.Request type is Value Supplier Portal user request.
The following screenshot shows an example of the conditional step settings.
Add the Provision Microsoft Entra ID B2B user automated task on the True branch before Automated provision user. The workflow diagram should now look like this:
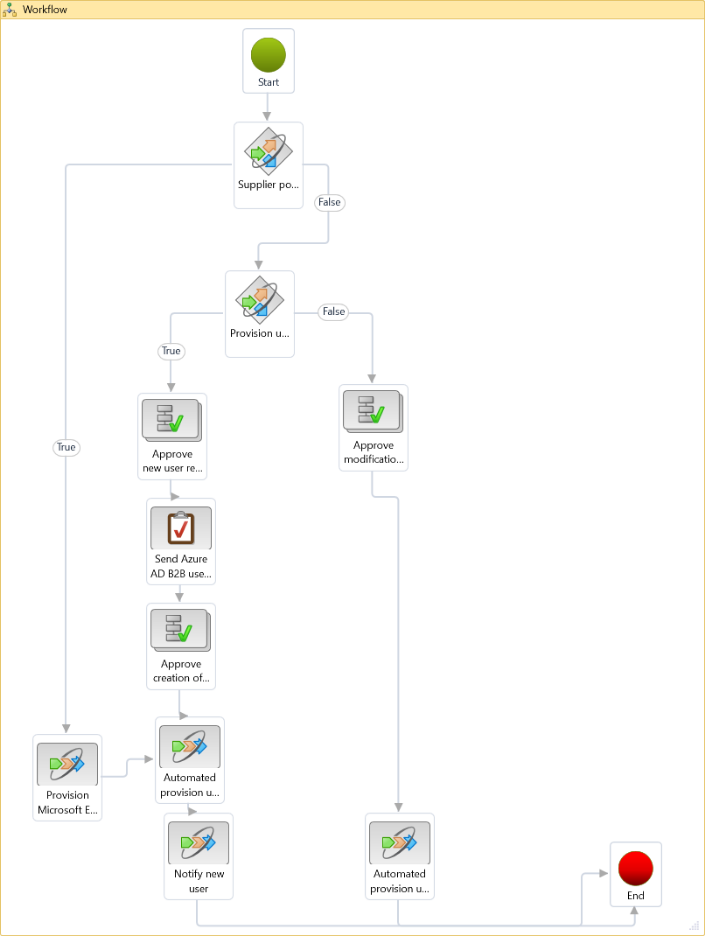
Select Save and close to save your changes to the workflow as a new version.
In Supply Chain Management, go back to System administration > Workflow > User workflows and select the Vendor user request (new user or modify user) workflow. On the Action Pane, open the Workflow tab and select Versions. Use the Workflow versions dialog to set the new version of the workflow as the active version.
Learn more in Example of a workflow for provisioning new users and modifying security roles.
Set up the vendor category request workflow
The vendor category request workflow is triggered when a vendor requests a new procurement category.
To create or modify the workflow, follow these steps.
- Go to Procurement and sourcing > Setup > Procurement and sourcing workflows.
- Find or add the Vendor category request workflow.
- Configure the workflow steps and activate the workflow.
Learn more in Set up the Vendor category request workflow.
Set up the vendor invoice workflow
The vendor invoice workflow is triggered when a vendor invoice is submitted.
To create or modify the workflow, follow these steps.
- Go to Accounts payable > Setup > Accounts payable workflows.
- Create or update the vendor invoice workflow that you want suppliers to use.
- Activate the workflow after configuration is complete.
Learn more in Set up options for vendor invoice automation and Vendor invoices overview.
Set up localization metadata
Local laws and regulations vary from place to place, so the fields and options available for each vendor must adapt to that vendor's specific country/region. To prepare your system to provide localized features, you must generate the required entity field metadata. To generate the entity field metadata, follow these steps.
- Go to Procurement and sourcing > Setup > (Preview) Supplier Engagement > Entity field metadata for supplier portal.
- On the Action Pane, select Generate entity field metadata.
Create global vendors from existing data
To enable interaction with the supplier portal and ensure visibility in Supplier Engagement processes, each of your existing suppliers must be registered as a global vendor. Supply Chain Management can create global vendors based on existing vendor records or parties. The new global vendors are then linked to the existing vendor party.
This capability is particularly useful for organizations transitioning to Supplier Engagement that want to integrate their current vendor base with the supplier portal.
Supply Chain Management provides a global vendor creation wizard that streamlines the registration process by generating global vendors based on existing vendors or global address book (party) records. It can also merge parties, which helps eliminate duplicate records in your global address book.
To run the global vendor creation wizard, follow these steps:
- Sign in to Supply Chain Management.
- Start the wizard in one of the following ways:
- Go to Procurement and sourcing > Vendors > All vendors, select up to 200 vendors that aren't already linked to global vendors. On the Action Pane, open the Vendor tab and, from the Set up group, select Global vendor.
- Go to Organization administration > Global address book > Global address book, select up to 200 parties that have a vendor role and aren't already linked to global vendors, and then select Party > New > Global vendor.
- Go to Procurement and sourcing > Vendors > Supplier engagement > Global vendor creation.
- The Global vendor creation wizard opens. On the Welcome page, select Next.
- If the Select vendor page appears, select the vendors that you want to process. Use the Vendor selection filter to help find vendors that meet your criteria. Then select Next.
- The Check for duplicates page opens.
- Review each row in Selected vendors and evaluate possible matches in Duplicates search result.
- For each vendor, choose the party that should become the global vendor and select Global vendor.
- Select Merge for any parties that should be merged into the selected global vendor.
- Repeat the duplicate review and merge decisions for each selected vendor.
- Select Next to review the Summary page.
- If the summary is correct, select Finish.
When the wizard finishes, it creates the new global vendors, merges selected parties, links local vendors to the related global vendor parties, and synchronizes the new records to the Supplier Engagement app.
Review the global vendor creation log
The global vendor creation wizard runs asynchronously, so use the log to confirm results and handle failures.
- Go to Procurement and sourcing > Vendors > Supplier Engagement > Global vendor creation log.
- Review the creation status and failure reason for each record.
- If a record has a status of Error, select it and then select Resync.