Note
Access to this page requires authorization. You can try signing in or changing directories.
Access to this page requires authorization. You can try changing directories.
The outbound load planning workbench helps you build loads from the supply and demand that outbound orders represent. You can build loads from sales order lines, transfer order lines, and outbound shipment order lines. Then, rate and route each load to determine the carrier and cost. A transportation coordinator typically does this work as part of daily load planning.
This article shows how to create a load from a sales order, rate and route it, and set up filters that control which lines the workbench shows.
Prerequisites
Before you begin, ensure that you meet the following prerequisites:
- An open outbound order exists that has lines to build a load from. The examples in this article use a sales order.
- The items on the order are enabled for transportation management. If you're using the USMF demo data company, item A0001 is set up this way.
- The warehouse on the order lines is enabled for both transportation management and warehouse management processes (WMS). If you're using USMF, warehouse 24 is set up this way.
- At least one load template is available. The load template defines the maximum weight and volume for the whole load. For example, it might represent the size of a container or a truck. Learn more in Load templates.
Open the outbound load planning workbench
The workbench is available from both the Transportation management and Warehouse management modules. Both paths open the same page, so use whichever module you work in:
- Go to Transportation management > Planning > Outbound load planning workbench.
- Go to Warehouse management > Loads > Outbound load planning workbench.
You can also open the workbench from the Sales orders, Transfer orders, and Outbound shipment orders pages.
Create a load from order lines
The workbench shows a separate tab for each type of order line that you can use to build loads. You can build loads from the supply and demand that purchase orders, transfer orders, and sales orders represent.
- Open the outbound load planning workbench.
- Select the tab for the type of line to build the load from. For example, select the Sales lines tab.
- Select the order lines to include in the load.
- On the Action Pane, open the Supply and demand tab and select To new load.
- In the Load template ID field, select the load template that represents the container or vehicle to use.
- Select OK. The system creates a load that contains the selected lines.
Rate and route the load
Rating and routing determine which carrier and service a load uses, and what the freight costs.
Confirm the following settings before rating and routing a load:
- On the Warehouse management parameters page, open the General tab and expand the Performance settings tab. Set Transportation management actions usage to Used. This field is a performance setting. Organizations that don't use Transportation management can set it to Not used, so that pages load faster.
- The load that you want to rate and route must have its Loading strategy set to Full load shipping only. To find this setting, open the load, go to the Header tab and expand the General FastTab.
Follow these steps to find a rate for a load and assign it.
- Open the outbound load planning workbench.
- Select the load in the Loads grid.
- On the Loads grid toolbar, select Rating and routing > Rate route workbench.
- On the Action Pane, select Rate shop. The system finds all the carriers and rates that apply to the load, and lists each option together with its rate and total transit time on the Route results FastTab.
- On the Route results FastTab, select the option to use, and then select Assign from the FastTab toolbar. The system assigns the route to the load, together with the related carrier, service, and rate.
The Rate route workbench page provides several ways to find an option. Which one you use depends on how much of the decision you want the system to make for you.
| Button | Result |
|---|---|
| Rate | Finds the carrier that costs the least. |
| Rate shop | Finds all the carriers and rates. |
| Route | Finds all the applicable routes. |
| Route with rate | Finds all the routes and rates at the segment level. |
| Scheduled route | Finds an auto-generated route that is based on predefined segments and a date interval. |
Learn more about route guides and scheduled routes in Plan freight transportation routes with multiple stops.
Load planning filters
Set up custom filters to control which types of lines show in the Outbound load planning workbench. For example, you can choose to only show fully reserved transfer order lines. Follow these steps to set up one or more load planning workbench filters.
Open the outbound load planning workbench.
On the Action Pane, open the Filters tab and select Load planning filters.
On the Action Pane, select New to add a new load planning filter to the grid. Then make the following settings for the new line:
- Load planning filter code – Enter a unique name for the filter.
- Description – Enter a short description of the filter.
- Load planning filter type – Choose the type of lines the filter should apply to (such as Load, Sales order, Transfer order, or Shipment). For example, if you want to set up a filter that only shows fully reserved transfer order lines, select Transfer order.
On the Action Pane, select Save.
With the new filter selected in the grid, select Edit query on the Action Pane. A standard query editor opens, where you can define the filter criteria that you want to apply. Here's an example of how to set up a filter to show only fully reserved transfer order lines:
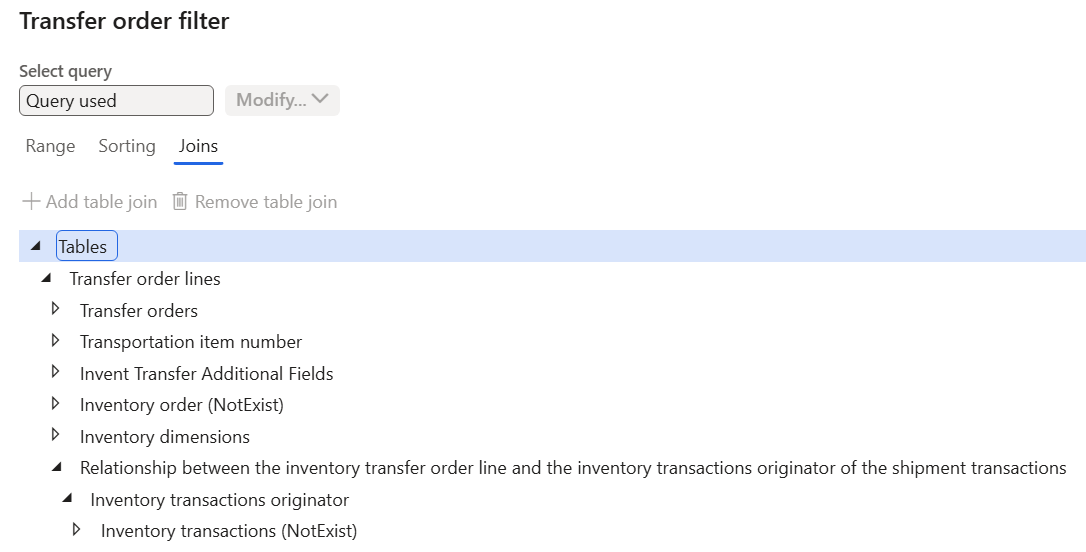
Open the Joins tab. Select the Transfer order lines node and then select Add table join from the toolbar. Find and select the row with a Relation of Relationship between the inventory transfer order line and the inventory transactions originator of the shipment transactions (Line number) (with Join mode 1:n). Then select Select on the toolbar.
Select the new Relationship between the inventory transfer order line and the inventory transactions originator of the shipment transactions node and then select Add table join from the toolbar. Find and select the row with a Relation of Inventory transactions originator (Inventory transactions originator). Then select Select on the toolbar.
Select the new Inventory transactions originator node and then select Add table join from the toolbar. Make sure that Show details is set to Yes. Find and select the row with a Relation of Inventory transactions (NotExist Record-ID) and a Relation source of InventTrans : InventTransOrigin. Then select Select on the toolbar. Your Joins tab should now resemble the following screenshot.
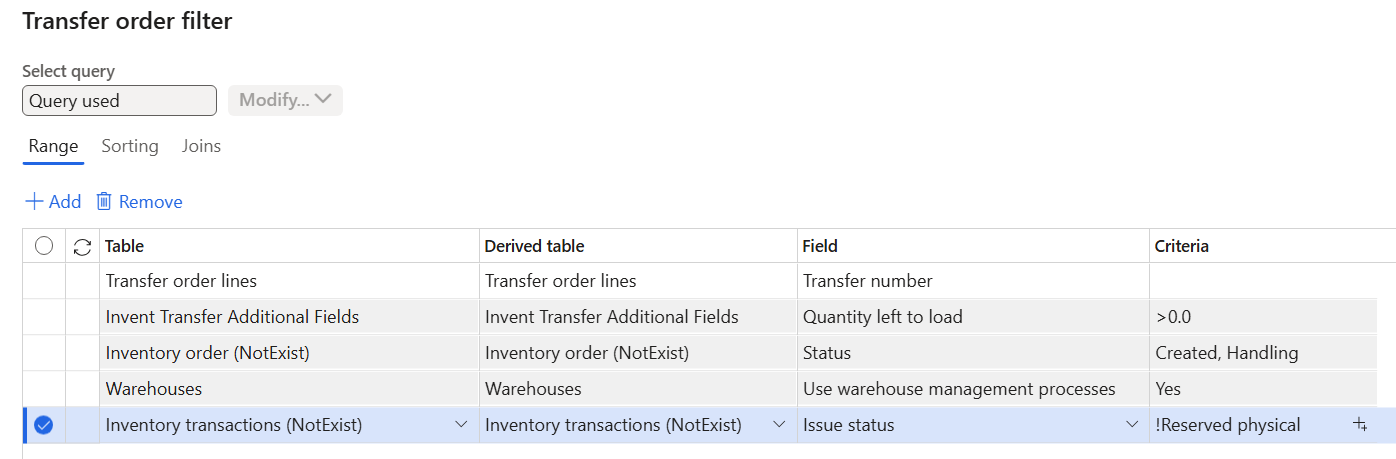
Open the Range tab. Add a new row to the grid with the following settings:
- Table – Select Inventory transactions (NotExist).
- Field – Select Issue status.
- Criteria – Enter !Reserved physical, which means "not Reserved physical."
These settings result in a filter that only includes transfer order lines with an inventory transactions status of Reserved Physical, which are the fully reserved lines. Your Range tab should now resemble the following screenshot.
Select OK to save the query.
Select the Back button to go back to the Outbound load planning workbench page.
Open the tab you created your filter for (for example, the Transfer lines tab). Then set Supply and demand filter to the filter you just created. The page is now filtered according to the criteria you defined for the selected filter.
If you want to apply the new filter by default when you open the workbench, then on the Action Pane, open the Filters tab and select Set as default.