Note
Access to this page requires authorization. You can try signing in or changing directories.
Access to this page requires authorization. You can try changing directories.
This article explains how to set up the system and the Warehouse Management mobile app so that they support work policies. You can use this functionality to quickly register inventory without creating putaway work when you receive purchase or transfer orders, or when you complete manufacturing processes. This article provides general information. For detailed information that is related to license plate receiving, see License plate receiving via the Warehouse Management mobile app.
A work policy controls whether warehouse work is created when a manufactured item is reported as finished, or when goods are received by using the Warehouse Management mobile app. You set up each work policy by defining the conditions where it applies: the work order types and processes, the inventory location, and (optionally) the products. For example, a purchase order for product A0001 must be received in location RECV in warehouse 24. Later, the product is consumed in another process at location RECV. In this case, you can set up a work policy to prevent putaway work from being created when a worker reports product A0001 as received in location RECV.
Note
- For a work policy to be active, you must define at least one location for it on the Inventory locations FastTab of the Work policies page.
- You can't specify the same location for multiple work policies.
- The Print label option for mobile device menu items won't print a license plate label unless work was created.
Prerequisites
If you are running Supply Chain Management version 10.0.35 or older, then you must turn on the following features in Feature management. In newer versions, these features are fully integrated into the product, so they're either mandatory or no longer listed in Feature management.
- License plate receiving enhancements
- Work policy enhancements for inbound work
The Work policies page
To set up work policies, go to Warehouse management > Setup > Work > Work policies. Then, on each FastTab, set the fields as described in the following subsections.
The Work order types FastTab
On the Work order types FastTab, add all the work order types, and the related work processes, that the work policy applies to. The following work order types and related work processes are supported for work policies.
| Work order type | Work process |
|---|---|
| Raw material picking | All related processes |
| Co-product and by-product put away | All related processes |
| Finished goods putaway | All related processes |
| Transfer receipt | License plate receiving (and putaway) |
| Purchase orders |
|
| Inbound shipment order |
|
To set up a work policy so that it applies to several work processes of the same work order type, add a separate line for each work process to the grid.
For each line in the grid, set the Work creation method field to one of the following values:
- Never – The work policy will prevent warehouse work from being created for the selected work order type and related work process.
- Cross docking – The work policy will create cross-docking work by using the policy that you select in the Cross docking policy name field.
The Inventory locations FastTab
On the Inventory locations FastTab, add all the locations where this work policy should be applied. If no location is associated with a work policy, the work policy won't be applied to any process.
You can't specify the same location for multiple work policies.
You can use a warehouse location that is assigned to a location profile where the Use license plate tracking option is turned off. In this case, workers will directly register the on-hand inventory.
The Products FastTab
On the Products tab, set the Product selection field to control which products the policy should apply to:
- All – The policy should apply to all products.
- Selected – The policy should apply only to products that are listed in the grid. Use the toolbar on the Products FastTab to add products to the grid or remove them from the grid.
Default and custom "to" locations
Note
To make the functionality that is described in this section available in your system, you must turn on the License plate receiving enhancements and Work policy enhancements for inbound work features in Feature management. As of Supply Chain Management version 10.0.32, both of these features are on by default. As of Supply Chain Management version 10.0.36, both of these features are mandatory and can't be turned off.
Previously, the system supported receiving only at the default location that is defined for each warehouse. However, mobile device menu items that use the following work creation processes now provide the Use default data option. This option lets you assign a custom "to" location to one or more menu items. (This option was already available for some other types of menu items.)
- License plate receiving (and putaway)
- Load item receiving (and putaway)
- Purchase order line receiving (and putaway)
- Purchase order item receiving (and putaway)
- Inbound shipment order line receiving (and putaway)
- Inbound shipment order item receiving (and putaway)
The To location setting for a menu item overrides the default receiving location for the warehouse, for all orders that are processed by using that menu item.
To set up a mobile device menu item to support receiving at a custom location, follow these steps.
Go to Warehouse management > Setup > Mobile device > Mobile device menu items.
Select or create a menu item that uses one of the work creation processes that are listed earlier in this section.
On the General FastTab, set the Use default data option to Yes.
On the Action Pane, select Default data.
On the Default data page, set the following values:
- Default data field: Set this field to To location.
- Warehouse: Select the destination warehouse to use with this menu item.
- Location: This field lists all the location IDs that are available for the selected warehouse. However, the setting of this field doesn't actually have any effect. Therefore, you can leave it blank. Nevertheless, you can use the list to confirm the ID that you must enter in the Hardcoded value field.
- Hardcoded value: Enter the location ID for the receiving location that applies to this menu item.
Tip
A work policy can be applied only if all the receiving locations are listed in the relevant work policy setup. This requirement applies regardless of whether you're using the default warehouse receiving location or a custom "to" location.
Example scenario: Warehouse receiving
All products that are received by the Purchase order item receiving (and putaway) process must be registered in location FL-001, and they must be available in warehouse 24. However, work should not be created. Products that are received by any other process (that is, by using other mobile device menu items) should be registered at the default warehouse receiving location (RECV), and work should be created as usual. (This scenario doesn't show the default receiving setup.)
This scenario requires the following elements:
- A work policy for the Purchase order item receiving (and putaway) process in location FL-001, for all products
- A mobile device menu item that has default data, and that sets the To location field to FL-001
Prerequisites
To make the functionality that is described in this scenario available in your system, you must turn on the License plate receiving enhancements and Work policy enhancements for inbound work features in Feature management. As of Supply Chain Management version 10.0.32, both of these features are on by default. As of Supply Chain Management version 10.0.36, both of these features are mandatory and can't be turned off.
This scenario uses the standard demo data. Therefore, if you want to work through it by using the values that are provided here, you must work on a system where demo data is installed. Additionally, you must select the USMF legal entity.
Set up a work policy
Go to Warehouse management > Setup > Work > Work policies.
Select New.
In the Work policy name field, enter No purchase item putaway work.
Select Save.
On the Work order types FastTab, select Add to add a row to the grid, and then set the following values for the new row:
- Work order type: Purchase orders
- Work process: Purchase order item receiving (and putaway)
- Work creation method: Never
- Cross docking policy name: Leave this field blank.
On the Inventory locations FastTab, select Add to add a row to the grid, and then set the following values for the new row:
- Warehouse: 24
- Location: FL-001
On the Products FastTab, set the Product selection field to All.
Select Save.
Set up a mobile device menu item to change the receiving location
Go to Warehouse management > Setup > Mobile device > Mobile device menu items.
In the left pane, select the existing Purchase receive menu item.
On the General FastTab, set the Use default data option to Yes.
Select Save.
On the Action Pane, select Default data.
On the Default data page, on the Action Pane, select New to add a row to the grid, and then set the following values for the new row:
- Default data field: To location
- Warehouse: 24
- Location: Leave this field blank.
- Hardcoded value: FL-001
Select Save.
Receive a purchase order without creating work
The example in this section shows how to receive a purchase order item, but without creating work, at a location that differs from the default receiving location that is set up for the warehouse. This example uses the work policy and mobile device item that you created earlier in this scenario.
Create a purchase order
Go to Procurement and sourcing > Purchase orders > All purchase orders.
Select New.
In the Create purchase order dialog box, set the following values:
- Vendor account: US-101
- Site: 2
- Warehouse: 24
Select OK to close the dialog box and open the new purchase order.
On the Purchase order lines FastTab, set the following values for the empty row:
- Item number: A0001
- Quantity: 1
Select Save.
Make a note of the purchase order number.
Receive a purchase order
- On the mobile device, sign in to warehouse 24 by using 24 as the user ID and 1 as the password.
- Select Inbound.
- Select Purchase receive. The Location field should be set to FL-001.
- Enter the purchase order number for the purchase order that you created in the previous procedure.
- In the Item number field, enter A0001.
- Select OK.
- In the Quantity field, enter 1.
- Select OK.
The purchase order is now received, but no work is associated with it. The on-hand inventory has been updated, and a quantity of 1 of item A0001 is now available at location FL-001.
Example scenario: Manufacturing
In the following example, there are two production orders, PRD-001 and PRD-002. Production order PRD-001 has an operation that is named Assembly, where product SC1 is being reported as finished to location 001. Production order PRD-002 has an operation that is named Painting and consumes product SC1 from location 001. Production order PRD-002 also consumes raw material RM1 from location 001. Raw material RM1 is stored in warehouse location BULK-001 and will be picked to location 001 by warehouse work for raw material picking. The picking work is generated when production PRD-002 is released.
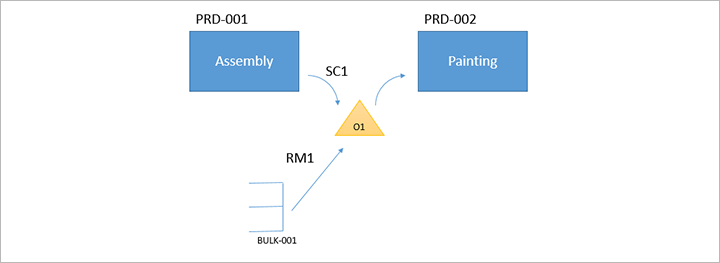
When you're planning to configure a warehouse work policy for this scenario, you should consider the following points:
- Warehouse work for putaway of finished goods isn't required when you report product SC1 as finished from production order PRD-001 to location 001. The reason is that the Painting operation for production order PRD-002 consumes product SC1 at the same location.
- Warehouse work for raw material picking is required to move raw material RM1 from warehouse location BULK-001 to location 001.
Here is an example of a work policy that you can set up, based on these considerations:
- Work policy name: No putaway work
- Work order types: Finished goods put away and Co-product and by-product put away
- Inventory locations: Warehouse 51 and location 001
- Products: SC1
The following example scenario provides step-by-step instructions for setting up the warehouse work policy for this scenario.
Example scenario: Report as finished to a location that isn't license plate–controlled
This scenario shows an example where a production order is reported as finished to a location that isn't license plate–controlled.
This scenario uses the standard demo data. Therefore, if you want to work through it by using the values that are provided here, you must work on a system where demo data is installed. Additionally, you must select the USMF legal entity.
Set up a warehouse work policy
Warehouse processes don't always include warehouse work. By defining a work policy, you can prevent the creation of work for raw material picking and putaway of finished goods for a set of products at specific locations.
Go to Warehouse management > Setup > Work > Work policies.
Select New.
In the Work policy name field, enter No putaway work.
On the Action Pane, select Save.
On the Work order types FastTab, select Add to add a row to the grid, and then set the following values for the new row:
- Work order type: Finished goods put away
- Work process: All related work processes
- Work creation method: Never
- Cross docking policy name: Leave this field blank.
Select Add again to add a second row to the grid, and then set the following values for the new row:
- Work order type: Co-product and by-product put away
- Work process: All related work processes
- Work creation method: Never
- Cross docking policy name: Leave this field blank.
On the Inventory locations FastTab, select Add to add a row to the grid, and then set the following values for the new row:
- Warehouse: 51
- Location: 001
On the Products FastTab, set the Product selection field to Selected.
On the Products FastTab, select Add to add a row to the grid.
In the new row, set the Item number field to L0101.
On the Action Pane, select Save.
Set up an output location
Go to Organization administration > Resources > Resource groups.
In the left pane, select resource group 5102.
On the General FastTab, set the following values:
- Output warehouse: 51
- Output location: 001
On the Action Pane, select Save.
Note
Location 001 isn't a license plate–controlled location. You can set up an output location that isn't license plate–controlled only if an applicable work policy exists for the location.
Create a production order and report it as finished
Go to Production control > Production orders > All production orders.
On the Action Pane, select New production order.
In the Create production order dialog box, set the Item number field to L0101.
Select Create to create the order and close the dialog box.
A new production order is added to the grid on the All production orders page.
Keep the new production order selected.
On the Action Pane, on the Production order tab, in the Process group, select Estimate.
In the Estimate dialog box, read the estimate, and then select OK to close the dialog box.
On the Action Pane, on the Production order tab, in the Process group, select Start.
In the Start dialog box, on the General tab, set the Automatic BOM consumption field to Never.
Select OK to save your setting and close the dialog box.
On the Action Pane, on the Production order tab, in the Process group, select Report as finished.
In the Report as finished dialog box, on the General tab, set the Accept error option to Yes.
Select OK to save your setting and close the dialog box.
On the Action Pane, on the Warehouse tab, in the General group, select Work details.
When the production order is reported as finished, no work is generated for putaway. This behavior occurs because a work policy is defined that prevents work from being generated when product L0101 is reported as finished to location 001.
More information
For more information about mobile device menu items, see Set up mobile devices for warehouse work.
For more information about license plate receiving and work policies, see License plate receiving via the Warehouse Management mobile app.
For more information about inbound load management, see Warehouse handling of inbound loads for purchase orders.