Note
Access to this page requires authorization. You can try signing in or changing directories.
Access to this page requires authorization. You can try changing directories.
Note
Community interest groups have now moved from Yammer to Microsoft Viva Engage. To join a Viva Engage community and take part in the latest discussions, fill out the Request access to Finance and Operations Viva Engage Community form and choose the community you want to join.
This article describes how to create, process, and release a wave to create picking work for a load, shipment, production order, or kanban order. You can create waves for the following types of orders:
- Sales orders, Transfer orders, and Outbound shipment orders – Use shipping waves to include lines from sales orders, transfer orders, and outbound shipment orders. When an order is released to the warehouse, its order lines can be included in the wave.
- Production orders – Use production waves to include lines from the bill of materials (BOM) for a product.
- Kanban orders – Kanban waves include picking list lines from kanban orders.
For sales orders and kanban orders, inventory must be reserved before the order is released to the warehouse. Otherwise, the items or allocation lines can't be processed in a wave. However, production orders are slightly more flexible. For production orders, you can choose either of the following options:
- Require that all materials are reserved before an order can be released to the warehouse.
- Allow production orders to be released to the warehouse even though all materials can't be reserved. If you select this option, you must manually repeat the release to warehouse process when the additional materials become available. For example, this is useful if you have the materials that you need to start a production, and can wait until the additional materials become available.
You can specify which of these production order options to use by default using the Requirement for material reservation field on the Production control parameters page. However, you can change the setting for each specific production order as needed. Learn more in Warehouse parameters for wave processing.
Create and process a wave
The following diagram shows the flow for how shipping waves are created, processed, and released. The numbers correspond to the sections later in this section.

Prerequisites
Before you start, a wave template must be available for the type of wave you want to create (shipping, production, or kanban). The wave template establishes many settings for how the wave will be generated and processed, including which steps must be done manually and which are done automatically. Learn more in Wave templates.
Create a wave
Automatically create waves based on warehouse and order type
To create waves automatically, set up Wave templates that apply for each relevant order type and warehouse. Make sure each template has the Automate wave creation option set to Yes.
Manually create waves
To manually create a wave, follow these steps:
Make sure that the relevant Wave templates aren't set to automatically create a wave for the warehouse and order types where you want to do so manually.
Depending on the type of wave you want to create, do one of the following:
- Go to Warehouse management > Outbound waves > Shipment waves > All waves. On the Action Pane, select Wave.
- Go to Warehouse management > Outbound waves > Production waves > All production waves. On the Action Pane, select Production wave.
- Go to Warehouse management > Outbound waves > Kanban waves > All kanban waves. On the Action Pane, select Create wave.
In the Description field, enter a short description of the wave. This should indicate what you are processing in the wave.
In the Wave template name field, select the wave template for the type of wave to create. The wave template contains the wave methods that will perform actions such as creating work for the wave. For example, the wave template for shipping waves can contain methods for creating loads, allocating lines to waves, replenishment, and creating picking work for the wave.
If you want to use wave attributes as additional query criteria for the wave, select the attributes in the Wave attributes fields.
Specify what to include in a wave
After a wave has been created, you are ready to start adding content to it.
Note
If needed, you can add lines to a wave even after it has been processed as long as it has not been released.
Automatically specify what to include in a wave
To create waves automatically, set up Wave templates that apply for each relevant order type and warehouse. Make sure each template has the Automate wave creation option set to Yes. Alternatively, your template could automatically assign lines to any qualifying open wave if the Assign to open waves option is set to Yes.
Manually specify what to include in a wave
When a wave has been created but not yet released, you can manually specify what to include in it. To add lines to a wave manually:
Depending on the type of wave to add lines to, do one of the following:
- Go to Warehouse management > Outbound waves > Shipment waves > All waves. On the Action Pane, select Wave.
- Go to Warehouse management > Outbound waves > Production waves > All production waves. On the Action Pane, select Production wave.
- Go to Warehouse management > Outbound waves > Kanban waves > All kanban waves. On the Action Pane, select Create wave.
Select the wave. On the Action Pane, select one of the following:
- Maintain shipments
- Maintain productions
- Maintain kanban job picking lists
In the upper part of the window, select the line to add to the wave, and then select Add to wave. The line is moved to the Wave lines FastTab.
Repeat this step for each line to add. To add all lines, select Add all.
Tip
For shipment waves, you can quickly find a specific order by selecting a custom filter in the Wave filter code field. Wave filter codes contain query criteria for shipments, which are created in the Wave filters form. This field is not available for production waves or kanban waves. A green check mark in the On wave column indicates that the shipment has been added to the wave.
Process the wave to create the picking work
After a wave has been created and contains all of its required lines, you are ready to process it to create the corresponding picking work.
Automatically process a wave
To automatically process a wave, set up the relevant Wave templates with the automatic processing options required.
Manually process a wave
You can process a wave only when the Wave status is Created. After you process a wave, the Wave status will be changed to Held.
To manually process a wave that has all of its required content, follow these steps:
Depending on the type of wave to process, do one of the following:
- Select Warehouse management > Outbound waves > Shipment waves > All waves. On the Action Pane, select Wave.
- Select Warehouse management > Outbound waves > Production waves > All production waves. On the Action Pane, select Production wave.
- Select Warehouse management > Outbound waves > Kanban waves > All kanban waves. On the Action Pane, select Create wave.
Select the wave to process. On the Action Pane, select Process.
Release the wave to the warehouse to start picking and packing
You must process a wave before you can release it. When you release the wave, the picking work is available in the warehouse. You can cancel a wave after it is released, and add more lines, but you can't change the lines.
Automatically release a wave
To automatically process a wave, set up the relevant Wave templates with the automatic processing options required.
Manually release a wave
To release a wave manually, follow these steps:
Depending on the type of wave to release, do one of the following:
- Select Warehouse management > Outbound waves > Shipment waves > All waves. On the Action Pane, select Wave.
- Select Warehouse management > Outbound waves > Production waves > All production waves. On the Action Pane, select Production wave.
- Select Warehouse management > Outbound waves > Kanban waves > All kanban waves. On the Action Pane, select Create wave.
Select the wave to release. On the Action Pane, select Release wave.
Containerize a wave
Automated containerization creates containers and the picking work for shipments when a wave is processed. For details about how to set it up, see Containerization.
Work with the scheduled work creation
The following flowchart shows how planned work is created during wave processing.
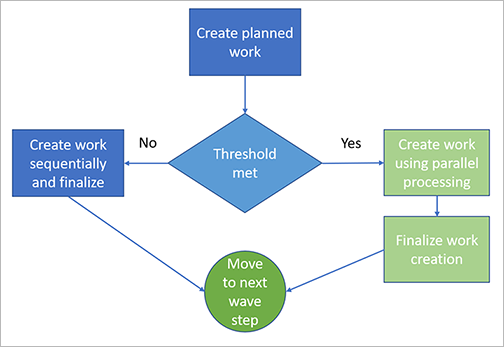
Planned work
The Planned work details page (Warehouse management > Work > Planned work details) shows information about the planned work, which is initially created during wave processing. The following Process status values are available:
- Queued - The planned work is waiting to be used to create work.
- Completed - The planned work has been used to create work.
- Failed – The wave processing has failed. Note that the planned work can be in a Failed state with or without related actual work. When the actual work creation process fails, the actual work remains in status Cancelled.
Batch job for the work creation process
To view the batch jobs for processing waves, select Batch jobs on the Action Pane on the All waves page.
From here, you can view all the batch task details for each of the batch job IDs.
Cancel a wave
If needed, you can cancel a wave that has been processed. To cancel a wave, and the picking work that was created, follow these steps:
Depending on the type of wave to cancel, do one of the following:
- Go to Warehouse management > Outbound waves > Shipment waves > All waves.
- Go to Warehouse management > Outbound waves > Production waves > All production waves.
- Go to Warehouse management > Outbound waves > Kanban waves > All kanban waves.
Select the wave to cancel. On the Action Pane, on the Work tab, select Cancel.
Review wave batch job details
Use the Wave batch job details page to inspect the batch jobs and related tasks associated with any wave. This is especially useful for troubleshooting a wave that has failed. Without this feature, only administrators will typically have access to batch job details. The Wave batch job details page can be made available to non-admin users and provides a read-only view of batch jobs and related tasks.
Use the Wave batch job details page
The Wave batch job details page combines batch jobs and batch job tasks, which lets you investigate all the wave steps without needing to navigate back and forth between a single batch job and the batch tasks list. The page also provides access to the batch log and, if you have the required permissions, provides a link to the Batch jobs page.
To open this page, select a wave on any of several different wave pages and then select Wave batch job details from the Action Pane.
Review load validation and error messages
During wave processing, the system validates and displays the status for each load line in the wave. If no warnings occur, it continues to the next wave step. If warnings do occur, it instead shows the following error after it has finished validating the entire wave:
Found invalid load lines in wave. Please remove the invalid load lines.
You are then able to review the final status of each load line in the wave and correct all warnings before trying again. This lets you address all the warnings at once before reprocessing the wave. (In previous releases, the system stopped processing the wave after the first warning, so you could only fix warnings one at a time.)
The way the system displays your wave processing status messages depends on how you have set the Create wave processing history log option on the Warehouse management parameters page.
- When Create wave processing history log is set to No, the load line status messages are shown in the Action center.
- When Create wave processing history log is set to Yes, the load line status messages are shown on the Wave processing history log page. To view the log, go to Warehouse management > Outbound waves > Wave processing history log.