About configuration data
You can import configuration data by:
Using the Configuration Migration tool
Creating a custom package for Unified Service Desk that contains the exported configuration data
Before you can import the configuration data to the target system, make sure you have exported the Unified Service Desk configuration data from your source system. More information: Export Unified Service Desk configuration data
Import configuration data by using the Configuration Migration tool
Make sure that the Microsoft Dataverse instance where you are migrating the configuration data has the required Unified Service Desk package deployed. If it doesn’t, deploy a sample Unified Service Desk package. More information: Deploy sample Unified Service Desk applications using Package Deployer
Run the Configuration Migration tool, and click Import data in the main screen. For information about downloading the tool, see step 1 in Export Unified Service Desk configuration data.
On the Login screen, provide authentication details to connect to your Dataverse server from where you want to export data. If you have multiple organizations on Dataverse server, and want to select the organization from where to export the data, select the Always display list of available orgs check box. Click Login.
If you have multiple organizations, and you selected the Always display list of available orgs check box, the next screen lets you choose the organization that you want to connect to. Select Dataverse organization to connect to.
The next screen prompts you to provide the data file (.zip) to be imported. Browse to the data file, select it, and then click Import Data.
The next screen displays the import status of your records. The data import is done in multiple passes to first import the foundation data while queuing up the dependent data, and then import the dependent data in the subsequent passes to handle any data dependencies or linkages. This ensures clean and consistent data import.
Click Exit to close the tool.
Import configuration data by using a custom package for Unified Service Desk
You can build a custom package to include the configuration data that you exported from your existing instance of Unified Service Desk. To create a custom package for deploying the Unified Service Desk configuration data, you will use all the existing files in one of the default Unified Service Desk packages, and replace the standard configuration data with your Unified Service Desk configuration data that you exported. You can create a custom package for Unified Service Desk using the Dynamics 365 Customer Engagement Web Services template for Visual Studio.
Before you begin
Download the Unified Service Desk package (self-extracting executable file), and double-click the file to extract the contents. You will use the files under one of the default packages to create a sample application. In this example, you’ll use the files under the Base package (<ExtractedFolder>\USDPackageDeployer\BasePackage).
Ensure that you know the prerequisites and how to create a custom package by using Dataverse SDK template for Visual Studio. For detailed information about using template to create a package, see Create packages for the Package deployer.
Download the CRM SDK package (.exe file), and extract it to locate the
PackageDeployerfolder under the <ExtractedFolder>\SDK\Tools\ folder. This folder contains assemblies required for creating a custom project by using Visual Studio.Install the template (CRMSDKTemplates.vsix) from Dataverse SDK package that you extracted in the previous step. The file is available under the SDK\Templates folder.
How to create a custom package
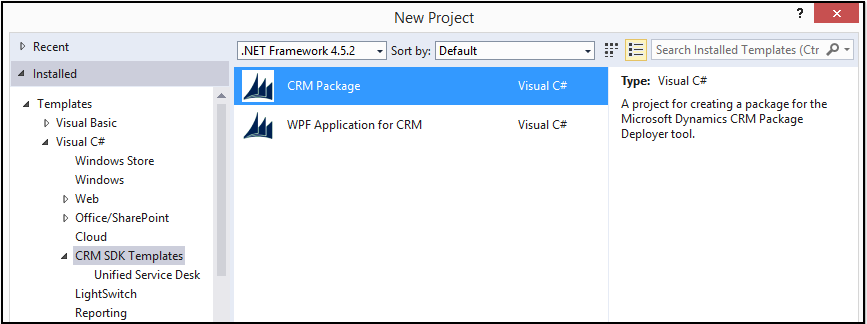
Start Visual Studio, and create a new project by using the CRM Package template.

In the Solution Explorer pane, expand PkgFolder, and delete the ImportConfig.xml file.
Add all the existing solutions, import configuration, and other files except for the default configuration data file from one of the default Unified Service Desk packages to the Visual Studio project. In this example, we will use the Base package. Add the following files from the <ExtractedFolder>\USDPackageDeployer\BasePackage folder to PkgFolder in your Visual Studio solution:
DynamicsUnifiedServiceDesk_1_0_managed.zip
ImportConfig.xml
UII Option.csv
UiiforMicrosoftDynamicsCRM3_0_managed.zip
UIIOption.xml
UsdBaseCustomization_1_0_managed.zip
Add the configuration data file (.zip) that you exported earlier from your existing instance of Unified Service Desk.
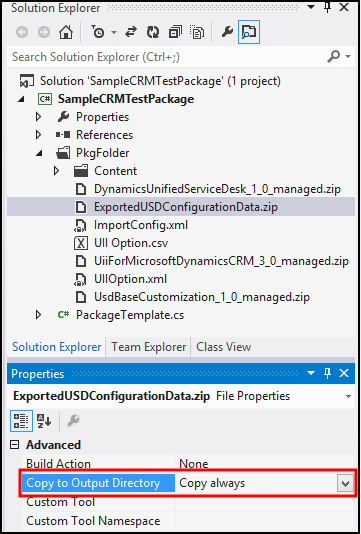
For each file that you added under the PkgFolder folder, in the Properties pane, set the Copy to Output Directory value to Copy Always. This ensures that the files you added are available in the generated package.

Double-click the ImportConfig.xml file under PkgFolder to edit it. Update the value of the
crmmigdataimportfileparameter to match the name of the exported file (.zip) that you added in step 5.Double-click the PackageTemplate.cs file to update the package name and description. For detailed information about this, see Create packages for the Package deployer in Dataverse SDK help.
Save your project, and then build it (Build > Build Solution) to create the package. All the contents in the <Project>\Bin\Debug folder are your package. Note that an assembly file (.dll) is created with the same name as your Visual Studio project name; this file contains the custom code that you created in the previous step.
Copy the entire contents from your Visual Studio project debug folder (<Project>\Bin\Debug) to the PackageDeployer folder, that is, at the same location as the PackageDeployer.exe file. You are prompted to replace some files; accept the confirmation to replace the files in the Package Deployer tool folder.
After the files are copied, run the tool by double-clicking the PackageDeployer.exe file.
You will be prompted to specify the credentials of the target Dataverse server. Specify the details, and proceed.
In the package selection screen, select your custom package to deploy, and follow the wizard screens to deploy the package.
More information: Deploy sample Unified Service Desk applications using Package Deployer
See also
Migrate your Unified Service Desk configuration to another server
Troubleshoot Unified Service Desk