Note
Access to this page requires authorization. You can try signing in or changing directories.
Access to this page requires authorization. You can try changing directories.
Applies to:  Workforce tenants (learn more)
If you use Microsoft Entra B2B collaboration to work with external partners, you can invite multiple guest users to your organization at the same time via the portal or PowerShell. In this tutorial, you learn how to use PowerShell to send bulk invitations to external users. Specifically, you do the following:
- Prepare a comma-separated value (.csv) file with the user information
- Run a PowerShell script to send invitations
- Verify the users are added to the directory
If you don't have an Azure subscription, create a free account before you begin.
Prerequisites
Install the latest Microsoft Graph PowerShell module
Make sure you install the latest version of the Microsoft Graph PowerShell module.
First, check which modules you've installed. Open PowerShell as an elevated user (run as administrator), and run the following command:
Get-InstalledModule Microsoft.Graph
To install the v1 module of the SDK in PowerShell Core or Windows PowerShell, run this command:
Install-Module Microsoft.Graph -Scope CurrentUser
Optionally, change the scope of the installation using the -Scope parameter. This requires admin permissions.
Install-Module Microsoft.Graph -Scope AllUsers
To install the beta module, run this command.
Install-Module Microsoft.Graph.Beta
You might receive a prompt that you're installing the module from an untrusted repository. This occurs if you haven't previously set the PSGallery repository as a trusted repository. Press Y to install the module.
Get test email accounts
You need two or more test email accounts to send the invitations to. The accounts must be from outside your organization. You can use any type of account, including social accounts such as gmail.com or outlook.com addresses.
Prepare the CSV file
In Microsoft Excel, create a CSV file with the list of invitee usernames and email addresses. Make sure to include the Name and InvitedUserEmailAddress column headings.
For example, create a worksheet in the following format:

Save the file as C:\BulkInvite\Invitations.csv.
If you don't have Excel, create a CSV file in any text editor, such as Notepad. Separate each value with a comma, and each row with a new line.
Sign in to your tenant
Run the following command to connect to the tenant:
Connect-MgGraph -TenantId "<YOUR_TENANT_ID>"
For example, Connect-MgGraph -TenantId "aaaabbbb-0000-cccc-1111-dddd2222eeee". You can also use the tenant domain, but the parameter remains the -TenantId. For example, Connect-MgGraph -TenantId "contoso.onmicrosoft.com".
When prompted, enter your credentials.
Send bulk invitations
To send the invitations, run the following PowerShell script (where * * c:\bulkinvite\invitations.csv is the path of the CSV file):
$invitations = import-csv c:\bulkinvite\invitations.csv

$messageInfo = New-Object Microsoft.Graph.PowerShell.Models.MicrosoftGraphInvitedUserMessageInfo

$messageInfo.customizedMessageBody = "Hello. You are invited to the Contoso organization."

foreach ($email in $invitations) {
	New-MgInvitation `
      -InvitedUserEmailAddress $email.InvitedUserEmailAddress `
		-InvitedUserDisplayName $email.Name `
		-InviteRedirectUrl https://myapplications.microsoft.com/?tenantid=aaaabbbb-0000-cccc-1111-dddd2222eeee `
		-InvitedUserMessageInfo $messageInfo `
		-SendInvitationMessage
}
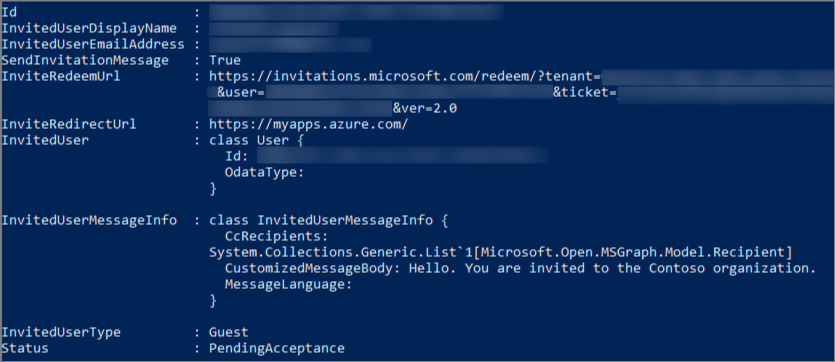
The script sends an invitation to the email addresses in the invitations.csv file. You see output similar to the following for each user:
Verify users exist in the directory
To verify that the invited users were added to Microsoft Entra ID, run the following command:
Get-MgUser -Filter "UserType eq 'Guest'"
You should see the users that you invited listed, with a user principal name (UPN) in the format emailaddress#EXT#@domain. For example, msullivan_fabrikam.com#EXT#@contoso.onmicrosoft.com, where contoso.onmicrosoft.com is the organization from which you sent the invitations.
Clean up resources
When no longer needed, you can delete the test user accounts in the directory. Run the following command to delete a user account:
Remove-MgUser -UserId "<String>"
For example: Remove-MgUser -UserId "00aa00aa-bb11-cc22-dd33-44ee44ee44ee"
Related content
In this tutorial, you sent bulk invitations to guest users outside of your organization. Next, learn how to bulk invite guest users on the portal and how to enforce MFA for them.