Note
Access to this page requires authorization. You can try signing in or changing directories.
Access to this page requires authorization. You can try changing directories.
Configure Microsoft Entra private network connectors to use outbound proxy servers. The article assumes the network environment already has a proxy server.
We start by looking at these main deployment scenarios:
- Configure connectors to bypass your on-premises outbound proxies.
- Configure connectors to use an outbound proxy to access Microsoft Entra application proxy.
- Configure using a proxy between the connector and backend application.
For more information about how connectors work, see Understand Microsoft Entra private network connectors.
Bypass outbound proxies
Connectors have underlying OS components that make outbound requests. These components automatically attempt to locate a proxy server on the network using Web Proxy Auto-Discovery (WPAD).
The OS components attempt to locate a proxy server by carrying out a Domain Name System (DNS) lookup for wpad.domainsuffix. If the lookup resolves in DNS, an HTTP request is then made to the Internet Protocol (IP) address for wpad.dat. This request becomes the proxy configuration script in your environment. The connector uses this script to select an outbound proxy server. However, connector traffic might continue to fail because more configuration settings are needed on the proxy.
You can configure the connector to bypass your on-premises proxy to ensure that it uses direct connectivity to the Microsoft Entra application proxy service. Direct connections are recommended because they require less configuration. However, some network policies require traffic going through a local proxy server.
To disable outbound proxy usage for the connector, edit the C:\Program Files\Microsoft Entra private network connector\MicrosoftEntraPrivateNetworkConnectorService.exe.config file and add the system.net section shown in the code sample:
<?xml version="1.0" encoding="utf-8" ?>
<configuration>
  <system.net>
    <defaultProxy enabled="false"></defaultProxy>
  </system.net>
  <runtime>
    <gcServer enabled="true"/>
  </runtime>
  <appSettings>
    <add key="TraceFilename" value="MicrosoftEntraPrivateNetworkConnector.log" />
  </appSettings>
</configuration>
To ensure that the Connector Updater service also bypasses the proxy, make a similar change to the MicrosoftEntraPrivateNetworkConnectorUpdaterService.exe.config file. This file is located at C:\Program Files\Microsoft Entra private network connector Updater.
Be sure to make copies of the original files, in case you need to revert to the default .config files.
Use the outbound proxy server
Some environments require all outbound traffic to go through an outbound proxy, without exception. As a result, bypassing the proxy isn't an option.
You can configure the connector traffic to go through the outbound proxy, as shown in the following diagram:
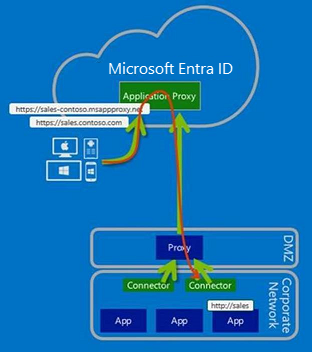
As a result of having only outbound traffic, there's no need to configure inbound access through your firewalls.
Note
Application proxy doesn't support authentication to other proxies. The connector/updater network service accounts should be able to connect to the proxy without being challenged for authentication.
Step 1: Configure the connector and related services to go through the outbound proxy
If WPAD is enabled in the environment and configured appropriately, the connector automatically discovers the outbound proxy server and attempt to use it. However, you can explicitly configure the connector to go through an outbound proxy.
To do so, edit the C:\Program Files\Microsoft Entra private network connector\MicrosoftEntraPrivateNetworkConnectorService.exe.config file, and add the system.net section shown in code sample. Change proxyserver:8080 to reflect your local proxy server name or IP address and port. The value must have the prefix http:// even if you're using an IP address.
<?xml version="1.0" encoding="utf-8" ?>
<configuration>
  <system.net>
    <defaultProxy>
      <proxy proxyaddress="http://proxyserver:8080" bypassonlocal="True" usesystemdefault="True"/>
    </defaultProxy>
  </system.net>
  <runtime>
    <gcServer enabled="true"/>
  </runtime>
  <appSettings>
    <add key="TraceFilename" value="MicrosoftEntraPrivateNetworkConnector.log" />
  </appSettings>
</configuration>
Next, configure the Connector Updater service to use the proxy by making a similar change to the C:\Program Files\Microsoft Entra private network connector Updater\MicrosoftEntraPrivateNetworkConnectorUpdaterService.exe.config file.
Note
The Connector service evaluates the defaultProxy configuration for usage in %SystemRoot%\Microsoft.NET\Framework64\v4.0.30319\Config\machine.config, if the defaultProxy isn't configured (by default) in MicrosoftEntraPrivateNetworkConnectorService.exe.config. The same applies to the Connector Updater service (MicrosoftEntraPrivateNetworkConnectorUpdaterService.exe.config) too.
Step 2: Configure the proxy to allow traffic from the connector and related services to flow through
There are four aspects to consider at the outbound proxy:
- Proxy outbound rules
- Proxy authentication
- Proxy ports
- Transport Layer Security (TLS) inspection
Proxy outbound rules
Allow access to the following URLs:
| URL | Port | Use |
|---|---|---|
| *.msappproxy.net *.servicebus.windows.net |
443/HTTPS | Communication between the connector and the application proxy cloud service |
| crl3.digicert.com crl4.digicert.com ocsp.digicert.com crl.microsoft.com oneocsp.microsoft.com ocsp.msocsp.com |
80/HTTP | The connector uses these URLs to verify certificates. |
| login.windows.net secure.aadcdn.microsoftonline-p.com *.microsoftonline.com *.microsoftonline-p.com *.msauth.net *.msauthimages.net *.msecnd.net *.msftauth.net *.msftauthimages.net *.phonefactor.net enterpriseregistration.windows.net management.azure.com policykeyservice.dc.ad.msft.net ctldl.windowsupdate.com |
443/HTTPS | The connector uses these URLs during the registration process. |
| ctldl.windowsupdate.com www.microsoft.com/pkiops |
80/HTTP | The connector uses these URLs during the registration process. |
If your firewall or proxy allows you to configure DNS allowlists, you can allow connections to *.msappproxy.net and *.servicebus.windows.net.
If you can't allow connectivity by Fully Qualified Domain Name (FQDN) and need to specify IP ranges instead, use these options:
- Allow the connector outbound access to all destinations.
- Allow the connector outbound access to all of the Azure datacenter IP ranges. The challenge with using the list of Azure datacenter IP ranges is that they're updated weekly. You need to put a process in place to ensure that your access rules are updated accordingly. Only using a subset of the IP addresses causes your configuration to break. The latest Azure Data Center IP ranges are downloaded at https://download.microsoft.com. Use the search term,
Azure IP Ranges and Service Tags. Be sure to select the relevant cloud. For example, the public cloud IP ranges can be found by searching forAzure IP Ranges and Service Tags – Public Cloud. The US Government cloud can be found by searching forAzure IP Ranges and Service Tags – US Government Cloud.
Proxy authentication
Proxy authentication isn't currently supported. Our current recommendation is to allow the connector anonymous access to the Internet destinations.
Proxy ports
The connector makes outbound TLS-based connections by using the CONNECT method. This method essentially sets up a tunnel through the outbound proxy. Configure the proxy server to allow tunneling to ports 443 and 80.
Note
When Service Bus runs over HTTPS, it uses port 443. However, by default, Service Bus attempts direct Transmission Control Protocol (TCP) connections and falls back to HTTPS only if direct connectivity fails.
TLS inspection
Don't use TLS inspection for the connector traffic, because it causes problems for the connector traffic. The connector uses a certificate to authenticate to the application proxy service, and that certificate can be lost during TLS inspection.
Configure using a proxy between the connector and backend application
Using a forward proxy for the communication towards the backend application is a special requirement in some environments. To enable a forward proxy, follow these steps:
Step 1: Add the required registry value to the server
- To enable use of the default proxy, add the registry value (DWORD)
UseDefaultProxyForBackendRequests = 1to the connector configuration registry key located inHKEY_LOCAL_MACHINE\Software\Microsoft\Microsoft Entra private network connector.
Step 2: Configure the proxy server manually using netsh command
- Enable the group policy
Make proxy settings per-machine. The group policy is found in:Computer Configuration\Policies\Administrative Templates\Windows Components\Internet Explorer. The group policy needs to be set rather than having the policy set per user. - Run
gpupdate /forceon the server. Alternatively, to ensure the group policy is updated, reboot the server. - Launch an elevated command prompt with admin rights and enter
control inetcpl.cpl. - Configure the required proxy settings.
The settings make the connector use the same forward proxy for the communication to Azure and to the backend application. Modify the file MicrosoftEntraPrivateNetworkConnectorService.exe.config to change the forward proxy. Forward proxy configuration is described in the sections Bypass outbound proxies and Use the outbound proxy server.
Note
There are various ways to configure the internet proxy in the operating system. Proxy settings configured via NETSH WINHTTP (run NETSH WINHTTP SHOW PROXY to verify) override the proxy settings you configured in Step 2.
The connector updater service uses the machine proxy. The setting is found in the MicrosoftEntraPrivateNetworkConnectorUpdaterService.exe.config file.
Troubleshoot connector proxy problems and service connectivity issues
Now you should see all traffic flowing through the proxy. If you have problems, the following troubleshooting information should help.
The best way to identify and troubleshoot connector connectivity issues is to take a network capture while starting the connector service. Here are some quick tips on capturing and filtering network traces.
You can use the monitoring tool of your choice. For the purposes of this article, we used Microsoft Message Analyzer.
Note
Microsoft Message Analyzer (MMA) was retired and its download packages removed from microsoft.com sites on November 25 2019. There's currently no Microsoft replacement for Microsoft Message Analyzer in development at this time. For similar functionality, consider using a non-Microsoft partner network protocol analyzer tool such as Wireshark.
The following examples are specific to Message Analyzer, but the principles can be applied to any analysis tool.
Take a capture of connector traffic
For initial troubleshooting, perform the following steps:
From
services.msc, stop the Microsoft Entra private network connector service.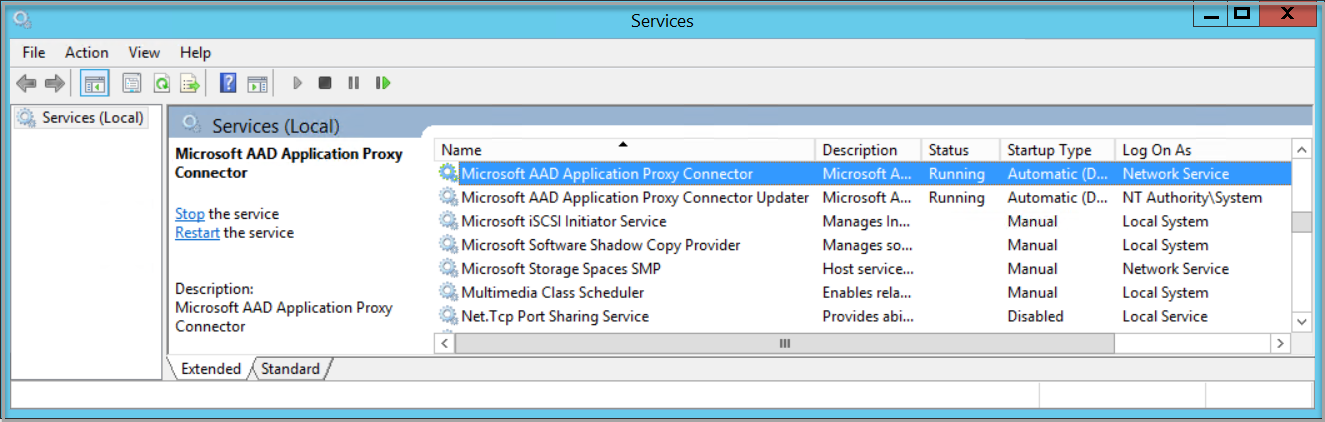
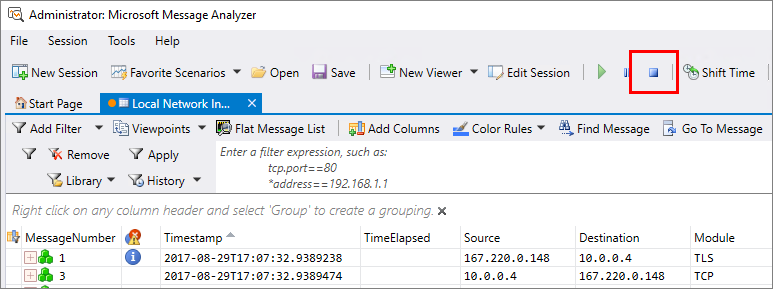
Run Message Analyzer as an administrator.
Select Start local trace.
Start the Microsoft Entra private network connector service.
Stop the network capture.
Check if the connector traffic bypasses outbound proxies
If you expect the connector to make direct connections to application proxy services, SynRetransmit responses on port 443 are an indication that you have a network or firewall problem.
Use the Message Analyzer filter to identify failed Transmission Control Protocol (TCP) connection attempts. Enter property.TCPSynRetransmit in the filter box and select Apply.
A synchronization (SYN) packet is the first packet sent to establish a TCP connection. If this packet doesn’t return a response, the SYN is reattempted. You can use the filter to see any retransmitted SYN packets. Then, you can check whether these SYN packets correspond to any connector-related traffic.
Check if the connector traffic uses outbound proxies
If you configured your private network connector traffic to go through the proxy servers, look for failed https connections to your proxy.
Use the Message Analyzer filter to identify failed HTTPS connection attempts to your proxy. Enter (https.Request or https.Response) and tcp.port==8080 in the Message Analyzer filter, replacing 8080 with your proxy service port. Select Apply to see the filter results.
The preceding filter shows just the HTTPs requests and responses to/from the proxy port. You're looking for the CONNECT requests that show communication with the proxy server. Upon success, you get an HTTP OK (200) response.
If you see other response codes, such as 407 or 502, that means that the proxy is requiring authentication or not allowing the traffic for some other reason. At this point, you engage your proxy server support team.