Represent AD FS security policies in Microsoft Entra ID: Mappings and examples
In this article, you'll learn how to map authorization and multifactor authentication rules from AD FS to Microsoft Entra ID when moving your app authentication. Find out how to meet your app owner's security requirements while making the app migration process easier with mappings for each rule.
When moving your app authentication to Microsoft Entra ID, create mappings from existing security policies to their equivalent or alternative variants available in Microsoft Entra ID. Ensuring that these mappings can be done while meeting security standards required by your app owners makes the rest of the app migration easier.
For each rule example, we show what the rule looks like in AD FS, the AD FS rule language equivalent code, and how this maps to Microsoft Entra ID.
Map authorization rules
The following are examples of various types of authorization rules in AD FS, and how you map them to Microsoft Entra ID.
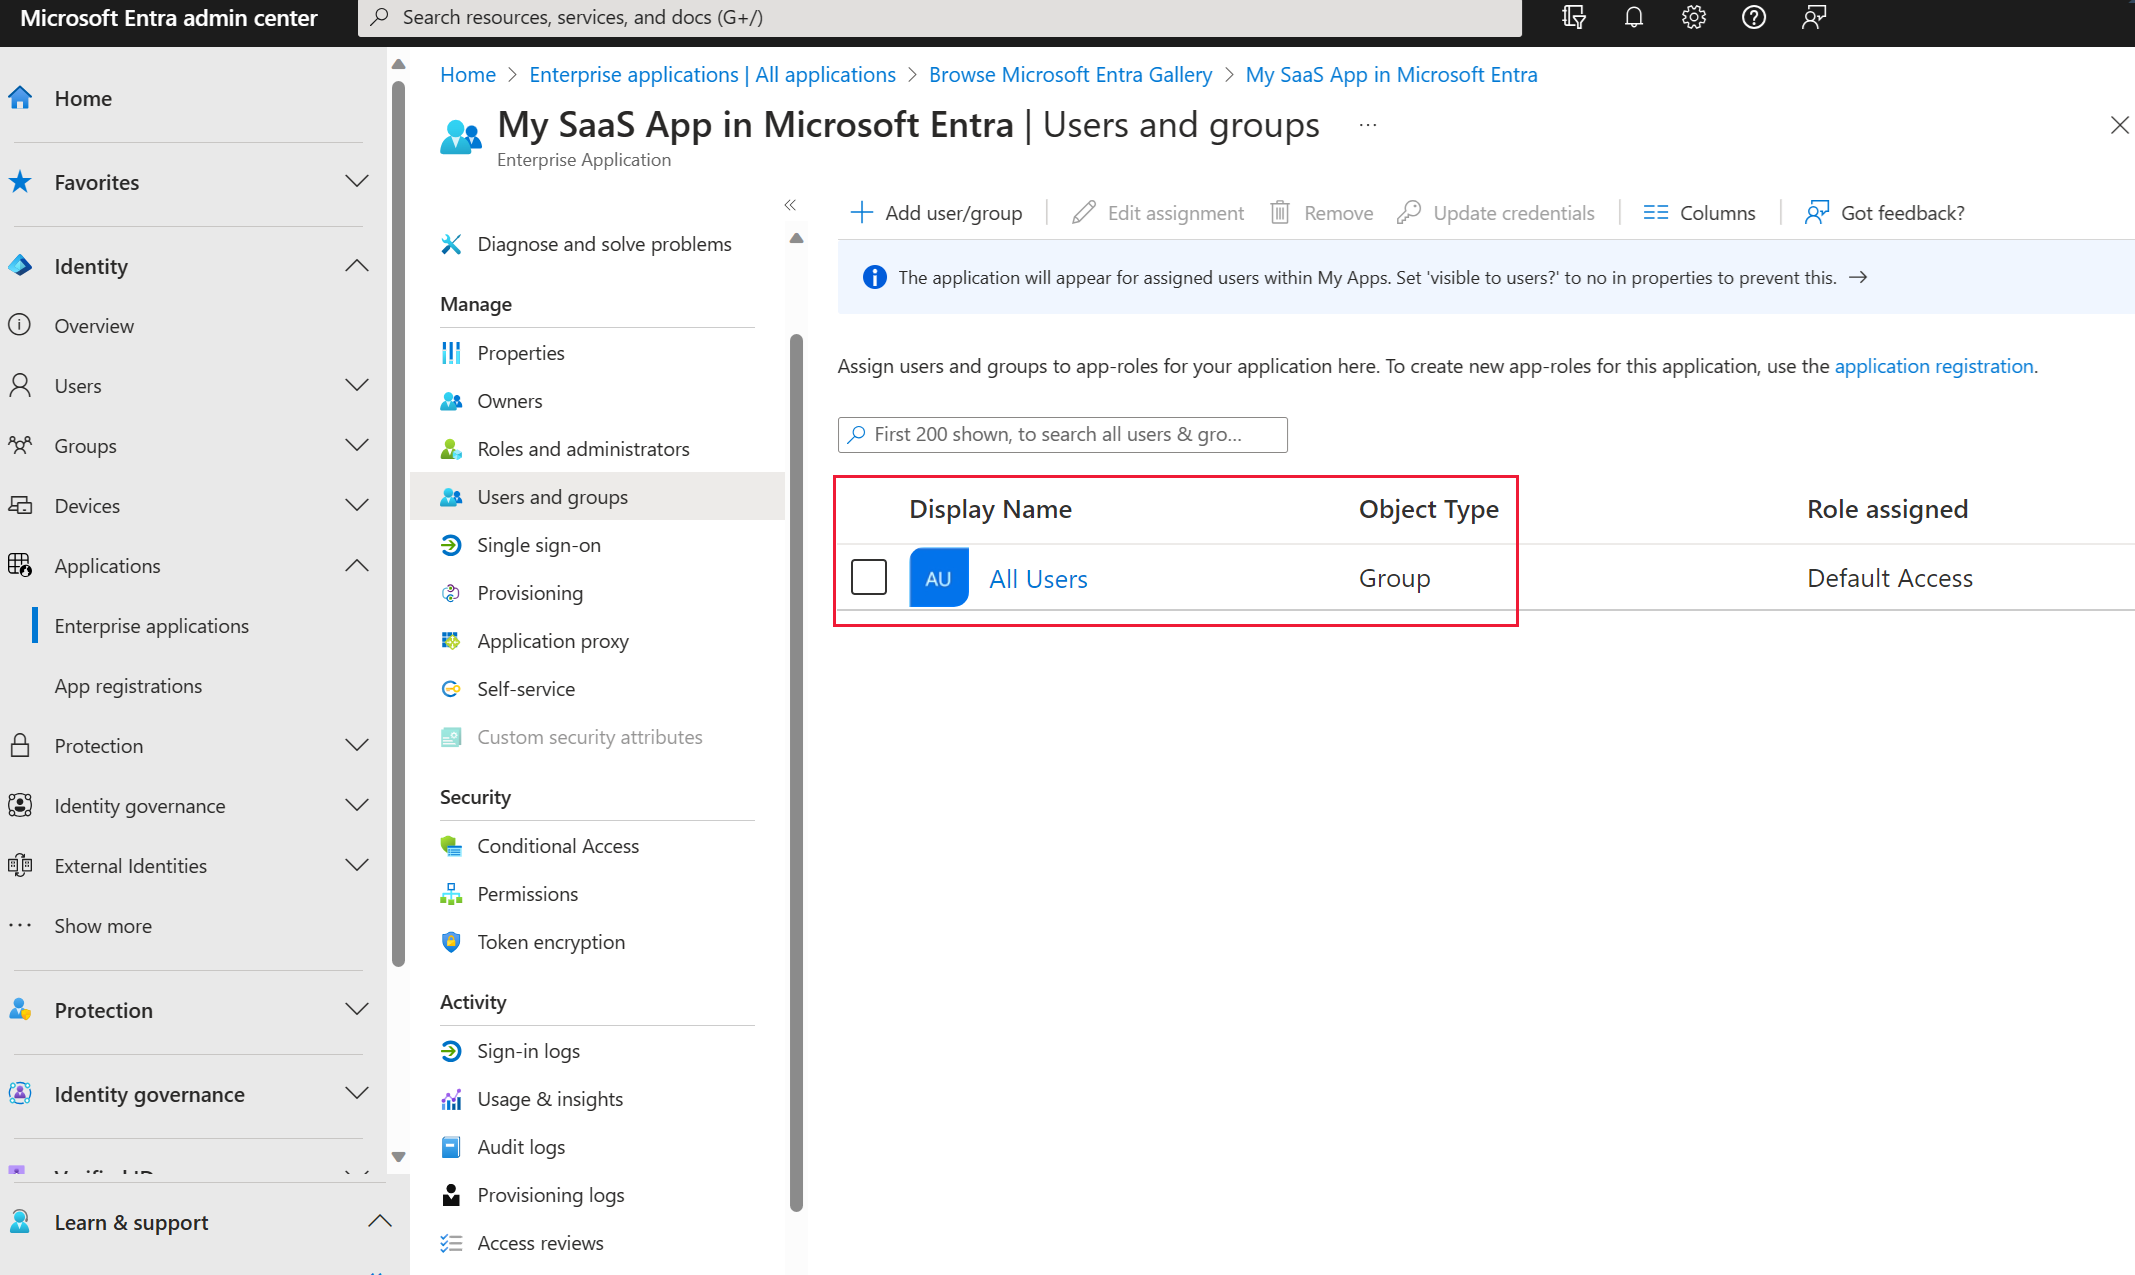
Example 1: Permit access to all users
Permit Access to All Users in AD FS:
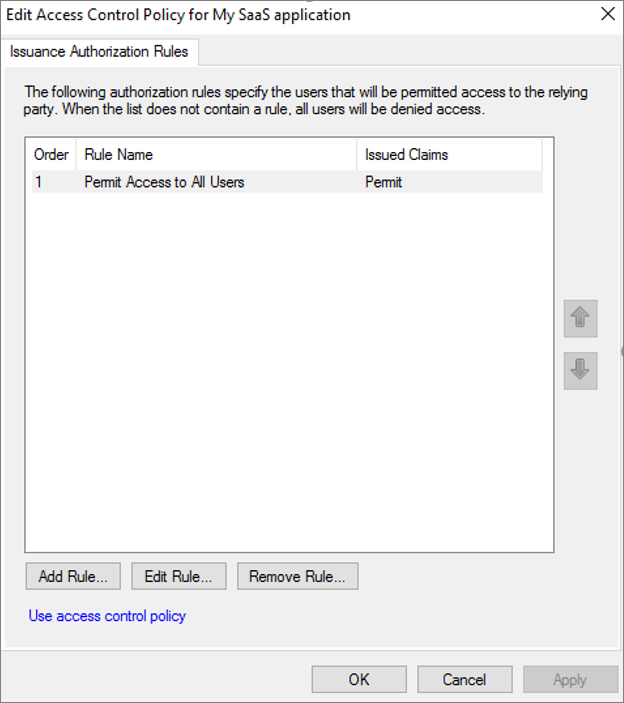
This maps to Microsoft Entra ID in one of the following ways:
Set Assignment required to No.
Note
Setting Assignment required to Yes requires that users are assigned to the application to gain access. When set to No, all users have access. This switch doesn't control what users see in the My Apps experience.
In the Users and groups tab, assign your application to the All Users automatic group. You must enable Dynamic Groups in your Microsoft Entra tenant for the default All Users group to be available.
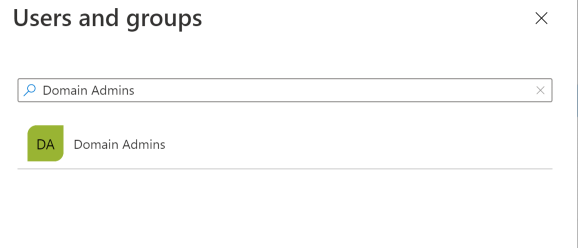
Example 2: Allow a group explicitly
Explicit group authorization in AD FS:
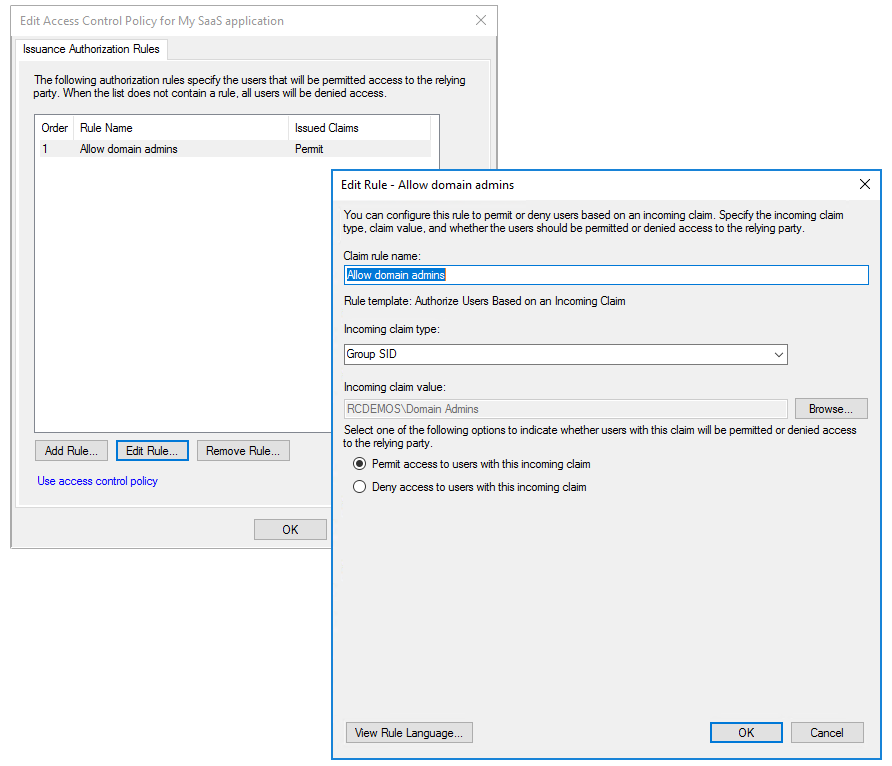
To map this rule to Microsoft Entra ID:
In the Microsoft Entra admin center, create a user group that corresponds to the group of users from AD FS.
Assign app permissions to the group:
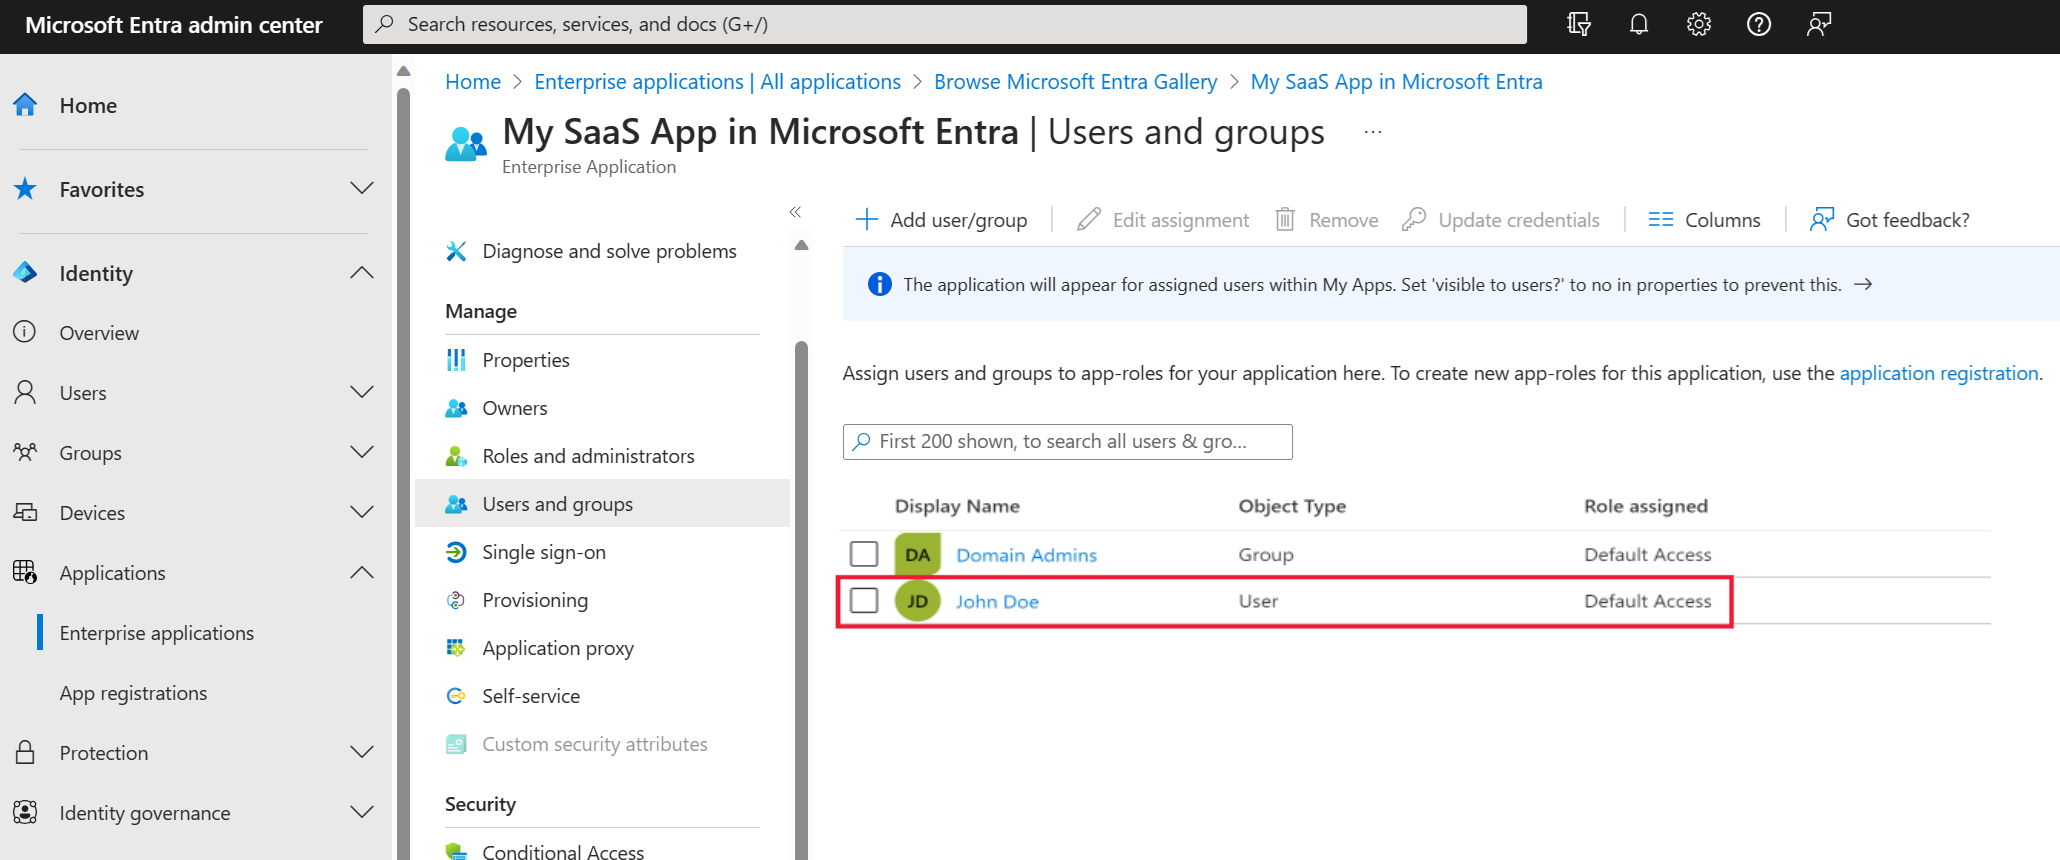
Example 3: Authorize a specific user
Explicit user authorization in AD FS:
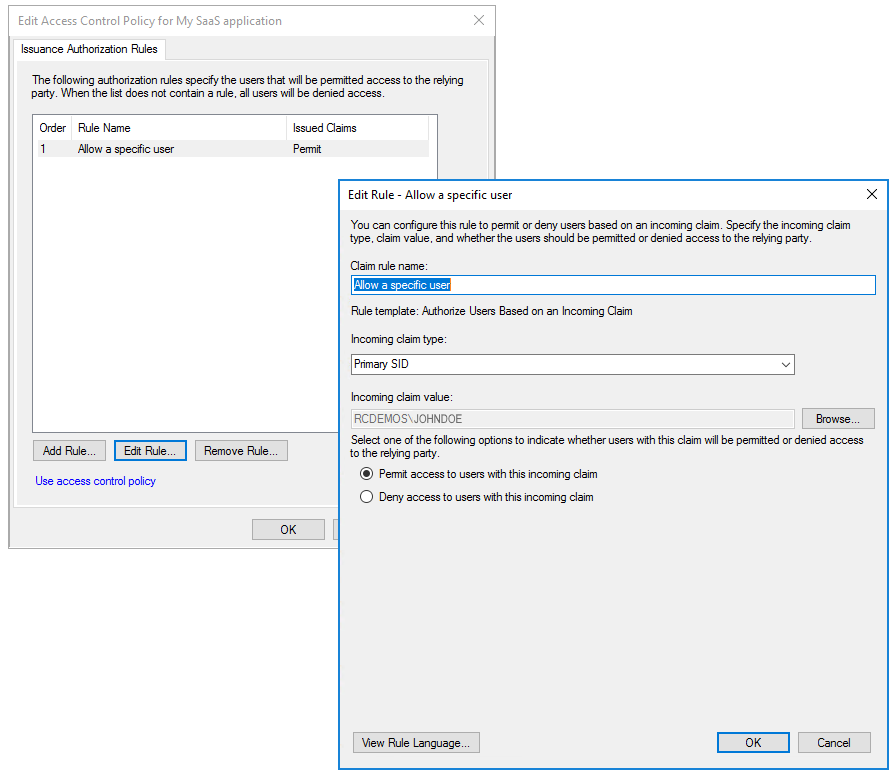
To map this rule to Microsoft Entra ID:
In the Microsoft Entra admin center, add a user to the app through the Add Assignment tab of the app as shown below:
Map multifactor authentication rules
An on-premises deployment of Multifactor Authentication (MFA) and AD FS still works after the migration because you're federated with AD FS. However, consider migrating to Azure's built-in MFA capabilities that are tied into Microsoft Entra Conditional Access policies.
The following are examples of types of MFA rules in AD FS, and how you can map them to Microsoft Entra ID based on different conditions.
MFA rule settings in AD FS:
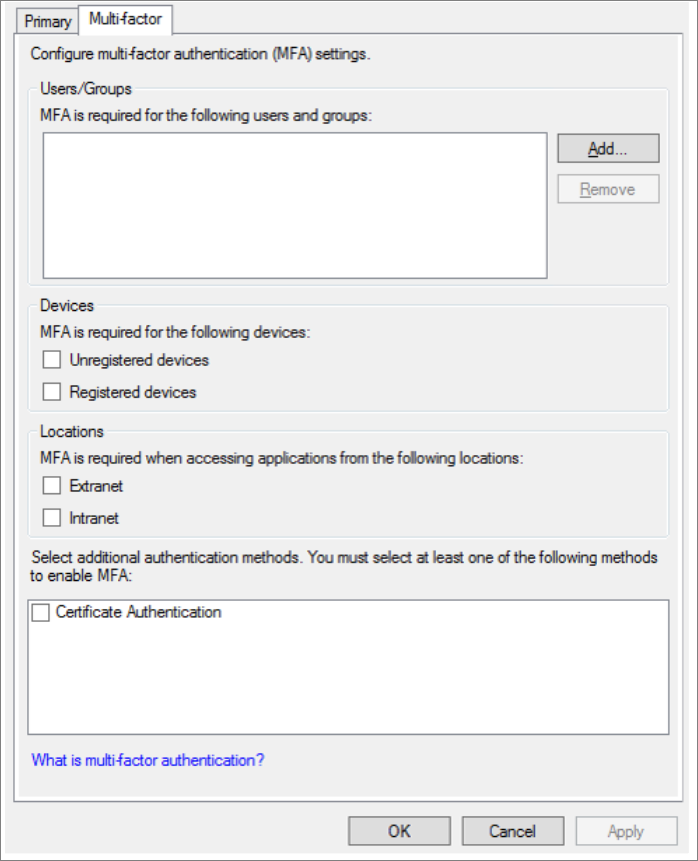
Example 1: Enforce MFA based on users/groups
The users/groups selector is a rule that allows you to enforce MFA on a per-group (Group SID) or per-user (Primary SID) basis. Apart from the users/groups assignments, all other checkboxes in the AD FS MFA configuration UI function as extra rules that are evaluated after the users/groups rule is enforced.
Common Conditional Access policy: Require MFA for all users
Example 2: Enforce MFA for unregistered devices
Specify MFA rules for unregistered devices in Microsoft Entra:
Map Emit attributes as Claims rule
Emit attributes as Claims rule in AD FS:
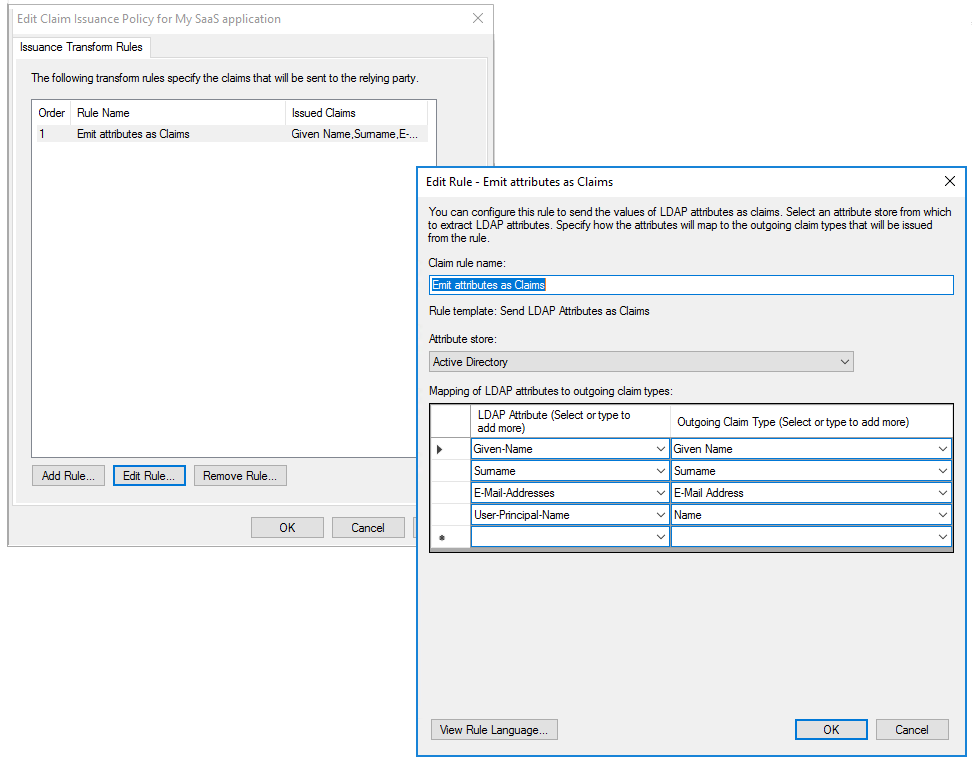
To map the rule to Microsoft Entra ID:
In the Microsoft Entra admin center, select Enterprise Applications and then Single sign-on to view the SAML-based sign-on configuration:
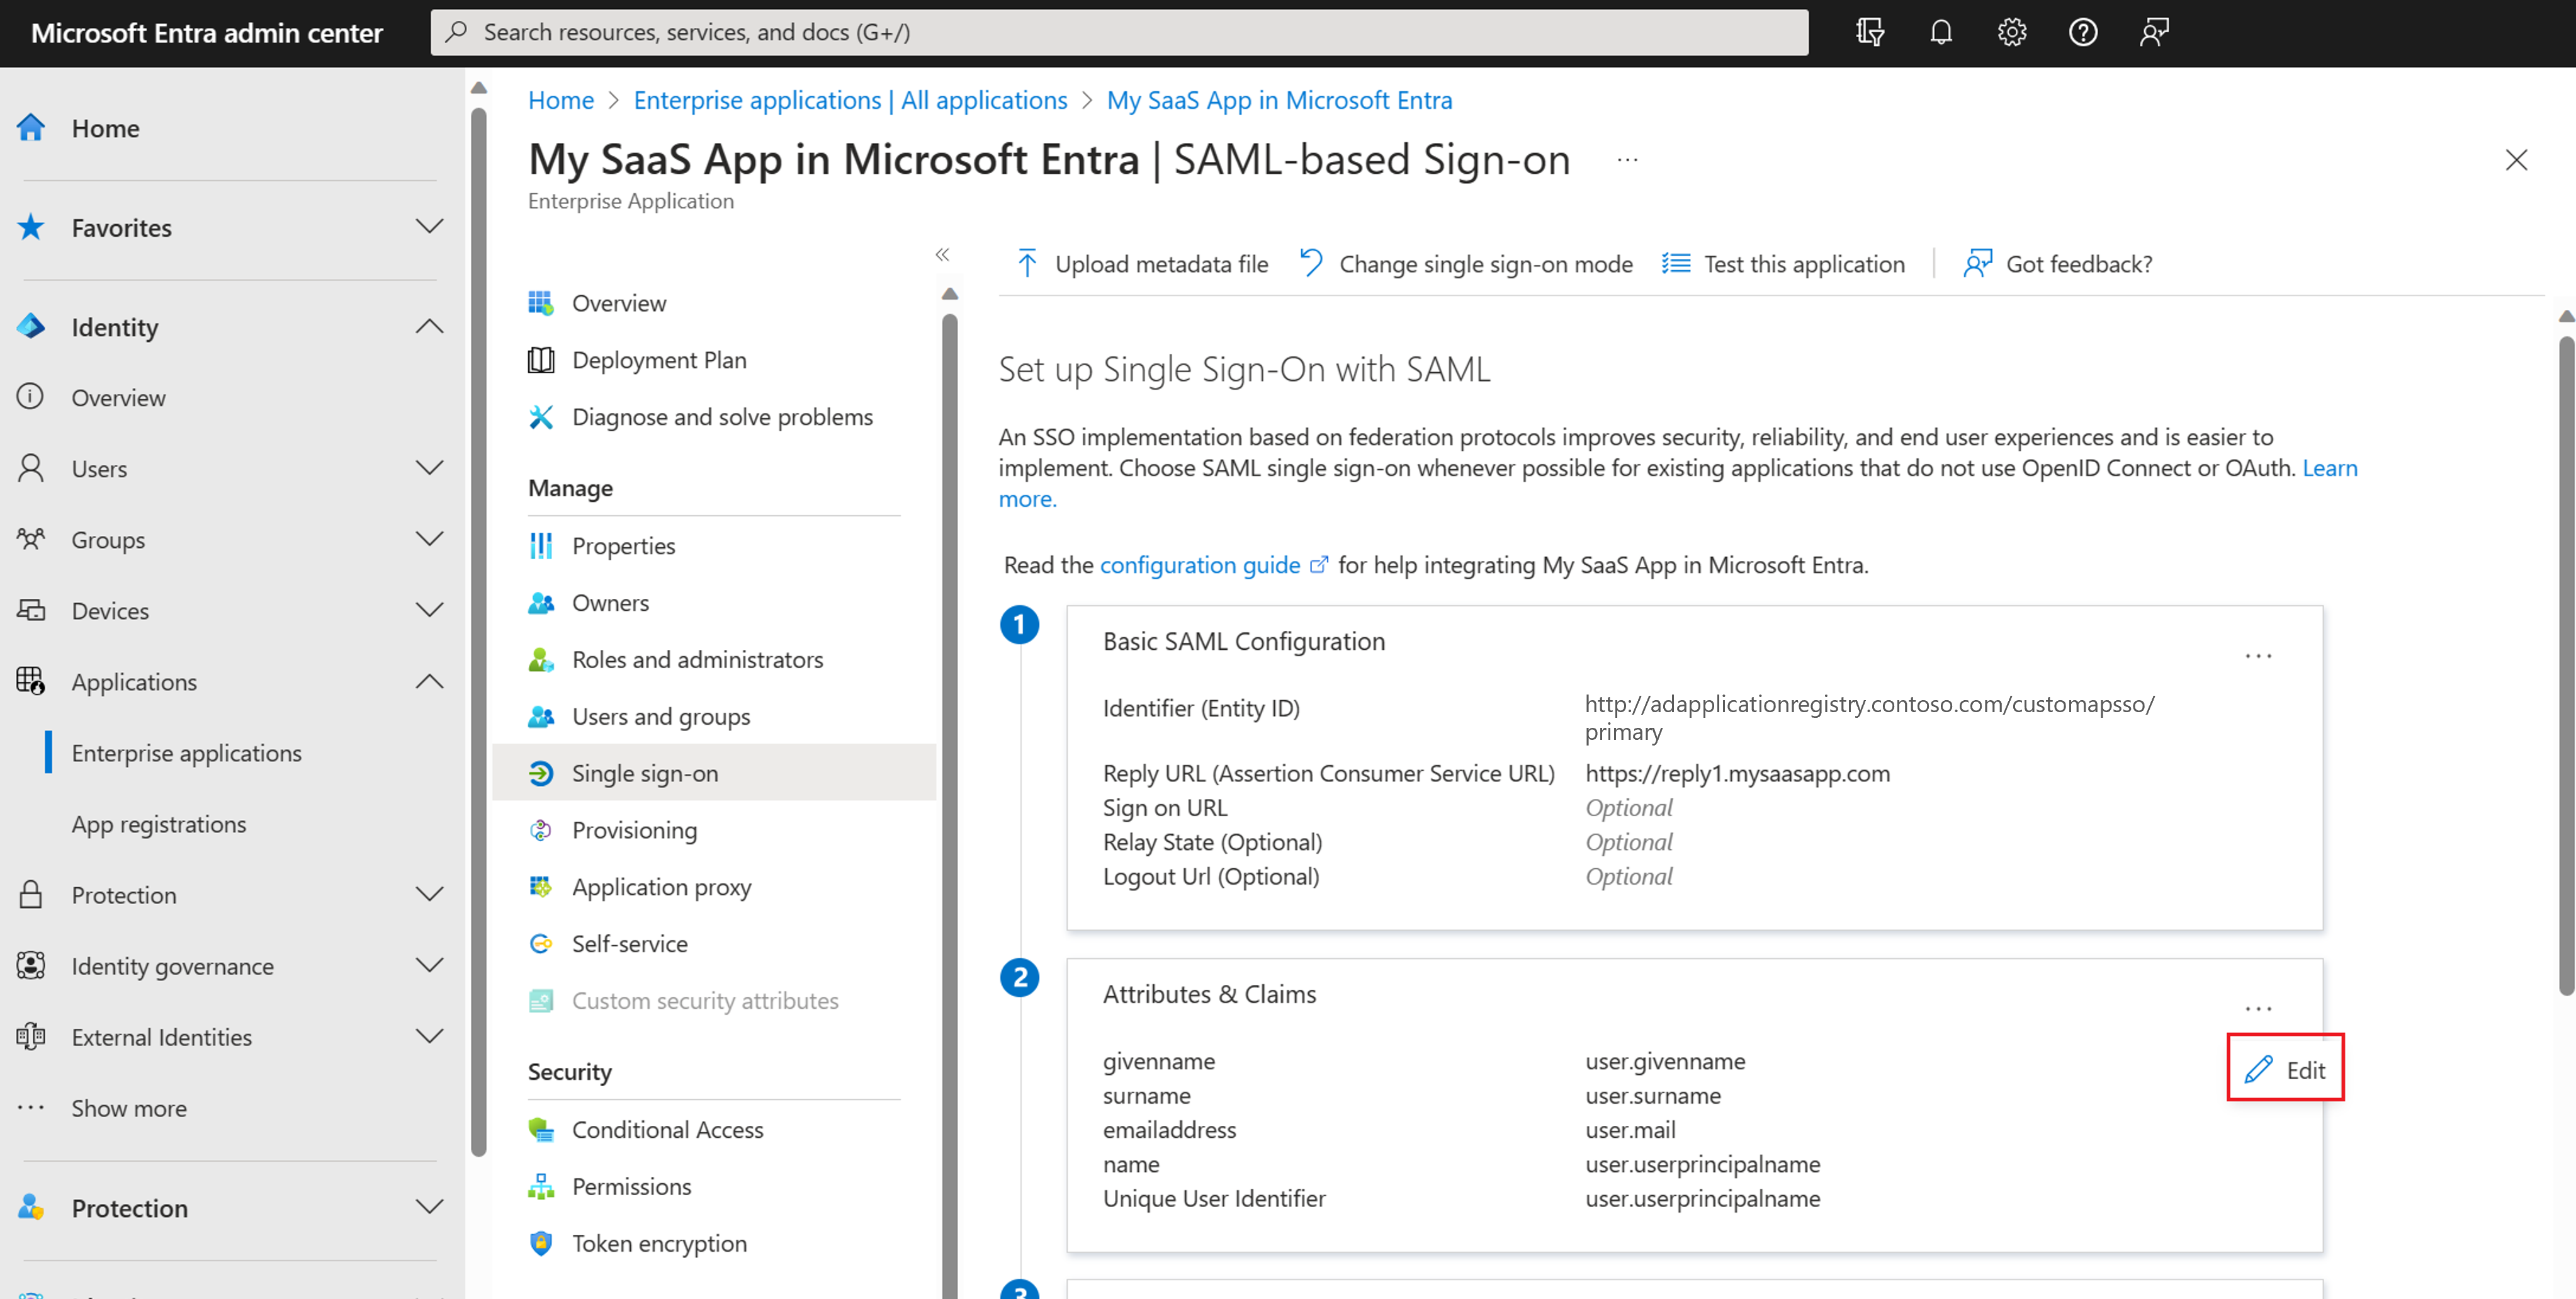
Select Edit (highlighted) to modify the attributes:


Map built-In access control policies
Built-in access control policies in AD FS 2016:
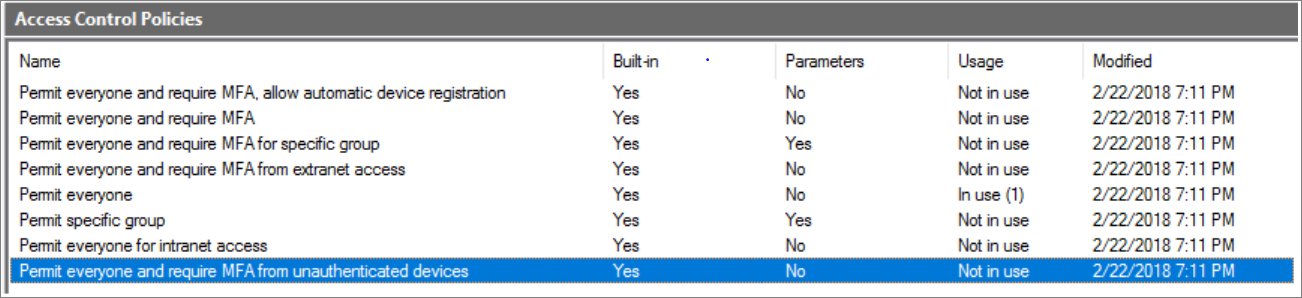
To implement built-in policies in Microsoft Entra ID, use a new Conditional Access policy and configure the access controls, or use the custom policy designer in AD FS 2016 to configure access control policies. The Rule Editor has an exhaustive list of Permit and Except options that can help you make all kinds of permutations.

In this table, we've listed some useful Permit and Except options and how they map to Microsoft Entra ID.
| Option | How to configure Permit option in Microsoft Entra ID? | How to configure Except option in Microsoft Entra ID? |
|---|---|---|
| From specific network | Maps to Named Location in Microsoft Entra | Use the Exclude option for trusted locations |
| From specific groups | Set a User/Groups Assignment | Use the Exclude option in Users and Groups |
| From Devices with Specific Trust Level | Set this from the Device State control under Assignments -> Conditions | Use the Exclude option under Device State Condition and Include All devices |
| With Specific Claims in the Request | This setting can't be migrated | This setting can't be migrated |
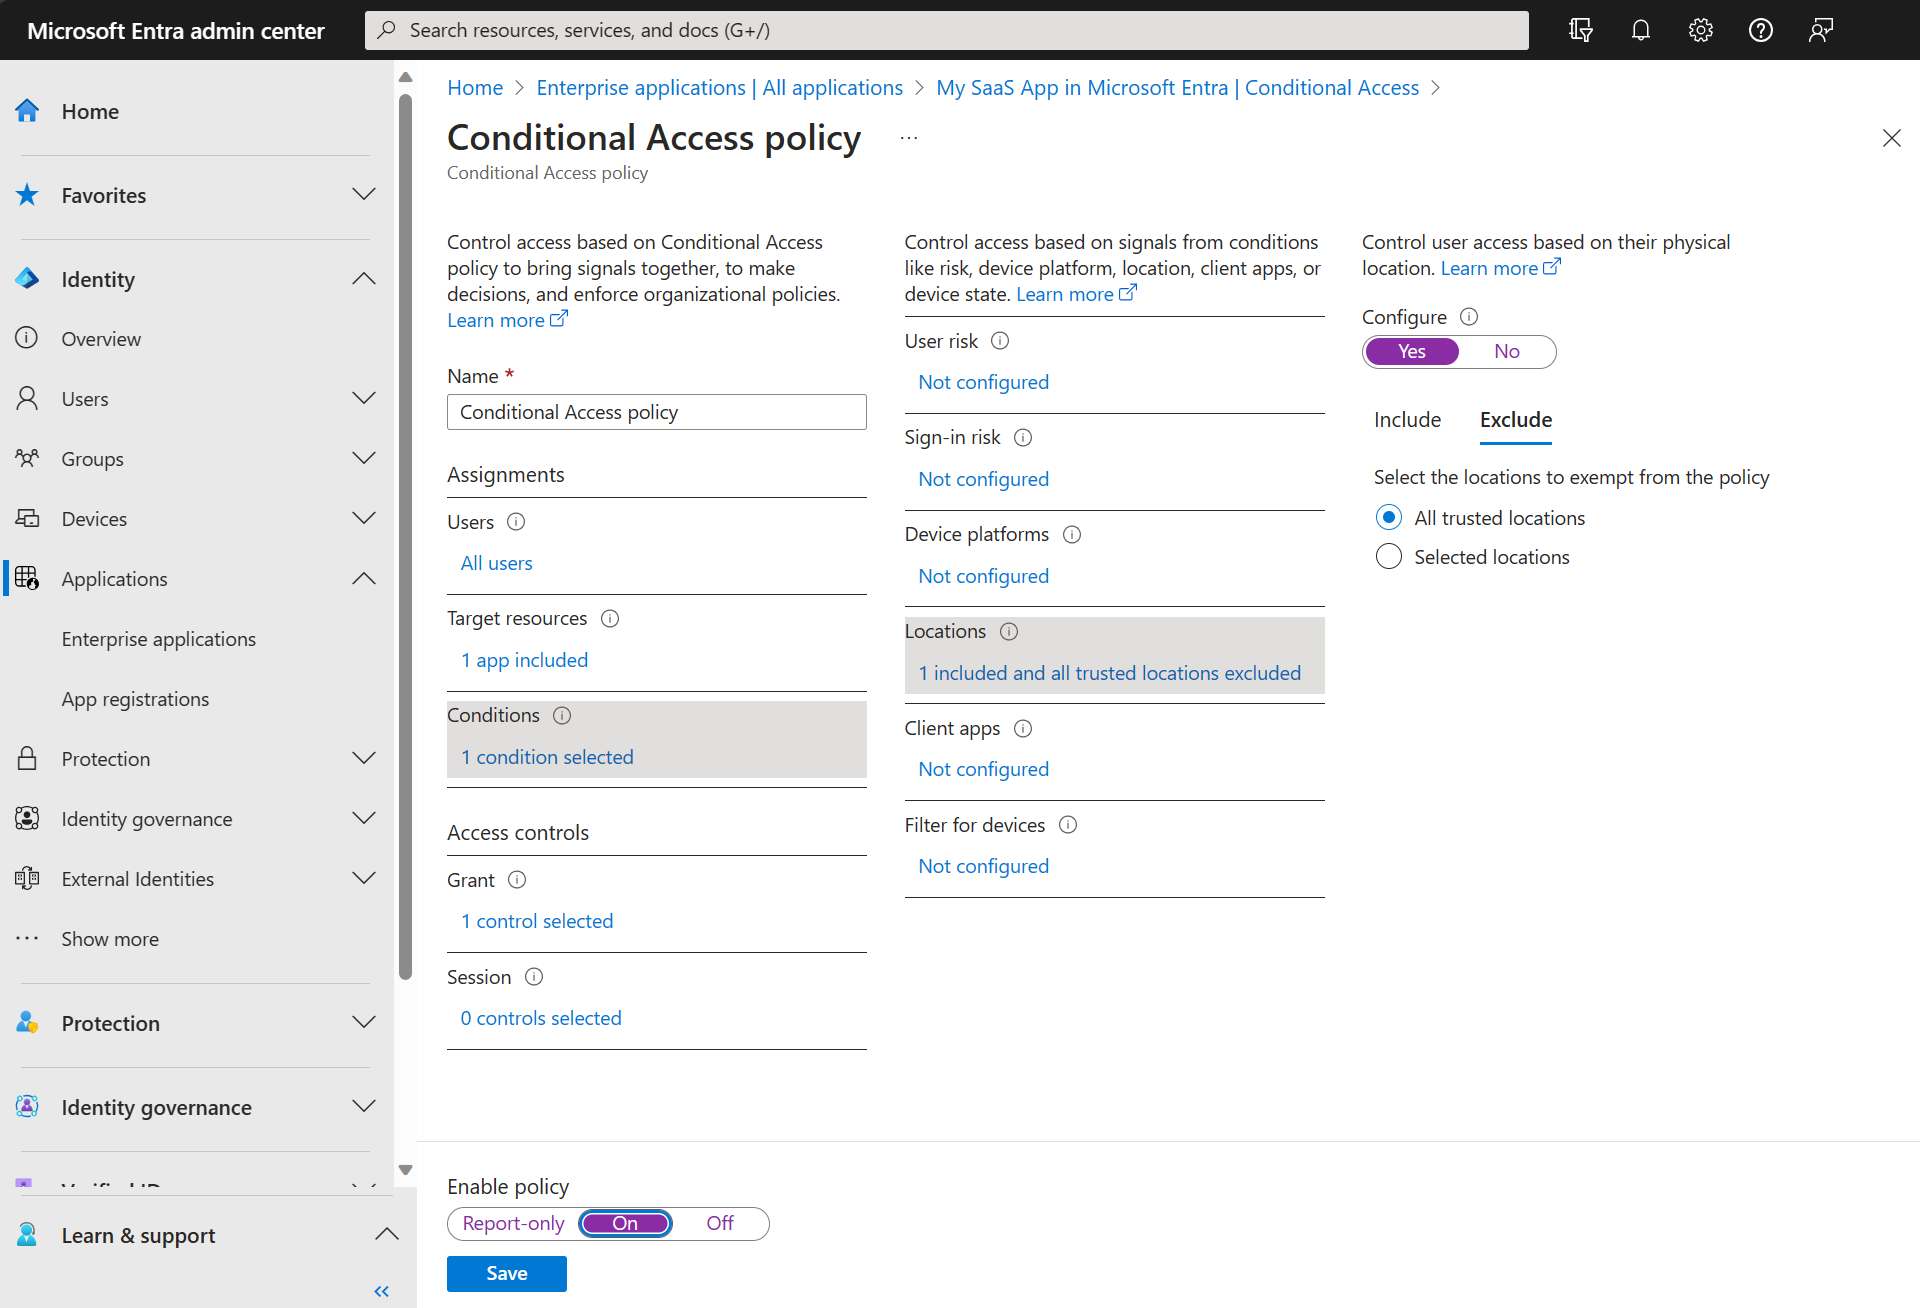
Here's an example of how to configure the Exclude option for trusted locations in the Microsoft Entra admin center:
Transition users from AD FS to Microsoft Entra ID
Sync AD FS groups in Microsoft Entra ID
When you map authorization rules, apps that authenticate with AD FS may use Active Directory groups for permissions. In such a case, use Microsoft Entra Connect to sync these groups with Microsoft Entra ID before migrating the applications. Make sure that you verify those groups and membership before migration so that you can grant access to the same users when the application is migrated.
For more information, see Prerequisites for using Group attributes synchronized from Active Directory.
Set up user self-provisioning
Some SaaS applications support the ability to Just-in-Time (JIT) provision users when they first sign in to the application. In Microsoft Entra ID, app provisioning refers to automatically creating user identities and roles in the cloud (SaaS) applications that users need to access. Users that are migrated already have an account in the SaaS application. Any new users added after the migration need to be provisioned. Test SaaS app provisioning once the application is migrated.
Sync external users in Microsoft Entra ID
Your existing external users can be set up in these two ways in AD FS:
- External users with a local account within your organization—You continue to use these accounts in the same way that your internal user accounts work. These external user accounts have a principle name within your organization, although the account's email may point externally.
As you progress with your migration, you can take advantage of the benefits that Microsoft Entra B2B offers by migrating these users to use their own corporate identity when such an identity is available. This streamlines the process of signing in for those users, as they're often signed in with their own corporate sign-in. Your organization's administration is easier as well, by not having to manage accounts for external users.
- Federated external Identities—If you're currently federating with an external organization, you have a few approaches to take:
- Add Microsoft Entra B2B collaboration users in the Microsoft Entra admin center. You can proactively send B2B collaboration invitations from the Microsoft Entra administrative portal to the partner organization for individual members to continue using the apps and assets they're used to.
- Create a self-service B2B sign-up workflow that generates a request for individual users at your partner organization using the B2B invitation API.
No matter how your existing external users are configured, they likely have permissions that are associated with their account, either in group membership or specific permissions. Evaluate whether these permissions need to be migrated or cleaned up.
Accounts within your organization that represent an external user need to be disabled once the user has been migrated to an external identity. The migration process should be discussed with your business partners, as there may be an interruption in their ability to connect to your resources.
Next steps
- Read Migrating application authentication to Microsoft Entra ID.
- Set up Conditional Access and MFA.
- Try a step-wise code sample:AD FS to Microsoft Entra application migration playbook for developers.