Note
Access to this page requires authorization. You can try signing in or changing directories.
Access to this page requires authorization. You can try changing directories.
This article shows you how to give an Azure virtual machine (VM) managed identity access to an Azure storage account. Once you've configured an Azure resource with a managed identity, you can then give the managed identity access to another resource, similar to any security principal.
Prerequisites
- Be sure you've enabled managed identity on an Azure resource, such as an Azure virtual machine or Azure virtual machine scale set. For more information about managed identity for Azure resources, see What are managed identities for Azure resources?.
- Review the difference between a system-assigned and user-assigned managed identity.
- If you don't already have an Azure account, sign up for a free account before continuing.
Use Azure RBAC to assign a managed identity access to another resource using the Azure portal
Important
The steps outlined below show is how you grant access to a service using Azure RBAC. Check specific service documentation on how to grant access; for example, check Azure Data Explorer for instructions. Some Azure services are in the process of adopting Azure RBAC on the data plane.
Sign in to the Azure portal using an account associated with the Azure subscription for which you've configured the managed identity.
Navigate to the desired resource that you want to modify access control. In this example, you'll give an Azure virtual machine (VM) access to a storage account, then you can navigate to the storage account.
Select Access control (IAM).
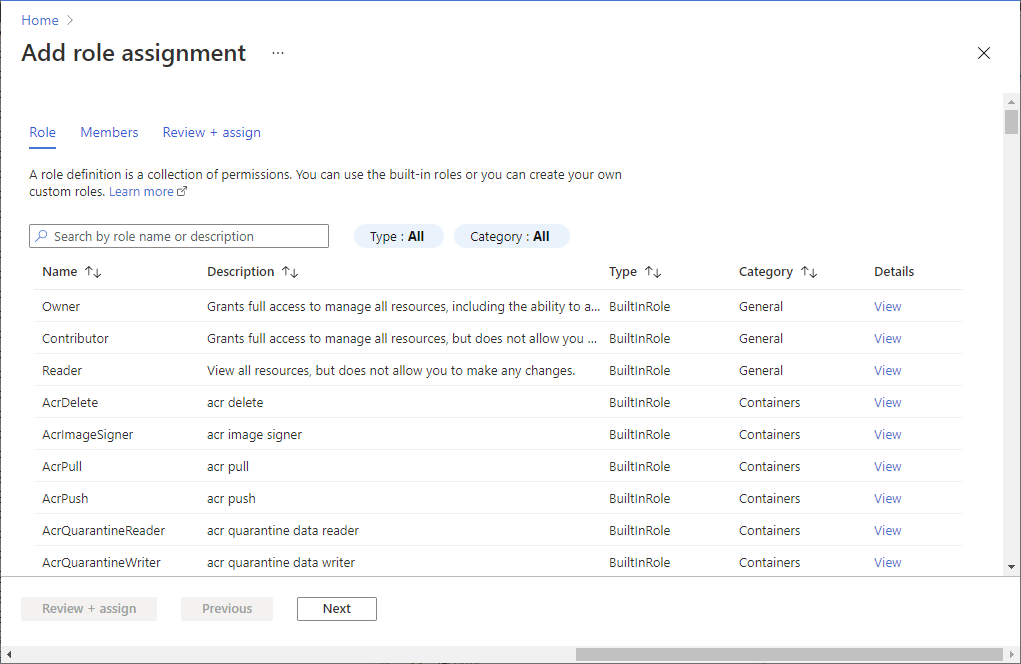
Select Add > Add role assignment to open the Add role assignment page.
Select the role and managed identity. For detailed steps, see Assign Azure roles using the Azure portal.
Use Azure RBAC to assign a managed identity access to another resource using CLI
Use the Bash environment in Azure Cloud Shell. For more information, see Get started with Azure Cloud Shell.

If you prefer to run CLI reference commands locally, install the Azure CLI. If you're running on Windows or macOS, consider running Azure CLI in a Docker container. For more information, see How to run the Azure CLI in a Docker container.
If you're using a local installation, sign in to the Azure CLI by using the az login command. To finish the authentication process, follow the steps displayed in your terminal. For other sign-in options, see Authenticate to Azure using Azure CLI.
When you're prompted, install the Azure CLI extension on first use. For more information about extensions, see Use and manage extensions with the Azure CLI.
Run az version to find the version and dependent libraries that are installed. To upgrade to the latest version, run az upgrade.
In this example, you give an Azure virtual machine (VM) managed access to a storage account. First use az resource list to get the service principal for a VM named myVM:
spID=$(az resource list -n myVM --query [*].identity.principalId --out tsv)For an Azure Virtual Machine (VM) scale set, the command is the same except here you get the service principal for the VM set named "DevTestVMSS":
spID=$(az resource list -n DevTestVMSS --query [*].identity.principalId --out tsv)Once you have the service principal ID, use az role assignment create to give the virtual machine or virtual machine scale set Reader access to a storage account called "myStorageAcct":
az role assignment create --assignee $spID --role 'Reader' --scope /subscriptions/<mySubscriptionID>/resourceGroups/<myResourceGroup>/providers/Microsoft.Storage/storageAccounts/myStorageAcct
Use Azure RBAC to assign a managed identity access to another resource using PowerShell
Note
We recommend that you use the Azure Az PowerShell module to interact with Azure. See Install Azure PowerShell to get started. To learn how to migrate to the Az PowerShell module, see Migrate Azure PowerShell from AzureRM to Az.
To run the scripts in this example, you have two options:
- Use the Azure Cloud Shell, which you can open using the Try It button on the top-right corner of code blocks.
- Run scripts locally by installing the latest version of Azure PowerShell, then sign in to Azure using
Connect-AzAccount.
Enable managed identity on an Azure resource, such as an Azure VM.
Give the Azure virtual machine (VM) access to a storage account.
- Use Get-AzVM to get the service principal for the VM named
myVM, which was created when you enabled managed identity. - Use New-AzRoleAssignment to give the VM Reader access to a storage account called
myStorageAcct:
$spID = (Get-AzVM -ResourceGroupName myRG -Name myVM).identity.principalid New-AzRoleAssignment -ObjectId $spID -RoleDefinitionName "Reader" -Scope "/subscriptions/<mySubscriptionID>/resourceGroups/<myResourceGroup>/providers/Microsoft.Storage/storageAccounts/<myStorageAcct>"- Use Get-AzVM to get the service principal for the VM named
Next steps
- To enable managed identities on an Azure virtual machine, see Configure managed identities for Azure resources.
- To enable managed identities on an Azure virtual machine scale set, see Configure managed identities for Azure resources on a virtual machine scale set.