Note
Access to this page requires authorization. You can try signing in or changing directories.
Access to this page requires authorization. You can try changing directories.
In this quickstart, you use a sample web app to learn how to sign in users or agents and call downstream APIs by using its own identity. The sample app uses the Microsoft Entra SDK for AgentID to validate user tokens for delegated access and uses application identity for service-to-service communication with downstream APIs like Microsoft Graph.
Prerequisites
Install Node.js 18.x or later.
Install Docker Desktop.
An Azure account with an active subscription. If you don't already have one, Create an account for free.
This Azure account must have permissions to manage applications. Any of the following Microsoft Entra roles include the required permissions:
- Application Administrator
- Application Developer
A workforce tenant. You can use your Default Directory or set up a new tenant.
Create and configure your Microsoft Entra application
To complete the rest of the quickstart, you need to first register an application in Microsoft Entra ID.
Create application registration
Follow these steps to create the app registration:
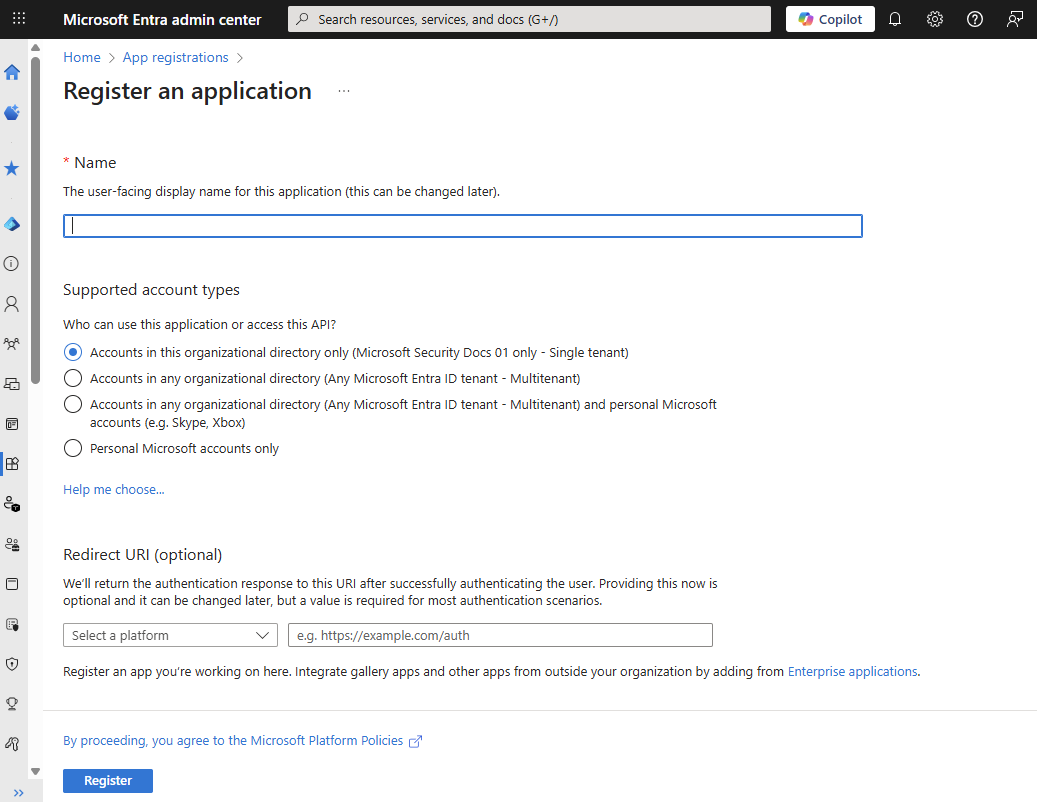
Sign in to the Microsoft Entra admin center as at least an Application Developer.
If you have access to multiple tenants, use the Settings icon
 in the top menu to switch to the tenant in which you want to register the application.
Browse to Entra ID > App registrations and select New registration.
Enter a meaningful Name for your app, such as identity-client-app. App users see this name, and you can change it at any time. You can have multiple app registrations with the same name.
Under Supported account types, specify who can use the application. Select Accounts in this organizational directory only for most applications. Refer to the table for more information on each option.
Supported account types Description Accounts in this organizational directory only For single-tenant apps for use only by users (or guests) in your tenant. Accounts in any organizational directory For multitenant apps and you want users in any Microsoft Entra tenant to be able to use your application. Ideal for software-as-a-service (SaaS) applications that you intend to provide to multiple organizations. Accounts in any organizational directory and personal Microsoft accounts For multitenant apps that support both organizational and personal Microsoft accounts (for example, Skype, Xbox, Live, Hotmail). Personal Microsoft accounts For apps used only by personal Microsoft accounts (for example, Skype, Xbox, Live, Hotmail). Select Register to complete the app registration.
The application's Overview page is displayed. Record the following values from the application Overview page for later use:
- Application (client) ID
- Directory (tenant) ID

Add a redirect URI
The TypeScript sample app uses interactive authentication with a browser-based sign-in flow. Configure a redirect URI to handle the authentication response:
- In your app registration, under Manage, select Authentication.
- Select Add a platform.
- Select Mobile and desktop applications.
- Under Custom redirect URIs, enter
http://localhost. - Select Configure.
Add client credentials
The Microsoft Entra SDK for AgentID uses client credentials to authenticate and acquire tokens for downstream APIs. For local development and testing, use a self-signed certificate for authentication.
Generate a self-signed certificate
Run PowerShell as an administrator and use the following commands to generate a self-signed certificate:
# Generate a self-signed certificate
$cert = New-SelfSignedCertificate `
    -Subject "CN=AgentID-Client-Certificate" `
    -CertStoreLocation "Cert:\CurrentUser\My" `
    -KeyExportPolicy Exportable `
    -KeySpec Signature `
    -KeyLength 2048 `
    -KeyAlgorithm RSA `
    -HashAlgorithm SHA256 `
    -NotAfter (Get-Date).AddDays(7)

# Export public key (CER) for upload to Azure
$cerPath = "agentid-client-certificate.cer"
Export-Certificate -Cert $cert -FilePath $cerPath

# Export private key (PFX) for the Agent ID SDK container
$pfxPath = "agentid-client-certificate.pfx"
$certPassword = ConvertTo-SecureString -String "YourSecurePassword123!" -Force -AsPlainText
Export-PfxCertificate -Cert $cert -FilePath $pfxPath -Password $certPassword


Write-Host "Certificate generated successfully!"
Write-Host "CER file (public key): $cerPath"
Write-Host "PFX file (private key): $pfxPath"
Write-Host "Certificate Thumbprint: $($cert.Thumbprint)"
Write-Host "Certificate Password: YourSecurePassword123!"
Record the certificate thumbprint displayed in the PowerShell output. You need it to verify the certificate in the Microsoft Entra admin center matches the one installed locally.
Upload the certificate to Microsoft Entra ID
Follow these steps to upload the .cer file created in your current directory to the Microsoft Entra admin center:
- Open your app registration in the Microsoft Entra admin center
- Under Manage, select Certificates & secrets.
- In the Certificates tab, select Upload certificate.
- Select the
.cerfile you generated (for example,agentid-client-cert.cer). - Provide a description (for example, "AgentID Local Development Certificate").
- Select Add.
- Record the certificate Thumbprint displayed (it should match the one from your certificate generation).
Note
For production environments, use certificates issued by a trusted Certificate Authority (CA) and store them in Azure Key Vault with managed identity access. Self-signed certificates should only be used for local development and testing.
Configure API permissions
Follow these steps to configure delegated permissions to Microsoft Graph. With these permissions, your client application can perform operations on behalf of the signed-in user, such as reading their email.
- In your app registration, under Manage, select API permissions > Add a permission > Microsoft Graph.
- Select Delegated permissions. Microsoft Graph exposes many permissions, with the most commonly used shown at the top of the list.
- Under Select permissions, select and add User.Read.
Configure application permissions
To test application-only flows where the AgentID SDK calls APIs by using its own identity (without a user context), configure application permissions:
- From the API permissions page, select Add a permission > Microsoft Graph.
- Select Application permissions.
- Under Select permissions, search for and select User.Read.All.
- Select Add permissions.
- Select Grant admin consent for [Your Tenant] and confirm.
Note
Application permissions require administrator consent. Without this step, the application-only endpoints in the testing section fail.
Expose an API (for token validation testing)
To call the AgentID SDK's /validate endpoint with tokens issued specifically for your application (using the api://<application-client-id>/access_as_user scope), you must complete this step. If you're only testing Microsoft Graph scenarios with delegated permissions, you can skip this section. Follow these steps to expose an API containing the required scopes:
Under Manage, select Expose an API.
At the top of the page, select Add next to Application ID URI. This value defaults to
api://<application-client-id>. The App ID URI acts as the prefix for the scopes you'll reference in your API's code, and it must be globally unique. Select Save.Select Add a scope as shown:

Next, specify the scope's attributes in the Add a scope pane, as follows:
- Scope name:
access_as_user - Who can consent: Admins and users
- Admin consent display name: Access the AgentID SDK as user
- Admin consent description: Allow access to AgentID SDK APIs as the signed-in user
- State: Enabled
- Scope name:
Select Add scope.
Start the Microsoft Entra SDK for AgentID
The Microsoft Entra SDK for AgentID is a containerized web service that handles token acquisition, validation, and secure downstream API calls. It runs as a companion container alongside your application, allowing you to offload identity logic to a dedicated service.
Create a configuration file
The AgentID SDK requires a configuration file to connect to your Microsoft Entra application. Create a new directory for your configuration and create an appsettings.json file:
# Create a directory for the AgentID SDK configuration
New-Item -ItemType Directory -Path "agentid-config" -Force
cd agentid-config

# Create the appsettings.json file
New-Item -ItemType File -Path "appsettings.json"
Open appsettings.json in your preferred text editor and add the following configuration, replacing the placeholder values with your Microsoft Entra application details:
{
    "AzureAd": {
        "Instance": "https://login.microsoftonline.com/",
        "TenantId": "YOUR_TENANT_ID_HERE",
        "ClientId": "YOUR_CLIENT_ID_HERE",
        "ClientCredentials": [
            {
                "SourceType": "Path",
                "CertificateStorePath": "agentid-client-certificate.pfx",
                "CertificateDistinguishedName": "YourSecurePassword123!"
            }
        ]
    },
    "DownstreamApis": {
        "me": {
            "BaseUrl": "https://graph.microsoft.com/v1.0/",
            "RelativePath": "me",
            "Scopes": [ "User.Read" ]
        }
    },
    "Logging": {
        "LogLevel": {
            "Default": "Information",
            "Microsoft.AspNetCore": "Warning"
        }
    },
    "AllowedHosts": "*"
}
Pull and run the AgentID SDK container
The AgentID SDK is available as a prebuilt container image from the Microsoft Container Registry (MCR). Before pulling the container image, verify that Docker Desktop is running. If Docker isn't running, open Docker Desktop and wait for the status to show "Docker Desktop is running".
Navigate to your configuration directory and run the following commands:
# Navigate to your config directory
cd agentid-config

# Pull the AgentID SDK container image from MCR
docker pull mcr.microsoft.com/entra-sdk/auth-sidecar:1.0.0-rc.2-azurelinux3.0-distroless

# Run the container
docker run -d `
    --name agentid-sdk `
    -p 5178:8080 `
    -e ASPNETCORE_ENVIRONMENT=Development `
    mcr.microsoft.com/entra-sdk/auth-sidecar:1.0.0-rc.2-azurelinux3.0-distroless

# Copy configuration files into the container
docker cp appsettings.json agentid-sdk:/app/appsettings.json
docker cp agentid-client-certificate.pfx agentid-sdk:/app/agentid-client-certificate.pfx

# Restart the container to apply the configuration
docker restart agentid-sdk
Note
For Windows hosts, use the Windows container variant: mcr.microsoft.com/entra-sdk/auth-sidecar:1.0.0-rc.2-windows
You can manage the Agent ID SDK container by using the following Docker commands:
- View container logs:
docker logs agentid-sdk - View real-time logs:
docker logs -f agentid-sdk - Stop the container:
docker stop agentid-sdk - Start the container again:
docker start agentid-sdk - Remove the container:
docker rm agentid-sdk
Verify that the container is running
You can verify whether the AgentID SDK container is running correctly by calling the health check endpoint,/healthz:
Invoke-RestMethod -Uri "http://localhost:5178/healthz" -ErrorAction SilentlyContinue
This endpoint returns Healthy, which confirms the AgentID SDK is running correctly and ready to handle requests. Don't terminate the AgentID SDK while testing. The container must continue running in the background for all authentication and API calls from the TypeScript sample app to work.
Run the TypeScript sample app
The TypeScript sample app demonstrates how to use the Microsoft Entra SDK for AgentID to validate user tokens. The app is an Express.js server that validates incoming requests through the AgentID SDK. The AgentID SDK can also call downstream APIs like Microsoft Graph on your behalf.
Clone or download the sample app
Download the TypeScript sample app and extract it to a local directory. Alternatively, clone the repository by opening a command prompt, navigating to your desired project location, and running the following command:
git clone https://github.com/AzureAD/microsoft-identity-web.git
After cloning the repo, navigate to the TypeScript sample app:
cd microsoft-identity-web/tests/DevApps/SidecarAdapter/typescript
The TypeScript sample app consists of three main files that work together to demonstrate authentication patterns with the Microsoft Entra SDK for AgentID.
sidecar.ts: Provides the SidecarClient class, which is a TypeScript client that communicates with the AgentID SDK container. It sends bearer tokens to the AgentID SDK's /Validate endpoint, receives back the validated token along with user claims, and handles token validation errors.
app.ts: An Express.js web server that authenticates all incoming requests. It extracts bearer tokens from the authorization header and validates them using SidecarClient. If validation fails, the server returns a 401 Unauthorized response. When validation succeeds, it attaches the user's claims to the request object via req.sidecarValidation, for use in downstream route handlers.
sidecar.test.ts: Contains automated integration tests that verify the complete authentication flow. The test suite starts by launching the Express server, then uses MSAL Node to perform interactive browser authentication and acquire an access token with the required scopes. It then makes an HTTP request to the server with the acquired token and verifies that the AgentID SDK validates the token correctly before returning the expected user claims.
Install dependencies
Navigate to the TypeScript sample directory and install the required packages:
cd d:\SDKs\microsoft-identity-web\tests\DevApps\SidecarAdapter\typescript
npm install
Configure the sample app
Before running the sample app, configure it with your application details as follows:
Open
sidecar.test.tsand update the client ID, tenant ID, and scopes to match your app registration.Create a
.envfile in thetypescriptdirectory for environment variables:# Create .env file New-Item -ItemType File -Path ".env" -ForceAdd the following configuration to
.env:PORT=5555 SIDECAR_BASE_URL=http://localhost:5178
Start the Express server
Start the TypeScript sample app by running npm start. The server starts on http://localhost:5555 and is ready to accept authenticated requests. You should see output similar to:
Server listening on port 5555
Sidecar base URL: http://localhost:5178
Keep this terminal window open. The Express server must continue running to handle test requests in the next section.
Test the TypeScript sample app
Now that both the AgentID SDK container and the Express server are running, you can test the authentication and API call scenarios.
Test with user-delegated permissions
This scenario shows how to sign in a user, acquire a token, and call the Express server with that token.
Acquire a user token
The sample includes an automated test that acquires a user token by using MSAL. Open a new PowerShell window (keep the Express server running) and run:
cd d:\SDKs\microsoft-identity-web\tests\DevApps\SidecarAdapter\typescript
npm test
This command runs the integration test that:
- Opens a browser window for interactive authentication
- Acquires an access token with the
api://<your-client-id>/access_as_userscope - Calls the Express server with the token
- Checks that the AgentID SDK validates the token successfully
On the first run, you're prompted to sign in with your Microsoft Entra credentials. The browser window opens automatically. After successful authentication, you can close the browser.
Manual testing with curl
If you prefer manual testing, you can acquire a token and call the Express server directly:
# First, get a token (you'll need to implement token acquisition or extract from test output)
$token = "YOUR_ACCESS_TOKEN_HERE"

# Call the Express server
Invoke-RestMethod -Uri "http://localhost:5555/api/protected" `
    -Headers @{ Authorization = "Bearer $token" } `
    -Method Get
The expected response is:
message                                                  protocol token          claims
-------                                                  -------- -----          ------
Request authenticated via Microsoft Identity Web Sidecar Bearer   ***redacted*** @{aud=api://"Your client ID"; iss=https://sts.win…
Test application-only authentication
This scenario demonstrates how to call downstream APIs by using the application's own identity without user context.
From your PowerShell window, call the AgentID SDK directly to test application-only flow:
# Call Microsoft Graph using application identity
Invoke-RestMethod -Uri "http://localhost:5178/DownstreamApiUnauthenticated/me" `
    -Method Get
This endpoint:
- Authenticates by using the application's certificate (configured in
appsettings.json) - Acquires an app-only access token for Microsoft Graph
- Calls the Graph API
/meendpoint - Returns the service principal information
Note
This scenario requires the User.Read.All application permission with admin consent (configured earlier in the quickstart).
Test custom downstream API calls
You can test custom downstream API configurations by adding them to the AgentID SDK's appsettings.json:
"DownstreamApis": {
    "me": {
        "BaseUrl": "https://graph.microsoft.com/v1.0/",
        "RelativePath": "me",
        "Scopes": [ "User.Read" ]
    },
    "users": {
        "BaseUrl": "https://graph.microsoft.com/v1.0/",
        "RelativePath": "users",
        "Scopes": [ "User.Read.All" ]
    }
}
Then restart the AgentID SDK container and test the new endpoint:
# Restart container to reload configuration
docker restart agentid-sdk

# Test the new endpoint
Invoke-RestMethod -Uri "http://localhost:5178/DownstreamApiUnauthenticated/users" `
    -Method Get
Next steps
- Agent identities: Learn how to use the Microsoft Entra SDK for AgentID with service principals and managed identities by testing with
--agent-identityand--agent-usernameparameters - Custom APIs: Add more downstream API configurations to
appsettings.jsonto call your own protected APIs - Production deployment: Configure the Microsoft Entra SDK for AgentID to use managed identities instead of certificates