Exchange dev/test environments in Azure
This topic steps you through creating an Exchange 2016 or Exchange 2019 dev/test deployment in Microsoft Azure. Here is the resulting configuration.
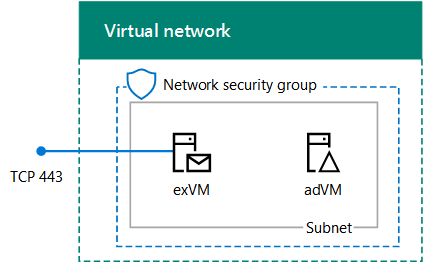
This configuration consists of a single Exchange server and a Windows Server Active Directory (AD) domain controller in a subnet of an Azure virtual network. This provides a basis and common starting point from which you can demonstrate Exchange and develop Exchange Server applications. This configuration is only for internal email and application testing on the Exchange server. No external email flow is configured.
There are three major phases to setting up this dev/test environment:
- Set up the virtual network and domain controller (adVM).
- Add the Exchange server (exVM).
- Configure Exchange.
If you don't already have an Azure subscription, you can sign up for an Azure Free Trial. If you have an MSDN or Visual Studio subscription, see Monthly Azure credit for Visual Studio subscribers.
Note
Because Exchange makes changes to the schema in Windows Server AD, this configuration cannot use Microsoft Entra Domain Services.
Phase 1: Deploy the virtual network and a domain controller
You can create a new Azure virtual network with a domain controller with Azure PowerShell. You can run the following PowerShell commands from a Windows PowerShell command prompt or in the PowerShell Integrated Script Environment (ISE). If you have not installed Azure PowerShell, see Get started with Azure PowerShell cmdlets.
Note
These commands are for Azure PowerShell 1.0.0 and later.
Sign into your Azure account.
Connect-AzAccountGet your subscription name using the following command.
Get-AZSubscription | Sort-Object Name | Select-Object NameSet your Azure subscription with the following commands. Set the $subscrName variable by replacing everything within the quotes, including the < and > characters, with the correct name.
$subscrName="<subscription name>"

Select-AzSubscription -SubscriptionName $subscrName
Create a new resource group. To determine a unique resource group name, use this command to list your existing resource groups.
Get-AZResourceGroup | Sort-Object ResourceGroupName | Select-Object ResourceGroupNameCreate your new resource group with these commands. Set the variables by replacing everything within the quotes, including the < and > characters, with the correct names.
$rgName="<resource group name>"

$locName="<location name, such as West US>"

New-AZResourceGroup -Name $rgName -Location $locName
Resource Manager-based virtual machines require a Resource Manager-based storage account. You must pick a globally unique name for your storage account that contains only lowercase letters and numbers. You can use this command to list the existing storage accounts.
Get-AZStorageAccount | Sort-Object StorageAccountName | Select-Object StorageAccountNameUse this command to test whether a proposed storage account name is unique.
Get-AZStorageAccountNameAvailability "<proposed name>"Create a new storage account for your new test environment with these commands.
$saName = "<storage account name>"

New-AZStorageAccount -Name $saName -ResourceGroupName $rgName -Type Standard_LRS -Location $locName
Create the EXSrvrVnet Azure Virtual Network that will host the EXSrvrSubnet subnet and protect it with a network security group.
$exSubnet=New-AZVirtualNetworkSubnetConfig -Name EXSrvrSubnet -AddressPrefix 10.0.0.0/24

New-AZVirtualNetwork -Name EXSrvrVnet -ResourceGroupName $rgName -Location $locName -AddressPrefix 10.0.0.0/16 -Subnet $exSubnet -DNSServer 10.0.0.4

$rule1 = New-AZNetworkSecurityRuleConfig -Name "RDPTraffic" -Description "Allow RDP to all VMs on the subnet" -Access Allow -Protocol Tcp -Direction Inbound -Priority 100 -SourceAddressPrefix Internet -SourcePortRange * -DestinationAddressPrefix * -DestinationPortRange 3389

$rule2 = New-AZNetworkSecurityRuleConfig -Name "ExchangeSecureWebTraffic" -Description "Allow HTTPS to the Exchange server" -Access Allow -Protocol Tcp -Direction Inbound -Priority 101 -SourceAddressPrefix Internet -SourcePortRange * -DestinationAddressPrefix "10.0.0.5/32" -DestinationPortRange 443

New-AZNetworkSecurityGroup -Name EXSrvrSubnet -ResourceGroupName $rgName -Location $locName -SecurityRules $rule1, $rule2

$vnet=Get-AZVirtualNetwork -ResourceGroupName $rgName -Name EXSrvrVnet

$nsg=Get-AZNetworkSecurityGroup -Name EXSrvrSubnet -ResourceGroupName $rgName

Set-AZVirtualNetworkSubnetConfig -VirtualNetwork $vnet -Name EXSrvrSubnet -AddressPrefix "10.0.0.0/24" -NetworkSecurityGroup $nsg

$vnet | Set-AzVirtualNetwork
Create the adVM virtual machine in Azure. adVM is a domain controller for the corp.contoso.com Windows Server AD domain and a DNS server for the virtual machines of the EXSrvrVnet virtual network.
First, fill in the name of your resource group, Azure location, and storage account name and run these commands at the Azure PowerShell command prompt on your local computer to create an Azure virtual machine for adVM.
# Create an availability set for domain controller virtual machines
New-AZAvailabilitySet -ResourceGroupName $rgName -Name dcAvailabilitySet -Location $locName -Sku Aligned -PlatformUpdateDomainCount 5 -PlatformFaultDomainCount 2

# Create the domain controller virtual machine
$vnet = Get-AZVirtualNetwork -Name EXSrvrVnet -ResourceGroupName $rgName

$pip = New-AZPublicIpAddress -Name adVM-NIC -ResourceGroupName $rgName -Location $locName -AllocationMethod Dynamic

$nic = New-AZNetworkInterface -Name adVM-NIC -ResourceGroupName $rgName -Location $locName -SubnetId $vnet.Subnets[0].Id -PublicIpAddressId $pip.Id -PrivateIpAddress 10.0.0.4

$avSet=Get-AZAvailabilitySet -Name dcAvailabilitySet -ResourceGroupName $rgName

$vm=New-AZVMConfig -VMName adVM -VMSize Standard_D1_v2 -AvailabilitySetId $avSet.Id

$vm=Set-AZVMOSDisk -VM $vm -Name adVM-OS -DiskSizeInGB 128 -CreateOption FromImage -StorageAccountType "Standard_LRS"

$diskConfig=New-AZDiskConfig -AccountType "Standard_LRS" -Location $locName -CreateOption Empty -DiskSizeGB 20

$dataDisk1=New-AZDisk -DiskName adVM-DataDisk1 -Disk $diskConfig -ResourceGroupName $rgName

$vm=Add-AZVMDataDisk -VM $vm -Name adVM-DataDisk1 -CreateOption Attach -ManagedDiskId $dataDisk1.Id -Lun 1

$cred=Get-Credential -Message "Type the name and password of the local administrator account for adVM."

$vm=Set-AZVMOperatingSystem -VM $vm -Windows -ComputerName adVM -Credential $cred -ProvisionVMAgent -EnableAutoUpdate

$vm=Set-AZVMSourceImage -VM $vm -PublisherName MicrosoftWindowsServer -Offer WindowsServer -Skus 2012-R2-Datacenter -Version "latest"

$vm=Add-AZVMNetworkInterface -VM $vm -Id $nic.Id

New-AZVM -ResourceGroupName $rgName -Location $locName -VM $vm
You will be prompted for a username and password. This article will refer to this username as ADMIN_NAME. Use a strong password and record both in a secure location.
Note: The password that you specify cannot be "pass@word1". It must be between 8-123 characters long and must satisfy at least 3 of the following password complexity requirements:
- Contains an uppercase letter
- Contains an lowercase letter
- Contains a numeric digit
- Contains a special character
It can take a few minutes for Azure to build the virtual machine.
Connect to the domain controller virtual machine using local administrator account credentials
In the Azure portal, click Resource Groups > <your resource group name>> adVM > Connect.
Run the adVM.rdp file that is downloaded, and then click Connect.
In Windows Security, click Use another account. In User name, type **adVM**<ADMIN_NAME>.
In Password, type the password of the ADMIN_NAME account, and then click OK.
When prompted, click Yes.
Add an extra data disk as a new volume with the drive letter F: with these commands at an administrator-level Windows PowerShell command prompt on adVM.
$disk=Get-Disk | where {$_.PartitionStyle -eq "RAW"}

$diskNumber=$disk.Number

Initialize-Disk -Number $diskNumber

New-Partition -DiskNumber $diskNumber -UseMaximumSize -AssignDriveLetter

Format-Volume -DriveLetter F
Configure adVM as a domain controller and DNS server for the corp.contoso.com domain. Run these commands at an administrator-level Windows PowerShell command prompt on adVM.
Install-WindowsFeature AD-Domain-Services -IncludeManagementTools

Install-ADDSForest -DomainName corp.contoso.com -DatabasePath "F:\NTDS" -SysvolPath "F:\SYSVOL" -LogPath "F:\Logs"
Note that these commands can take a few minutes to complete.
After adVM restarts, reconnect to the adVM virtual machine.
Connect to the domain controller virtual machine using domain credentials
In the Azure portal, click Resource Groups > <the name of your new resource group> > adVM > Connect.
Run the adVM.rdp file that is downloaded, and then click Connect.
In Windows Security, click Use another account. In User name, type **CORP**<ADMIN_NAME>.
In Password, type the password of the ADMIN_NAME account, and then click OK.
When prompted, click Yes.
From the desktop, open an administrator-level Windows PowerShell command prompt and run the following command:
Add-WindowsFeature RSAT-ADDS-Tools
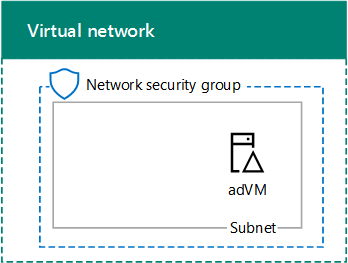
Here is the result of Phase 1.
Phase 2: Create the Exchange virtual machine
In this phase, you create an Exchange virtual machine in the EXSrvrVNet virtual network and make it a member of the CORP domain.
To create the Exchange virtual machine with Azure PowerShell, first log in to Azure with your Azure account from the Windows PowerShell command prompt (if needed).
Connect-AzAccount
You must determine a globally unique DNS name for the exVM virtual machine. You must pick a globally unique DNS name that contains only lowercase letters and numbers. You can do this with the following PowerShell commands:
$vmDNSName="<DNS name to test>"

$rgName="<resource group name>"

$locName=(Get-AZResourceGroup -Name $rgName).Location

Test-AZDnsAvailability -DomainQualifiedName $vmDNSName -Location $locName
If you see "True", your proposed name is globally unique.
Next, fill in the variable values and run the resulting block at the PowerShell prompt.
# Set up key variables
$subscrName="<name of your Azure subscription>"

$vmDNSName="<unique, public DNS name for the Exchange server>"

# Set the Azure subscription
Select-AzSubscription -SubscriptionName $subscrName

# Get the Azure location and storage account names
$locName=(Get-AZResourceGroup -Name $rgName).Location

$saName=(Get-AZStorageaccount | Where {$_.ResourceGroupName -eq $rgName}).StorageAccountName

# Create an availability set for Exchange virtual machines
New-AZAvailabilitySet -ResourceGroupName $rgName -Name exAvailabilitySet -Location $locName -Sku Aligned  -PlatformUpdateDomainCount 5 -PlatformFaultDomainCount 2

# Specify the virtual machine name and size
$vmName="exVM"

$vmSize="standard_d8s_v3"

$vnet=Get-AZVirtualNetwork -Name "EXSrvrVnet" -ResourceGroupName $rgName

$avSet=Get-AZAvailabilitySet -Name exAvailabilitySet -ResourceGroupName $rgName

$vm=New-AZVMConfig -VMName $vmName -VMSize $vmSize -AvailabilitySetId $avSet.Id

# Create the NIC for the virtual machine
$nicName=$vmName + "-NIC"

$pipName=$vmName + "-PublicIP"

$pip=New-AZPublicIpAddress -Name $pipName -ResourceGroupName $rgName -DomainNameLabel $vmDNSName -Location $locName -AllocationMethod Dynamic

$nic=New-AZNetworkInterface -Name $nicName -ResourceGroupName $rgName -Location $locName -SubnetId $vnet.Subnets[0].Id -PublicIpAddressId $pip.Id -PrivateIpAddress "10.0.0.5"

# Create and configure the virtual machine
$cred=Get-Credential -Message "Type the name and password of the local administrator account for exVM."

$vm=Set-AZVMOSDisk -VM $vm -Name ($vmName +"-OS") -DiskSizeInGB 128 -CreateOption FromImage -StorageAccountType "Standard_LRS"

$vm=Set-AZVMOperatingSystem -VM $vm -Windows -ComputerName $vmName -Credential $cred -ProvisionVMAgent -EnableAutoUpdate

$vm=Set-AZVMSourceImage -VM $vm -PublisherName MicrosoftWindowsServer -Offer WindowsServer -Skus 2019-Datacenter -Version "latest"

$vm=Add-AZVMNetworkInterface -VM $vm -Id $nic.Id

New-AZVM -ResourceGroupName $rgName -Location $locName -VM $vm
Note
This command block uses a standard storage account created in phase 1 to reduce costs for this dev/test environment. For a production Exchange server, you must use a premium storage account.
From the Azure portal, connect to the exVM virtual machine using the credentials of the local administrator account.
Next, join exVM to the Windows AD domain with these commands at a Windows PowerShell prompt.
Add-Computer -DomainName "corp.contoso.com"
Restart-Computer
Note that you must supply domain account credentials after entering the Add-Computer command. Use the CORP\<ADMIN_NAME> account and password.
Here is the result of Phase 2.
Phase 3: Configure Exchange
In this phase, you configure Exchange on exVM and test mail delivery between two mailboxes.
Prepare Windows Server AD
At the Windows PowerShell command prompt on your local computer, run the following command:
Write-Host (Get-AZPublicIpaddress -Name "exVM-PublicIP" -ResourceGroup $rgName).DnsSettings.FqdnNote or copy the full DNS name from the display of the command. This is the Internet DNS name of the exVM virtual machine. You will need this value later.
If needed, connect to the adVM virtual machine with the Azure portal using the CORP\<ADMIN_NAME> account and password.
At the Windows PowerShell command prompt, run the following command:
Get-ADForest | Set-ADForest -UPNSuffixes @{Add="<DNS Name of Exchange>"}Close the remote desktop session with adVM.
Install Exchange
Connect to the exVM virtual machine with the Azure portal using the CORP\<ADMIN_NAME> account and password.
From exVM, open an administrator-level Windows PowerShell command prompt and run the following commands.
Install-WindowsFeature NET-Framework-45-Core, NET-Framework-45-ASPNET, NET-WCF-HTTP-Activation45, NET-WCF-Pipe-Activation45, NET-WCF-TCP-Activation45, NET-WCF-TCP-PortSharing45, RPC-over-HTTP-proxy, RSAT-Clustering, RSAT-Clustering-CmdInterface, RSAT-Clustering-Mgmt, RSAT-Clustering-PowerShell, Web-Mgmt-Console, WAS-Process-Model, Web-Asp-Net45, Web-Basic-Auth, Web-Client-Auth, Web-Digest-Auth, Web-Dir-Browsing, Web-Dyn-Compression, Web-Http-Errors, Web-Http-Logging, Web-Http-Redirect, Web-Http-Tracing, Web-ISAPI-Ext, Web-ISAPI-Filter, Web-Lgcy-Mgmt-Console, Web-Metabase, Web-Mgmt-Console, Web-Mgmt-Service, Web-Net-Ext45, Web-Request-Monitor, Web-Server, Web-Stat-Compression, Web-Static-Content, Web-Windows-Auth, Web-WMI, Windows-Identity-Foundation, RSAT-ADDS-Tools

Restart-Computer
Connect to the exVM virtual machine with the Azure portal using the CORP\<ADMIN_NAME> account and password.
From Server Manager, click Local Server. In the Properties for exVM, click On for IE Enhanced Security Configuration. In Internet Explorer Enhanced Security Configuration, click Off for both Administrators and Users, and then click OK.
From the Start screen, click Internet Explorer, and then download the Unified Communications Managed API 4.0 Runtime from https://www.microsoft.com/download/details.aspx?id=34992. When prompted, click Run.
When prompted with the Microsoft Unified Communications Managed API 4.0, Runtime Setup, click Next.
Click I have read and accept the license terms, and then click Install. On the Installation is Complete page, click Finish.
From Internet Explorer, download the latest version of Exchange. For more information, see Updates for Exchange Server.
Click Save to store the ISO file in the Downloads folder.
Click Open Folder, right-click the Exchange ISO file, and then click Mount.
From an administrator-level Windows PowerShell command prompt on exVM, run the following:
Note
The previous /IAcceptExchangeServerLicenseTerms switch will not work starting with the September 2021 Cumulative Updates (CUs). You now must use either /IAcceptExchangeServerLicenseTerms_DiagnosticDataON or /IAcceptExchangeServerLicenseTerms_DiagnosticDataOFF for unattended and scripted installs.
The examples below use the /IAcceptExchangeServerLicenseTerms_DiagnosticDataON switch. It's up to you to change the switch to /IAcceptExchangeServerLicenseTerms_DiagnosticDataOFF.
e:

.\setup.exe /mode:Install /role:Mailbox /OrganizationName:Contoso /IAcceptExchangeServerLicenseTerms_DiagnosticDataON
Restart-Computer
Wait until Exchange setup completes, which can take some time, and exVM restarts.
Add two mailboxes to the Exchange server
Connect to the exVM virtual machine with the Azure portal using the CORP\<ADMIN_NAME> account and password.
From the Start screen, type Exchange, and then click Exchange Management Shell.
Copy the following commands to Notepad, insert the Internet DNS name of the exVM virtual machine for the $dnsName variable, and then copy and paste the resulting commands into the Exchange Management Shell.
$dnsName="<Internet DNS name of the exVM virtual machine>"

$user1Name="chris@" + $dnsName

$user2Name="janet@" + $dnsName

$db=Get-MailboxDatabase

$dbName=$db.Name

$password = Read-Host "Enter password" -AsSecureString
Record the password specified in a safe place. Next, run these commands to create two mailboxes.
New-Mailbox -UserPrincipalName $user1Name -Alias chris -Database $dbName -Name ChrisAshton -OrganizationalUnit Users -Password $password -FirstName Chris -LastName Ashton -DisplayName "Chris Ashton"

New-Mailbox -UserPrincipalName $user2Name -Alias janet -Database $dbName -Name JanetSchorr -OrganizationalUnit Users -Password $password -FirstName Janet -LastName Schorr -DisplayName "Janet Schorr"
Test email delivery between mailboxes
From the browser on your local computer, access the web site https://<Internet DNS name of the exVM virtual machine> /owa. When prompted with an error page for the website's security certificate, click Continue to this website. On the Outlook sign-in page, use the corp\chris account name with its password.
When prompted to specify the language and time zone, select the appropriate value for each, and then click Save.
From Chris Ashton's inbox, click New. In To, type janet and then click Search Directory. For Subject, type Test message, and then click Send.
Click the user icon in the upper right part of the Mail web page, and then click Sign out.
On the Outlook sign-in page, use the corp\janet account name with its password. When prompted to specify the language and time zone, select the appropriate value for each, and then click Save.
Verify that the inbox contains the test message from Chris Ashton. Click it, then click Reply all. In the body of the message, type Replied, and then click Send.
Click the user icon in the upper right part of the Mail web page, and then click Sign out.
On the Outlook sign-in page, use the corp\chris account name with its password. Verify that the reply email message sent from Janet is in the inbox.
You are now ready to test Exchange features or applications.
Stop and start the virtual machines
Azure virtual machines incur an ongoing cost when they are running. To help minimize the cost of your Exchange dev/test environment, use these commands to stop the virtual machines:
$rgName="<your resource group name>"

Stop-AZVM -Name exVM -ResourceGroupName $rgName -Force

Stop-AZVM -Name adVM -ResourceGroupName $rgName -Force
To start them again, use these commands:
$rgName="<your resource group name>"

Start-AZVM -Name adVM -ResourceGroupName $rgName

Start-AZVM -Name exVM -ResourceGroupName $rgName
See also
Troubleshoot outbound SMTP connectivity issues in Azure
Deploy new installations of Exchange