Configure certificate based authentication in Exchange Server
Certificate based authentication (CBA) in Exchange allows Outlook on the web (formerly known as Outlook Web App) and Exchange ActiveSync clients to be authenticated by client certificates instead of entering a username and password.
Note
Microsoft has received inquiries from customers regarding the KB5014754: Certificate-based authentication changes on Windows domain controllers update, which enforces a change to make certificate-based authentication more secure. We have tested this update with the supported versions and builds of Exchange Server, running the latest Exchange Server updates, and can confirm that Exchange Servers, which are configured to support CBA, are not affected by this change.
Before you configure Exchange, you need to issue a client certificate to each user. Because of the sheer number of certificates involved, you should use an automated internal public key infrastructure (PKI) to issue and manage the client certificates. An example of an automated internal PKI is Active Directory Certificate Services (AD CS). For more information about AD CS, see Active Directory Certificate Services Overview.
Here's more information about the certificate requirements:
The client certificate must be issued for client authentication (for example, the default User certificate template in AD CS).
The client certificate must contain the user principal name (UPN) of the user (in the certificate's Subject or Subject Alternative Name fields).
The client certificate must be associated with the user account in Active Directory.
All servers and devices that are involved in access to Outlook on the web and ActiveSync (including proxy servers and client devices) must trust the entire chain of trust for the client certificates (the root certificate of the certification authority, and any intermediate CAs that were used to issue certificates).
For CBA in Outlook on the web, the client certificate needs to be installed on the local computer, device, or on a smart card. For CBA in ActiveSync, the client certificate needs to be installed on the local device. You can automate the installation of certificates on devices by using a mobile device management (MDM) solution like Intune. For more information about Intune, see Overview of Microsoft Intune.
What do you need to know before you begin?
Estimated time to complete this task: 20 minutes
You need to be assigned permissions before you can perform this procedure or procedures. To see what permissions you need, see the "IIS Manager" entry in the Outlook on the web permissions section of the Clients and mobile devices permissions topic.
To learn how to open the Exchange Management Shell in your on-premises Exchange organization, see Open the Exchange Management Shell.
For information about keyboard shortcuts that may apply to the procedures in this topic, see Keyboard shortcuts in the Exchange admin center.
Tip
Having problems? Ask for help in the Exchange forums. Visit the forums at: Exchange Server, Exchange Online, or Exchange Online Protection.
Step 1: Use the Exchange Management Shell to install the Client Certificate Mapping Authentication feature on all of your Exchange servers
All Exchange servers that share the same namespace and URLs need to use the same authentication methods. You need to install the Client Certificate Mapping Authentication feature on all of your Exchange servers.
In the Exchange Management Shell, run the following command:
Install-WindowsFeature Web-Client-Auth
For detailed syntax and parameter information, see Install-WindowsFeature.
Step 2: Use IIS Manager to enable Active Directory Client Certificate Authentication for the Exchange server
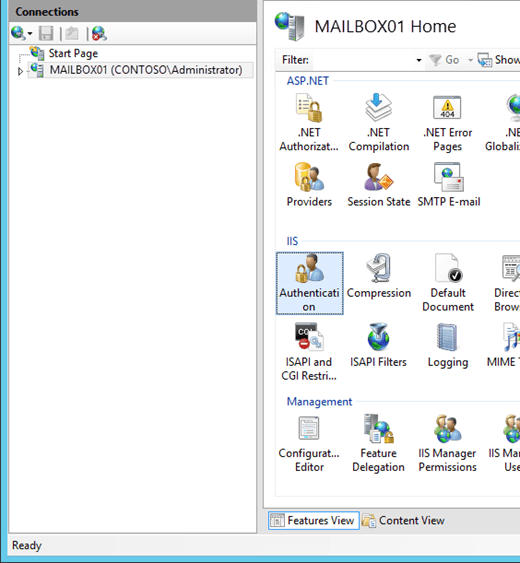
Open IIS Manager on the Exchange server. An easy way to do this in Windows Server 2012 or later is to press Windows key + Q, type inetmgr, and select Internet Information Services (IIS) Manager in the results.
Select the server, and verify Features View is selected at the bottom of the page.
In the IIS section, double-click Authentication.
On the Authentication page that opens, select Active Directory Client Certificate Authentication from the list, and in the Actions pane, click Enable.
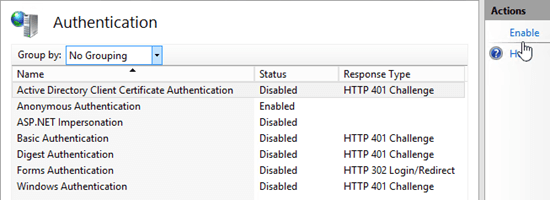
You'll see a warning that SSL must be enabled to use Active Directory Client Certificate Mapping.
Step 3: Use IIS Manager to configure the Outlook on the web, Exchange admin center, and ActiveSync virtual directories to require client certificates
Note: You need to require client certificates, because accepting client certificates (to support both CBA and regular username and password authentication) doesn't work consistently across all types of ActiveSync devices.
In IIS Manager, expand the server, expand Sites, and then expand Default Web Site.
Select the owa virtual directory, and verify Features View is selected at the bottom of the page.
In the IIS section, double-click SSL Settings.
On the SSL Settings page, verify Require SSL is checked, and select the Client certificates value Require.
In the Actions pane, click Apply.
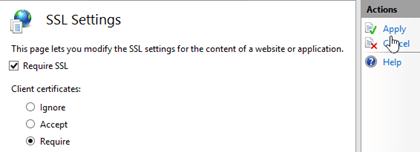
Select the Microsoft-Server-ActiveSync virtual directory.
In the IIS section, double-click SSL Settings.
On the SSL Settings page, verify Require SSL is checked, and select the Client certificates value Require.
In the Actions pane, click Apply.
Note: Although you can perform these procedures on the command line, the steps might not configure a required registry key. You can use the earlier procedures in IIS Manager (which will definitely set the registry key correctly), or you need to verify that the registry key HKEY_LOCAL_MACHINE\SYSTEM\CurrentControlSet\Services\HTTP\Parameters\SslBindingInfo\0.0.0.0:443 is set to the value 1 after you perform the procedures on the command line.
To perform these procedures on the command line, open an elevated command prompt on the Exchange server (a Command Prompt window you open by selecting Run as administrator) and run the following commands:
%windir%\system32\inetsrv\appcmd.exe set config "Default Web Site/owa/" -section:system.webserver/security/access /sslFlags:"Ssl, SslRequireCert" /commit:apphost
%windir%\system32\inetsrv\appcmd.exe set config "Default Web Site/ecp/" -section:system.webserver/security/access /sslFlags:"Ssl, SslRequireCert" /commit:apphost
%windir%\system32\inetsrv\appcmd.exe set config "Default Web Site/Microsoft-Server-ActiveSync/" -section:system.webserver/security/access /sslFlags:"Ssl, SslRequireCert" /commit:apphost
Step 4: Use the Exchange Management Shell to disable authentication other authentication methods on the Outlook on the web, Exchange admin center, and ActiveSync virtual directories
After you require client certificates for authentication, you need to disable all other authentication methods on the Outlook on the web, Exchange admin center (EAC) and ActiveSync virtual directories. By default, only Basic authentication and Forms authentication are enabled.
In the Exchange Management Shell, replace <ServerName> with the name of your Exchange server, and run the following command to disable all other authentication methods on the Outlook on the web virtual directory:
Set-OwaVirtualDirectory "<ServerName>\owa (Default Web Site)" -BasicAuthentication $false -WindowsAuthentication $false -DigestAuthentication $false -FormsAuthentication $false -AdfsAuthentication $false -OAuthAuthentication $falseFor detailed syntax and parameter information, see Set-OwaVirtualDirectory.
In the Exchange Management Shell, replace <ServerName> with the name of your Exchange server, and run the following command to disable all other authentication methods on the EAC virtual directory:
Set-EcpVirtualDirectory "<ServerName>\ecp (Default Web Site)" -BasicAuthentication $false -WindowsAuthentication $false -DigestAuthentication $false -FormsAuthentication $false -AdfsAuthentication $falseFor detailed syntax and parameter information, see Set-EcpVirtualDirectory.
Replace <ServerName> with the name of your Exchange server, and run the following command to disable all other authentication methods on the ActiveSync virtual directory:
Set-ActiveSyncVirtualDirectory "<ServerName>\Microsoft-Server-ActiveSync (Default Web Site)" -BasicAuthEnabled $false -WindowsAuthEnabled $falseFor detailed syntax and parameter information, see Set-ActiveSyncVirtualDirectory.
Step 5: Use IIS Manager to enable client certificate mapping for the Outlook on the web, Exchange admin center, and ActiveSync virtual directories
Important
After you perform this step, running the Set-ActiveSyncVirtualDirectory cmdlet might disable the client certificate mapping for ActiveSync.
In IIS Manager, expand the server, expand Sites, and then expand Default Web Site.
Select the owa virtual directory, and verify Features View is selected at the bottom of the page.
In the Management section, double-click Configuration Editor.
On the Configuration Editor page, click the drop down on Section, and navigate to system.webServer > security > authentication > clientCertificateMappingAuthentication.
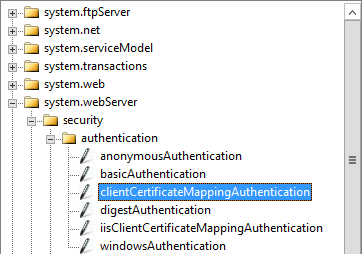
Set the enabled value to True, and in the Actions pane, click Apply.

Select the ecp virtual directory.
In the Management section, double-click Configuration Editor.
On the Configuration Editor page, click the drop down on Section, and navigate to system.webServer > security > authentication > clientCertificateMappingAuthentication.
Set the enabled value to True, and in the Actions pane, click Apply.
Select the Microsoft-Server-ActiveSync virtual directory.
In the Management section, double-click Configuration Editor.
On the Configuration Editor page, click the drop down on Section, and navigate to system.webServer > security > authentication > clientCertificateMappingAuthentication.
Set the enabled value to True, and in the Actions pane, click Apply.
Note: To perform these procedures on the command line, open an elevated command prompt on the Exchange server and run the following commands:
%windir%\system32\inetsrv\appcmd.exe set config "Default Web Site/owa/" -section:system.webserver/security/authentication/clientCertificateMappingAuthentication /enabled:"True" /commit:apphost
%windir%\system32\inetsrv\appcmd.exe set config "Default Web Site/ecp/" -section:system.webserver/security/authentication/clientCertificateMappingAuthentication /enabled:"True" /commit:apphost
%windir%\system32\inetsrv\appcmd.exe set config "Default Web Site/Microsoft-Server-ActiveSync/" -section:system.webserver/security/authentication/clientCertificateMappingAuthentication /enabled:"True" /commit:apphost
Step 6 (Optional): Add the root certificate of a third-party certification authority to the Enterprise NTAuth store in Active Directory
You only need to perform this step if you aren't using AD CS to issue the client certificates. This setting indicates that the certification authority (CA) is trusted to issue client certificates for Active Directory authentication.
Export the CA's root certificate to a Base-64 encoded or DER binary encoded X.509 .cer file. In this example, we'll use C:\Data\CARoot.cer.
On any domain member server (for example, a domain controller or an Exchange server), open an elevated command prompt run the following command:
%windir%\system32\certutil.exe -enterprise -addstore NTAuth "C:\Data\CARoot.cer"Note that this step requires membership in the Enterprise Admins group.
Step 7 (Optional): Use IIS Manager to increase the UploadReadAheadSize value for the Outlook on the web and ActiveSync virtual directories
If your clients receive errors, you might need to increase the uploadReadAheadSize values in the IIS metabase to allow for the request headers.
In IIS Manager, expand the server, expand Sites, and then expand Default Web Site.
Select the owa virtual directory, and verify Features View is selected at the bottom of the page.
In the Management section, double-click Configuration Editor.
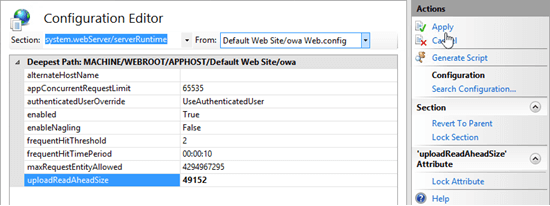
On the Configuration Editor page, click the drop down on Section, and navigate to systemwebServer > serverRuntime.
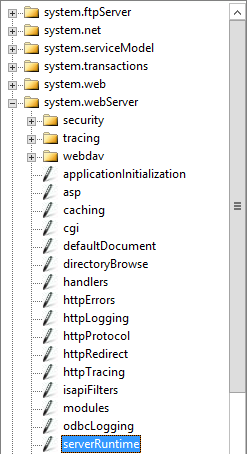
Set the uploadReadAheadSize value to 49152, and in the Actions pane, click Apply.
Select the ecp virtual directory.
In the Management section, double-click Configuration Editor.
On the Configuration Editor page, click the drop down on Section, and navigate to systemwebServer > serverRuntime.
Set the uploadReadAheadSize value to 49152, and in the Actions pane, click Apply.
Select the Microsoft-Server-ActiveSync virtual directory.
In the Management section, double-click Configuration Editor.
On the Configuration Editor page, click the drop down on Section, and navigate to systemwebServer > serverRuntime.
Set the uploadReadAheadSize value to 49152, and in the Actions pane, click Apply.
Note: To perform these procedures on the command line, open an elevated command prompt on the Exchange server and run the following commands:
%windir%\system32\inetsrv\appcmd.exe set config "Default Web Site/owa/" -section:system.webserver/serverRuntime /uploadReadAheadSize:49152
%windir%\system32\inetsrv\appcmd.exe set config "Default Web Site/ecp/" -section:system.webserver/serverRuntime /uploadReadAheadSize:49152
%windir%\system32\inetsrv\appcmd.exe set config "Default Web Site/Microsoft-Server-ActiveSync/" -section:system.webserver/serverRuntime /uploadReadAheadSize:49152