Note
Access to this page requires authorization. You can try signing in or changing directories.
Access to this page requires authorization. You can try changing directories.
APPLIES TO:  2016 2019 Subscription Edition
Journaling in Exchange Server records inbound and outbound email messages. For more information, see Journaling in Exchange Server.
This topic shows you how to configure standard journaling (journal messages for all mailboxes on a mailbox database) and premium journaling (use journal rules to specify the recipients that are journaled). Some configuration settings are available in the Exchange admin center (EAC), while others are only available in the Exchange Management Shell.
What do you need to know before you begin?
Estimated time to complete each procedure: 5 minutes.
You need to be assigned permissions before you can perform this procedure(s). For more information on permissions that you need, see the "Journaling" entry in Messaging policy and compliance permissions in Exchange Server.
To learn how to open the Exchange Management Shell in your on-premises Exchange organization, see Open the Exchange Management Shell.
For information about keyboard shortcuts that may apply to the procedures in this topic, see Keyboard shortcuts in the Exchange admin center.
Tip
Having problems? Ask for help in the Exchange forums. Visit the forums at: Exchange Server, Exchange Online, or Exchange Online Protection. If you're having trouble with the JournalingReportDNRTo mailbox, see Transport and Mailbox Rules in Exchange Online don't work as expected.
Procedures for standard journaling
Standard journaling records all messages that are sent to and received by all mailboxes on the specified mailbox database. You enable journaling by specifying the journaling mailbox for the database (the mailbox that stores the journaled messages). To disable journaling for the database, clear the value for the journaling mailbox on the mailbox database. For more information about the journaling mailbox, see Journaling mailbox.
Caution
Disabling journaling on a mailbox database may result in your organization being out of compliance with any applicable messaging retention policies.
Use the EAC to enable or disable journaling on mailbox databases
In the EAC, go to Servers > Databases.
Select the mailbox database, and then select Edit (
 ).
).In the mailbox database properties window that opens, select the Maintenance tab, and then perform one of the following procedures:
Enable journaling: Select Browse next to the Journal recipient field. In the resulting dialog box, select the mailbox where you want to store the journaled messages, and then select OK.
Disable journaling: Select Remove X next to the value in the Journal recipient field.

When you're finished, select Save.
Use the Exchange Management Shell to enable or disable journaling on mailbox databases
To enable journaling on a mailbox database, use the following syntax:
Set-MailboxDatabase -Identity <MailboxDatabaseIdentity> -JournalRecipient <JournalMailboxIdentity>
The following example enables journaling on the mailbox database named Sales Database, and configures the mailbox named Sales Database Journal Mailbox as the journaling mailbox that stores the journaled messages.
Set-MailboxDatabase -Identity "Sales Database" -JournalRecipient "Sales Database Journal Mailbox"
To disable journaling on a mailbox database, use the following syntax:
Set-MailboxDatabase -Identity <MailboxDatabaseIdentity> -JournalRecipient $null
The following example disables journaling on the mailbox database named Sales Database.
Set-MailboxDatabase -Identity "Sales Database" -JournalRecipient $null
The following example disables journaling on all mailbox databases in the Exchange organization.
Get-MailboxDatabase | Set-MailboxDatabase -JournalRecipient $null
How do you know this worked?
To verify that you've successfully enabled or disabled journaling on a mailbox database, use any of the following procedures:
In the EAC, go to Servers > Databases > select the database > Edit (
) > Maintenance, and verify whether the Journal recipient field is populated (journaling is enabled), or empty (journaling is disabled).In the Exchange Management Shell, run the following command to verify the value of the JournalRecipient property on all mailbox databases in your organization:
Get-MailboxDatabase | Format-Table -Auto Name,JournalRecipientSend a message to a mailbox on the database, open the journaling mailbox in Outlook or Outlook Web App (formerly known as Outlook on the web), and verify whether the journaled message (journal report) has or hasn't been delivered to the journaling mailbox.
Procedures for premium journaling
Premium journaling uses journal rules to record messages based on recipients (all recipients or specified recipients) and scope (internal messages, external messages, or all messages). Premium journaling requires Exchange Enterprise client access licenses (CALs). For more information about CALs, see Exchange licensing FAQs.
Create journal rules
The basic components of a journal rule are:
Journal recipient: Who you want to journal. You can specify all messages, or messages received by or sent by specific recipients (including members of distribution groups).
Journal rule scope: What you want to journal - internal messages only, external messages only, or internal and external messages.
Journaling mailbox: Where you want to store the journaled messages.
Use the EAC to create journal rules
In the EAC, go to Compliance management > Journal rules, and then select Add (
 ).
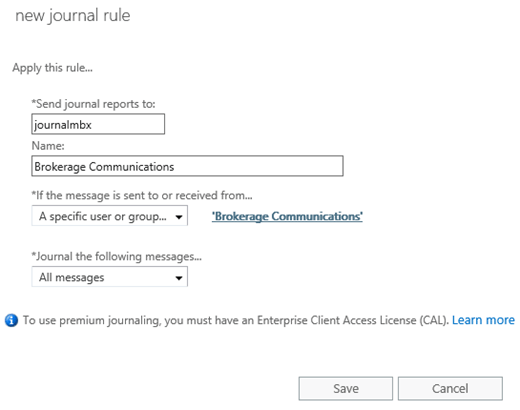
).In New journal rule window that opens, configure the following settings:
Send journal reports to: Type the alias or email address of the journaling mailbox where the journaled messages (journal reports) will be delivered.
Name: Type a unique, descriptive name for the journal rule.
If the message is sent to or received from: Specify the journal recipient (whom you want to journal). Click the drop-down arrow and select either of the following values:
A specific user or group: In the dialog box that opens, select one recipient, and then select OK when you're finished.
[Apply to all messages]
Journal the following messages: Specify the scope of the journal rule. Click the drop-down arrow and select one of the available values:
All messages
Internal messages only
External messages only
When you're finished, select Save.
Use the Exchange Management Shell to create journal rules
To create journal rules in the Exchange Management Shell, use the following syntax:
New-JournalRule -Name <RuleName> -JournalEmailAddress <JournalMailboxIdentity> [-Recipient <JournalRecipientEmailAddress>] [-Scope <Global | Internal | External>] [-Enabled <$true | $false>]
You can use the following settings to create a journal rule named Regulation 123:
Journal recipient: The user Connie Mayr, whose email address is cmayr@contoso.com.
Journal rule scope: Internal and external messages (We didn't use the Scope parameter, and the default value is
Global.).Journaling mailbox: The mailbox named Journal Mailbox.
Use these settings in the following example:
New-JournalRule -Name "Regulation 123" -JournalEmailAddress "Journal Mailbox" -Recipient cmayr@contoso.com
The journal rule is enabled (We didn't use the Enabled parameter, and the default value is $true.).
Note: To create a journal rule that applies to all recipients, don't use the Recipient parameter.
For detailed syntax and parameter information, see New-JournalRule.
How do you know this worked?
To verify that you've successfully created a journal rule, use any of the following procedures:
In the EAC, go to Compliance management > Journal rules and verify that the new journal rule you created is listed.
In the Exchange Management Shell, run the following command to verify that the new journal rule is listed:
Get-JournalRule | Format-Table -Auto Name,Recipient,JournalEmailAddress,Scope,EnabledSend a message to a recipient that's in the scope of the journal rule, open the journaling mailbox in Outlook or Outlook Web App, and verify that the journaled message (journal report) is delivered to the journaling mailbox.
Enable or disable journal rules
By default, when you create a journal rule in the EAC or the Exchange Management Shell, the rule is enabled. You can only use the Exchange Management Shell to create a journal rule that's disabled (The Enabled parameter value is $false in the New-JournalRule command.).
After you create a journal rule, you can use the EAC or the Exchange Management Shell to disable or enable the rule.
Important
When a journal rule is disabled, any messages that would have normally been journaled by the rule aren't journaled. Verify that you don't compromise the regulatory or compliance requirements of your organization by disabling a journaling rule.
Use the EAC to enable or disable journal rules
In the EAC, go to Compliance management > Journal rules.
In the list view, select the journal rule and in the On column, clear the checkbox to disable the rule, and select the checkbox to enable the rule.
Use the Exchange Management Shell to enable or disable journal rules
To enable or disable journal rules in the Exchange Management Shell, use the following syntax:
<Disable-JournalRule | Enable-JournalRule> -Identity <JournalRuleIdentity>
The following example disables the journal rule named Contoso Legal.
Disable-JournalRule -Identity "Contoso Legal"
The following example enables the journal rule named Contoso Legal.
Enable-JournalRule -Identity "Contoso Legal"
How do you know this worked?
To verify that you've successfully enabled or disabled a journal rule, use any of the following procedures:
In the EAC, go to Compliance management > Journal rules, and verify the status of the checkbox in the On column for the rule.
In the Exchange Management Shell, run the following command to verify the value of the Enabled property on all journal rules:
Get-JournalRule | Format-Table -Auto Name,EnabledSend a message to a recipient that's in the scope of the journal rule, open the journaling mailbox in Outlook or Outlook Web App, and verify whether the journaled message (journal report) has or hasn't been delivered to the journaling mailbox.
Modify journal rules
No additional settings are available when you modify a journal rule. The available settings are the same that were available when you created the rule:
EAC: Go to Compliance management > Journal rules, and then select Edit (
). The available settings are the same as when you created the rule. For more information, see the Use the EAC to create journal rules section.Exchange Management Shell: The syntax to modify a journal rule is:
Set-JournalRule -Identity <JournalRuleIdentity> [-Name <RuleName>] [-JournalEmailAddress <JournalMailboxIdentity>] [-Recipient <JournalRecipientEmailAddress | $null>] [-Scope <Global | Internal | External>]You can't use the Set-Journal cmdlet to enable or disable the rule (there's no Enabled parameter). To enable or disable the rule, you use the Enable-JournalRule and Disable-JournalRule cmdlets as described in the Enable or disable journal rules section.
For detailed syntax and parameter information, see Set-JournalRule.
Remove journal rules
Use the EAC to remove journal rules
In the EAC, go to Compliance management > Journal rules.
In the list view, select the rule or rules that you want to remove, and then select Delete (
 ).
).
Use the Exchange Management Shell to remove journal rules
To remove journal rules in the Exchange Management Shell, use the following syntax:
Remove-JournalRule -Identity <JournalRuleIdentity>
The following example removes the journal rule named Brokerage Journal Rule.
Remove-JournalRule "Brokerage Journal Rule"
For detailed syntax and parameter information, see Remove-JournalRule.
How do you know this worked?
To verify that you've successfully removed a journal rule, use any of the following procedures:
In the EAC, go to Compliance management > Journal rules and verify that the rule you removed is no longer listed.
In the Exchange Management Shell, run the following command to verify that the rule you removed is no longer listed:
Get-JournalRule | Format-Table -Auto NameSend a message to a recipient that was in the scope of the deleted journal rule, open the journaling mailbox in Outlook or Outlook Web App, and verify that the journaled message (journal report) isn't delivered to the journaling mailbox.
Enable or disable journaling for voicemail and missed call notifications
By default, premium journaling will journal voicemail notification and missed call notification messages that are generated by Unified Messaging (UM) in Exchange 2016. However, you can disable journaling for these types of messages. Even if you disable journaling for UM notification messages, messages containing faxes that were generated by the UM service are always journaled.
Note
Unified Messaging isn't available in Exchange 2019.
You can only change this setting in the Exchange Management Shell.
To disable journaling for voicemail and missed call notifications, run the following command:
Set-TransportConfig -VoicemailJournalingEnabled $false
To enable journaling for voicemail and missed call notifications, run the following command:
Set-TransportConfig -VoicemailJournalingEnabled $true
How do you know this worked?
To verify that you've successfully enabled or disabled journaling for voicemail and missed call notifications, run the following command to verify the value of the VoicemailJournalingEnabled property:
Get-TransportConfig | Format-List VoicemailJournalingEnabled
Specify the alternate journaling mailbox
For premium journaling, you can specify an alternate journaling mailbox that accepts non-delivery reports (also known as NDRs or bounce messages) for all undeliverable journal reports when any journaling mailbox is unavailable (one alternate journaling mailbox for all journaling mailboxes in your organization). For more information, see Alternate journaling mailbox.
Caution
If the alternate journaling mailbox also becomes unavailable and rejects the NDRs for undeliverable journal reports, the original journal reports are lost and can't be retrieved.
Use the EAC to specify the alternate journaling mailbox
In the EAC, go to Compliance management > Journal rules.
Select Select address next to Send undeliverable journal reports to.
In the NDRs for undeliverable journal reports window that opens, select Browse, select the mailbox in the dialog box that appears, select OK, and then select Save.
Note
To remove the functionality of the alternate journaling mailbox, select the email address next to Send undeliverable journal reports to. In the NDRs for undeliverable journal reports window that opens, select Remove X next to the email address, and then select Save.
Use the Exchange Management Shell to specify an alternate journaling mailbox
To specify the alternate journaling mailbox in the Exchange Management Shell, use the following syntax:
Set-TransportConfig -JournalingReportNdrTo <MailboxEmailAddress>
The following example specifies the mailbox that has the email address altjournalingmbx@contoso.com as the alternate journaling mailbox.
Set-TransportConfig -JournalingReportNdrTo altjournalingmbx@contoso.com
Important
The default value for the JournalingReportNdrTo property is $null. Once it has been set to a mailbox email address, it can be set to an alternate address, that is, to another email address, but can never be reverted to $null.
How do you know this worked?
To verify that you've successfully specified an alternate journaling mailbox, use any of the following procedures:
In the EAC, go to Compliance management > Journal rules and verify the value of Send undeliverable journal reports to.
In the Exchange Management Shell, run the following command to verify the value of the JournalingReportNdrTo property:
Get-TransportConfig | Format-List JournalingReportNdrTo
Enable journal report decryption
Journal report decryption allows premium journaling to save a clear-text copy of IRM-protected messages in journal reports (along with the original IRM-protected message). If the message contains any attachments that were protected by the Active Directory Rights Management Services (AD RMS) cluster in your organization, the attachments are also decrypted.
To enable journal report decryption, perform the following steps:
Configure the AD RMS super users group. For instructions, see Add the Federation Mailbox to the AD RMS Super Users Group.
Run the following command in the Exchange Management Shell:
Set-IRMConfiguration -JournalReportDecryptionEnabled $true
For more information, see Enable or Disable Journal Report Decryption.