Note
Access to this page requires authorization. You can try signing in or changing directories.
Access to this page requires authorization. You can try changing directories.
Applies to: Exchange Server 2013
If your organization uses forms to collect sensitive information, users might try emailing those forms to outside contacts, which creates a security risk. Data loss prevention (DLP) in Exchange helps you protect that information by detecting it with Document Fingerprinting. To use document fingerprinting, simply upload a blank form, such as an intellectual property document, government form, or other standard form used in your organization. Then, add the resulting document fingerprint to a DLP policy or transport rule. Here's how.
Use the EAC to create a document fingerprint
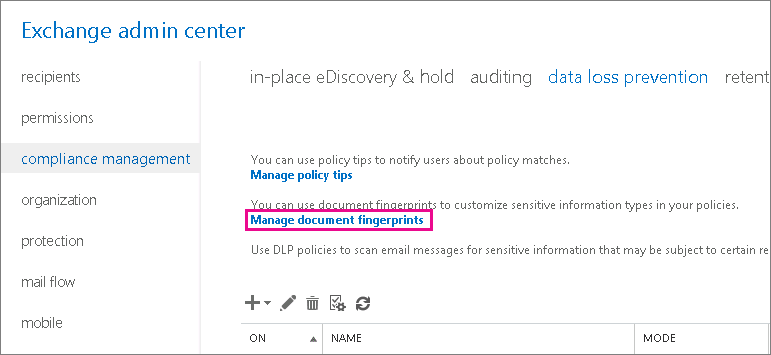
In the Exchange admin center EAC, go to compliance management > data loss prevention.
Click Manage document fingerprints.
On the document fingerprints page, click New
 to create a new document fingerprint.
Give the document fingerprint a Name and Description. (The name you choose will appear in the sensitive information types list.)
To upload a form, click Add
.Choose a form, and click Open. (Make sure that the file you upload contains text, isn't password protected, and is in one of the file types that are supported in transport rules. For a list of supported file types, see Use transport rules to inspect message attachments. Otherwise, you'll get an error when you try creating the fingerprint.) Repeat for any additional files you want to add to the document list for this document fingerprint. You can also add or remove files from this document fingerprint later if you want.
Click Save.
The document fingerprint is now part of your sensitive information types, and you can add it to a DLP policy or add it to a transport rule via the The message contains sensitive information... condition.

For more information about adding rules to a DLP policy, see the "Change a DLP policy" section of Manage DLP policies, and for more information about modifying transport rules, see Integrating sensitive information rules with transport rules. If you want to create a new policy, see Create a DLP policy from a template.
Use the Shell to create a classification rule package based on document fingerprinting
Tip
Even though you can create and modify classification rule packages in the Shell, you might find that creating document fingerprints is a little simpler in the EAC. We recommend you try it there before trying this procedure in the Shell.
DLP uses classification rule packages to detect sensitive content in messages. To create a classification rule package based on a document fingerprint, use the New-Fingerprint and New-DataClassification cmdlets. Because the results of New-Fingerprint aren't stored outside the data classification rule, you always run New-Fingerprint and New-DataClassification or Set-DataClassification in the same PowerShell session. The following example creates a new document fingerprint based on the file C:\My Documents\Contoso Employee Template.docx. You store the new fingerprint as a variable so you can use it with the New-DataClassification cmdlet in the same PowerShell session.
$Employee_Template = [System.IO.File]::ReadAllBytes('C:\My Documents\Contoso Employee Template.docx')
$Employee_Fingerprint = New-Fingerprint -FileData $Employee_Template -Description "Contoso Employee Template"
Now, let's create a new data classification rule named "Contoso Employee Confidential" that uses the document fingerprint of the file C:\My Documents\Contoso Customer Information Form.docx.
$Customer_Form = [System.IO.File]::ReadAllBytes('C:\My Documents\Contoso Customer Information Form.docx')
$Customer_Fingerprint = New-Fingerprint -FileData $Customer_Form -Description "Contoso Customer Information Form"
New-DataClassification -Name "Contoso Customer Confidential" -Fingerprints $Customer_Fingerprint -Description "Message contains Contoso customer information."
You can now use the Get-DataClassification cmdlet to find all DLP data classification rule packages, and in this example, "Contoso Customer Confidential" is part of the data classification rule packages list.
Finally, add the "Contoso Customer Confidential" data classification rule package to a DLP policy.
New-TransportRule -Name "Notify :External Recipient Contoso confidential" -NotifySender NotifyOnly -Mode Enforce -SentToScope NotInOrganization -MessageContainsDataClassification @{Name=" Contoso Customer Confidential"}
The DLP agent now detects documents that match the Contoso Customer Form.docx document fingerprint.
For syntax and parameter information, see New-Fingerprint, New-DataClassification, Set-DataClassification, and Get-DataClassification.
For more information
Integrating sensitive information rules with transport rules