Note
Access to this page requires authorization. You can try signing in or changing directories.
Access to this page requires authorization. You can try changing directories.
Note
The features described in this article are currently in Preview, aren't available in all organizations, and are subject to change.
This article covers the authentication and authorization requirements for using endpoints for the Exchange Online Admin API.
The Exchange Online Admin API provides a REST-based way to run specific PowerShell cmdlets, replacing legacy Exchange Web Services (EWS) scenarios. For more information, see Overview of the Exchange Online Admin API.
To access the Admin API, your app must establish its identity, obtain the right permissions, and follow best practices for secure token handling. At a high level, the process involves the following key steps:
Register an app in Microsoft Entra ID
Create an app registration to establish an identity for your app and configure credentials (client secret or certificate). This registration enables your app to request tokens from Microsoft Entra ID.
Assign required API permissions
Add the necessary OAuth scopes to your app registration:
- Delegated flow:
Exchange.ManageV2. - App-only flow:
Exchange.ManageAsAppV2.
- Delegated flow:
Step 3: Assign RBAC permissions
Exchange Online uses role-based access control (RBAC) to determine which endpoints, cmdlets, and objects the caller can manage. Assign the appropriate RBAC roles to the user (for delegated access) or to the app's service principal (for app-only access).
-
Use OAuth 2.0 flows to acquire tokens from Microsoft Entra ID:
- Delegated flow for user-based access.
- App-only flow for service-to-service access.
Step 1: Register an app in Microsoft Entra ID
To call the Exchange Online Admin API, you first must register your app in Microsoft Entra ID. An app is like a class object. A service principal is like an instance of the class. For more information, see Application and service principal objects in Microsoft Entra ID. For a detailed visual flow about creating applications in Microsoft Entra ID, see https://aka.ms/azuread-app.
Open the Microsoft Entra admin center at https://entra.microsoft.com.
In the search box at the top of the page, enter App registrations and select it from the results.

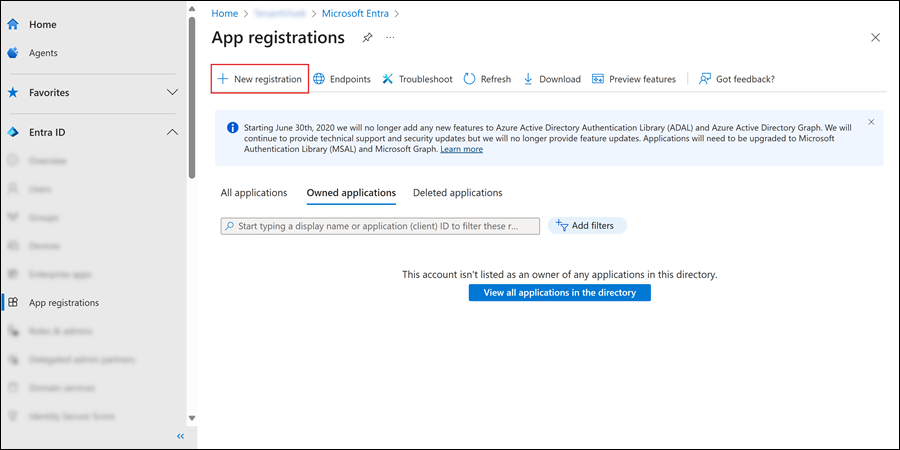
On the App registrations page, select New registration.
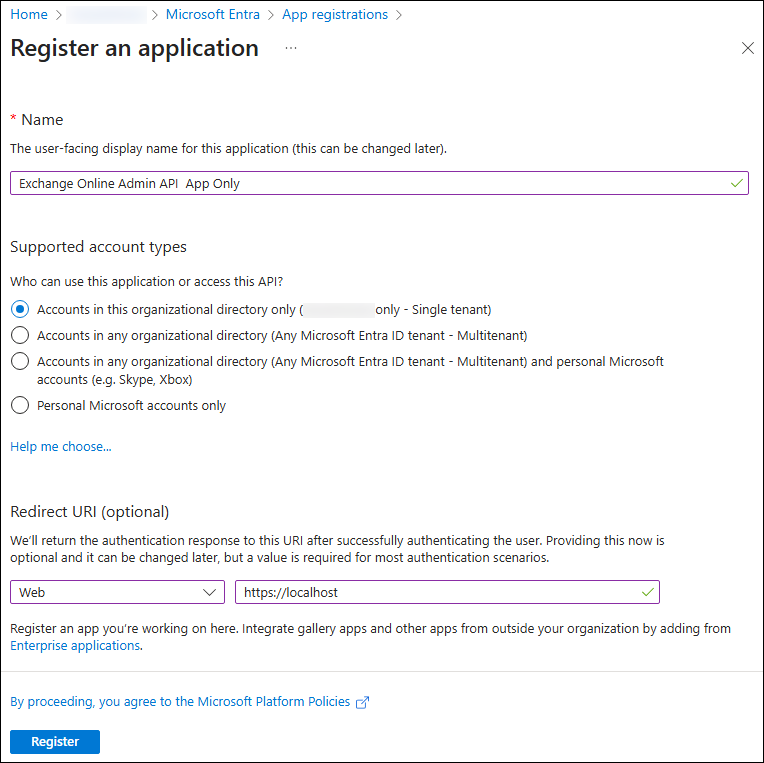
On the Register an application page, configure the application settings:
- Name: Enter a descriptive name (for example, Exchange Admin API Client).
- Supported account types: Select one of the following values:
- Single-organization apps: Select Accounts in this organizational directory only.
- Multitenant delegated scenarios: Select Accounts in any organizational directory.
- Redirect URI (optional): Required for delegated flow.
- Platform: Select Web.
- URI: Enter the URL where the access token is sent (for example,
https://localhostfor testing).
When you're finished on the Register an application page, select Register.


You're taken to the Overview page of the app you registered. Stay on the page for the next step.
Note
You can't create credentials for native applications because they can't be used for automated service-to-service calls.
Step 2: Assign required API permissions
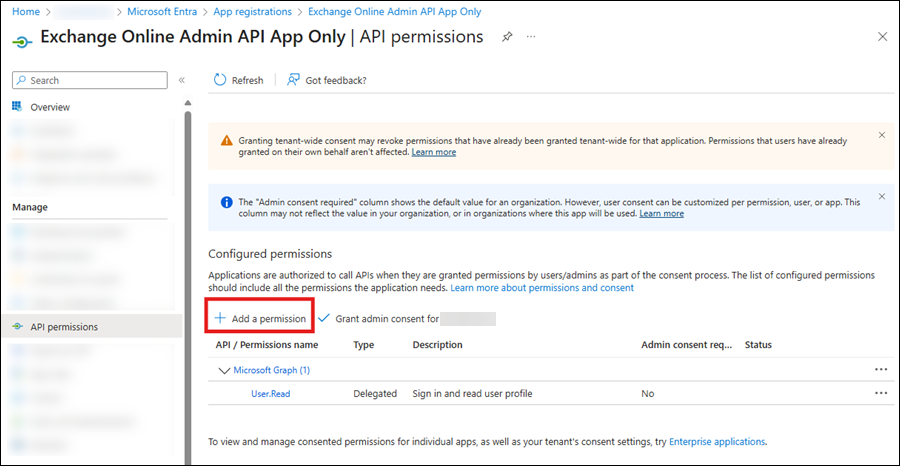
On Overview page of the app you created in the previous step, select API permissions from the Manage section.

On the API permissions page for the app, select Add a permission.
In the Request API permissions flyout that opens, select the APIs my organization uses tab, enter Office 365 Exchange Online in the search box, and then select it from the results.

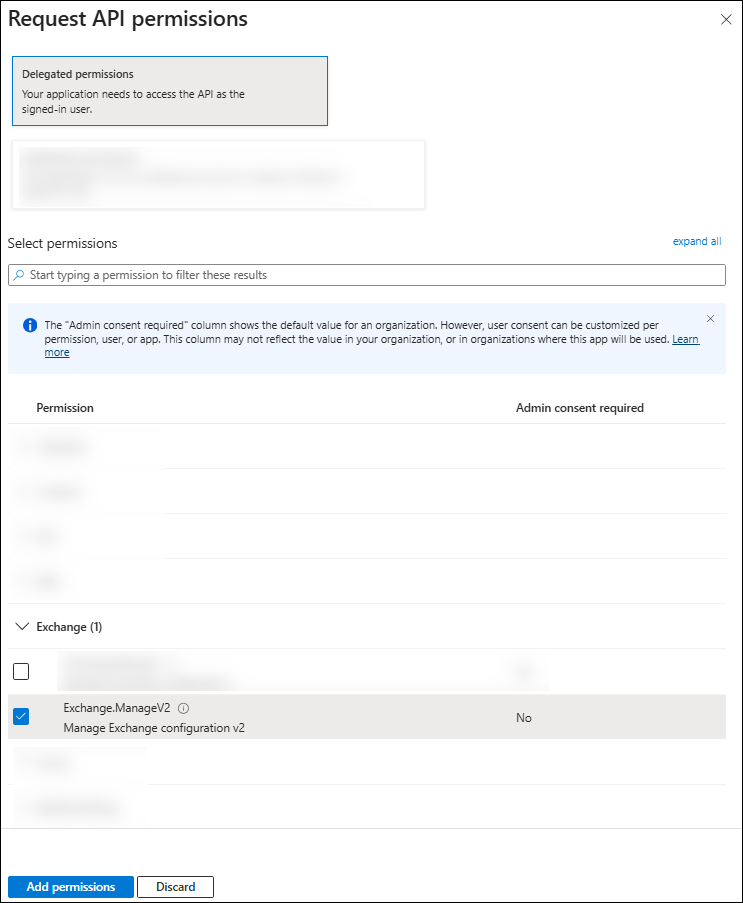
On the What type of permissions does your application require? flyout, make one of the following selections:
App-only flow: Select Application permissions, expand Exchange, select Exchange.ManageAsAppV2, and then select Add permissions.
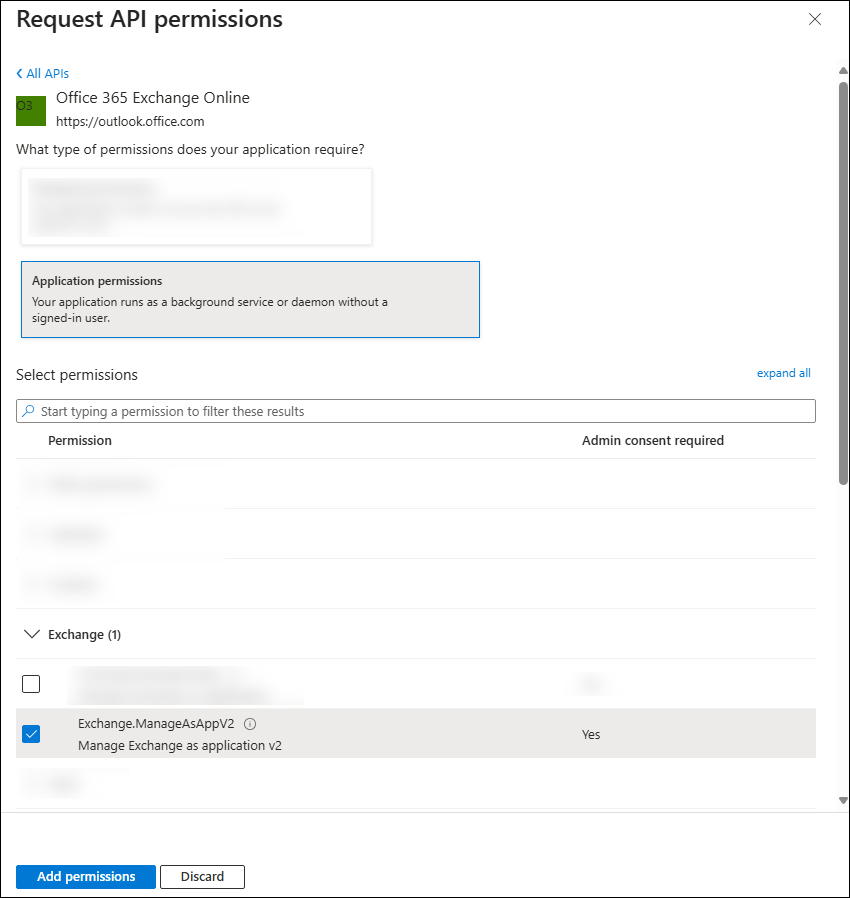
Delegated flow: Select Delegated permissions, expand Exchange, select Exchange.ManageV2, and then select Add permissions.
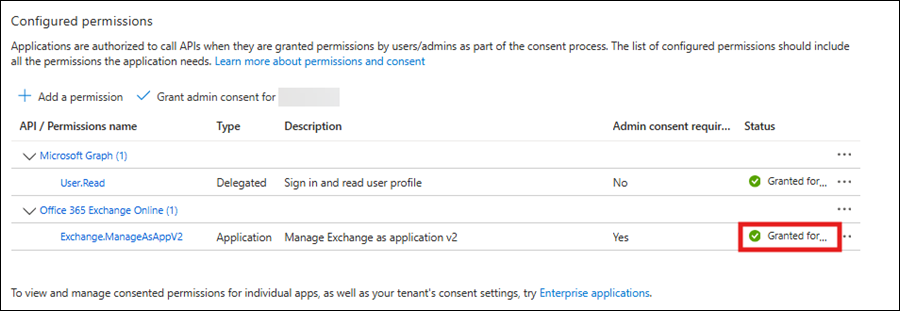
Back on the API permissions page, verify the selections from the previous step are listed:
- Office 365 Exchange Online > Exchange.ManageAsApp:
- Type: Application
- Admin consent required: Yes
- Office 365 Exchange Online > Exchange.ManageV2:
- Type: Delegated
- Admin consent required: Yes
- Office 365 Exchange Online > Exchange.ManageAsApp:
Select Grant admin consent for, review the confirmation dialog, and select Yes.


Step 3: Assign RBAC permissions
After registering your app and granting API permissions, you must configure Exchange RBAC roles. OAuth scopes let your app obtain tokens, but RBAC determines which cmdlets and objects the caller can manage. Without the appropriate RBAC role assignments, even valid tokens fail with the error: 403 Forbidden.
Use the steps in one of the following subsections based on the nature of your app.
Permissions for delegated (user) flow
For delegated scenarios, the user on whose behalf the app acquires the token must have the necessary RBAC roles assigned in Exchange Online. Common role examples:
- Recipient Management for mailbox and folder operations.
- Organization Management for organization-level settings.
- View-Only Organization Management for read-only org operations.
Assign these roles via the Exchange admin center or Exchange Online PowerShell. For instruction, see Manage role groups in Exchange Online.
Permissions for app-only flow
For app-only scenarios, the service principal representing your app must have sufficient permissions. You have the following options:
Assign Microsoft Entra roles (recommended for simplicity): Grant a built-in Microsoft Entra role to the enterprise application. For example, Exchange Administrator for full Exchange Online permissions:
- In the Microsoft Entra admin center at https://entra.microsoft.com, select Roles & admins.
- On the Roles and administrators | All roles page, select the Exchange Administrator role by clicking anywhere in the row other than the check box next to the first column.
- On the Exchange Administrator | Assignments page that opens, select Add assignments, choose your app, and then select Confirm.
Assign built-in or custom Exchange RBAC role groups (least privilege): Create or use existing custom role groups in Exchange Online that contain only the cmdlets your app needs and add the service principal to those groups. This approach avoids broad privileges and aligns with least-privilege security. For more information, see App-only authentication in Exchange Online PowerShell.
The following table lists the built-in RBAC role required for each endpoint.
| Endpoint | Required Exchange role group |
|---|---|
| /OrganizationConfig /AcceptedDomain |
View-Only Organization Management |
| /Mailbox /MailboxFolderPermission /DistributionGroupMember /DynamicDistributionGroupMember |
Recipient Management |
For even more granular control, consider using custom role groups that include only the specific management roles (cmdlet sets) your application needs. This approach follows least-privilege security and reduces risk compared to broad roles like Exchange Administrator or Global Administrator, which exceed the scope required for typical Admin API operations.
Step 4: Get an access token
To call the Exchange Online Admin API, your app must get an OAuth 2.0 access token from Microsoft Entra ID. As previously mentioned, Admin API supports the following flows:
- Authorization code flow (delegated) with refresh token: Your app acts on behalf of a signed-in user and can also obtain a refresh token for silent renewal if the request includes the
offline_accessscope. - Client credentials flow (app-only): Your app acts as itself (no user). Used for service/background scenarios. Refresh tokens aren't issued in this flow.
Use the /.default scope of the resource when requesting tokens (for example, https://outlook.office365.com/.default). This method tells Microsoft Entra ID to issue a token containing the application permissions (roles) previously granted for that resource.
Authorization code flow (delegated) with refresh token
Use this flow when you need user context. To get a refresh token, you must request offline_access in the authorization and token requests. For more information, see Refresh tokens in the Microsoft identity platform and Scopes and permissions in the Microsoft identity platform.
Step 1: Send the user to sign-in and consent
The user needs to authorize the app to act on their behalf. The app redirects the user to the /authorize endpoint in the Microsoft identity platform. Through this endpoint, Microsoft Entra ID signs the user in and requests their consent for the permissions the app requests. After consent, Microsoft Entra ID returns an authorization code to the app. The app can then redeem this code at the /token endpoint of the Microsoft identity platform for an access token.
The following example shows a request to the /authorize endpoint. In the request URL, you call the /authorize endpoint and specify the required and recommended properties as query parameters. For example:
GET https://login.microsoftonline.com/<TenantID>/oauth2/v2.0/authorize
    ?client_id=<ClientID>
    &response_type=code
    &redirect_uri=<RedirectURI> # must exactly match the app registration
    &response_mode=query
    &scope=https://outlook.office365.com/.default offline_access
    &state=12345
The parameters are described in the following table:
| Parameter | Required | Description |
|---|---|---|
| TenantID | Required | The organization where you request permission. The value can be the TenantID GUID or the friendly name. |
| client_id | Required | The Client ID assigned to the app by the the registration portal. Also known as the appId. |
| response_type | Required | Must include the value code for OAuth 2.0 authorization code flow. |
| redirect_uri | Recommended | The redirect URI of the app in URL-encoded format, where authentication responses are sent and received by the app. It must match one of the redirect URIs you registered in the app registration portal. |
| scope | Required | A space-separated list of the Exchange Online Admin API permissions you want the user to consent to. These permissions can include resource permissions (https://outlook.office365.com/.default in this scenario) and OIDC scopes, such as offline_access, which indicates that the app needs a refresh token for long-lived access to resources. |
| response_mode | Recommended | Specifies the method to send the resulting token back to the app. Valid values are query or form_post. |
| state | Recommended | A value included in the request that's also returned in the token response. It can be a string of any content. You typically use a random, unique value to prevent cross-site request forgery attacks. This property also encodes information about the user's state in the app before the authentication request occurred, such as the page or view they were on. |
- The user signs in and consents. Microsoft Entra ID redirects to your
redirect_uriwith?code=<authorization_code>. - Using
offline_accessenables issuing a refresh token later. For more information, see Refresh tokens in the Microsoft identity platform and Scopes and permissions in the Microsoft identity platform.
Step 2: Redeem the authorization code for tokens
The app uses the authorization code from the previous step to request an access token by sending a POST request to the /token endpoint.
POST https://login.microsoftonline.com/<TenantID>/oauth2/v2.0/token
Content-Type: application/x-www-form-urlencoded

client_id=<ClientID>
&client_secret=<ClientSecret>                  # confidential clients only
&grant_type=authorization_code
&code=<authorization_code>
&redirect_uri=<RedirectURI>
&scope=https://outlook.office365.com/.default offline_access
The parameters are described in the following table:
| Parameter | Required | Description |
|---|---|---|
| TenantID | Required | The organization where you request permission. The value can be the TenantID GUID or the friendly name. |
| client_id | Required | The Client ID assigned to the app by the the registration portal. Also known as the appId. |
| grant_type | Required | The value must be authorization_code for authorization code flow. |
| scope | Required | A space-separated list of scopes. The scopes your app requests must be equivalent to or a subset of the scopes requested in Step 1: Send the user to sign-in and consent. |
| code | Required | The authorization code you got in Step 1: Send the user to sign-in and consent. |
| redirect_uri | Required | The same redirect URI value you used to acquire the authorization code in Step 1: Send the user to sign-in and consent. |
| client_secret | Required for web apps | The client secret that you created in the app registration portal for your app. |
A successful response includes:
access_token: Bearer. Typically, about 60 minutes.refresh_token: Present, becauseoffline_accesswas requested.id_token: Optional. Returned if the scopeopenidwas requested. For more information, see Microsoft identity platform app types and authentication flows and Refresh tokens in the Microsoft identity platform.
Tip
Store the TenantID (tid) value from the token claims. You need it to form Admin API URLs and future token requests. For more information, see Microsoft identity platform app types and authentication flows.
Step 3: Refresh the access token silently (no user prompt)
Access tokens are short lived, and the app must refresh them after they expire to continue accessing resources. The app refreshes an access token by submitting another POST request to the /token endpoint:
- Provide the
refresh_tokeninstead of thecodein the request body. - Specify
refresh_tokeninstead ofauthorization_codeas the grant_type.
POST https://login.microsoftonline.com/<TenantID>/oauth2/v2.0/token
Content-Type: application/x-www-form-urlencoded

client_id=<ClientID>
&client_secret=<ClientSecret>
&grant_type=refresh_token
&refresh_token=<refresh_token>
&scope=https://outlook.office365.com/.default offline_access
The parameters are described in the following table:
| Parameter | Required | Description |
|---|---|---|
| TenantID | Required | The organization where you request permission. The value can be the TenantID GUID or the friendly name. |
| client_id | Required | The Client ID assigned to the app by the the registration portal. Also known as the appId. |
| grant_type | Required | The value must be refresh_token. |
| refresh_token | Required | The refresh_token your app got during the token request in Step 2: Redeem the authorization code for tokens. |
| scope | Required | A space-separated list of scopes. The scopes your app requests must be equivalent to or a subset of the scopes it requested in Step 2: Redeem the authorization code for tokens. |
| client_secret | Required for web apps | The client secret that you created in the app registration portal for your app. |
A successful response includes the following results:
- Returns a new access_token and often a new refresh_token to replace the old one.
- Refresh tokens last longer than access tokens. The default is about 90 days for confidential clients, and 24 hours for SPA redirect URIs. The tokens they can be revoked at any time, so handle reauthentication when needed. For more information, see Refresh tokens in the Microsoft identity platform.
Client credentials flow (app-only)
Use this flow for service-to-service calls without a user. After admin consent to application permissions (for example, Exchange.ManageAsAppV2) and assigning the required RBAC roles, request a token using the app's own credentials. No refresh token is issued. Request new access tokens as needed.
To acquire an access token, send a POST request to the /token identity platform endpoint. In this request, the client uses the client secret.
POST https://login.microsoftonline.com/<TenantID>/oauth2/v2.0/token
Content-Type: application/x-www-form-urlencoded

client_id=<ClientID>
&client_secret=<ClientSecret>                   # or client assertion (certificate)
&grant_type=client_credentials
&scope=https://outlook.office365.com/.default
The parameters are described in the following table:
| Parameter | Condition | Description |
|---|---|---|
| TenantID | Required | The organization where you request permission. The value can be the TenantID GUID or the friendly name. |
| client_id | Required | The application ID assigned to the app by the the registration portal. |
| scope | Required | The app ID URI of the resource with the .default suffix. For the Exchange Online Admin API, the resource app ID URI is https://outlook.office365.com/, so the scope value is https://outlook.office365.com/.default. This value informs the Microsoft identity platform endpoint to include all app-level permissions the admin consented to in the access token. |
| client_secret | Required | The client secret that you generated for your app in the app registration portal. Verify the value is URL encoded. |
| grant_type | Required | The value must be client_credentials. |
Step 5: Use the access token
After you get an access token as described in Step 4: Get an access token, include the access token in the Authorization header for each subsequent API call:
POST https://outlook.office365.com/adminapi/v2.0/<TenantID>/OrganizationConfig
Authorization: Bearer <access_token>
Content-Type: application/json

 { "CmdletInput": { "CmdletName": "Get-OrganizationConfig" } }
Use the Microsoft Authentication Library (MSAL)
This article contains the required protocol details when you manually create an issue raw HTTP requests to get tokens for client secrets. In production apps, use a built-in or supported authentication library to get security tokens and call protected web APIs. For example, the Microsoft Authentication Library (MSAL).
The MSAL and other supported authentication libraries simplify the process by handling details so you can focus on the functionality of your app. For example:
- Validation.
- Cookie handling.
- Token caching.
- Secure connections.
Microsoft maintains a wide selection of code samples that demonstrate supported authentication libraries with the Microsoft identity platform. To access these code samples, see Microsoft identity platform code samples.
For examples on how to get tokens using certificates, see Microsoft identity platform and the OAuth 2.0 client credentials flow.