Note
Access to this page requires authorization. You can try signing in or changing directories.
Access to this page requires authorization. You can try changing directories.
The mail flow rules UX in the Exchange Admin Center (EAC) has been enhanced and modernized. This updated experience is consistent with the EAC design and will enable easier rule management. The new Mail Flow Rules landing page now exposes more rule details; therefore, you can immediately get more insight into your rule configurations. The new UX also walks you through the process of creating a rule to simplify the rule creation experience. You'll find that most of the functionalities remain the same; so these Updates in UX don't interrupt your workflow and also allow for a smoother transition.
Updates in UX
The following updates have taken place in the mail flow rules section in the EAC:
- Rule creation wizard: This new wizard experience will be used to create new rules. The wizard walks you through the configuration of all your rule conditions and settings with a step-by-step approach to help avoid misconfiguring the rules.
- Rules will be disabled upon creation: If you want the rule to be turned on, enable it from the Details panel by selecting and enabling the rule.
- The status of the Stop rule processing setting is displayed on the landing page. Use this setting to avoid applying more rules once this rule (the created rule) processes a message. The display of this setting on the landing page enables you to know when this setting is turned on for a rule, as this setting can affect more rules from processing.
- Last executed column is displayed on the landing page. This column shows the last time a rule was executed to help better manage which rules are still being applied to your organization. Note that the last execution value is not updated in real-time and may take up to 24 hours to reflect recent activities.
Use the new Rule Creation wizard to create a mail flow rule
The EAC allows you to create mail flow rules by using a template, copying an existing rule, or from scratch.
Go to Mail flow > Rules.
Create the rule by using one of the following options:
- From a template: Select Add + and select a template.
- Copying a rule: Select the rule and then select Duplicate.
- From scratch: Select Add + and then select Create a new rule, and use the Rule Creation wizard.
In the Rule Creation wizard, enter a name for the new rule in the Name dialog box, and then select the conditions and actions for this rule.
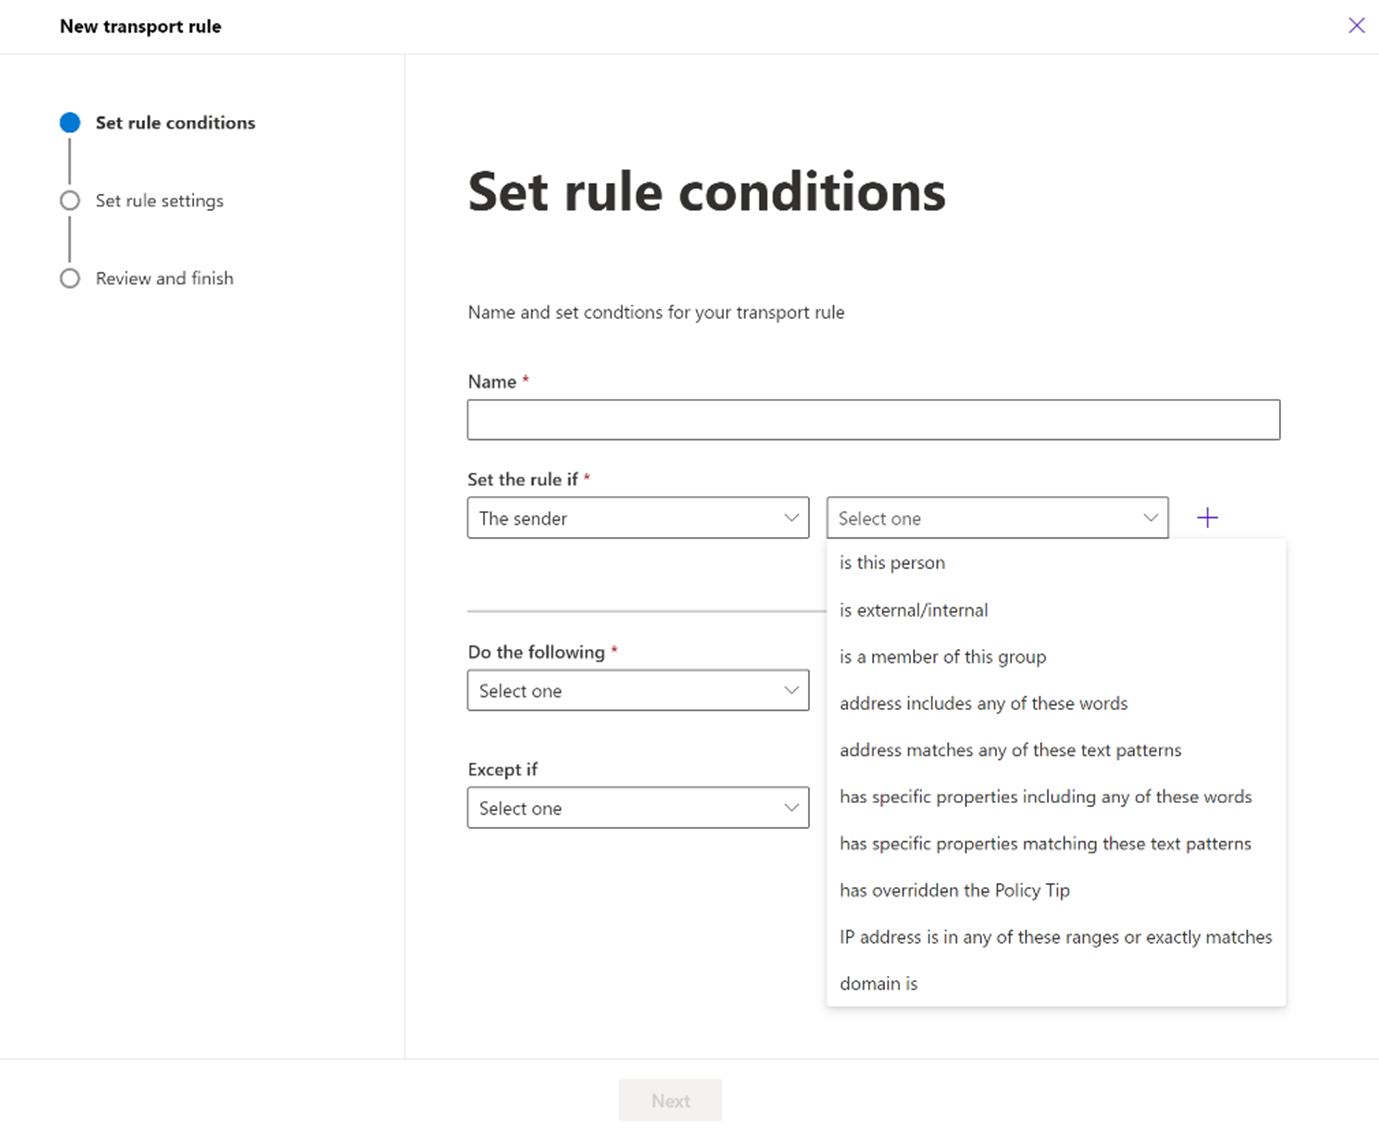
- From the See the rule if drop-down list (in which you'll see all the possible conditions you can set for your rule), select the condition you want.
- Most conditions will require you to make a selection using both the side-by-side drop-down lists. Select the rule condition subject from the first drop-down list and you'll be able to see all your possible rule options in the second drop-down list. For example, if you select The sender is.. from the first drop-down list, then you'll have a list of options in the second drop-down list from which you select one to complete the condition, as shown in the preceding screenshot. Furthermore, some conditions will require you to specify values. For example, if you select the The sender is this person... condition, you'll need to select a recipient in your organization.
- If you don't want to specify a condition and want this rule to apply to every message in your organization, select the Apply to all messages condition.
- As you configure your conditions, the description below the drop-down lists will also get updated.
- From the Do the following drop-down list, select the action you want the rule to take on messages matching the criteria.
- Most of the actions follow the same structure as the conditions. There are two drop-down lists; so, you can select from the variety of actions available.
- Some of the actions will require you to specify values. For example, if you select the Forward the message for approval to these people action, you'll need to select a recipient in your organization.
- To add more conditions, select + beside the drop-down lists. You can remove any one of them by selecting the trash bin icon next to it.
- To add more actions, select Add action. You can remove any one of them by selecting the trash bin icon next to it.
- From the Except if drop-down list, select the exceptions you want the rule to take on. You can remove any exceptions from the rule by selecting the trash bin icon next to it.
Note
Selection of exceptions isn't a requirement to create a rule. You can create a rule without any exceptions configured.
- From the See the rule if drop-down list (in which you'll see all the possible conditions you can set for your rule), select the condition you want.
After you're done configuring your rule conditions, select Next to configure your rule settings.
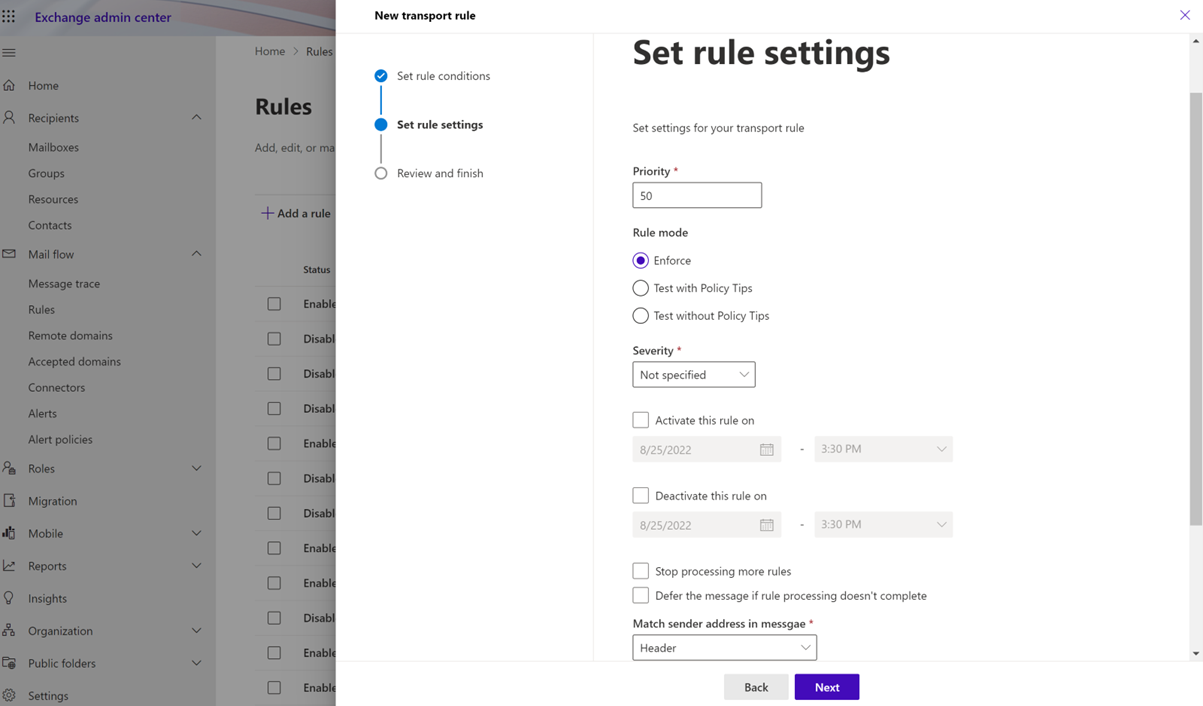
- Specify how the rule-match data for this rule is displayed in the Data Loss Prevention (DLP) reports and the Mail protection reports.
- Under Audit this rule with severity level, select a level to specify the severity for this rule. The activity reports for mail flow rules group the rule-matches by severity level. The severity level is just a filter to make the reports easier to use. The severity level has no impact on the priority in which the rule is processed.
Note
If you clear the Audit this rule with severity level checkbox, rule-matches won't show up in the rule reports.
- Set the mode for the rule. You can use one of the two test modes to test the rule without impacting mail flow. In both test modes, when the conditions are met, an entry is added to the message trace.
- Enforce: This mode turns on the rule, and it starts processing messages immediately. All actions on the rule will be performed.
- Test with Policy Tips: This mode turns on the rule, and any Policy Tip actions (Notify the sender with a Policy Tip) will be sent, but no actions related to message delivery will be performed. DLP is required to use this mode. For more information, see Policy Tips.
- Test without Policy Tips: Only the Generate incident report action will be enforced. No actions related to message delivery are performed.
- If you want to be deactivated only on a specific date:
- Select Activate this rule on the following date: and specify a date. The rule will still be enabled prior to that date, but it won't be processed.
- Similarly, you can have the rule stopped from being processed on a certain date. To do so, select Deactivate this rule on the following date: and specify a date. The rule will remain enabled, but it won't be processed.
- You can choose to avoid applying more rules once this rule processes a message. To do so, select Stop processing more rules. If you select this option, and a message is processed by this rule, no subsequent rules are processed for that message.
- You can specify how the message should be handled if the rule processing can't be completed. By default, the rule will be ignored, and the message will be processed regularly, but you can choose to resubmit the message for processing. To do so, check the Defer the message if rule processing doesn't complete checkbox.
- If your rule analyzes the sender's address, it only examines the message headers by default. However, you can configure your rule to also examine the SMTP message envelope. To specify what is to be examined, select one of the following values for the Match sender address parameter in the message:
- Header: Only the message headers will be examined.
- Envelope: Only the SMTP message envelope will be examined.
- Header or envelope: Both the message headers and SMTP message envelope will be examined.
- You can add comments to this rule in the Comments box.
- If your rule analyzes the sender's address, it only examines the message headers by default. However, you can configure your rule to also examine the SMTP message envelope. To specify what is to be examined, select one of the following values for the Match sender address parameter in the message:
- Specify how the rule-match data for this rule is displayed in the Data Loss Prevention (DLP) reports and the Mail protection reports.
Select Next if you're satisfied with the rule settings that have been configured.
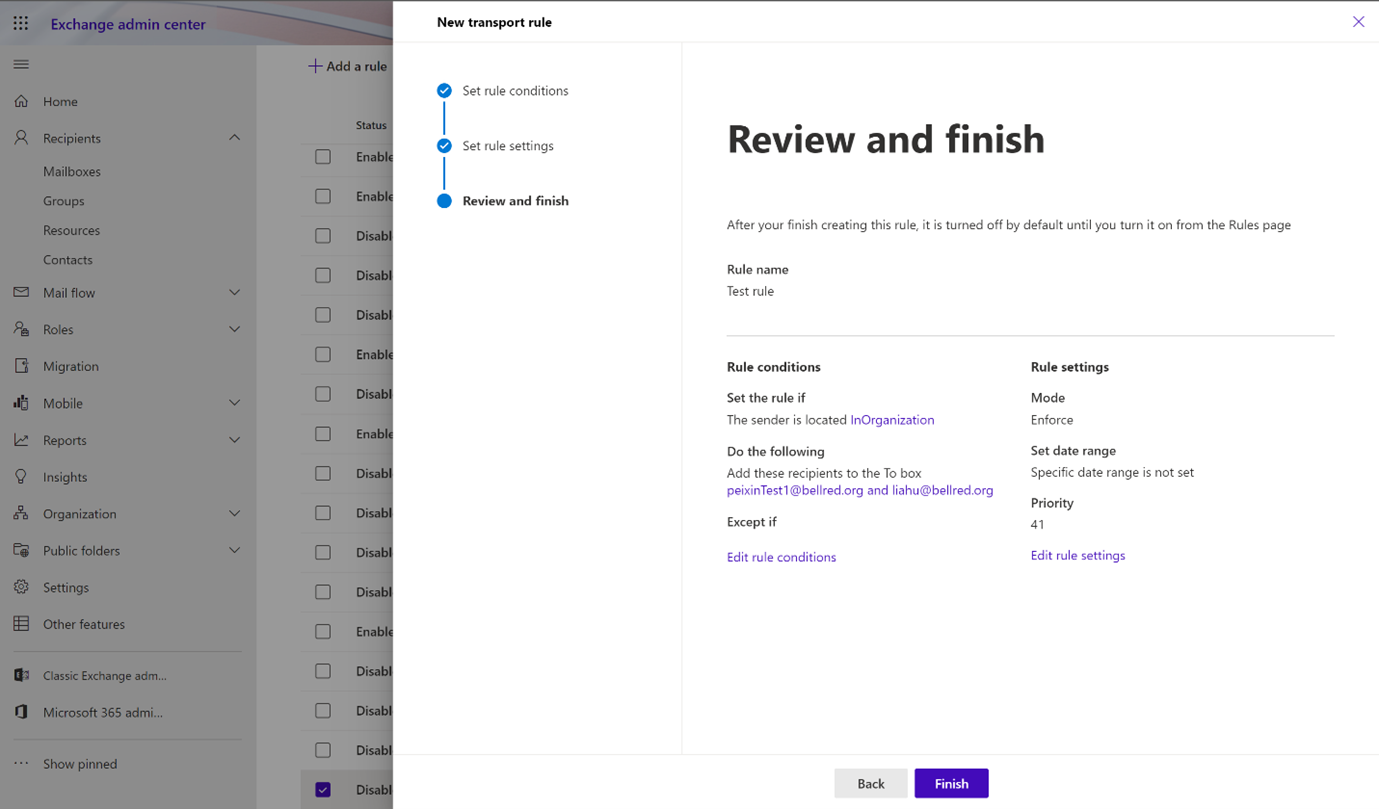
- For the final step of the rule creation process, look over the description to see all the conditions, actions, exceptions, and settings that you've configured for the rule.
- Once you're satisfied with all your selections, select Finish.
All rules will be defaulted to Off upon creation. If you wish to enable your rule, then select the rule from the Mail Flow Rules landing page and turn on your rule from the Details panel.