Note
Access to this page requires authorization. You can try signing in or changing directories.
Access to this page requires authorization. You can try changing directories.
This guide provides essential information and steps for tenant administrators who want to perform common management tasks for Microsoft 365 Groups. Use the following sections for guidance on how to create, configure, troubleshoot, and maintain your organization's groups.
Create and display Microsoft 365 Groups:
Manage delegation and permissions for Microsoft 365 Groups:
Manage email addresses for Microsoft 365 Groups:
Manage mail flow settings in Microsoft 365 Groups:
Restore deleted Microsoft 365 Groups and content:
Other common Microsoft 365 Groups management tasks:
PowerShell scripts for Microsoft 365 Groups management:
Create and display Microsoft 365 Groups
Control Microsoft 365 Groups creation
By default, all users of your tenant are allowed to create Microsoft 365 Groups. However, that approach can result in unaccounted, orphaned, and inactive groups. To avoid these issues, see Manage who can create Microsoft 365 Groups.
You can also use the following tools to control Microsoft 365 Groups creation:
Microsoft 365 Groups expiration policy: This feature makes life easier for users, including admins, group owners, and members by automating the expiration and renewal process. It does so by tracking groups for user activity across different apps that are associated with the group, such as Teams, SharePoint, and Outlook. For more information, see the following resources:
Microsoft 365 Groups naming policy: Worried that users might give offensive names to the Microsoft 365 Groups that they create? Use the Microsoft 365 Groups naming policy to block specific words and limit group names to certain criteria, such as department names. See Microsoft 365 Groups naming policy.
Display a Microsoft 365 group associated with a team
All new teams have an associated Microsoft 365 group. By default, this Microsoft 365 group is hidden from Exchange clients (Outlook and Outlook on the web) and is also hidden from the global address list (GAL). To unhide the group, use Exchange Online PowerShell.
Unhide the Microsoft 365 group from the Outlook or Outlook on the web address list
Run the following command and specify the required value:
Set-UnifiedGroup -Identity <UnifiedGroup ID> -HiddenFromAddressListsEnabled $falseNote
The value
$falseunhides the group from the address list, and$truehides it.
Unhide the Microsoft 365 group from an Exchange client
Run the following command and specify the required value:
Set-UnifiedGroup -Identity <UnifiedGroup ID> -HiddenFromExchangeClientsEnabled $falseNote
The value
$falseunhides the group from the Exchange client, and$truehides it.
Manage delegation and permissions for Microsoft 365 Groups
Enable specific users to Send As a Microsoft 365 group
You can assign "Send As" permissions to allow specific users to send messages on behalf of a Microsoft 365 group:
Run the following command:
Add-RecipientPermission <group name> -Trustee <MailboxName> -AccessRights SendAs
For more information, see Allow members to send as or send on behalf of a Microsoft 365 group.
Control user access to specific group resources
A Microsoft 365 group has many more resources, but the following ones are the minimum set:
- Inbox
- Calendar
- SharePoint site
- OneNote
A user must be the member of the Microsoft 365 group to access any of these resources. You can't delegate access to a group resource individually. However, you can grant access to group conversations, files, calendar invitations, and notebooks to individual guests. See Adding guests to Microsoft 365 Groups.
Prevent group members from changing a group calendar
You can set read-only calendar permissions on group members by specifying the CalendarMemberReadOnly parameter.
For example, the following command makes the calendar read-only for all members in Group1.
Set-UnifiedGroup Group1 -CalendarMemberReadOnly
Microsoft 365 Groups limits
This table shows the size and membership limits that apply to Microsoft 365 Groups.
| Maximum | Value |
|---|---|
| Owners per group | 100 |
| Groups a user can create | 250 |
| Groups that an admin can create | Up to default tenant limit of 500,000 |
| Number of members | More than 1,000, though only 1,000 can access the Group conversations concurrently. Users might notice delays when they access the calendar and conversations in very large groups in Outlook. |
| Number of groups a user can be a member of | 1,000 |
| File storage | 1 Terabyte + 10 GB per subscribed user + any additional storage purchased. You can purchase an unlimited amount of additional storage. |
| Group mailbox size | 50 GB |
| Maximum email message send/receive size | 35/36 MB is the default maximum send/receive limit, respectively. It can be increased by using the Set-UnifiedGroup command, as necessary. |
| Distribution Group as a member of a Microsoft 365 group | A distribution group that has more than 1,000 members can't be added to a Microsoft 365 group. This also includes the nested distribution group members. |
Manage email addresses for Microsoft 365 Groups
Remove the onmicrosoft.com email address from a Microsoft 365 group
The <domain>.onmicrosoft.com email address is a Microsoft Online Email Routing Address (MOERA). At least one MOERA must be attached to a group at any one time. Therefore, you can't remove the onmicrosoft.com address from a group. However, you can change the MOERA domain to be a secondary email address of the group.
Example:
Assume that contoso.com is your primary email domain and contoso.onmicrosoft.com is your MOERA domain. To make contoso.com the primary email address for the Marketing group and set the MOERA as a secondary address, run the following command:
Set-UnifiedGroup Marketing -PrimarySmtpAddress marketing@contoso.com
To learn more about MOERA addresses, see How the proxyAddresses attribute is populated in Microsoft Entra ID.
Customize email addresses stamped onto new Microsoft 365 Groups
You can create an email address policy to automatically stamp customized email addresses onto Microsoft 365 Groups. See Choose the domain to use when creating Microsoft 365 Groups.
Note
The email address policy doesn't change the email addresses of Microsoft 365 Groups that were in use before the policy was created.
Change email addresses of existing groups after adding a domain to a tenant
Assume that you add an accepted domain, and you want to make it the primary SMTP address for all Microsoft 365 Groups that were created before the domain was added to the tenant.
You can use the Set-UnifiedGroup command to update the email address of the existing groups.
Example:
Add the contoso.com domain to all Microsoft 365 Groups that exist in your tenant:
$domain = "@groups.contoso.com"
$microsoft365Groups = Get-UnifiedGroup -ResultSize Unlimited
foreach ($Microsoft365Group in $microsoft365Groups)
{
  $newEmailId = $Microsoft365Group.alias + $Domain
  Set-UnifiedGroup -Identity $Microsoft365Group.identity -EmailAddresses @{add=$newEmailId}
}
Note
Replace groups.contoso.com with the domain name that you want to add, and make sure that the new name is an accepted domain.
Add or remove a secondary email address from a Microsoft 365 group
You can change the email address of a Microsoft 365 group using Microsoft 365 admin center, select the group and selecting @edit email address.
Alternatively, you can also use the following Exchange Online PowerShell commands to add and remove a nonprimary email address from a Microsoft 365 group:
Add:
Set-UnifiedGroup Group1 -EmailAddresses @{add="group1@secondary.contoso.com"}
Remove:
Set-UnifiedGroup Group1 -EmailAddresses @{remove="group1@secondary.contoso.com"}
Manage mail flow settings in Microsoft 365 Groups
Control delivery of email messages to new members of a Microsoft 365 group
To control whether new members of a group receive group email messages, run the following Exchange Online PowerShell command:
Set-UnifiedGroup <group name> -AutoSubscribeNewMembers
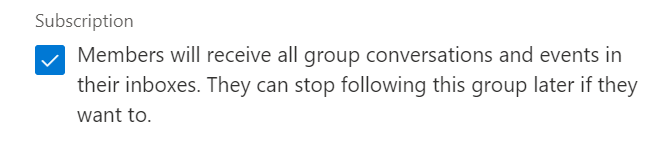
Group owners can enable/disable the subscription from group settings by selecting the following option:
Note
The AutoSubscribeNewMembers parameter takes effect for new members of a group after the change is made. Existing members aren't affected.
Individual users can start and stop receiving group email messages by selecting the Follow in Inbox/Stop following in Inbox option on the group. See Follow a group in Outlook.
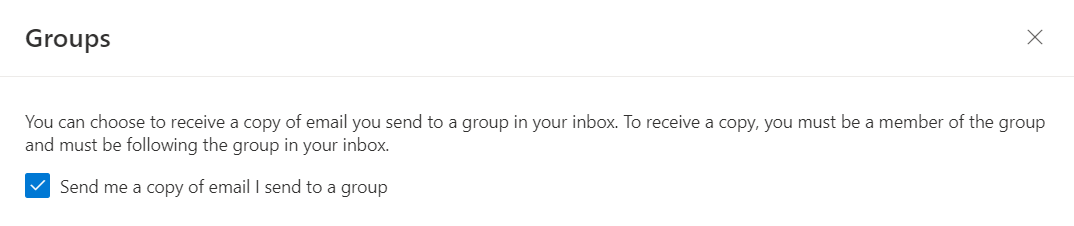
Get a copy of email messages you send to a Microsoft 365 group
By default, when you send an email message to an Outlook group that you're a member of, you don't receive a copy of that message in your Inbox. You can change this setting.
Sign in to your mailbox by using Outlook on the web (Outlook on the web), and then select Settings > View all Outlook settings.
Select Mail > Groups.
Select the Send me a copy of email I send to a group check box.
Administrators can enable the setting from Exchange Online PowerShell using the following command:
Individual mailbox:
Set-MailboxMessageConfiguration <mailbox name> -EchoGroupMessageBackToSubscribedSender $True
All mailboxes:
To enable the setting for all mailboxes at once, use the following command:
Get-Mailbox -ResultSize Unlimited | ForEach {Set-MailboxMessageConfiguration -Identity $_.UserPrincipalName -EchoGroupMessageBackToSubscribedSender $true}
Note
This setting takes up to an hour to take effect.
Configure automatic replies for a Microsoft 365 group
To configure automatic reply messages for a specific Microsoft 365 group mailbox, run the following Exchange Online PowerShell command:
Set-MailboxAutoReplyConfiguration -Identity <group mailbox> -AutoReplyState Enabled -InternalMessage "<Internal auto-reply message>" -ExternalMessage "<External auto-reply message>"
Note
If your group mailbox reached its allotted quota, you receive a Microsoft.Exchange.Data.Storage.QuotaExceededException error when you run the Set-MailboxAutoReplyConfiguration cmdlet. Use the following steps, to resolve the error:
- Reduce the size of your group mailbox.
- Wait 1 hour for the changes to take effect.
- Rerun the Set-MailboxAutoReplyConfiguration cmdlet.
Email issues in Microsoft 365 Groups
Issue 1: Messages sent from external users to a Microsoft 365 group aren't received
If your sender receives a nondelivery report (NDR) that has the status code 550 5.7.193, make sure that the Microsoft 365 group is enabled to receive email messages from external users.
Issue 2: Messages sent to a Microsoft 365 group aren't received by all members
Make sure that all group members have subscribed to the desired messages. See Follow a group in Outlook.
To check the message status of members who have subscribed to group email messages, run the following command:
Get-UnifiedGroup <group name> | Get-UnifiedGroupLinks -LinkType Subscribers
To configure all group members to receive messages that are sent to a Microsoft 365 group, run the following command:
$group = "<address of Microsoft 365 group>"
Get-UnifiedGroupLinks $group -LinkType Member | % {Add-UnifiedGroupLinks -Identity $group -LinkType subscriber -Links $_.Guid.ToString() -Confirm:$false}
Here's an example that resubscribes all members of the group testg@contoso.onmicrosoft.com to receive messages in their Inbox:
$group="testg@contoso.onmicrosoft.com"
Get-UnifiedGroupLinks $group -LinkType Member | % {Add-UnifiedGroupLinks -Identity $group -LinkType subscriber -Links $_.Guid.ToString() -Confirm:$false}
Restore deleted Microsoft 365 Groups and content
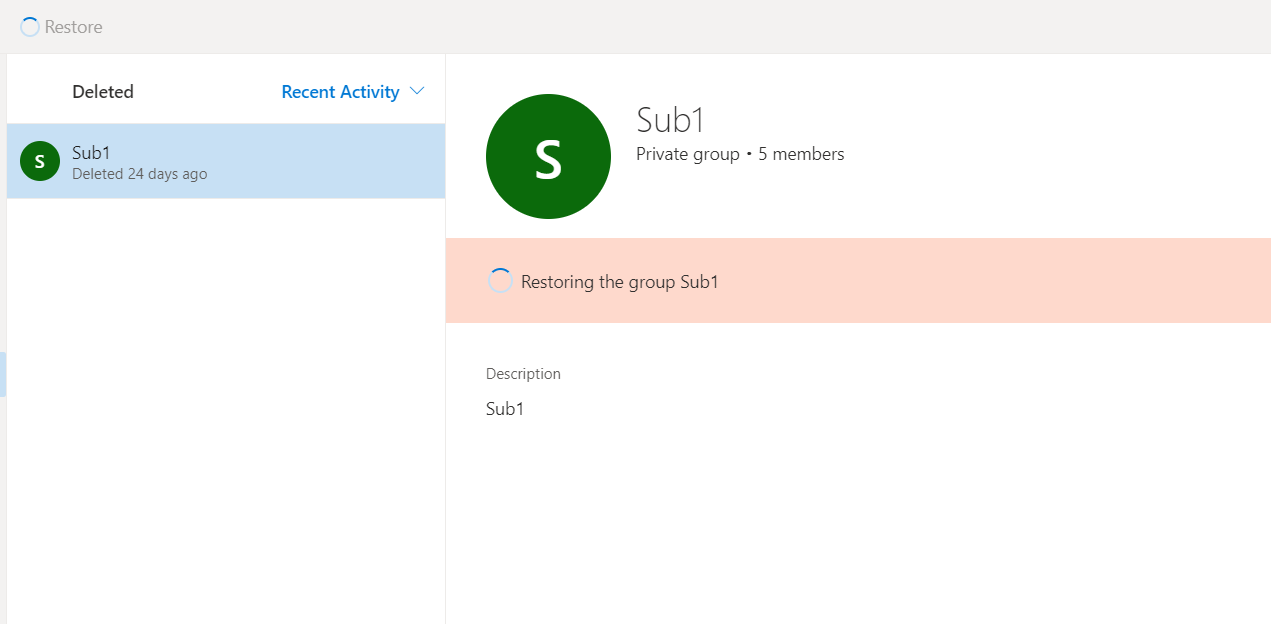
Restore a Microsoft 365 group
Deleted Microsoft 365 Groups are retained for 30 days. Within this period, either a group owner or a tenant admin can restore the group. After 30 days, the group and its associated contents are permanently deleted and can't be restored.
Restoring a Microsoft 365 group restores any services that are related to the group, such as Planner, Teams, and SharePoint sites.
Note
It might take up to 48 hours to restore all the associated content for a group.
For group owners
Open the Deleted groups page, select Manage groups under the Groups node, and then select Deleted.

Select the Restore tab next to the group that you want to restore.

For tenant admins
Use the Microsoft 365 admin center. For more information, see Restore a deleted Microsoft 365 group.
Restore email conversations deleted from a Microsoft 365 group
If you accidentally delete email conversations from a Microsoft 365 group, you can restore them by using Outlook on the web or by running the Restore-RecoverableItems PowerShell cmdlet. For more information, see Restore deleted email conversations from Microsoft 365 Groups.
Other common Microsoft 365 Groups management tasks
Convert to a Microsoft 365 group
Microsoft provides no tools to convert a shared mailbox to a Microsoft 365 group, or vice versa.
However, you can upgrade distribution lists to Microsoft 365 Groups. It's a great way to give your organization's distribution lists all the features and functionality of Microsoft 365 Groups. See Why you should upgrade your distribution lists to groups in Outlook.
You can upgrade distribution lists one at a time, or several at the same time. If the distribution list can't be upgraded, a dialog box opens to indicate this. See Which distribution lists can't be upgraded?.
Also, see Upgrade distribution lists to Microsoft 365 Groups in Outlook.
Access Microsoft 365 Groups from Exchange clients
For the best Microsoft 365 group user experience, use the latest version of Outlook from the Microsoft 365 suite or Outlook on the web.
The following Outlook clients can access Microsoft 365 Groups:
- Outlook for Microsoft 365
- Outlook 2016 MSI and later versions
- Outlook for Mac 2016 (version 16.9 and later)
- Outlook for Android and Outlook for iOS
- Outlook on the web
Microsoft 365 group migration between tenants
There's no native tool or method available to migrate Microsoft 365 Groups between tenants.
Microsoft 365 group deletion
Deleted Microsoft 365 Groups and related services (such as Teams, SharePoint sites, and so on) are retained in a soft-deleted state for 30 days. If you're a tenant admin, you can permanently delete a Microsoft 365 group without waiting for 30 days. To do so, follow these steps:
Run the following PowerShell cmdlet to connect to Microsoft Graph:
Connect-MgGraph -Scopes "Group.ReadWrite.All"Run the following PowerShell cmdlet to get the name and group ID of all soft-deleted groups:
Get-MgDirectoryDeletedGroup | Select-Object DisplayName, IdRun the following PowerShell cmdlet to purge (hard delete) a deleted group:
Warning
Purging the group permanently removes the group and its data.
Remove-MgDirectoryDeletedItem -DirectoryObjectId <group ID>
Export Microsoft 365 Groups information
Use the Microsoft Purview search to export email contents of a Microsoft 365 group to PST. For more information, see Search for content using the Content Search tool.
You can run PowerShell commands to accomplish the following tasks.
Export the membership list of a Microsoft 365 group:
Get-UnifiedGroup <GroupName> | Get-UnifiedGroupLinks -LinkType Members | Export-CSV ".\GroupMembers.csv" -NoTypeInformation -Encoding UTF8
List all groups (including deleted groups) and group owners:
Get-UnifiedGroup -IncludeSoftDeletedGroups |?{$_.ManagedBy -ne $null} | FT DisplayName, ManagedBy
List all groups (including deleted groups) that don't have assigned owners:
Get-UnifiedGroup -IncludeSoftDeletedGroups |?{$_.ManagedBy -eq $null}
To list all Microsoft 365 Groups together with tracking information about the group creator, you have to use the auditing information. Search the unified audit log for the "added group" activity.

Microsoft 365 group mailbox size
The size limit of Microsoft 365 group mailboxes is 50 GB by default. The following information explains how to view the current size of a Microsoft 365 group mailbox, and how to free up space in it before it gets full.
View the group mailbox size
Run the following command to view the current size of a Microsoft 365 group mailbox:
Get-Mailbox -GroupMailbox <group name> | Get-MailboxStatistics | fl TotalDeletedItemSize, TotalItemSizeTo view the current size of all group mailboxes:
Get-Mailbox -GroupMailbox -ResultSize unlimited | Get-MailboxStatistics | ft DisplayName, TotalDeletedItemSize, TotalItemSize
Increase space in the group mailbox
There's no supported way to increase the quota of a group mailbox. You must remove older email messages to free up space in the group mailbox.
A group owner can remove older email messages by using Outlook or Outlook on the web to free up space immediately. A tenant administrator can set up a retention policy to clean older email messages from groups. Retention policies take longer to clean up the data though.
Also, you can search the content of the group mailbox and export the search results to a PST file before removing email messages from the group mailbox.
Microsoft 365 Groups usage report
In the Microsoft 365 Groups report, you can gain insights into the activity of groups in your organization, such as Emails received in Exchange, Messages in Viva Engage. For more information, see Microsoft 365 Reports in the admin center.
PowerShell scripts for Microsoft 365 Groups management
Example 1: See all the groups together with created date, owner, and membership count
Get-UnifiedGroup |
  Select-Object Id, DisplayName, ManagedBy, Alias, AccessType, WhenCreated, @{Expression={([array](Get-UnifiedGroupLinks -Identity $_.Id -LinkType Members)).Count }; Label='Members'} |
  Sort-Object WhenCreated |
  Format-Table DisplayName, alias, ManagedBy, Members, AccessType, WhenCreated
Example 2: Create a report for users in a group
$groups = Get-UnifiedGroup -ResultSize Unlimited
$groups | ForEach-Object {
  $group = $_
  Get-UnifiedGroupLinks -Identity $group.Name -LinkType Members | ForEach-Object {
    New-Object -TypeName PSObject -Property @{
      Group = $group.DisplayName
      Member = $_.Name
      EmailAddress = $_.PrimarySMTPAddress
      RecipientType= $_.RecipientType
    }
  }
} | Export-CSV ".\groupMembers.csv" -NoTypeInformation -Encoding UTF8
Example 3: Assign Send As permissions on a group
$groupAlias = "group1"
$userAlias = "john"
$groupsRecipientDetails = Get-Recipient -RecipientTypeDetails groupmailbox -Identity $groupAlias
Add-RecipientPermission -Identity $groupsRecipientDetails.Name -Trustee $userAlias -AccessRights SendAs