Note
Access to this page requires authorization. You can try signing in or changing directories.
Access to this page requires authorization. You can try changing directories.
Original KB number: 10048
This article explains how to assign access permissions to a user mailbox, to multiple mailboxes, and to individual users in Microsoft 365.
Who is it for?
Microsoft 365 administrators who help set up access permissions for users to open other people's mailboxes.
How does it work?
We'll begin by asking you the task you want to do. Then we'll take you through a series of steps that are specific to your situation.
Estimated time of completion:
10-15 minutes.
Welcome to the guide
Select the scenario that you are trying to configure for your users. Once you select the appropriate scenario below, the step-by-step instructions will be provided.
Which Microsoft 365 plan do you use
Select the plan that your organization subscribes to in Microsoft 365.
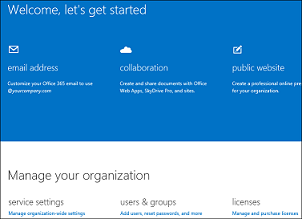
Not sure which Microsoft 365 plan your organization uses? Go to https://portal.microsoftonline.com and login using your Microsoft 365 administrator credentials.
If you see the below administrative interface, then you are using the Small Business plan.
Enterprise | Midsize | Education
If you see the below administrative interface, then you are using the Enterprise/Midsize or Education plan.

How do I access the mailbox (Small Business)
Use the Exchange Admin Center (EAC) to assign permissions
The following procedure shows how to assign full permissions to a user mailbox:
Before you begin, sign in to the Exchange admin center (EAC) at https://outlook.office365.com/ecp/ using your Microsoft 365 tenant administrator credentials. As a Microsoft 365 Small Business admin, you need to access EAC by using the direct URL. The Microsoft 365 Small Business Microsoft Online Portal does not have an option to access EAC.
In the EAC, navigate to Recipients > Mailboxes.
In the list of mailboxes, select the mailbox that you want to assign permissions for, and then select Edit
 .
.On the mailbox properties page, select Mailbox Delegation.
To assign permissions to delegates, select Add
 under Full Access to display a page that lists all recipients in your Exchange organization that can be assigned the permission. Select the recipients you want, add them to the list, and then select OK. You can also search for a specific recipient by typing the recipient's name in the search box and then selecting Search
 . To remove a permission for a recipient, under the appropriate permission, select the recipient and then select Remove
 .
.Select Save to save your changes.
How do I access the mailbox
Depending on the email client you choose, the detailed instructions for accessing the mailbox that you have Full Access permissions to are listed below:
Outlook
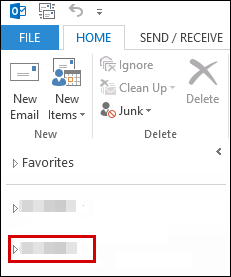
If you are using Outlook 2013 or Outlook 2010, the mailbox for which you have been granted access automatically display in your folder list. In the example below, Adam Barr has been granted access to the mailbox of Kim Akers. Kim's mailbox displays automatically in Adam's folder list in Outlook 2013.
Note
If you were recently granted access to the mailbox, it may take a few hours for the other user's mailbox to display in your folder list.
Outlook Web App
After you complete this procedure, the person's mailbox for which you have been provided access to will display in your Outlook Web App folder list every time you open Outlook Web App.
Sign in to your mailbox using Outlook Web App.
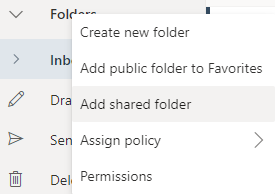
Right-click Folders in the left navigation pane, and then select Add shared folder.
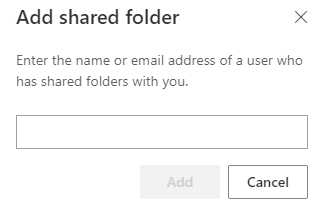
In the Add shared folder dialog box, type the name of the mailbox that you have been provided access, and select Add.
The mailbox appears in your Outlook Web App folder list.
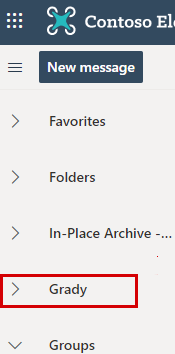
If you have only been provided access to specific folders in the other user's mailbox, you will only see the folders for which you have been granted access.
If you decide that you no longer want to see the other person's mailbox every time you open Outlook Web App, right-click the folder, and select Remove shared folder.

Did this resolve your issue?
- If yes, congratulations! Your scenario is complete.
- If no, see The issue was not resolved.
How do I access the mailbox (Enterprise, Midsize, Education)
Use the EAC to assign permissions
The following procedure shows how to assign full permissions to a user mailbox:
Before you begin, sign in to the Exchange admin center (EAC) at https://outlook.office365.com/ecp/ using your Microsoft 365 tenant administrator credentials. As a Microsoft 365 admin for Enterprises, Midsize, or Education, you can also access EAC by selecting Admin > Exchange in the Microsoft Online Portal.
In the EAC, navigate to Recipients > Mailboxes.
In the list of mailboxes, select the mailbox that you want to assign permissions for, and then select Edit
 .
.On the mailbox properties page, select Mailbox Delegation.
To assign permissions to delegates, select Add
 under Full Access to display a page that lists all recipients in your Exchange organization that can be assigned the permission. Select the recipients you want, add them to the list, and then select OK. You can also search for a specific recipient by typing the recipient's name in the search box and then selecting Search
  .
.The Full Access permission allows a delegate to open a user's mailbox and access the contents of the mailbox.
Note
Assigning the Full Access permission doesn't allow the delegate to send email from the mailbox.You have to assign the delegate the Send As or the Send on Behalf permission to send email.
Select Save to save your changes.
How do I access the mailbox
Depending on the email client you choose, the detailed instructions for accessing the mailbox that you have Full Access permissions to are listed below:
Outlook
If you are using Outlook 2013 or Outlook 2010, the mailbox for which you have been granted access automatically display in your folder list. In the example below, Adam Barr has been granted access to the mailbox of Kim Akers. Kim's mailbox displays automatically in Adam's folder list in Outlook 2013.
Note
If you were recently granted access to the mailbox, it may take a few hours for the other user's mailbox to display in your folder list.

Outlook Web App
After you complete this procedure, the person's mailbox for which you have been provided access to will display in your Outlook Web App folder list every time you open Outlook Web App.
Log in to your mailbox using Outlook Web App.
Right-click Folders in the left navigation pane, and then select Add shared folder.

In the Add shared folder dialog box, type the name of the mailbox that you have been provided access, and select Add.

The mailbox appears in your Outlook Web App folder list.

If you decide that you no longer want to see the other person's mailbox every time you open Outlook Web App, right-click the folder, and select Remove shared folder.

Did this resolve your issue?
- If yes, congratulations! Your scenario is complete.
- If no, see The issue was not resolved.
Set up permissions to access multiple mailboxes
You can assign access permissions to multiple mailboxes for the entire mailbox or specific folders in the mailbox. You can also choose to assign access permissions to individual user or group.
Select if you would like permissions to be assigned on the mailbox level (access to all of the mailbox folders) or just specific folders within the mailbox (access only folders specifically shared).
How do I access the mailbox (Entire Mailbox)
Assign permissions to the entire mailbox
You may want to perform this procedure as if an administrator in your organization needs to have access to all mailboxes in the organization.
Connect to Exchange Online by using remote PowerShell. For info about how to do this, go to the following Microsoft website:
Type the following command, and then press Enter:
Get-Mailbox -ResultSize unlimited -Filter {(RecipientTypeDetails -eq 'UserMailbox') -and (Alias -ne 'Admin')} | Add-MailboxPermission -User AdministratorAccount@contoso.com -AccessRights fullaccess -InheritanceType all
After you perform these steps, the specified user will be able to access all user mailboxes in Microsoft 365. The user will be able to view the contents of the mailboxes from either Outlook or Outlook Web App.
For more information, see How to use Windows PowerShell to grant an admin access to all user mailboxes in Microsoft 365.
To assign permissions to a user mailbox, run the following command:
Add-MailboxPermission -Identity ayla@contoso.com -User Ed@contoso.com -AccessRights fullaccess -InheritanceType all
This example assigns the user Ed Full Access permission to Ayla's mailbox.
How do I access the mailbox
You can access user's mailboxes by using Outlook or Outlook Web App. Use the following steps to open the mailboxes for which you have been granted access. Depending on the email client you choose, the detailed instructions for accessing the shared mailbox are listed below:
Outlook
If you are using Outlook 2013 or Outlook 2010, the mailbox for which you have been granted access automatically display in your folder list. In the example below, Adam Barr has been granted access to the mailbox of Kim Akers. Kim's mailbox displays automatically in Adam's folder list in Outlook 2013.

Outlook Web App
After you complete this procedure, the person's mailbox for which you have been provided access to will display in your Outlook Web App folder list every time you open Outlook Web App.
Log in to your mailbox using Outlook Web App.
Right-click Folders in the left navigation pane, and then select Add shared folder.

In the Add shared folder dialog box, type the name of the mailbox that you have been provided access, and select Add.

The mailbox appears in your Outlook Web App folder list.

If you have only been provided access to specific folders in the other user's mailbox, you will only see the folders for which you have been granted access.
If you decide that you no longer want to see the other person's mailbox every time you open Outlook Web App, right-click the folder, and select Remove shared folder.

Did this resolve your issue?
- If yes, congratulations! Your scenario is complete.
- If no, see The issue was not resolved.
Assign access to specific folders in a user's mailbox
This example assigns permissions for a user to access specific folders in another user's mailbox in an Exchange Online or Microsoft 365 environment. Do the following:
Connect to Exchange Online by using remote PowerShell. For more information about how to do this, go to Connect to Exchange Online PowerShell.
Enter a command using the following syntax to assign access permissions to the specific folder:
Add-MailboxFolderPermission -Identity <SMTP address or alias of recipient> : <Folder path>-AccessRights <Permission you want to grant the recipient> -User <SMTP address or alias of recipient to be granted access>This example assigns permissions for Ed to access Ayla's Marketing mailbox folder and applies the Owner role to Ed's access of that folder.
Add-MailboxFolderPermission -Identity ayla@contoso.com:\Marketing -User Ed@contoso.com -AccessRights Owner
For more information, see Add-MailboxFolderPermission.
Did this resolve your issue?
- If yes, congratulations! Your scenario is complete.
- If no, see The issue was not resolved.
The issue was not resolved
Sorry, we couldn't resolve your issue with this guide. Provide feedback on this walkthrough, and then use the resources below to continue troubleshooting.
Visit the Microsoft 365 Community for self-help support. Do one of the following:
- Use search to find a solution to your issue.
- Use the Help Center or the Troubleshooting tool that are both available from the top of every community page.
- Sign in with your Microsoft 365 admin credentials, and then post a question to the community.