Note
Access to this page requires authorization. You can try signing in or changing directories.
Access to this page requires authorization. You can try changing directories.
In a pipeline, you can use the Copy activity to copy data between data stores in the cloud. After you copy the data, you can use other activities in your pipeline to transform and analyze it.
The Copy activity connects to your data sources and destinations, then moves data efficiently between them. Here's how the service handles the copy process:
- Connects to your source: Creates a secure connection to read data from your source data store.
- Processes the data: Handles serialization/deserialization, compression/decompression, column mapping, and data type conversions based on your configuration.
- Writes to destination: Transfers the processed data to your destination data store.
- Provides monitoring: Tracks the copy operation and provides detailed logs and metrics for troubleshooting and optimization.
Tip
If you only need to copy your data and don't need transformations, a Copy job might be a better option for you. Copy jobs provide a simplified experience for data movement scenarios that don't require creating a full pipeline. See: the Copy jobs overview or use our decision table to compare Copy activity and Copy job.
Prerequisites
To get started, you need to complete these prerequisites:
- A Microsoft Fabric tenant account with an active subscription. Create an account for free.
- A Microsoft Fabric enabled Workspace.
Add a copy activity using copy assistant
Follow these steps to set up your copy activity using copy assistant.
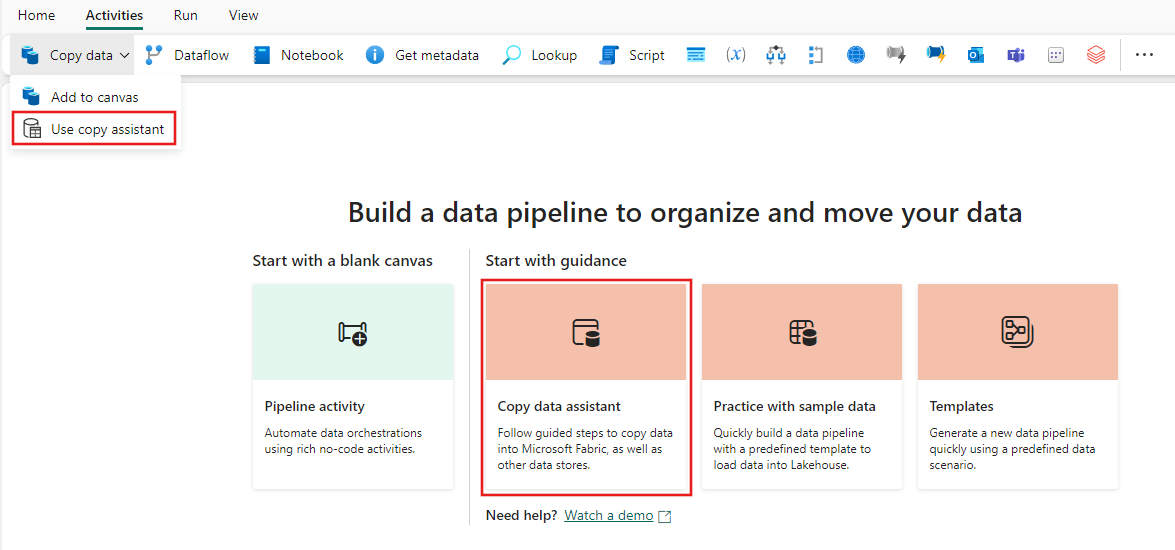
Start with copy assistant
Open an existing pipeline or create a new pipeline.
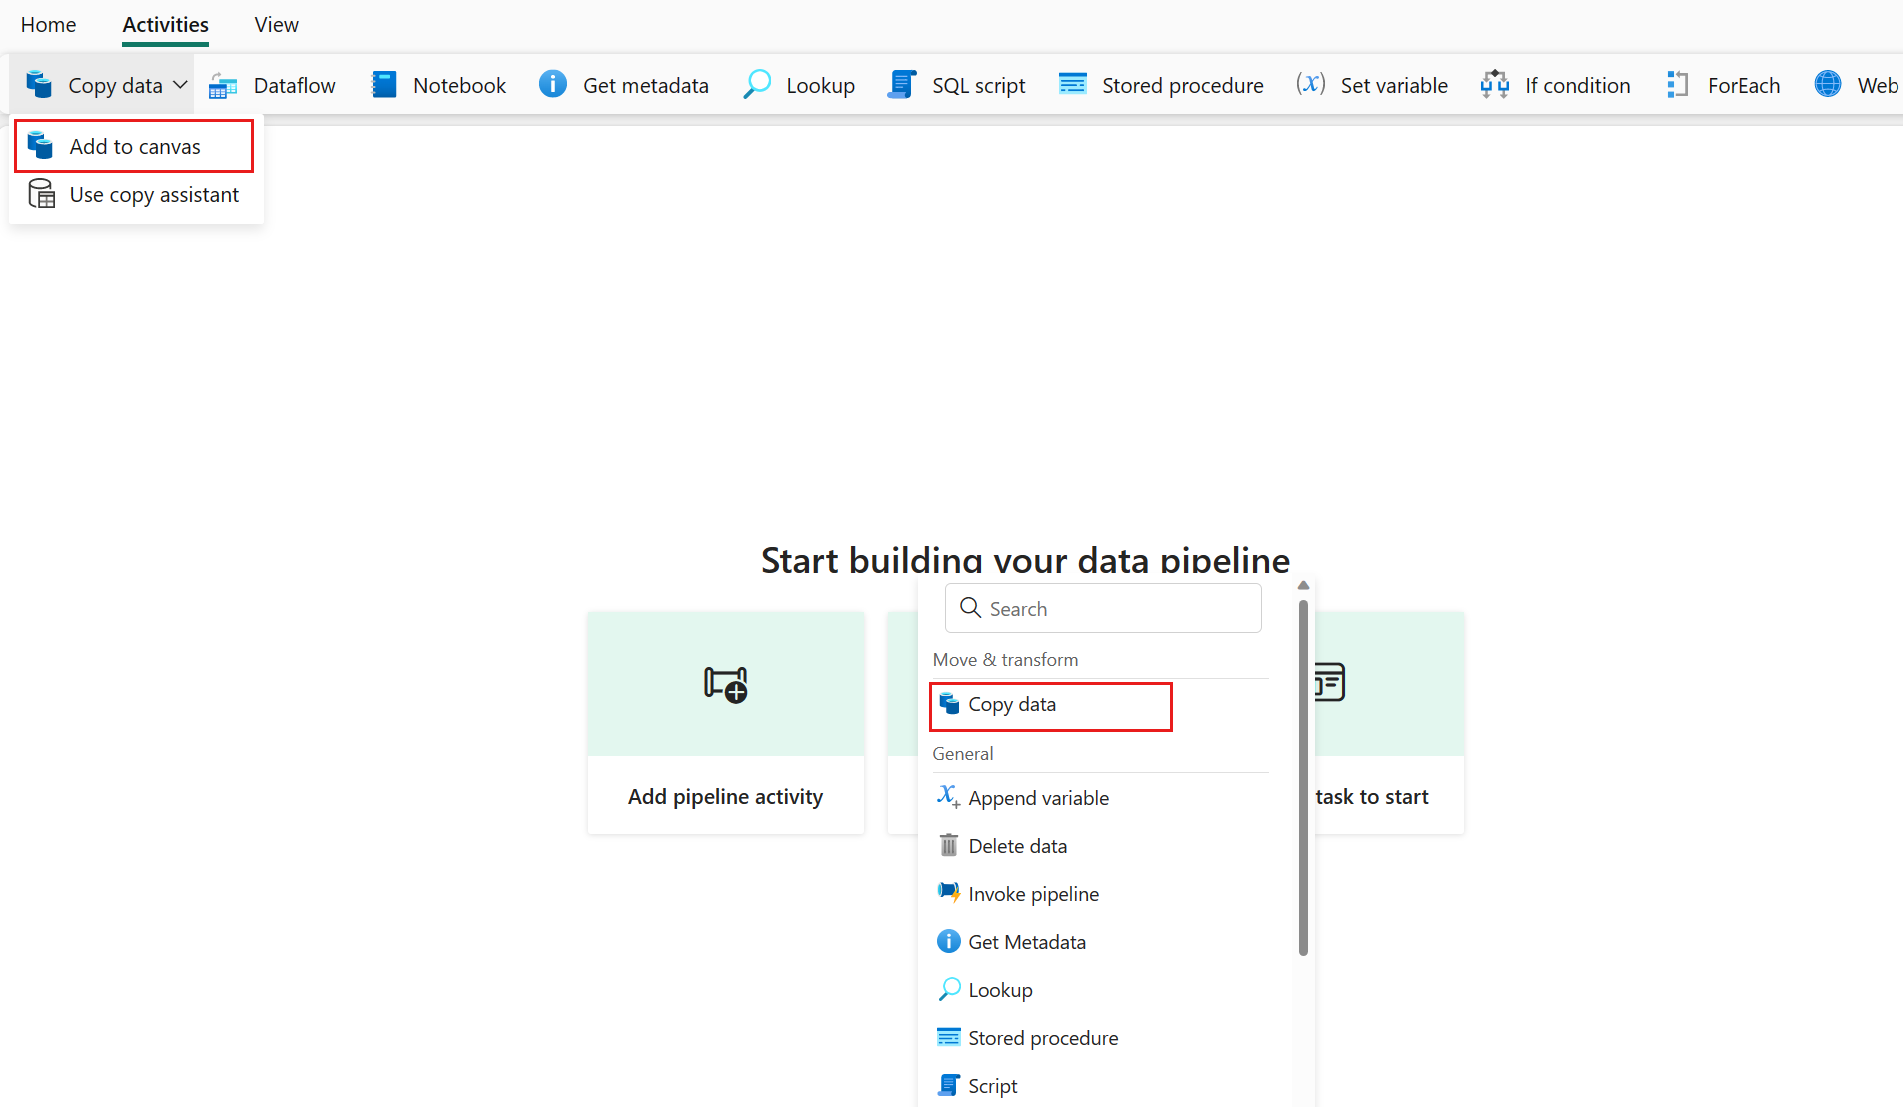
Select Copy data on the canvas to open the Copy Assistant tool to get started. Or select Use copy assistant from the Copy data drop down list under the Activities tab on the ribbon.

Configure your source
Select a data source type from the category. You'll use Azure Blob Storage as an example. Select Azure Blob Storage.
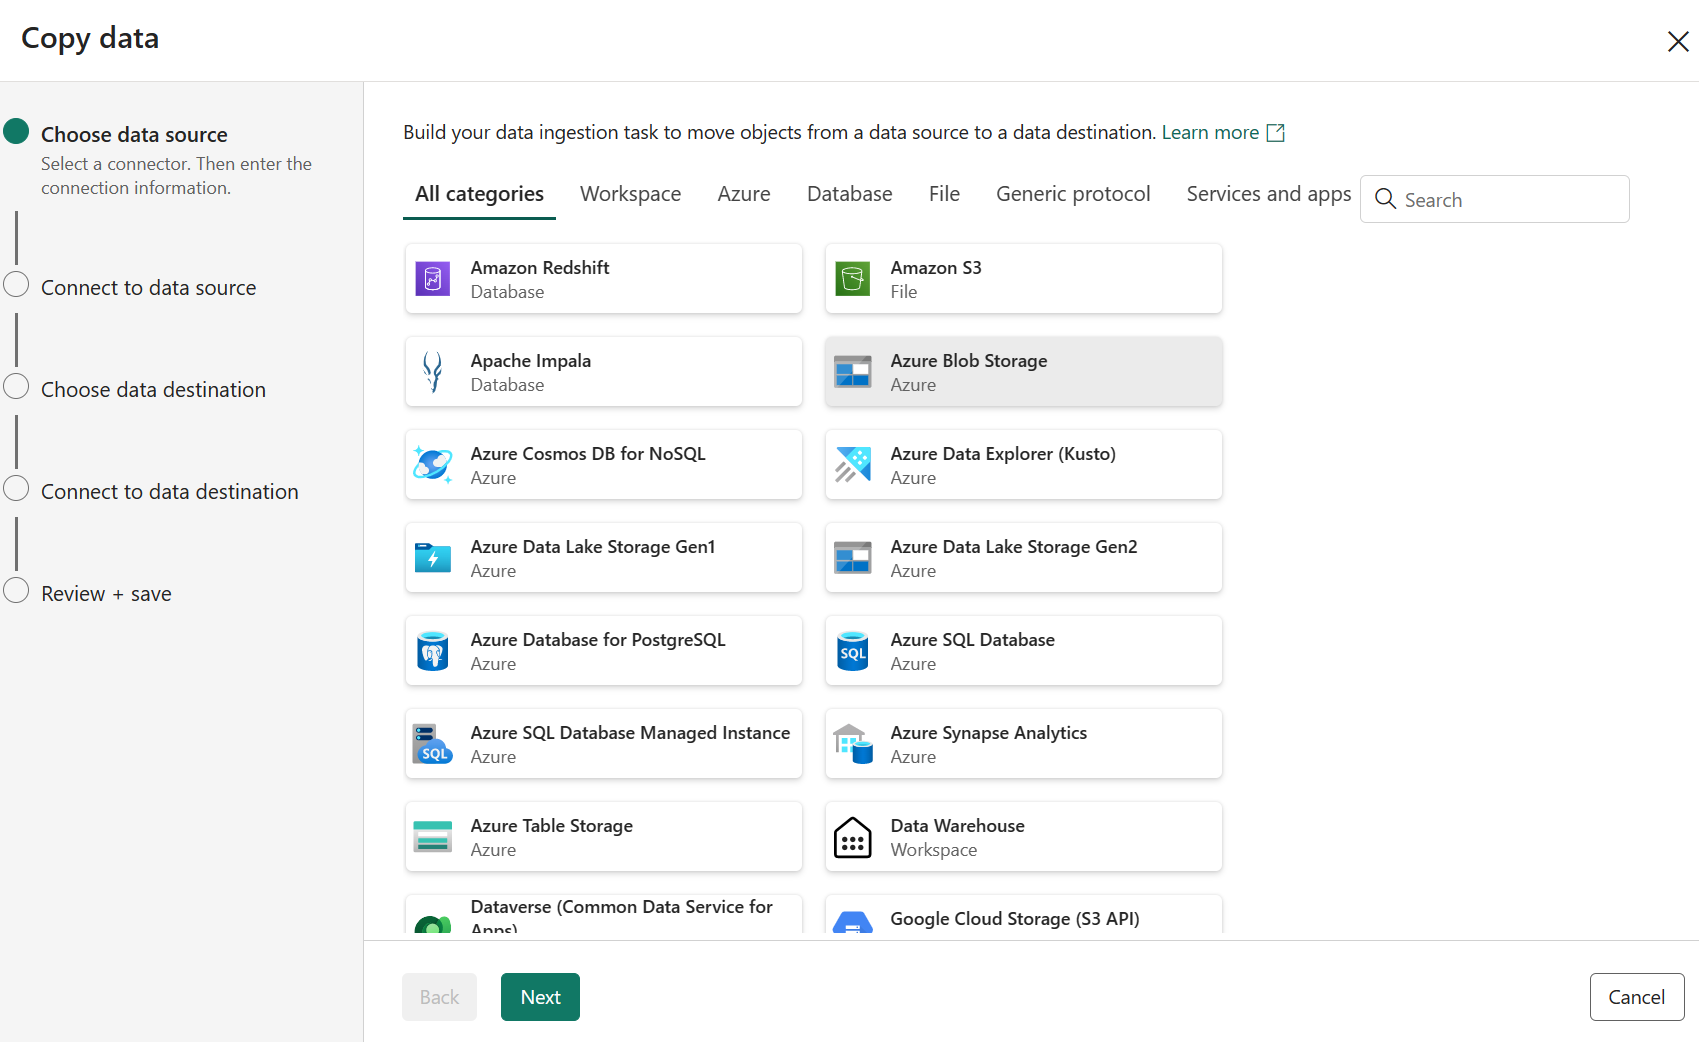
Create a connection to your data source by selecting Create new connection.

After you select Create new connection, fill in the required connection information and then select Next. For the details of connection creation for each type of data source, you can refer to each connector article.
If you already have connections, you can select Existing connection and select your connection from the drop-down list.
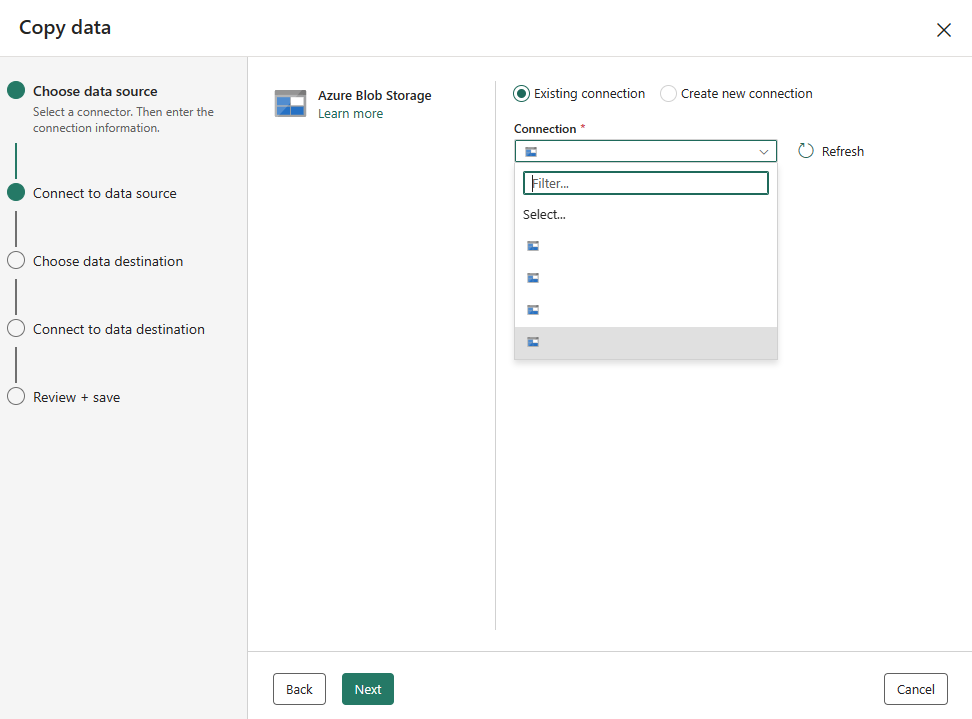
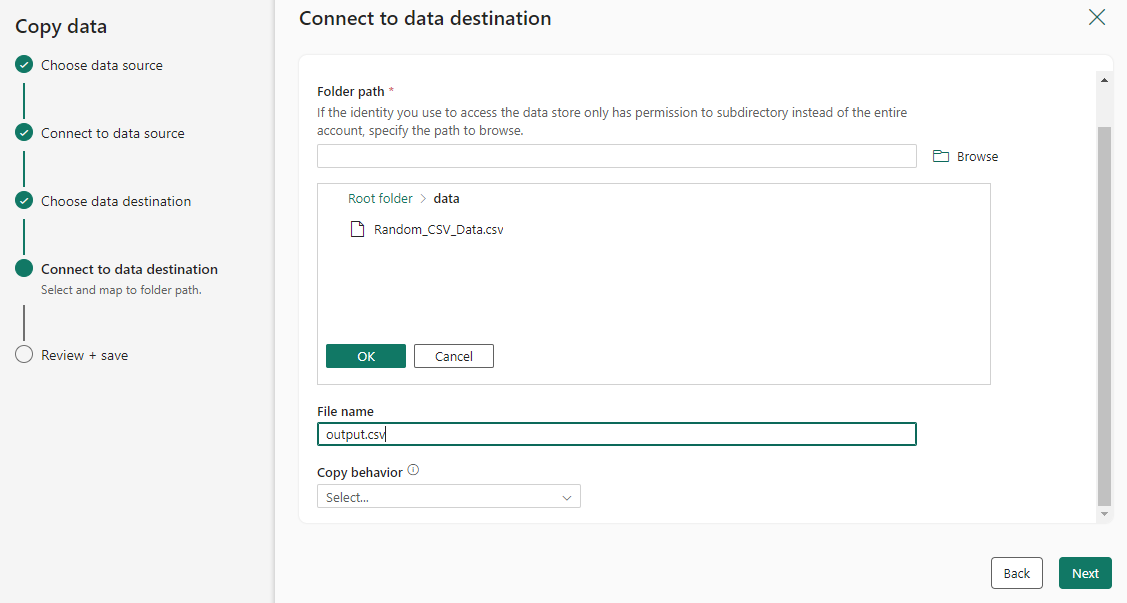
Choose the file or folder to be copied in this source configuration step, and then select Next.


Configure your destination
Select a data source type from the category. You'll use Azure Blob Storage as an example. You can either create a new connection that links to a new Azure Blob Storage account by following the steps in the previous section or use an existing connection from the connection drop-down list. The Test connection and Edit capabilities are available for each selected connection.
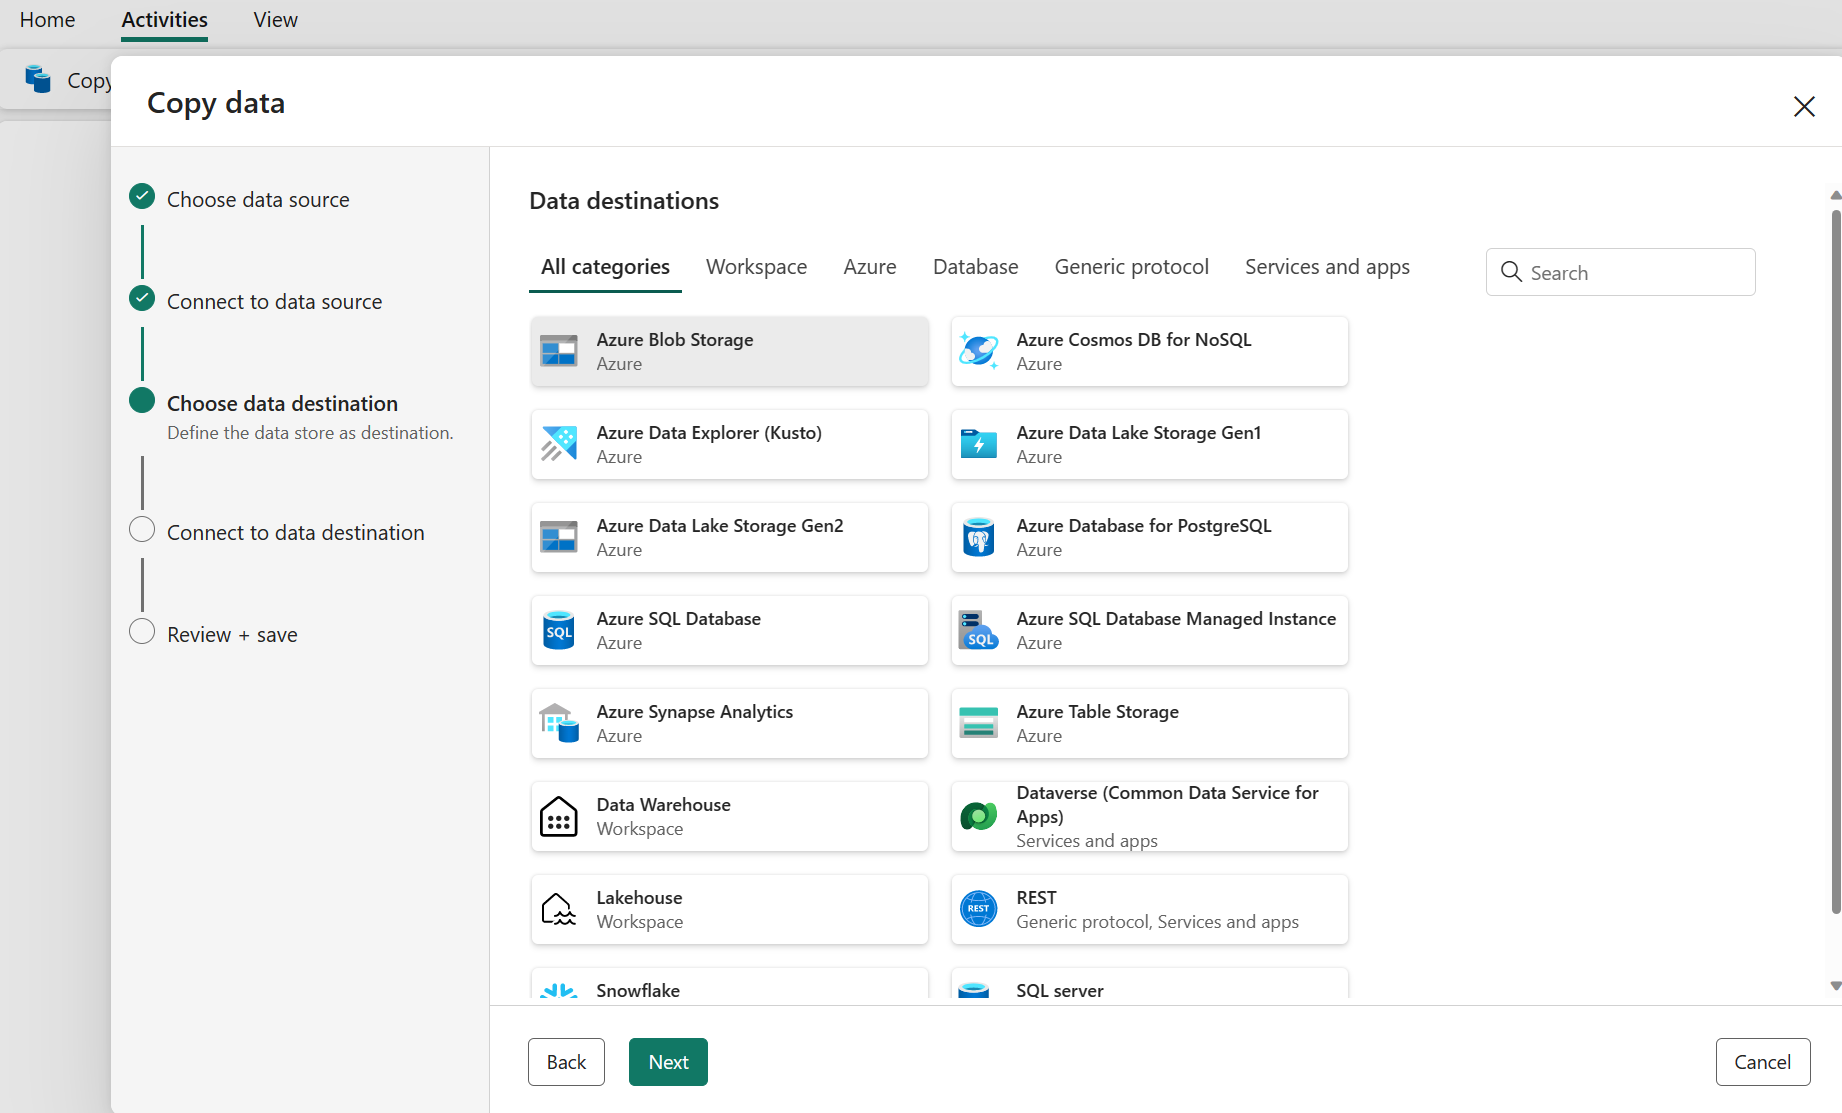
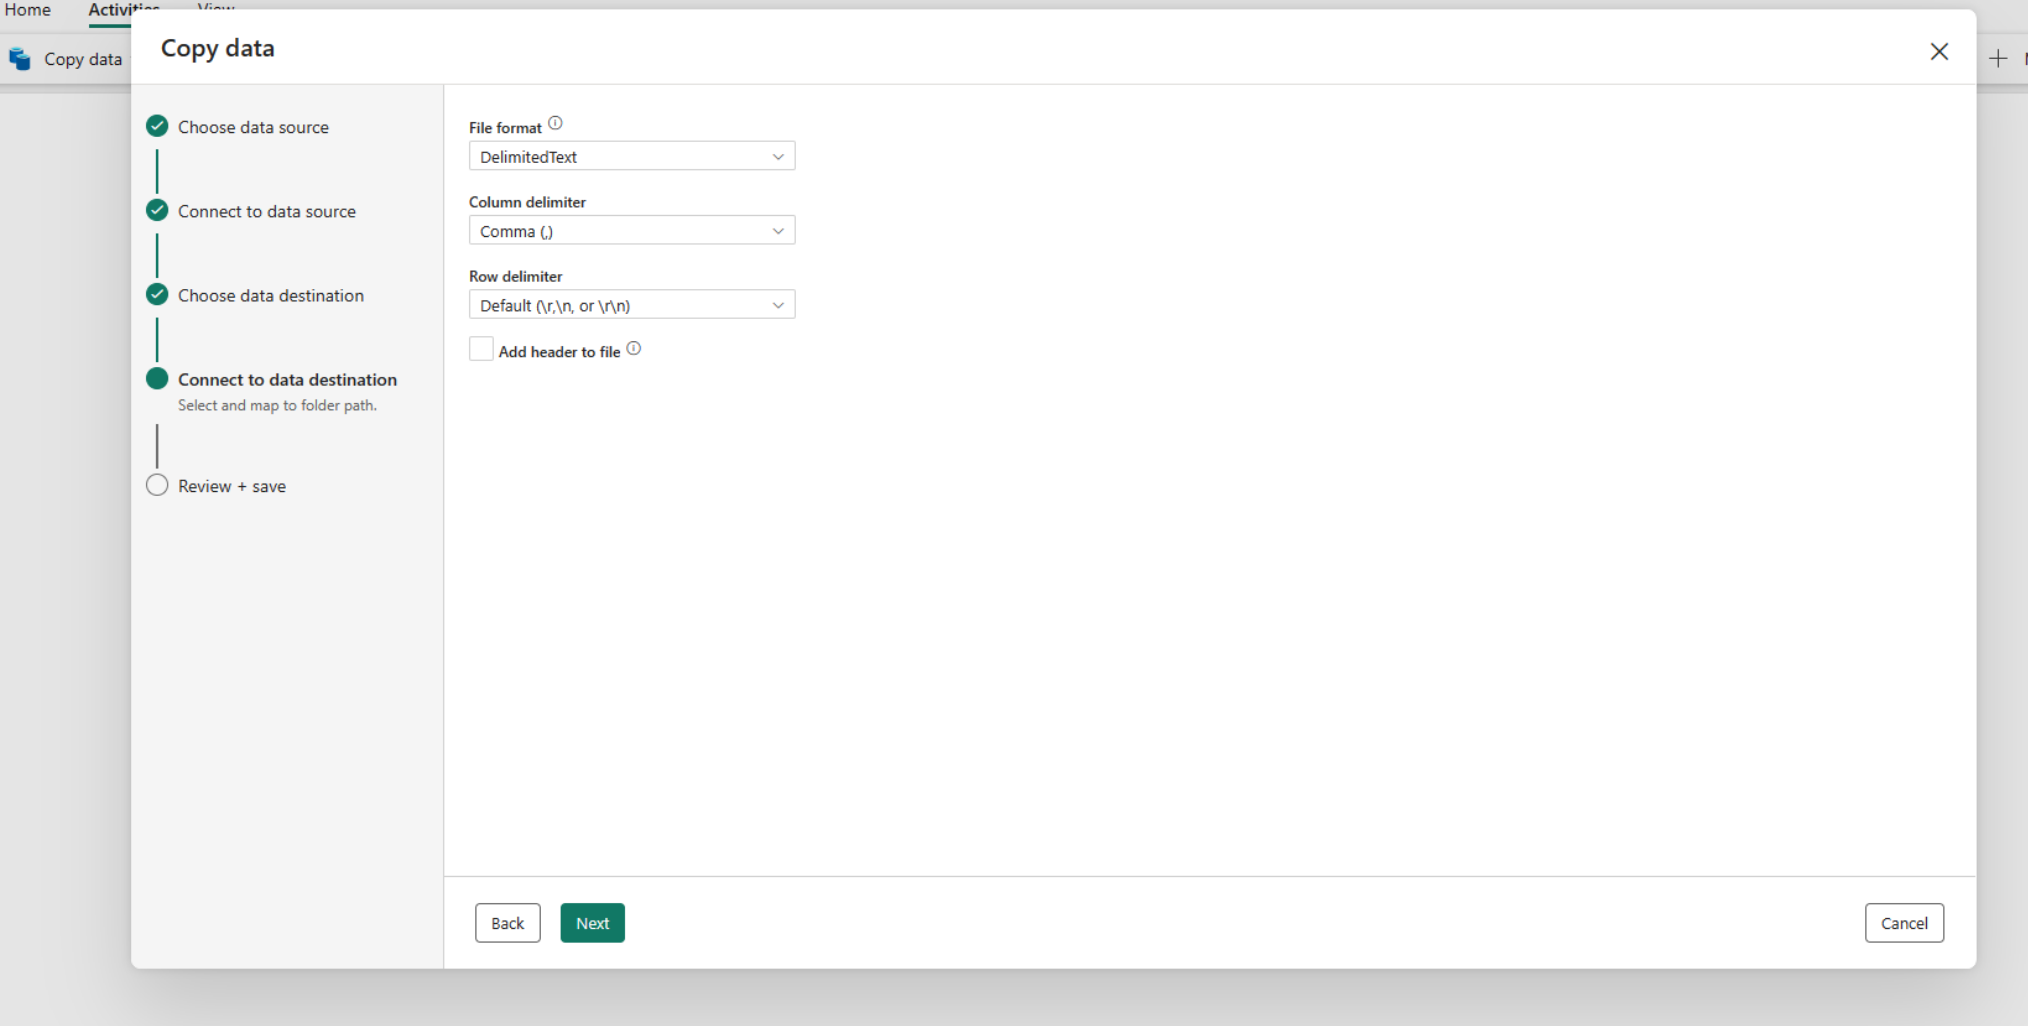
Configure and map your source data to your destination. Then select Next to finish your destination configurations.
Note
You can only use a single on-premises data gateway within the same Copy activity. If both source and sink are on-premises data sources, they need to use the same gateway. To move data between on-premises data sources with different gateways, you need to copy using the first gateway to an intermediate cloud source in one Copy activity. Then you can use another Copy activity to copy it from the intermediate cloud source using the second gateway.


Review and create your copy activity
Review your copy activity settings in the previous steps and select OK to finish. Or you can go back to the previous steps to edit your settings if needed in the tool.
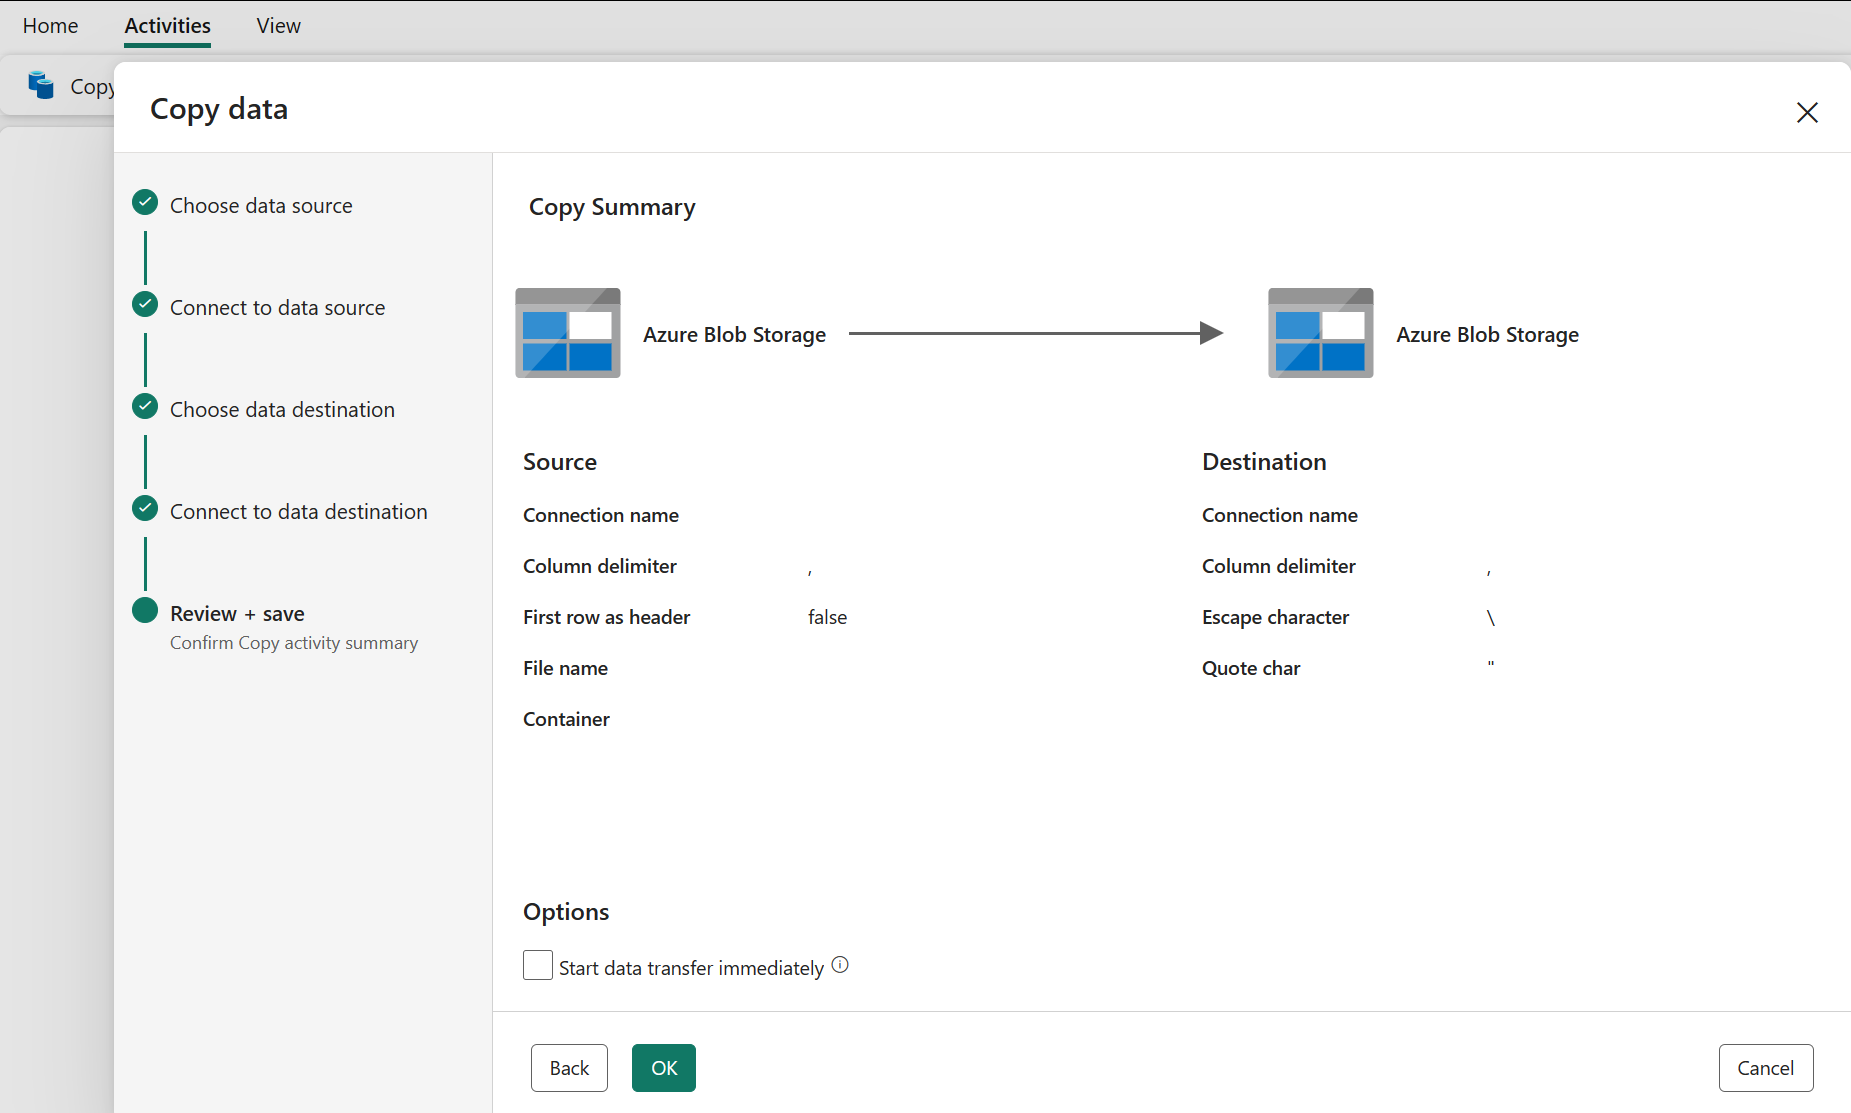

Once finished, the copy activity will then be added to your pipeline canvas. All settings, including advanced settings to this copy activity, are available under the tabs when it’s selected.

Now you can either save your pipeline with this single copy activity or continue to design your pipeline.
Add a copy activity directly
Follow these steps to add a copy activity directly.
Add a copy activity
Open an existing pipeline or create a new pipeline.
Add a copy activity either by selecting Add pipeline activity > Copy activity or by selecting Copy data > Add to canvas under the Activities tab.

Configure your general settings under general tab
To learn how to configure your general settings, see General.
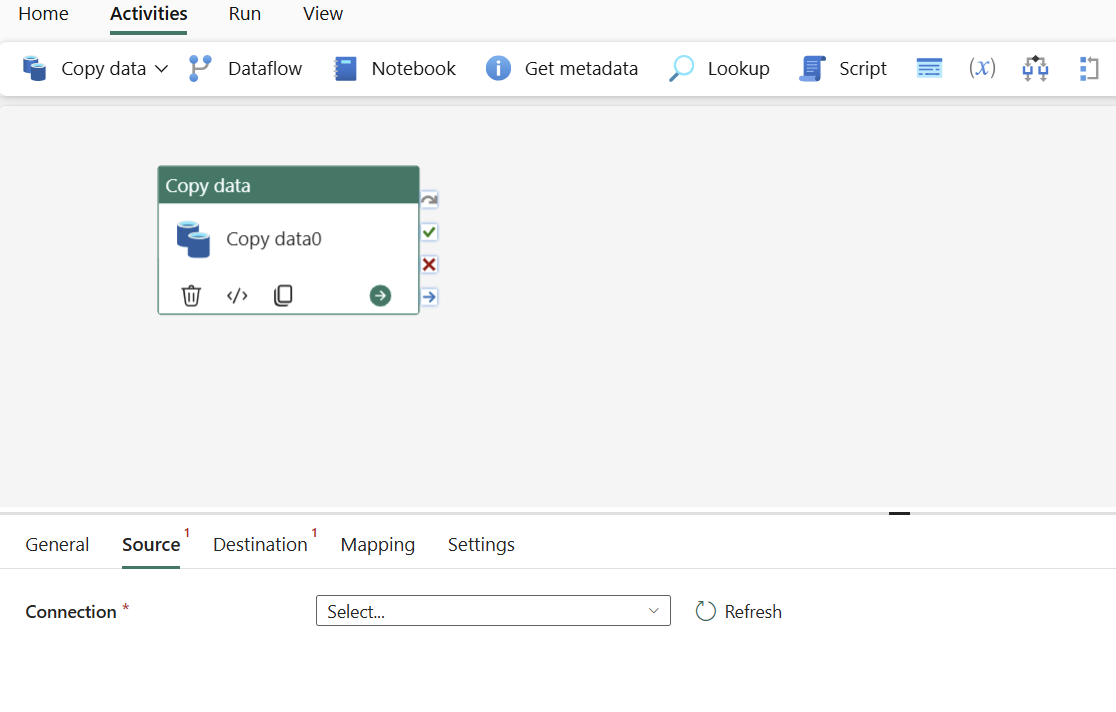
Configure your source under the source tab
In Connection, select an existing connection, or select More to create a new connection.
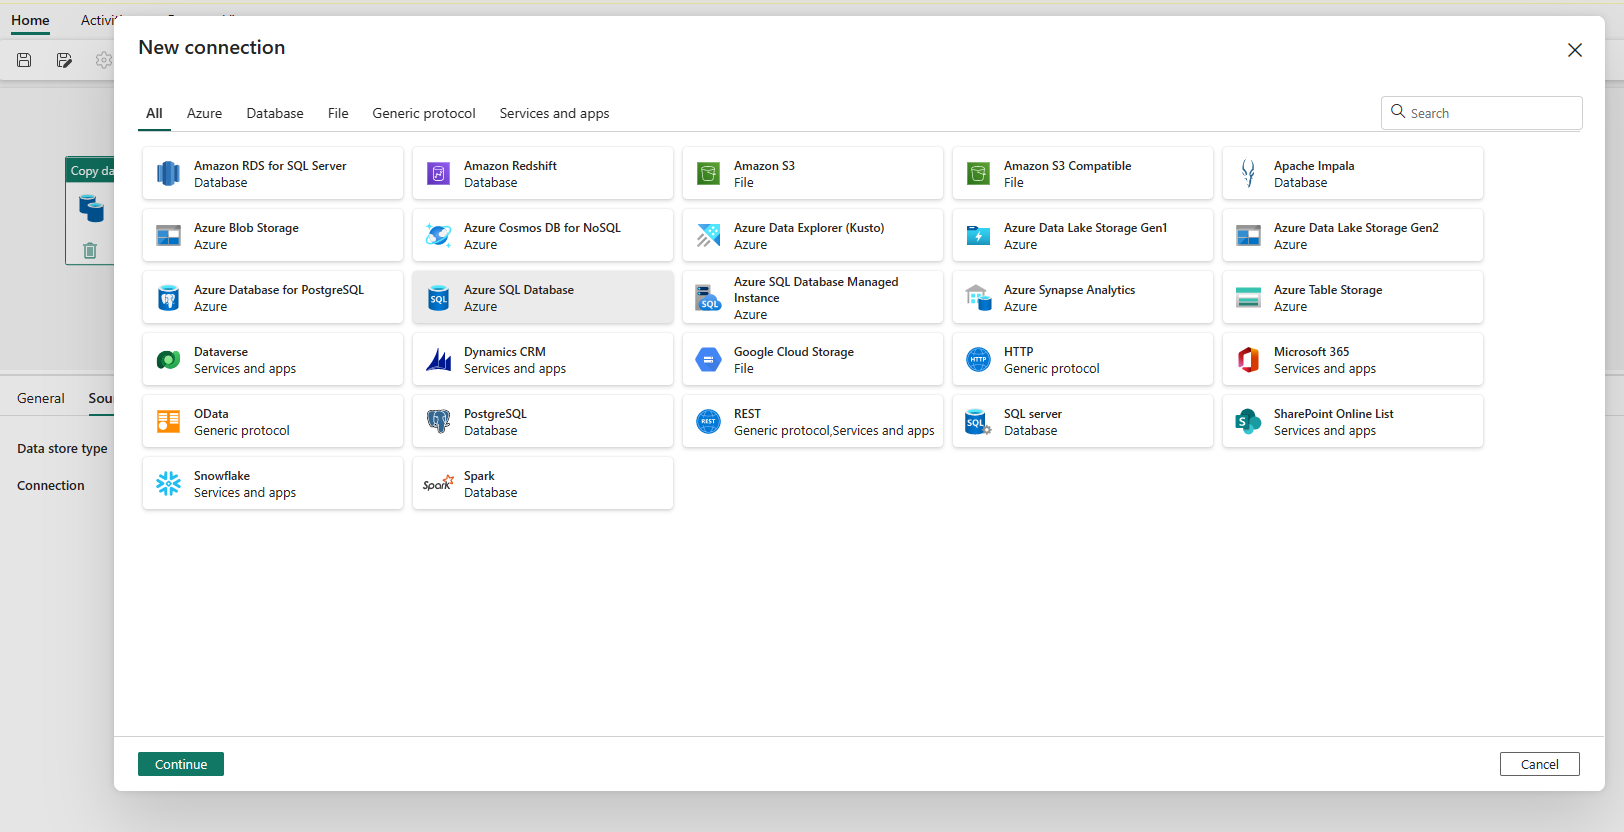
Choose the data source type from the pop-up window. You'll use Azure SQL Database as an example. Select Azure SQL Database, and then select Continue.
It navigates to the connection creation page. Fill in the required connection information on the panel, and then select Create. For the details of connection creation for each type of data source, you can refer to each connector article.

Once your connection is created, it takes you back to the pipeline page. Then select Refresh to get the connection that you created from the drop-down list. You can also choose an existing Azure SQL Database connection from the drop-down directly if you already created it before. The Test connection and Edit capabilities are available for each selected connection. Then select Azure SQL Database in Connection type.
Specify a table to be copied. Select Preview data to preview your source table. You can also use Query and Stored procedure to read data from your source.
Expand Advanced for more advanced settings like query timeout, or partitioning. (Advanced settings vary by connector.)


Configure your destination under the destination tab
In Connection select an existing connection, or select More to create a new connection. It can be either your internal first class data store from your workspace, such as Lakehouse, or your external data stores. In this example, we use Lakehouse.
Once your connection is created, it takes you back to the pipeline page. Then select Refresh to get the connection that you created from the drop-down list. You can also choose an existing Lakehouse connection from the drop-down directly if you already created it before.
Specify a table or set up the file path to define the file or folder as the destination. Here select Tables and specify a table to write data.
Expand Advanced for more advanced settings, like max rows per file, or table action. (Advanced settings vary by connector.)
Now you can either save your pipeline with this copy activity or continue to design your pipeline.
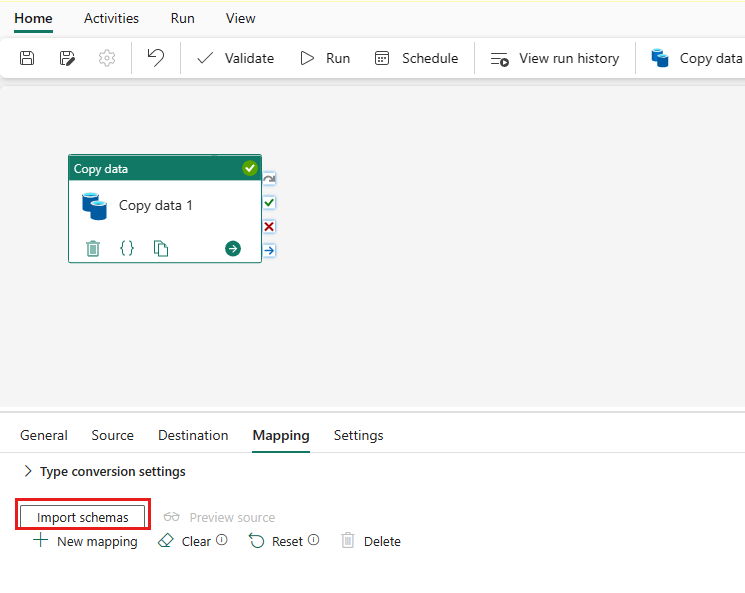
Configure your mappings under mapping tab
If the connector that you use supports mapping, you can go to Mapping tab to configure your mapping.
Select Import schemas to import your data schema.
You can see the auto mapping shows up. Specify your Source column and Destination column. If you create a new table in the destination, you can customize your Destination column name here. If you want to write data into the existing destination table, you can't modify the existing Destination column name. You can also view the Type of source and destination columns.


You can also select + New mapping to add new mapping, select Clear to clear all mapping settings, and select Reset to reset all mapping Source column.
Data type mapping
Copy activity in pipelines and Copy job perform source types to destination types mapping with the following flow:
- Convert from source native data types to interim data types used by Fabric Data Factory.
- Automatically convert interim data type as needed to match corresponding destination types.
- Convert from interim data types to destination native data types.
Copy activity in pipelines and Copy job currently support the following interim data types: Boolean, Byte, Byte array, Datetime, DatetimeOffset, Decimal, Double, GUID, Int16, Int32, Int64, SByte, Single, String, Timespan, UInt16, UInt32, and UInt64.
The following data type conversions are supported between the interim types from source to destination.
| Source\Destination | Boolean | Byte array | Date/Time | Decimal | Float-point | GUID | Integer | String | TimeSpan |
|---|---|---|---|---|---|---|---|---|---|
| Boolean | ✓ | ✓ | ✓ | ✓ | |||||
| Byte array | ✓ | ✓ | |||||||
| Date/Time | ✓ | ✓ | |||||||
| Decimal | ✓ | ✓ | ✓ | ✓ | |||||
| Float-point | ✓ | ✓ | ✓ | ✓ | |||||
| GUID | ✓ | ✓ | |||||||
| Integer | ✓ | ✓ | ✓ | ✓ | |||||
| String | ✓ | ✓ | ✓ | ✓ | ✓ | ✓ | ✓ | ✓ | |
| TimeSpan | ✓ | ✓ |
(1) Date/Time includes DateTime, DateTimeOffset, Date and Time.
(2) Float-point includes Single and Double.
(3) Integer includes SByte, Byte, Int16, UInt16, Int32, UInt32, Int64, and UInt64.
To learn the detailed data type conversions for a particular connector, go to the copy activity configuration article for that connector from here.
Note
Currently such data type conversion is supported when copying between tabular data. Hierarchical sources/destinations are not supported, which means there is no system-defined data type conversion between source and destination interim types.
Configure your other settings under settings tab
The Settings tab contains the settings of performance, staging, and so on.

See the following table for the description of each setting.
| Setting | Description | JSON script property |
|---|---|---|
| Intelligent throughput optimization | Specify to optimize the throughput. You can choose from: • Auto • Standard • Balanced • Maximum When you choose Auto, the optimal setting is dynamically applied based on your source-destination pair and data pattern. You can also customize your throughput, and custom value can be 4-256 while higher value implies more gains. |
dataIntegrationUnits |
| Degree of copy parallelism | Specify the degree of parallelism that data loading would use. | parallelCopies |
| Adaptive performance tuning (Preview) | Specify whether the service can apply performance optimizations and tuning according to the custom configuration. | adaptivePerformanceTuning |
| Data consistency verification | If you set true for this property, when copying binary files, copy activity will check file size, lastModifiedDate, and checksum for each binary file copied from source to destination store to ensure the data consistency between source and destination store. When copying tabular data, copy activity will check the total row count after job completes, ensuring the total number of rows read from the source is same as the number of rows copied to the destination plus the number of incompatible rows that were skipped. Be aware the copy performance is affected by enabling this option. |
validateDataConsistency |
| Fault tolerance | When you select this option, you can ignore some errors that happen in the middle of copy process. For example, incompatible rows between source and destination store, file being deleted during data movement, etc. | • enableSkipIncompatibleRow • skipErrorFile: fileMissing fileForbidden invalidFileName |
| Enable logging | When you select this option, you can log copied files, skipped files and rows. | / |
| Enable staging | Specify whether to copy data via an interim staging store. Enable staging only for helpful scenarios. | enableStaging |
| For Workspace | ||
| Workspace | Specify to use built-in staging storage. Ensure the last modified user for the pipeline has at least Contributor role assigned in the workspace. | / |
| For External | ||
| Staging account connection | Specify the connection of an Azure Blob Storage or Azure Data Lake Storage Gen2, which refers to the instance of Storage that you use as an interim staging store. Create a staging connection if you don't have it. | connection (under externalReferences) |
| Storage path | Specify the path that you want to contain the staged data. If you don't provide a path, the service creates a container to store temporary data. Specify a path only if you use Storage with a shared access signature, or you require temporary data to be in a specific location. | path |
| Enable compression | Specifies whether data should be compressed before it's copied to the destination. This setting reduces the volume of data being transferred. | enableCompression |
| Preserve | Specify whether to preserve metadata/ACLs during data copy. | preserve |
Note
If you use staged copy with compression enabled, the service principal authentication for staging blob connection isn't supported.
Note
Workspace staging times out after 60 minutes. For long-running jobs, it’s recommended to use external storage for staging.
Configure parameters in a copy activity
Parameters can be used to control the behavior of a pipeline and its activities. You can use Add dynamic content to specify parameters for your copy activity properties. Let's take specifying Lakehouse/Data Warehouse as an example to see how to use it.
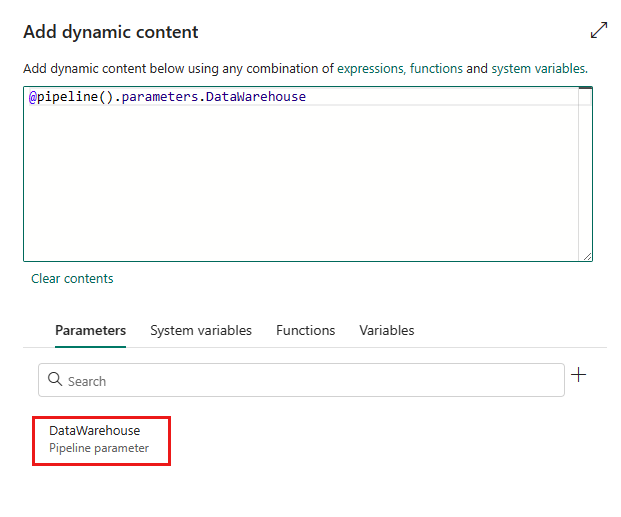
In your source or destination, select Use dynamic content in the drop-down list of Connection.
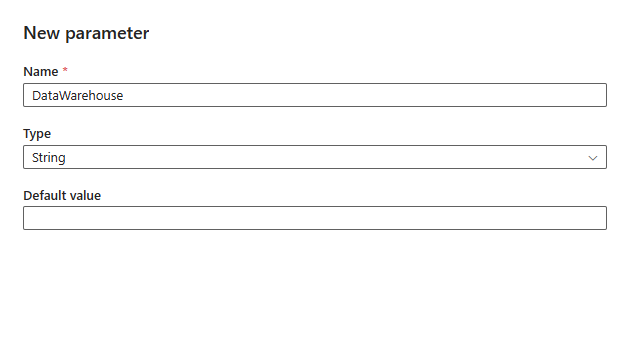
In the pop-up Add dynamic content pane, under Parameters tab, select +.

Specify the name for your parameter and give it a default value if you want, or you can specify the value for the parameter when it is triggered in the pipeline.
The parameter value should be Lakehouse/Data Warehouse connection ID. To get it, open your Manage Connections and Gateways, choose the Lakehouse/Data Warehouse connection that you want to use, and open Settings to get your connection ID. If you want to create a new connection, you can select + New on this page or go to get data page through Connection drop-down list.
Select Save to go back to the Add dynamic content pane. Then select your parameter so it appears in the expression box. Then select OK. You'll go back to the pipeline page and can see the parameter expression is specified after Connection.
Specify the ID of your Lakehouse or Data Warehouse. To find the ID, go to your Lakehouse or Data Warehouse in your workspace. The ID appears in the URL after
/lakehouses/or/datawarehouses/.Lakehouse ID:

Warehouse ID:

Specify the SQL connection string for your Data Warehouse.