Note
Access to this page requires authorization. You can try signing in or changing directories.
Access to this page requires authorization. You can try changing directories.
In this tutorial, you learn how to use Oracle GoldenGate (OGG) to extract and replicate Oracle database CDC (change data capture) data to Microsoft Fabric Real-Time Intelligence using the Kafka endpoint offered from an Eventstream’s custom endpoint source. This setup allows for real-time processing of Oracle CDC data and enables sending it to various destinations within Fabric, such as Eventhouse, Reflex, Derived stream, or custom endpoint destination for further analysis.
In this tutorial, you will:
- Create an Oracle VM and the Oracle database.
- Install Oracle GoldenGate (OGG) Core on the Oracle VM.
- Configure the Oracle database for OGG and the OGG Extract to extract CDC data.
- Install Oracle GoldenGate (OGG) Big Data on the Oracle VM.
- Configure OGG Big Data to replicate the CDC data to Eventstream’s Kafka endpoint.
- Validate the entire end-to-end flow from Oracle to Eventstream.
Prerequisites
- Get access to a workspace with Contributor or higher permissions where your eventstream is located.
- Preferred shell: Windows, Linux, or Azure Shell.
- Familiarity with Unix editors like
viorvim, and a basic understanding of X Server.
Create Oracle VM and Database
This section provides instructions on using Azure CLI commands to create an Oracle virtual machine and set up a database within it.
Create Oracle Virtual Machine
Open your preferred shell to sign in to your Azure subscription with the
az logincommand. Then follow the on-screen directions:$ az loginCheck the subscription name and ID you're using to ensure it's the correct one:
$ az account showCreate a resource group which is used to group all the Azure resources for this tutorial:
$ az group create --name esoggcdcrg --location eastus2Create the network resources that are required for this tutorial:
- Create a virtual network (virtual network) which is used for the virtual machines in this tutorial:
$ az network vnet create --name oggVnet --resource-group esoggcdcrg --address-prefixes "10.0.0.0/16" --subnet-name oggSubnet1 --subnet-prefixes "10.0.0.0/24" - Create a network security group (NSG):
$ az network nsg create --resource-group esoggcdcrg --name oggVnetNSG - Create NSG rule to allow network traffic within virtual network:
$ az network nsg rule create --resource-group esoggcdcrg --nsg-name oggVnetNSG --name oggAllowVnet --protocol '*' --direction inbound --priority 3400 --source-address-prefix 'VirtualNetwork' --source-port-range '*' --destination-address-prefix 'VirtualNetwork' --destination-port-range '*' --access allow - Create NSG rule to allow RDP connection to connect the windows VM. It's used to access the windows VM remotely from your local windows machine:
$ az network nsg rule create --resource-group esoggcdcrg --nsg-name oggAllowRDP --protocol '*' --direction inbound --priority 3410 --source-address-prefix '*' --source-port-range '*' --destination-address-prefix '*' --destination-port-range '3389' --access allow - Create NSG rule to deny all inbound connections:
$ az network nsg rule create --resource-group esoggcdcrg --nsg-name oggDenyAllInBound --protocol '*' --direction inbound --priority 3500 --source-address-prefix '*' --source-port-range '*' --destination-address-prefix '*' --destination-port-range '*' --access deny - Assign NSG to Subnet where we host our servers:
$ az network vnet subnet update --resource-group esoggcdcrg --vnet-name oggVNet --name oggSubnet1 --network-security-group oggVnetNSG
- Create a virtual network (virtual network) which is used for the virtual machines in this tutorial:
Create the Oracle Virtual Machine:
$ az vm create --resource-group esoggcdcrg --name oggVM --image Oracle:oracle-database:oracle_db_21:21.0.0 --size Standard_D2s_v3 --generate-ssh-keys --admin-username azureuser --vnet-name oggVnet --subnet oggSubnet1 --public-ip-address "" --nsg "" --zone 1
Create and Configure X Server VM
To create the Oracle database, it requires to use SSH to sign-in to the virtual machine that was created in the previous step. Because the NSG rule defined before denies all inbound connections but allows connections within the virtual network and RDP 3389 port, a Windows virtual machine is created to connect to the Oracle virtual machine. This Windows virtual machine is also used to host the X server which is to receive the graphical installation interface when installing the GoldenGate core application on Oracle VM later.
Replace your password and run the following command to create a Windows workstation VM where we deploy X Server.
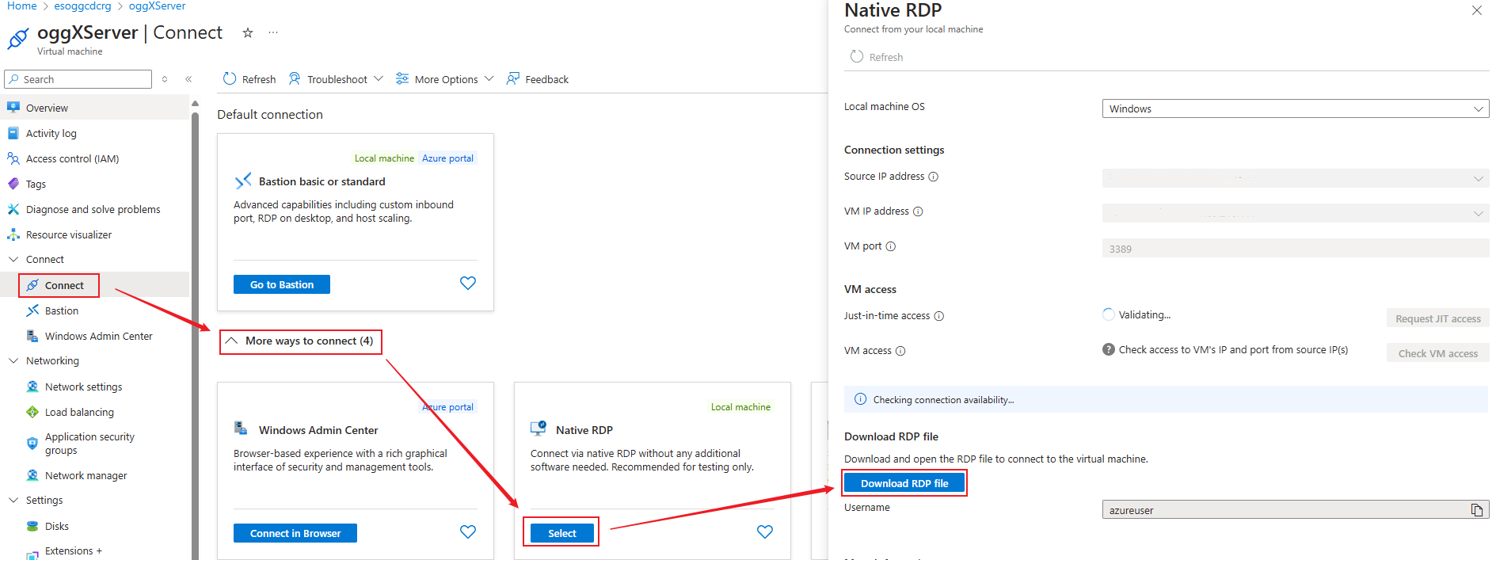
$ az vm create --resource-group esoggcdcrg --name oggXServer --image MicrosoftWindowsDesktop:windows-11:win11-24h2-pro:26100.2605.241207 --size Standard_D2s_v3 --vnet-name oggVnet --subnet oggSubnet1 --public-ip-sku Standard --nsg "" --data-disk-delete-option Delete --os-disk-delete-option Delete --nic-delete-option Delete --security-type Standard --admin-username azureuser --admin-password <YOUR_OWN_PASSWORD>Once it's created, go to Azure portal to download the RDP file from oggXServer resource so that you can use it to remote access this windows machine. Open the RDP file and use the password you specified when creating the windows VM (oggXServer).
Install the WSL on the windows VM (oggXServer) so that SSH can be used to connect to Oracle VM (oggVM). You can also use other SSH tools, like putty to connect as well.
PS C:\Users\azureuser> wsl --install -d Ubuntu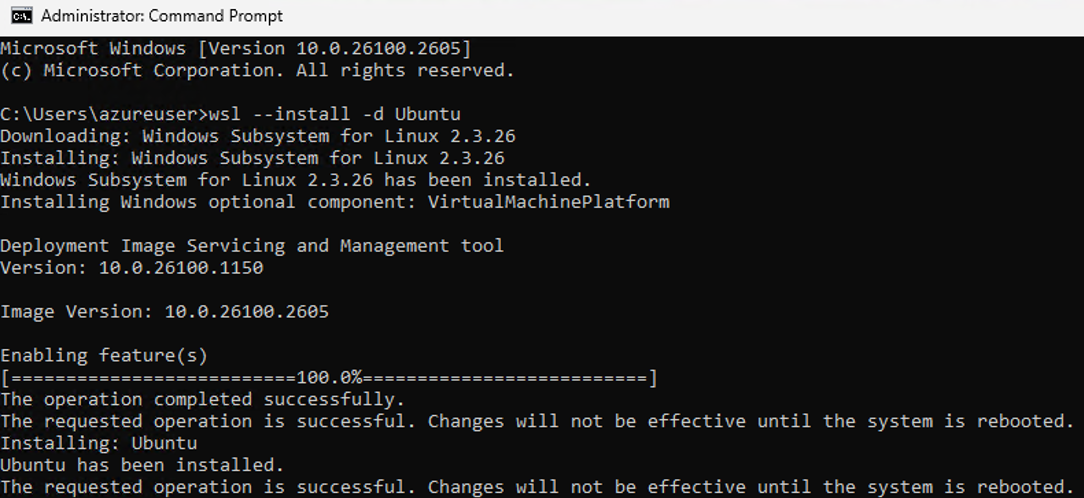
You need to download the private key for SSH sign in on oggXServer from the oggVM. After the key is downloaded, use this key (move this key to your WSL home .ssh directory) to sign-in:
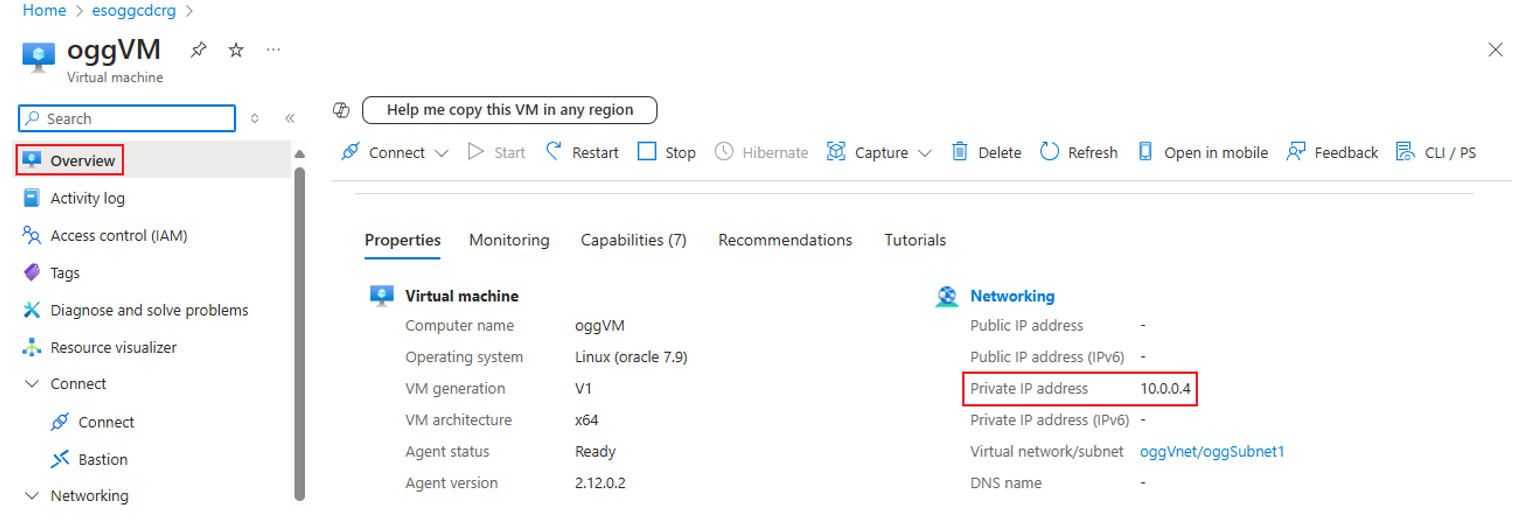
$ ssh -i ~/.ssh/id_rsa.pem azureuser@10.0.0.4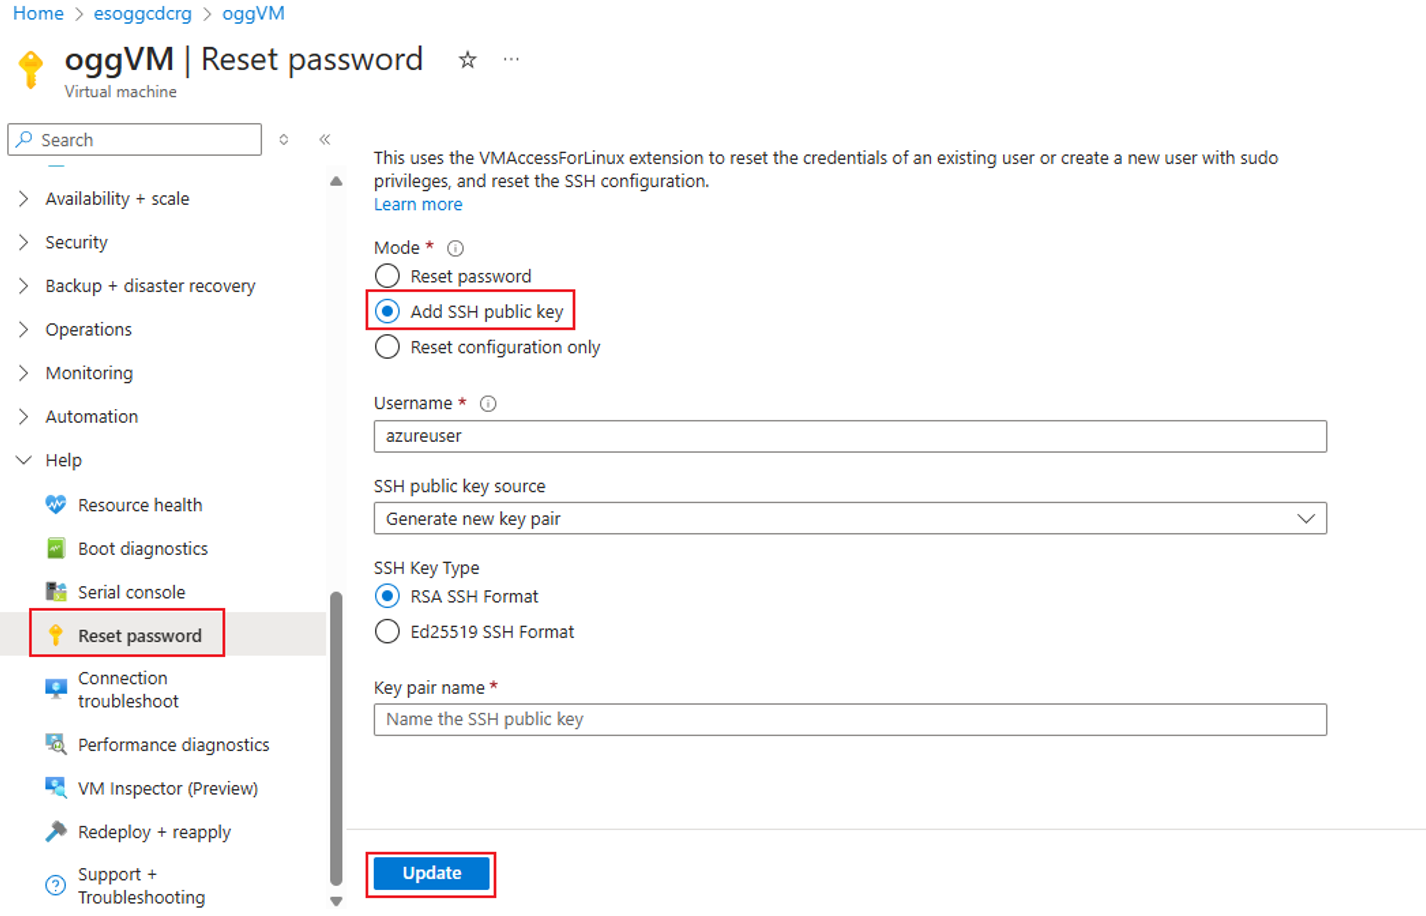
Connect the Oracle VM with its private IP address with SSH.


Create the Oracle Database
Now, you should be able to sign-in to the Oracle VM on the X server windows VM (oggXServer) with SSH. Follow these steps to get the Oracle database created.
Use SSH to sign-in to Oracle VM (oggVM).
$ chmod 400 ~/.ssh/oggVM.pem
$ ssh -i ~/.ssh/oggVM.pem azureuser@10.0.0.4
Change the user to
oracle.$ sudo su - oracleCreate the database using following command. This command can take 30-40 minutes to complete.
$ dbca -silent -createDatabase -templateName General_Purpose.dbc -gdbname cdb1 -sid cdb1 -responseFile NO_VALUE -characterSet AL32UTF8 -sysPassword OraPasswd1 -systemPassword OraPasswd1 -createAsContainerDatabase true -numberOfPDBs 1 -pdbName pdb1 -pdbAdminPassword OraPasswd1 -databaseType MULTIPURPOSE -automaticMemoryManagement false -storageType FS -datafileDestination "/u01/app/oracle/oradata/" -ignorePreReqsSet the ORACLE_SID and LD_LIBRARY_PATH variables
$ export ORACLE_SID=cdb1
$ export LD_LIBRARY_PATH=$ORACLE_HOME/lib
Add ORACLE_SID and LD_LIBRARY_PATH to ~/.bashrc file, so that these settings are saved for future logins. ORACLE_HOME variable should already be set in .bashrc file
$ sed -i '$ a export ORACLE_SID=cdb1' .bashrc
$ sed -i '$ a export LD_LIBRARY_PATH=$ORACLE_HOME/lib' .bashrc
Start Oracle listener
$ lsnrctl start
By now, the Oracle database has been created. To enable the Oracle CDC for GoldenGate, the archive log needs to be enabled. Follow these steps to get it enabled.
Connect to sqlplus:
$ sqlplus / as sysdbaEnable archive log with following command. Execute these commands one by one:
SQL> SELECT log_mode FROM v$database;
SQL> SHUTDOWN IMMEDIATE;
SQL> STARTUP MOUNT;
SQL> ALTER DATABASE ARCHIVELOG;
SQL> ALTER DATABASE OPEN;
Enable force logging and GoldenGate replication, and make sure at least one log file is present. Execute these commands one by one:
SQL> ALTER DATABASE FORCE LOGGING;
SQL> ALTER SYSTEM SWITCH LOGFILE;
SQL> ALTER SYSTEM set enable_goldengate_replication=true;
SQL> ALTER PLUGGABLE DATABASE PDB1 OPEN;
SQL> ALTER SESSION SET CONTAINER=CDB$ROOT;
SQL> ALTER DATABASE ADD SUPPLEMENTAL LOG DATA;
SQL> ALTER SESSION SET CONTAINER=PDB1;
SQL> ALTER DATABASE ADD SUPPLEMENTAL LOG DATA;
SQL> EXIT;
Install Oracle GoldenGate Core
In this section, you learn how to download the Oracle GoldenGate Core Application and transfer to the Oracle VM (oggVM) and get it installed. All these steps are performed on the X server windows VM (oggXServer).
Download and transfer Oracle GoldenGate Core application to VM
Open the X server windows VM (oggXServer) RDP and download
Oracle GoldenGate 21.3.0.0.0 for Oracle on Linux x86-64from Oracle Golden Gate on the windows VM (oggXServer).Transfer the downloaded zip file to Oracle VM (oggVM) with Secure Copy Protocol (SCP) on the X server windows VM (oggXServer).
$ scp -i ~/.ssh/oggVM.pem 213000_fbo_ggs_Linux_x64_Oracle_shiphome.zip azureuser@10.0.0.4:~/In order to install the Oracle GoldenGate core application with GUI interface, the Xming application is needed to install on oggXServer. Download Xming X Server for Windows to ggXServer and install with all default option.
- Ensure that you didn't select Launch at the end of installation
- Launch "XLAUNCH" application from start menu.
Complete the configuration by launching the XLAUNCH application from the Start menu. Make sure to select No Access Control.
Install Oracle GoldenGate Core Application on oggVM
All the operations in this section are performed on Oracle VM (oggVM). So, Use SSH sign in to this VM and follow these steps to get it installed.
Connect to oggVM with SSH.
$ ssh -i ~/.ssh/oggVM.pem azureuser@10.0.0.4Move the uploaded zip file to oracle home dir.
$ sudo su -
$ mv /home/azureuser/213000_fbo_ggs_Linux_x64_Oracle_shiphome.zip /home/oracle/
Unzip the files (install unzip utility if not already installed).
$ yum install unzip
$ cd /home/oracle/
$ unzip 213000_fbo_ggs_Linux_x64_Oracle_shiphome.zip
Change permission.
$ chown -R oracle:oinstall fbo_ggs_Linux_x64_Oracle_shiphome/
$ exit
Now, let’s start the Oracle GoldenGate Core installation. The private IP in ‘DISPLAY=10.0.0.5:0.0’ is the oggXServer’s private IP.
$ sudo su - oracle
$ export DISPLAY=10.0.0.5:0.0
$ cd fbo_ggs_Linux_x64_Oracle_shiphome/Disk1
$ ./runInstaller
You should see the Xming server is opened by this installer.
Select Oracle GoldenGate for Oracle Database 21c. Then select Next to continue.
Choose the software installation path as /u01/app/oggcore, make sure Start Manager box is selected and select Next to continue.
Select Install in the summary step.
Select Close in the last step.
Now, the Oracle GoldenGate core application is successfully installed in the Oracle VM (oggVM).
Configure Oracle database for OGG and OGG Extract to extract the CDC data
After the Oracle GoldenGate core application is installed, it can be configured to extract the Oracle CDC data. Follow these steps to get the Extract configured. All the operations in this section are still performed on Oracle VM (oggVM) with SSH connection.
Prepare the database for extract
Create or update the tnsnames.ora file.
$ sudo su - oracle
$ cd $ORACLE_HOME/network/admin
$ vi tnsnames.ora
When vi editor opens you have to press
ito switch to insert mode, then copy and paste file contents and pressEsckey,:wqto save file.cdb1= (DESCRIPTION= (ADDRESS= (PROTOCOL=TCP) (HOST=localhost) (PORT=1521) ) (CONNECT_DATA= (SERVER=dedicated) (SERVICE_NAME=cdb1) ) ) pdb1= (DESCRIPTION= (ADDRESS= (PROTOCOL=TCP) (HOST=localhost) (PORT=1521) ) (CONNECT_DATA= (SERVER=dedicated) (SERVICE_NAME=pdb1) ) )Create the Golden Gate owner and user accounts.
$ sqlplus / as sysdbaSQL> CREATE USER C##GGADMIN identified by ggadmin; SQL> EXEC dbms_goldengate_auth.grant_admin_privilege('C##GGADMIN',container=>'ALL'); SQL> GRANT DBA to C##GGADMIN container=all; SQL> connect C##GGADMIN/ggadmin SQL> ALTER SESSION SET CONTAINER=PDB1; SQL> EXIT;Create the Golden Gate ggtest user account.
$ cd /u01/app/oggcore
$ sqlplus system/OraPasswd1@pdb1
SQL> CREATE USER ggtest identified by ggtest DEFAULT TABLESPACE USERS TEMPORARY TABLESPACE TEMP; SQL> GRANT connect, resource, dba TO ggtest; SQL> ALTER USER ggtest QUOTA 100M on USERS; SQL> connect ggtest/ggtest@pdb1 SQL> @demo_ora_create SQL> @demo_ora_insert SQL> select * from TCUSTMER; SQL> select * from TCUSTORD; SQL> EXIT;
You should be able to see two tables (TCUSTMER and TCUSTORD) are created and two records are inserted in each of the two tables.
Configure and enable the extract
Configure the extract parameter file for Oracle GoldenGate Extract.
$ sudo su – oracleEnsure
$TNS_ADMINis set in~/.bashrc. If not, set it as:export TNS_ADMIN=$ORACLE_HOME/network/adminin~/.bashrc. And run commandsource ~/.bashrcto make it take effect.$ cd /u01/app/oggcore $ ./ggsci GGSCI> DBLOGIN USERID ggtest@pdb1 Successfully logged into database pdb1 GGSCI> ADD SCHEMATRANDATA pdb1.ggtest 2025-01-04 15:57:42 INFO OGG-01788 SCHEMATRANDATA has been added on schema "ggtest". 2025-01-04 15:57:42 INFO OGG-01976 SCHEMATRANDATA for scheduling columns has been added on schema "ggtest". 2025-01-04 15:57:42 INFO OGG-10154 Schema level PREPARECSN set to mode NOWAIT on schema "ggtest". GGSCI> EDIT PARAMS EXT1EXTRACT EXT1 USERID C##GGADMIN@cdb1, PASSWORD ggadmin RMTHOST 10.0.0.4, MGRPORT 7809 RMTTRAIL ./dirdat/rt DDL INCLUDE MAPPED DDLOPTIONS REPORT LOGALLSUPCOLS UPDATERECORDFORMAT COMPACT TABLE pdb1.ggtest.TCUSTMER; TABLE pdb1.ggtest.TCUSTORD;Register extract--integrated extract.
GGSCI> dblogin userid C##GGADMIN@cdb1

Successfully logged into database CDB$ROOT.

GGSCI> REGISTER EXTRACT EXT1 DATABASE CONTAINER(pdb1)

2025-01-04 16:04:58  INFO    OGG-02003  Extract group EXT1 successfully registered with database at SCN 2147164.

GGSCI> exit
Set up extract checkpoints and start real-time extract.
GGSCI> ADD EXTRACT EXT1, INTEGRATED TRANLOG, BEGIN NOW
GGSCI> ADD RMTTRAIL ./dirdat/rt, EXTRACT EXT1, MEGABYTES 10

RMTTRAIL added.

GGSCI> START EXTRACT EXT1

Sending START request to MANAGER ...
EXTRACT EXT1 starting

GGSCI> INFO ALL

Program     Status      Group       Lag at Chkpt  Time Since Chkpt
MANAGER     RUNNING
EXTRACT     RUNNING     EXTORA      00:00:11      00:00:04

GGSCI > EXIT
Smoke test for the configured extract.
Sign in DB with test account and insert a record to the table:
$ sqlplus ggtestSQL> select * from TCUSTORD; SQL> INSERT INTO TCUSTORD VALUES ('OLLJ',TO_DATE('11-JAN-25'),'CYCLE',400,16000,1,102); SQL> COMMIT; SQL> EXIT;Check the transaction picked up by Golden Gate (Note Total inserts value):
$ cd /u01/app/oggcore
$ ./ggsci
GGSCI> STATS EXT1

Sending STATS request to Extract group EXT1 ...
Start of statistics at 2025-01-04 16:12:16.
DDL replication statistics (for all trails):

*** Total statistics since extract started     ***
    Operations                                         0.00
    Mapped operations                                  0.00
    Unmapped operations                                0.00
    Other operations                                   0.00
    Excluded operations                                0.00

Output to ./dirdat/rt:
Extracting from PDB1.GGTEST.TCUSTORD to PDB1.GGTEST.TCUSTORD:
*** Total statistics since 2025-01-04 16:11:02 ***
    Total inserts                              1.00
    Total updates                              0.00
    Total deletes                              0.00
    Total upserts                              0.00
    Total discards                             0.00
    Total operations                           1.00

*** Daily statistics since 2025-01-04 16:11:02 ***
    Total inserts                              1.00
    Total updates                              0.00
    Total deletes                              0.00
    Total upserts                              0.00
    Total discards                             0.00
    Total operations                           1.00

*** Hourly statistics since 2025-01-04 16:11:02 ***
    Total inserts                              1.00
    Total updates                              0.00
    Total deletes                              0.00
    Total upserts                              0.00
    Total discards                             0.00
    Total operations                           1.00

*** Latest statistics since 2025-01-04 16:11:02 ***
    Total inserts                              1.00
    Total updates                              0.00
    Total deletes                              0.00
    Total upserts                              0.00
    Total discards                             0.00
    Total operations                           1.00
End of statistics.
Install Oracle GoldenGate Big Data
The Oracle GoldenGate Big Data replicates the extracted data to the desired handler (destination). In this tutorial, the handler is Kafka topic. In this section, you're guided to download the software packages needed and get them installed.
Download the required software packages
The Windows VM (oggXServer) is still used to download these software packages and transfer them to Oracle VM (oggVM).
Download OGG for big data (Oracle GoldenGate for Big Data 21.4.0.0.0 on Linux x86-64) from Oracle GoldenGate Downloads.
Download Kafka package(kafka_2.13-3.9.0.tgz).
Download JAVA SDK(jdk-8u202-linux-x64.tar.gz.
Use the SCP command in WSL to transfer them to Oracle VM:
$ scp -i ~/.ssh/oggVM.pem kafka_2.13-3.9.0.tgz jdk-8u202-linux-x64.tar.gz 214000_ggs_Linux_x64_BigData_64bit.zip azureuser@10.0.0.4:~/
Install the three software packages
To install the three software packages, get them extracted to the individual folders and get the corresponding environment variables configured. All the operations in this section are performed on Oracle VM (oggVM). So, use SSH sign in to this VM and follow these steps to get them installed.
Connect to oggVM with SSH.
$ ssh -i ~/.ssh/oggVM.pem azureuser@10.0.0.4Move these packages to oracle home dir.
$ sudo su –
$ mv /home/azureuser/214000_ggs_Linux_x64_BigData_64bit.zip /home/azureuser/kafka_2.13-3.9.0.tgz /home/azureuser/jdk-8u202-linux-x64.tar.gz /home/oracle/
$ exit
Change to oracle user and go the home directory to prepare the individual folders.
$ sudo su – oracle
$ mkdir kafka java oggbd
$ mv 214000_ggs_Linux_x64_BigData_64bit.zip oggbd/
$ mv jdk-8u202-linux-x64.tar.gz java/
$ mv kafka_2.13-3.9.0.tgz kafka
Go to each individual folder and get the package extracted.
$ cd java
$ tar -xvf jdk-8u202-linux-x64.tar.gz
$ cd ../kafka
$ tar -xvf kafka_2.13-3.9.0.tgz
$ cd ../oggbd
$ mkdir /u01/app/oggbd
$ tar -xvf ggs_Linux_x64_BigData_64bit.tar -C /u01/app/oggbd
Configure the environment variables for JAVA.
$ export JAVA_HOME=/home/oracle/java/jdk1.8.0_202
$ export LD_LIBRARY_PATH=$ORACLE_HOME/lib:$JAVA_HOME/lib:/$JAVA_HOME/jre/lib/amd64/server
Configure Oracle GoldenGate Big Data to replicate the CDC data to Eventstream’s Kafka endpoint
In this section, you're guided to configure the Oracle GoldenGate Big Data to replicate the CDC data extracted in previous section to the Eventstream’s Kafka endpoint.
Prepare the Eventstream Kafka endpoint
Following the normal creation procedures of Eventstream and its custom endpoint source creation to obtain the Kafka endpoint information for later use, see Add a custom endpoint or custom app source to an eventstream.

Configure the replicate for Oracle GoldenGate Big Data
All the operations in this section are performed on Oracle VM (oggVM). So, use SSH sign in to this VM and follow these steps to get it configured.
Connect to oggVM with SSH if you lost the connection after previous section.
$ ssh -i ~/.ssh/oggVM.pem azureuser@10.0.0.4
$ sudo su - oracle
Go to the folder where the Oracle GoldenGate Big Data package was extracted to and get the required folders created.
$ cd /u01/app/oggbd
$ ./ggsci
GGSCI> CREATE SUBDIRS
GGSCI> EDIT PARAMS MGR
PORT 7801GGSCI> START MGR GGSCI> INFO ALL Program Status Group Lag at Chkpt Time Since Chkpt MANAGER RUNNING GGSCI> EXITCopy the Kafka handler template configuration files.
$ cp AdapterExamples/big-data/kafka/* dirprm/Open the rkafka.prm file and change the MAP/TARGET schema name according to the schema name at the source database.
$ vim dirprm/rkafka.prmREPLICAT rkafka TARGETDB LIBFILE libggjava.so SET property=dirprm/kafka.props REPORTCOUNT EVERY 1 MINUTES, RATE GROUPTRANSOPS 10000 MAP pdb1.ggtest.*, TARGET pdb1.ggtest.*;Add the replicate using the following command within ./ggsci command. Be sure the replicate should be the one defined in extract step:
$ ./ggsci
GGSCI> ADD REPLICAT rkafka, exttrail /u01/app/oggcore/dirdat/rt
GGSCI> EXIT
Open the Kafka props file and change the gg.classpath to the correct kafka installation directory path under #Sample gg.classpath for Apache Kafka. And also fill in the Kafka topic name which is from Eventstream custom endpoint source.
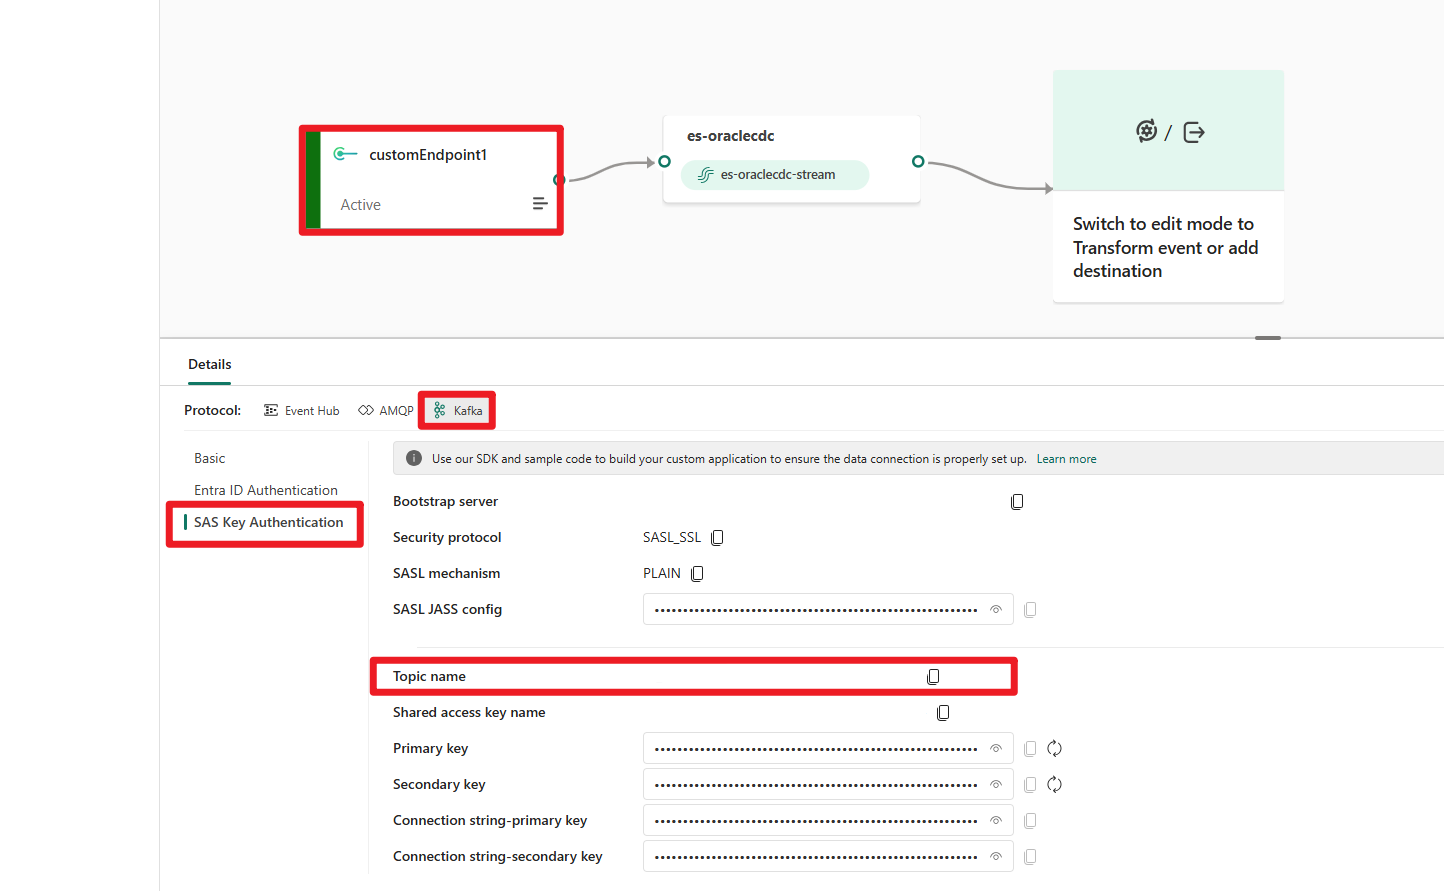
$ vim dirprm/kafka.propsgg.handlerlist=kafkahandler gg.handler.kafkahandler.type=kafka gg.handler.kafkahandler.kafkaProducerConfigFile=custom_kafka_producer.properties #The following resolves the topic name using the fixed topic which is from eventstream gg.handler.kafkahandler.topicMappingTemplate={YOUR.TOPIC.NAME} #The following selects the message key using the concatenated primary keys #A null Kafka message key distributes to the partitions on a round-robin basis gg.handler.kafkahandler.keyMappingTemplate=${null} #gg.handler.kafkahandler.schemaTopicName=mySchemaTopic gg.handler.kafkahandler.blockingSend=false gg.handler.kafkahandler.includeTokens=false gg.handler.kafkahandler.mode=op #gg.handler.kafkahandler.metaHeadersTemplate=${alltokens} gg.handler.kafkahandler.transactionsEnabled=false gg.handler.kafkahandler.format=json gg.handler.kafkahandler.format.metaColumnsTemplate=${objectname[table]},${optype[op_type]},${timestamp[op_ts]},${currenttimestamp[current_ts]},${position[pos]} #Sample gg.classpath for Apache Kafka gg.classpath=dirprm/:/var/lib/kafka/libs/*:/home/oracle/kafka/kafka_2.13-3.9.0/libs/* #Sample gg.classpath for HDP #gg.classpath=/etc/kafka/conf:/usr/hdp/current/kafka-broker/libs/*- You can find {YOUR.TOPIC.NAME} value on the SAS Key Authentication page under the Kafka tab:
Make changes to custom_producer.properties file by adding your Eventstream connect string and password needed to connect to Eventstream.
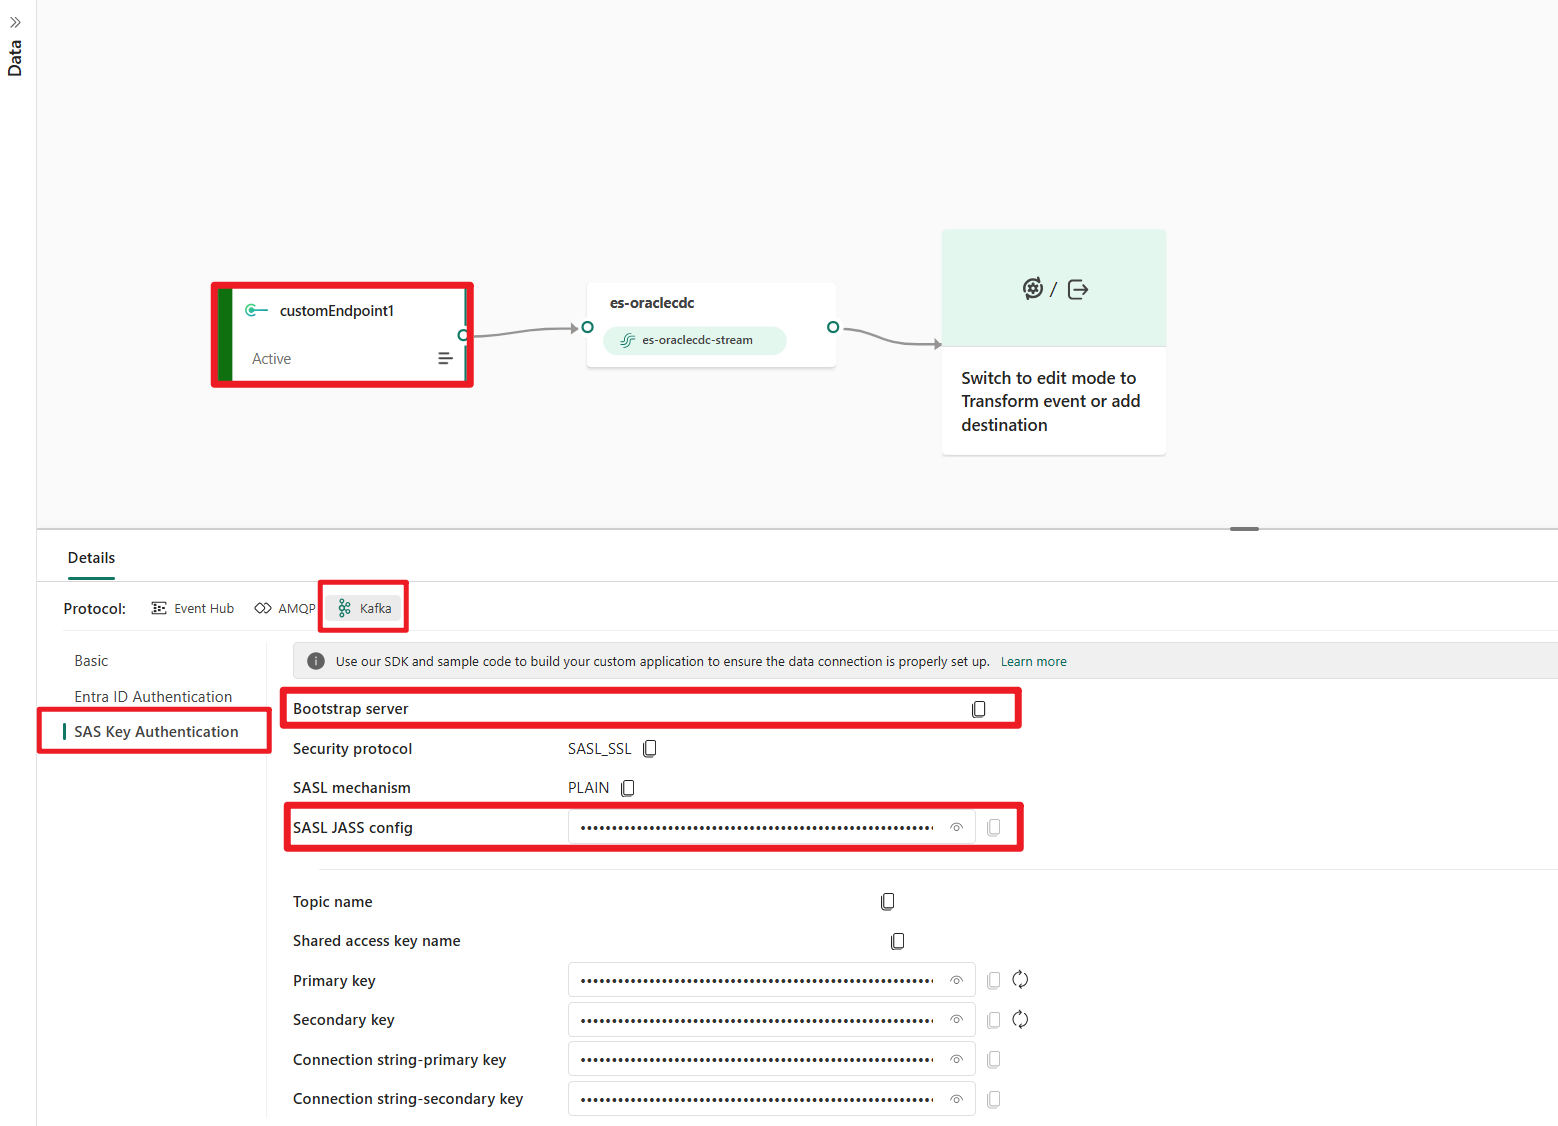
$ vim dirprm/custom_kafka_producer.propertiesbootstrap.servers={YOUR.BOOTSTRAP.SERVER} security.protocol=SASL_SSL sasl.mechanism=PLAIN sasl.jaas.config={YOUR.SASL.JASS.CONFIG}; acks=1 reconnect.backoff.ms=1000 value.serializer=org.apache.kafka.common.serialization.ByteArraySerializer key.serializer=org.apache.kafka.common.serialization.ByteArraySerializer # 100KB per partition batch.size=16384 linger.ms=0- Replace {YOUR.BOOTSTRAP.SERVER} with the Bootstrap server value, witch you can copy from your eventstream.
- Replace {YOUR.SASL.JASS.CONFIG} with the SASL JASS config value, which you can copy from your eventstream.
Sign in into your GoldenGate instance and start the replicate process.
$ ./ggsci
GGSCI> START RKAFKA

Sending START request to Manager ...
Replicat group RKAFKA starting.
GGSCI> INFO ALL Program Status Group Lag at Chkpt Time Since Chkpt MANAGER RUNNING REPLICAT RUNNING RKAFKA 00:00:00 00:53:17 GGSCI> EXIT


Validate the whole E2E flow from Oracle to Eventstream
To validate the whole E2E flow, let’s sign in to the Oracle database with ggtest account to insert a few records and then go to Eventstream to check if the change data flows in.
Sign-in Oracle DB with test account to insert a few new records:
$ sqlplus ggtestSQL> select * from TCUSTORD; SQL> INSERT INTO TCUSTORD VALUES ('MSFT',TO_DATE('3-JAN-25'),'M365',100,80000,2,104); SQL> INSERT INTO TCUSTMER VALUES ('TOM','SUNRISE SOFTWARE INC.','SAN FRANCISCO','CA'); SQL> COMMIT; SQL> EXIT;Preview the data that you sent with this Kafka endpoint source. Select the default stream node, which is the middle node that shows your eventstream name.

