Project Acoustics Unity Baking - Bake Submission
This article describes the Baking step of the Project Acoustics Unity workflow.
Bake your scene by using Azure Batch
You can bake your scene on a compute cluster in the cloud by using the Azure Batch service. The Project Acoustics Unity plug-in connects directly to Azure Batch to instantiate, manage, and tear down an Azure Batch cluster for each bake. On the Bake tab, enter your Azure credentials, select a cluster machine type and size, and then select Bake.
Bake Tab Reference
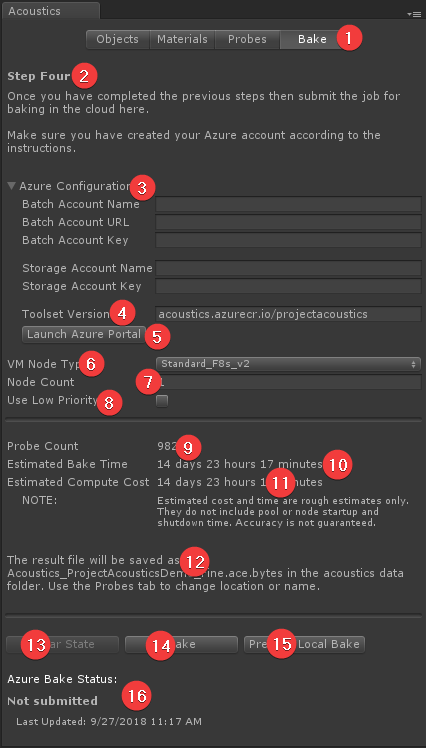
- The Bake button displays this tab.
- A brief description of what you can do on this page.
- Enter your Azure credentials in these fields, after your Azure account is created. For more information, see Create an Azure Batch account.
- The Docker image tag field for the Acoustics toolset.
- Opens the Azure portal to manage your subscriptions, monitor usage, and view billing information.
- Specifies the Azure Batch compute node type to use for calculation. The node type must be supported by your Azure datacenter location. If you're not sure, leave as Standard_F8s_v2.
- The number of nodes to use for the calculation. This number affects the bake time. It's limited by your Azure Batch core allocation. The default allocation only allows for two 8-core nodes or one 16-core node, but it can be expanded. For more information about core allocation constraints, see Create an Azure Batch account.
- Select this check box to configure your compute pool to use low-priority nodes. Low-priority compute nodes have much lower cost. But they may not always be available or may be preempted at any time.
- The probe count for your scene as calculated on the Probes tab. The number of probes determines the number of simulations that have to be run in the cloud. You can't specify more nodes than there are probes.
- An estimate of the time that your job will take to run in the cloud, excluding node startup time. After the job starts running, this field shows an estimate of how long until you get back the results.
- The total amount of computing time needed to run the simulations. This value is the total amount of node compute time that will be used in Azure. For more information, see Estimate Azure bake cost later in this article.
- This message tells you where the results of the bake will be saved when the job is finished.
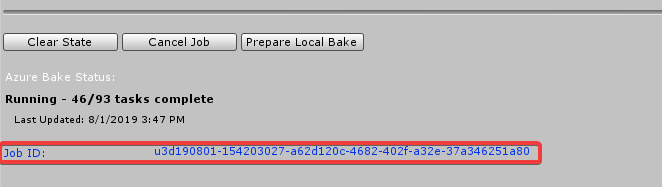
- (Advanced use only:) This button forces Unity to forget about a bake that you submitted. For example, if you downloaded the results by using another machine, select the Clear State button to forget that job. The result file, when ready, will not be downloaded. This is not the same as canceling the job. The job, if running, will continue to run in the cloud.
- Select this button to submit the bake to the cloud. While a job is running, this button becomes Cancel Job.
- Select this button to prepare for processing acoustics simulation on your PC.
- This area shows the status of the bake. When the bake is completed, it shows "Downloaded."
You can always get complete information about active jobs, compute pools, and storage in the Azure portal.
While a job is running, the Bake button label changes to Cancel Job. Use this button to cancel the job that's in progress. You'll be prompted to confirm. Canceling a job can't be undone. When you cancel, no results will be available, but you'll still be charged for any Azure compute time used.
After you've started a bake, you can close Unity. Depending on the project, node type, and number of nodes, a cloud bake can take several hours. The bake job status will be updated when you reload the project and open the Acoustics window. If the job is completed, the output file will be downloaded.
For security, Azure credentials are stored encrypted on your local machine and associated with your Unity editor. They're used only to establish a secure connection to Azure.
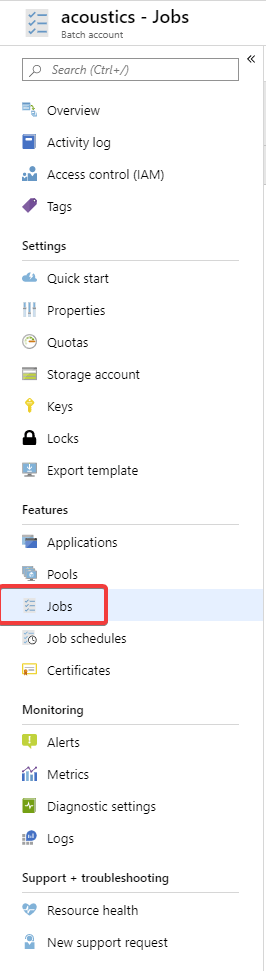
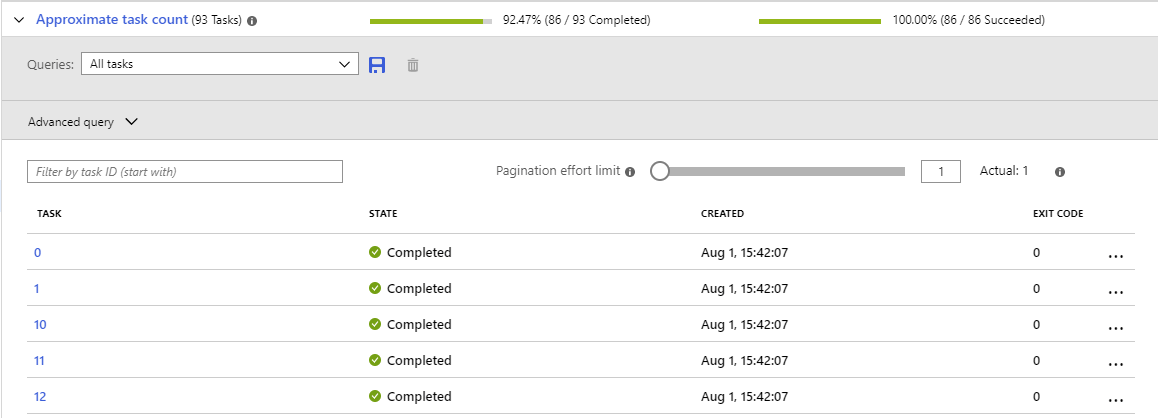
Find the status of a running job on the Azure portal
Find the bake job ID on the Bake tab.
Open the Azure portal, go to the Batch account that was used for the bake, and select Jobs.
Search for the job ID in the list of jobs.
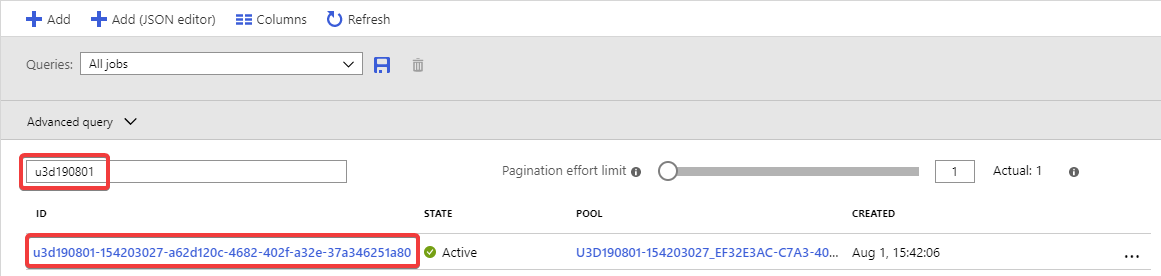
Select the job ID to see the status of the related tasks and the overall job status.
Estimate Azure bake cost
To estimate what a bake will cost, start with the Estimated Compute Cost value, which is a duration. Multiply that value by the hourly cost in your local currency for the VM Node Type that you select. Note that the result won't include the node time that's needed to get the nodes up and running.
For example, if the compute node you selected has a cost of $0.40/hr. If the Estimated Compute Cost is 3 hours and 57 minutes, the estimated cost to run the job will be $0.40 * ~4 hours = ~$1.60. The actual cost will vary based on the actual compute time used.
Find hourly nodes cost at Azure Batch pricing. (Select Compute optimized or High performance compute as the category.)
Bake your scene on your PC
You can also bake your scene on your own PC. This method can be useful for experimenting with acoustics for small scenes before you create an Azure Batch account. But note that local acoustics simulation can take a long time depending on the size of the scene.
Minimum hardware requirements
An x86-64 processor with at least 8 cores and 32 GB of RAM
Hyper-V enabled to run Docker
Refer to the compute cost estimation on the bake tab for an idea of how long this process will take on a single machine.
Setup Docker
Ensure your PC has at least 8GB RAM. Install and configure Docker Desktop on the PC that will process the simulation.
Run the local bake
- Select the Prepare Local Bake button on the Bake tab. Then, select a folder location to save the input files and execution scripts to. It is possible to run the bake on another machine by copying the local bake folder and ensuring the machine satisfies the minimum hardware and software requirements.
- To start the simulation, run the runlocalbake.bat script on Windows or the runlocalbake.sh script on MacOS. This script fetches the Project Acoustics Docker image with the toolset necessary for simulation processing and starts the simulation.
- After the simulation has finished, copy the resulting .ace file back to your Unity project. To make sure that Unity recognizes it as a binary file, append ".bytes" to the file extension (for example, "Scene1.ace.bytes").
Data files added by the bake process
The following four data files are created during the bake process. One contains the simulation results and ships with your title. The others store Unity editor-related data.
Simulation result:
Assets/AcousticsData/Acoustics_[SceneName].ace.bytes: This file is the runtime lookup table. It contains the simulation results and voxelized acoustic scene elements. You can change the name and location of this file on the Probes tab.
Be careful not to delete the simulation result file. It's not recoverable except by rebaking the scene.
Editor data files:
- Assets/Editor/[SceneName]_AcousticsParameters.asset: This file stores the data that you enter in fields in the Acoustics UI. You can't change the name and location of this file.
- Assets/AcousticsData/Editor/Acoustics_[SceneName].vox: This file stores the voxelized acoustics geometry and the material properties that are computed when you select the Calculate button on the Probes tab. You can change the name and location of this file on the Probes tab.
- Assets/AcousticsData/Editor/Acoustics_[SceneName]_config.xml: This file stores simulation parameters that are computed when you select Calculate. You can change the name and location of this file on the Probes tab.
Set up the acoustics lookup table
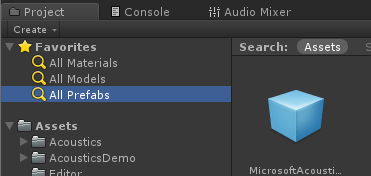
Drag the Project Acoustics prefab from the project panel into your scene:
Select the Acoustics Manager game object, and go to its inspector panel. Specify the location of your bake result (the .ace file, in Assets/AcousticsData): Drag it into the Acoustics Manager script or select the circle button next to the text box.

Next steps
- Explore the Unity design controls.
- Explore Project Acoustics design concepts.