Project Acoustics Unity Baking - Material Assignment
This article describes the Material Assignment step of the Project Acoustics Unity workflow.
Select acoustic materials
After your objects are marked, select the Materials button. Then assign acoustic materials. The Project Acoustics materials system is tied to the Unity visual materials system. For two objects to have separate acoustic materials, they must have separate visual materials.
The acoustic material selection determines the amount of sound energy that's reflected back from each surface. The default acoustic material has absorption similar to steel. Project Acoustics suggests materials based on the visual material name. You can also assign the acoustic material Custom to a material to activate an adjustable absorption-coefficient slider.
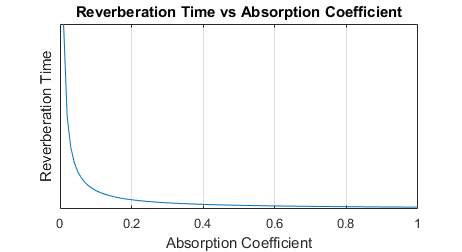
The reverberation time of a given material in a room is inversely related to its absorption coefficient. Materials with smaller absorption values (0-0.2) are much more reflective than materials with high absorption values (0.7-1.0).
Materials Tab Reference
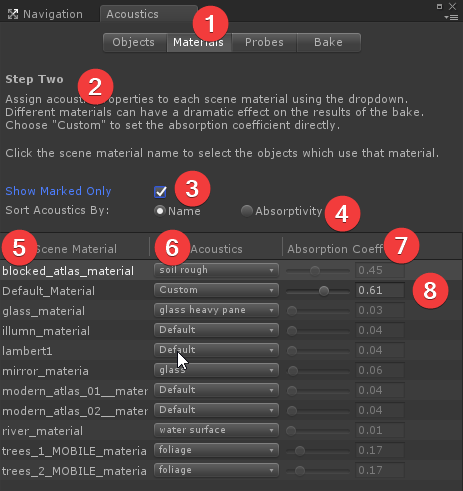
- The Materials button displays this tab.
- A brief description of what you can do by using this tab.
- When this check box is selected, only materials that are used by objects marked as Acoustics Geometry are listed. Otherwise, all materials that are used in the scene are listed.
- Use these options to change the order of the options on a menu in the Acoustics column (#6). Sort acoustic materials by Name or by Absorptivity, from low to high.
- An alphabetically sorted list of materials that are used in the scene. If the Show Marked Only check box is selected (#3), only materials used by objects marked as Acoustics Geometry are shown. Select a material here to select all objects in the scene that use that material.
- The acoustic material that the scene material has been assigned to. Select any item to change the acoustic material assigned to that scene material. To change the sorting order of these menus, use the Sort Acoustics By options (#4).
- The acoustic absorption coefficient of the material selected in the column to the left (#6). A value of 0 means perfectly reflective (no absorption), while 1 means perfectly absorptive (no reflection). The absorption coefficient can't be changed unless the selected material is Custom.
- For a material marked as Custom, the slider is activated. You can move the slider or type a value to assign an absorption coefficient.