Project Acoustics Unity Baking - Object Tagging
This article describes the Object Tagging step of the Project Acoustics Unity workflow.
Mark acoustic scene objects
Project Acoustics relies on two types of scene objects for simulation:
- The objects that reflect and occlude sound in the simulation
- The player navigation mesh that constrains listener probe points in simulation
Both object types are marked by using the Objects tab.
Because marking objects simply adds the AcousticsGeometry or AcousticsNavigation components to the object, you can also use the standard Unity component workflow to mark or unmark objects. You can only mark mesh renderers and terrains. All other object types will be ignored. The check boxes mark or unmark all affected objects.
Mark acoustic occlusion and reflection geometry
Open the Objects tab of the Acoustics window. Mark any objects as Acoustics Geometry if they should occlude, reflect, or absorb sound. Acoustics geometry can include things like ground, walls, roofs, windows and window glass, rugs, and large furniture. You can use any arbitrary level of complexity for these objects. Because the scene is voxelized before simulation, highly detailed meshes, such as trees that have many leaves, aren't more costly to bake than simplified objects.
Don't include things that shouldn't affect the acoustics, such as invisible collision meshes or skyboxes.
An object's transform during probe calculation (through the Probes tab) is fixed in the bake results. If any marked objects in the scene are moved later, probe calculation and baking need to be redone. Do not include any moveable objects in acoustics bakes. If your scene contains any dynamic geometry, it is best to exclude that geometry from the bake (i.e. don't include doors).
Mark the navigation mesh
Project Acoustics places probes automatically in areas where the player can navigate to. These areas need to be passed in to the acoustics bake system. Navigation meshes that were created through the Unity workflow will be automatically picked up by the Acoustics system. You can use the Unity navigation mesh workflow or you can use a different 3D modeling package to design your own mesh.
To use additional meshes as navigable areas, mark them from the Objects tab by using the Acoustics Navigation check box.
Objects Tab Reference
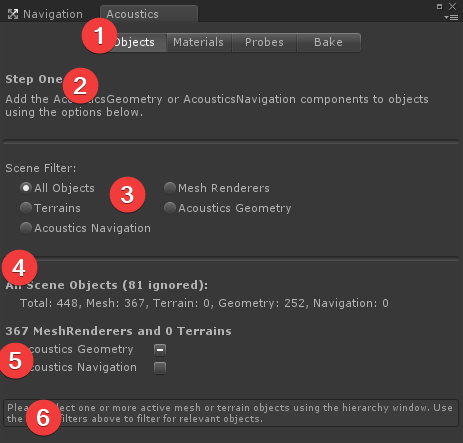
The parts of the tab page (pictured after the descriptions) are:
- The tab selection buttons (with the Objects tab selected). Use these buttons to move through the various steps of an acoustics bake, from left to right.
- A brief description of what you can do by using this tab.
- Object filters for the hierarchy window to assist with bulk selection. Use these options to filter the hierarchy window to objects of the specified type so that you can easily select and mark them for acoustics. If you haven't yet marked anything for acoustics, selecting the last two options will show you nothing. However, these options help you find objects after they're marked.
- When no objects are selected, this section shows the status of all objects in the scene.
- Total: The total number of active, non-hidden objects.
- Ignored: The number of objects that aren't mesh renderers or terrains.
- Mesh: The number of mesh renderer objects.
- Terrain: The number of terrain objects.
- Geometry: The number of mesh or terrain objects that are marked as Acoustics Geometry.
- Navigation: The number of mesh or terrain objects marked as Acoustics Navigation. This number doesn't include the Unity NavMesh.
- The total number of "markable" objects in the scene. Use the check boxes to mark those objects as geometry or navigation for acoustics. Only mesh renderers and terrains are considered "markable".
- When nothing is selected, this note reminds you to select objects for marking, if needed. You can also select one or both check boxes to mark all the objects in the scene.
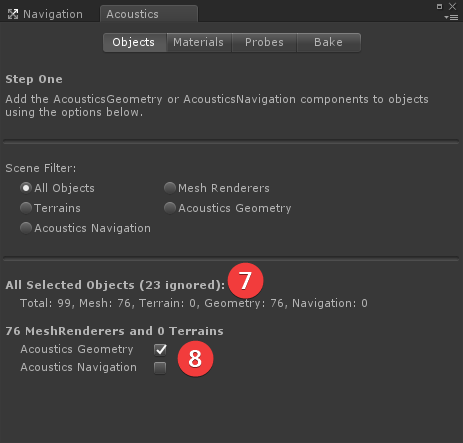
- When objects are selected, this section shows the status of only the selected objects.
- The total number of "markable" selected objects. Selecting or clearing the check boxes marks or unmarks only the selected objects.
If you have nothing selected in your scene, the Objects tab looks like the following picture.
If you have something selected in your scene or hierarchy window, the tab looks like the following picture.
If some objects are marked and some aren't, the appropriate check boxes show a "mixed" value, like the following picture.
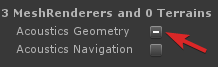
Select the check box to mark all the items. Unselect it to unmark all the objects.
Objects can be marked for both geometry and navigation.