Azure Cloud Build Pipelines
This document will guide you through all the steps required to create a basic Azure build pipeline like the one seen in the Game Developer Conference 2022 talk entitled “Harness the power of Azure cloud builds from development to deployment”. This is not a full, production-ready pipeline, rather, a sample from which to start building one.
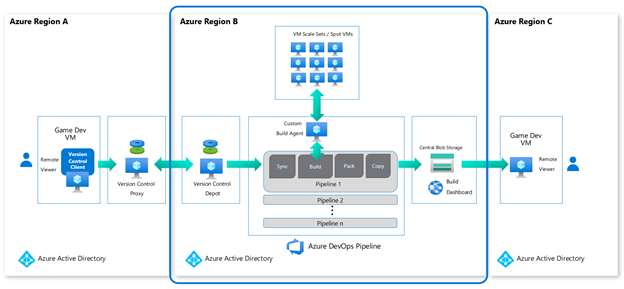
The focus of this documentation is the portion from version control through build distribution, which is the blue highlighted portion of the overall architecture below. We will use a popular Unreal Engine 4 sample, ShooterGame, as the game build and pipeline.
While we recommend using the Azure Game Development VM for this exercise, will not be covering the specifics of it, nor Virtual Desktop Infrastructure portion here. For that, please see documentation for the Azure Game Development VM.
This is a large guide, so it’s best to take some time to review it before working on it, to understand what you might need ahead of time.
If you have any questions, please contact us at azuregamedevs@microsoft.com. (Apologies to watchers of the video; the email listed there had technical issues. Please use this one instead.)
Broad Prerequisites
This document assumes a basic working knowledge of all components involved: how to set up a Perforce instance and do an initial population of a code depot, navigating Azure DevOps, setting up Unreal Engine 4, and working in Azure in general. Links to more detail are provided where appropriate. You will need the following Azure services available to you:
- A working Azure Subscription
- An Azure DevOps tenant
It is important that you are able to access both resources using the same user account.
Deployment Planning
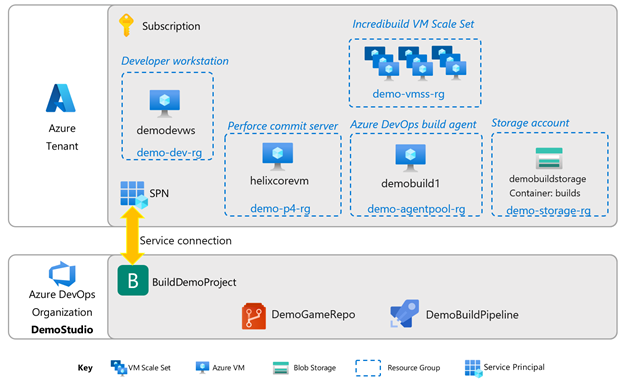
Here’s how we plan to deploy each of the components in terms of Azure resource groups and Azure DevOps project.
Azure Subscription Prerequisites
This guide assumes the use of the Azure Game Development VM as the developer workstation and the build agent. At present, this requires availability of a NV-series (GPU equipped) VM SKU. If you intend to follow this, please check that you have enough quota in your region for you subscription to allocate two such VMs. You can check and request quota increases at Per VM Quota Requests.
Here’s the order in which we will be setting up and testing this demo pipeline.
Section 1: Development workstation
- Create the developer workstation VM
Section 2: Version control
- Create the Perforce Helix Core commit server
- Create the code depot
- Install Azure Storage Explorer
Section 3: Azure DevOps organization and project
- Create the Organization
- Install Perforce extensions
- Create a Personal Access Token
- Create a Project
- Create a service principal and set up a service connection to Azure
Section 4: The Build agent
- Create the build agent VM
- Install the Azure DevOps agent
- Install and configure Incredibuild
Section 5: Simple build distribution
- Create Azure storage account and blob container
Section 6: The Azure DevOps pipeline
- Create the pipeline
- Set up the Perforce trigger
Section 7: Testing
Saving set up information
As you set up the various components, there will be many pieces of configuration data you will need in downstream steps. When you see
📝 Save this info! 📝
...please take note of the configuration values and save them temporarily in a consolidated list, to make setup easier.
Troubleshooting and Conclusions
If you come across any problems in your set up, look at the Troubleshooting section to see if any of the information there could help.
Finally, see what else you could do with this pipeline in the Conclusion. We also highlight some other customer examples there.
We hope you find this guide useful. Please send us feedback at EMAIL.
Next steps
Begin the setup! Go to Section 1: Developer Workstation.
Troubleshooting page is here.
Feedback
Coming soon: Throughout 2024 we will be phasing out GitHub Issues as the feedback mechanism for content and replacing it with a new feedback system. For more information see: https://aka.ms/ContentUserFeedback.
Submit and view feedback for