Initial configuration in Partner Center
In order to be able to develop and test commerce features, products must be set up in Partner Center and published to the development environment, which in almost all cases will be a developer sandbox specific to your publisher.
The most important thing is to be able to see the Microsoft Store page for your game to be able to acquire (purchase), download and install the package in your developer sandbox.
This will require a successful submission in Partner Center of your title which will include at least the following:
- Reserving a name
- Selecting which device families to target
- Enabling the game for Xbox services
- Enabling the game for sandbox publishing
- Uploading one or more packages
- Assign age ratings
- Defining store listings
- Set up pricing and availability
- Publishing to sandbox
This document is not intended to be a comprehensive guide to all things related to Partner Center configuration, but the minimum requirements to be able to get test accounts in the right state for testing the XStore API.
Here are some things to consider for each of the points above.
1. Reserving a name
This name will uniquely identify your title within our internal services and device ecosystem. This is static for the lifetime of the product, and will be used to generate the app identity and Package Family Name. It cannot be changed once published. This is typically not visible to end users in marketing and consumer interfaces, but can be still be found in diagnostic info and directory structures.
Examples:
| Name | App identity | Package Family Name |
|---|---|---|
| InGameStoreXS | 41336MicrosoftATG.InGameStoreXS | 41336MicrosoftATG.InGameStoreXS_dspnxghe87tn0 |
| FlightSimulator | Microsoft.FlightSimulator | Microsoft.FlightSimulator_8weka3d8bne |
Name is what is reserved. The strings in bold are associated with your publisher and are automatically generated.
The app identity is important to know as it needs to be assigned to the MicrosoftGame.Config in order for the associated package to be accepted by Partner Center.
On PC it is also needed for Xbox services and XStore operations even for loose and local package build scenarios.
Many titles opt to use a code name for this reserved name as there will be instances of this name showing up on consumer's gaming devices when the product's package is installed. It may be important, for instance, in the case of a pre-order where the package is pre-loaded but needs to remain secret until the day of release.
Variations of the app identity and Package Family Name can be found in:
get-appxpackagewdapp listwhen the package is installed.- C:\Program Files\WindowsApps or C:\XboxGames
- Registry
- Xbox: File info in My games
Note that if you make a mistake before publishing and delete your Partner Center product and create a new one using the same name, while this can be reused for the store listings and display name of the title, the App identity will use a randomized string for the name section.
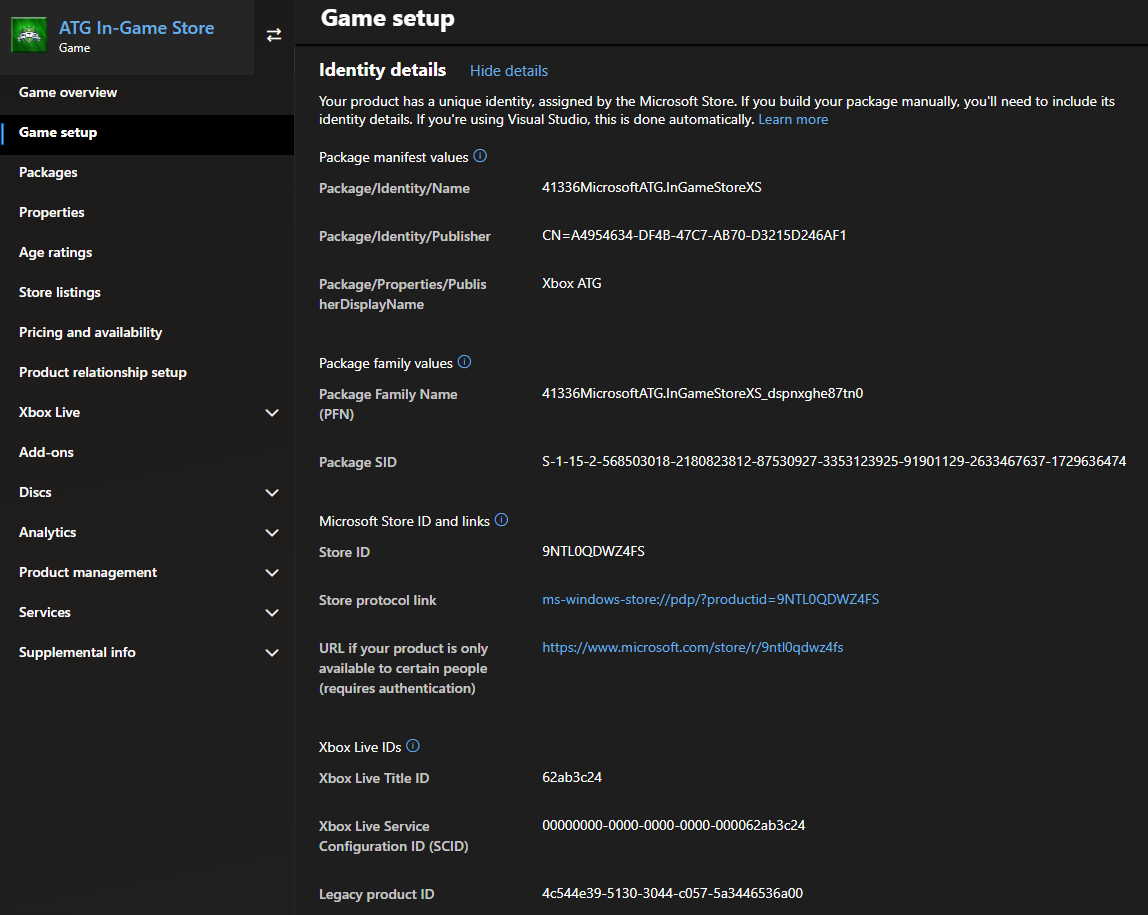
The finalized identity details can be found in Game setup > Identity details.
2. Selecting which device families to target
If your title is cross-platform, you will select each device family in the checklist that your title will be released for. In general you will only select Xbox and Desktop.
The Xbox is a single device family, which encompasses Xbox One and Xbox Series X/S devices. Select Xbox regardless of whether your title supports only Xbox One, only Xbox Series X/S, or both. Select Desktop to support PC.
Note that selecting Xbox and Desktop for the same product will imply that you wish to offer your game as a Smart Delivery title. See Smart delivery (NDA topic)Authorization required to understand what this means.
The alternative is to have separate products for Xbox One and Xbox Series X/S devices. This will get complicated if you wish to share things like Xbox services or a commerce ecosystem between the two console generations. Speak to your Microsoft Representative to talk through the implications of each option.
3. Enabling the game for Xbox services
This typically involves some steps involving your production team and Microsoft Account Management to set up, including concept approval. For the purposes of these documents we are assuming your title will be utilizing the full tier of Xbox services.
This is essential as switching sandboxes requires Xbox services authentication, as well as any B2B API that your title services will use.
Contact your Microsoft Representative for more information how to get set up for this.
4. Enabling the game for sandbox publishing
This is a well-established convention of Xbox and PC game development to isolate development content from retail. Not selecting this would mean all publishes will go straight to retail, which will make console testing difficult, but may be more straightforward for simple PC titles.
Please keep in mind that once the product is published for the first time, it will be impossible to change the sandbox capability from disabled to enabled or vice versa.
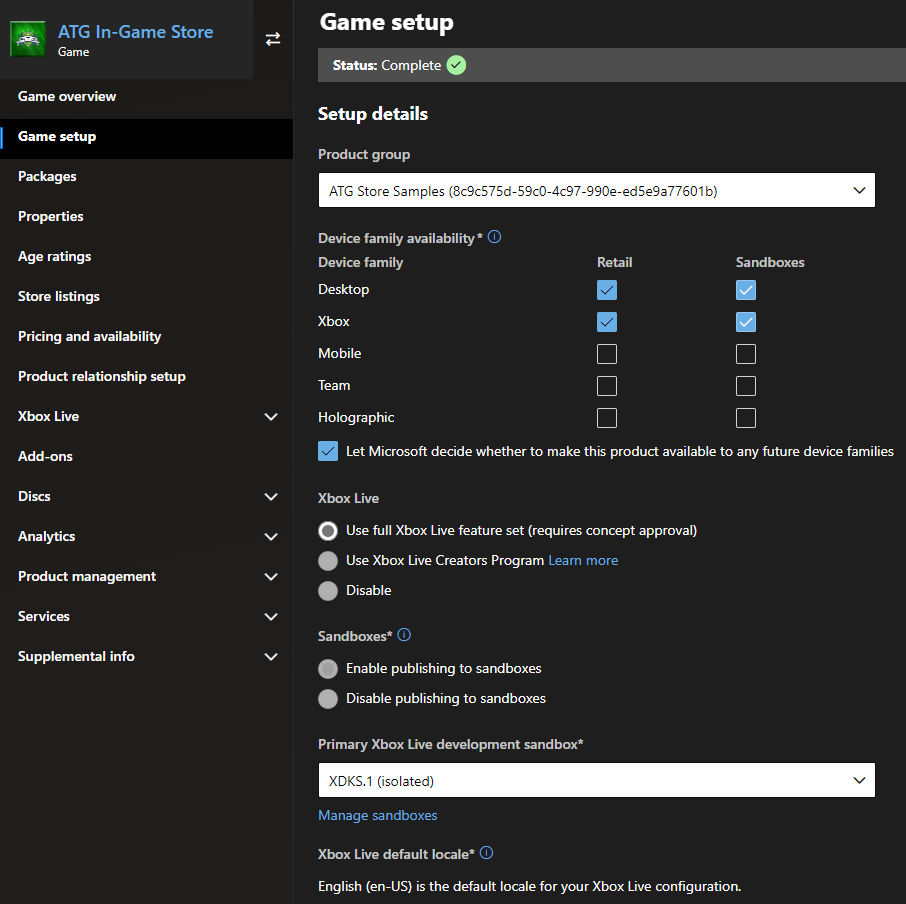
This figure shows a typical configuration for a cross-platform PC and Xbox game, fully Xbox services-enabled product, which will be developed in a sandbox by default.
5. Uploading one or more packages
Each device family will require at least one package submitted before it can be published. For the Xbox device family, one package for each generation is also supported. Keep in mind that for the purposes of being able to test commerce scenarios, this package doesn't have to represent a fully featured game—a stub package will suffice.
See these pages for more information on how to generate packages for each device:
Getting started packaging titles for Xbox consoles
Getting started with packaging titles for a PC
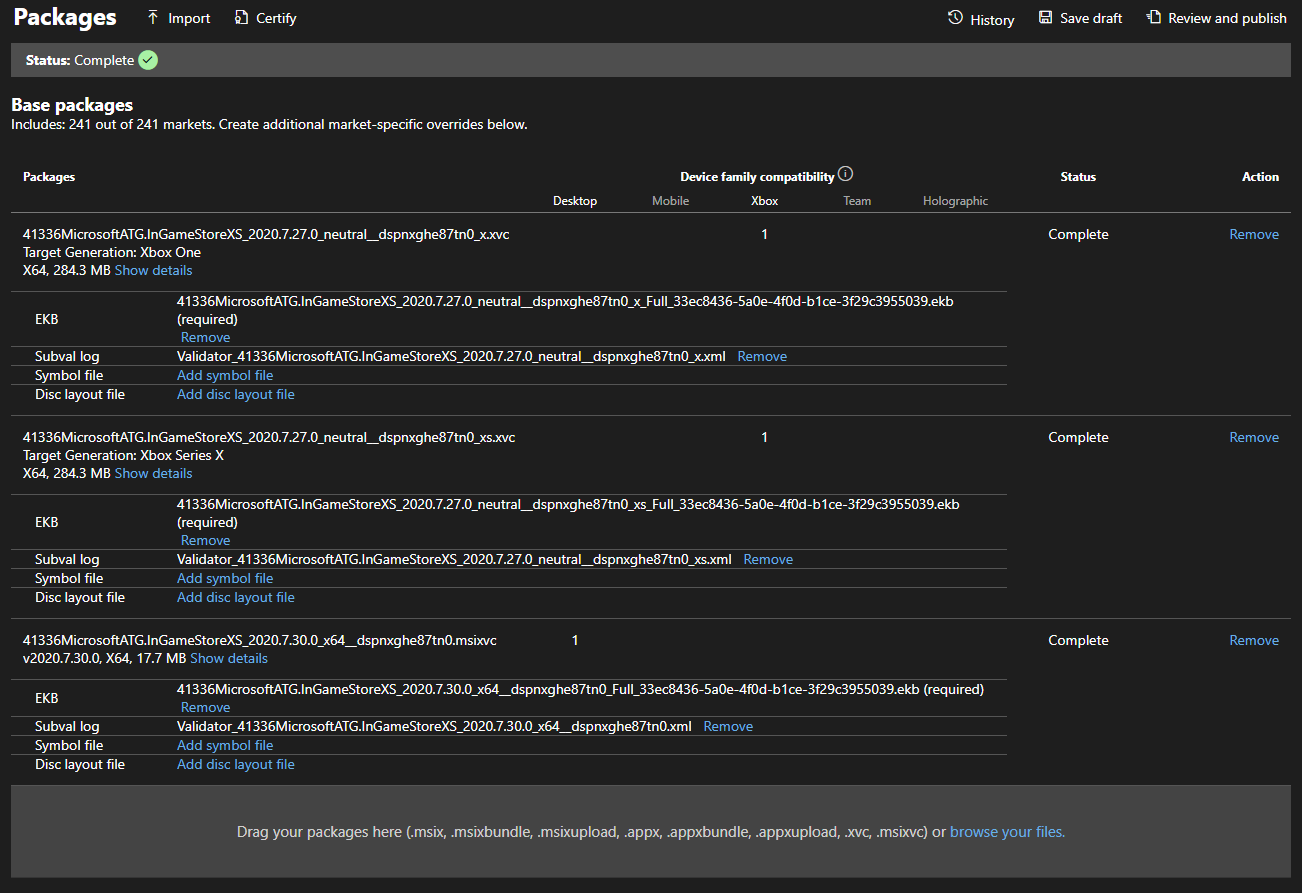
This figure shows a cross-platform, Smart Delivery title that has packages for all relevant devices. Note the Target Generation differentiating between Xbox One and Xbox Series X/S.
6. Assign age ratings
Talk to your Microsoft Representative for any questions regarding obtaining and submitting age ratings for actual game. For the purposes of testing commerce scenarios, any initial rating can be set as test accounts are always created with an adult age. The catalog results will respect age ratings when called by accounts that do not meet the required age, so to test this, contact your Microsoft Representative to get test accounts set with a different age.
7. Defining store listings
Here, just one language needs to be populated. The store listing by default will show the reserved name as the title of the product, to be seen in the Microsoft Store product page. Certain images of different dimensions are also required.
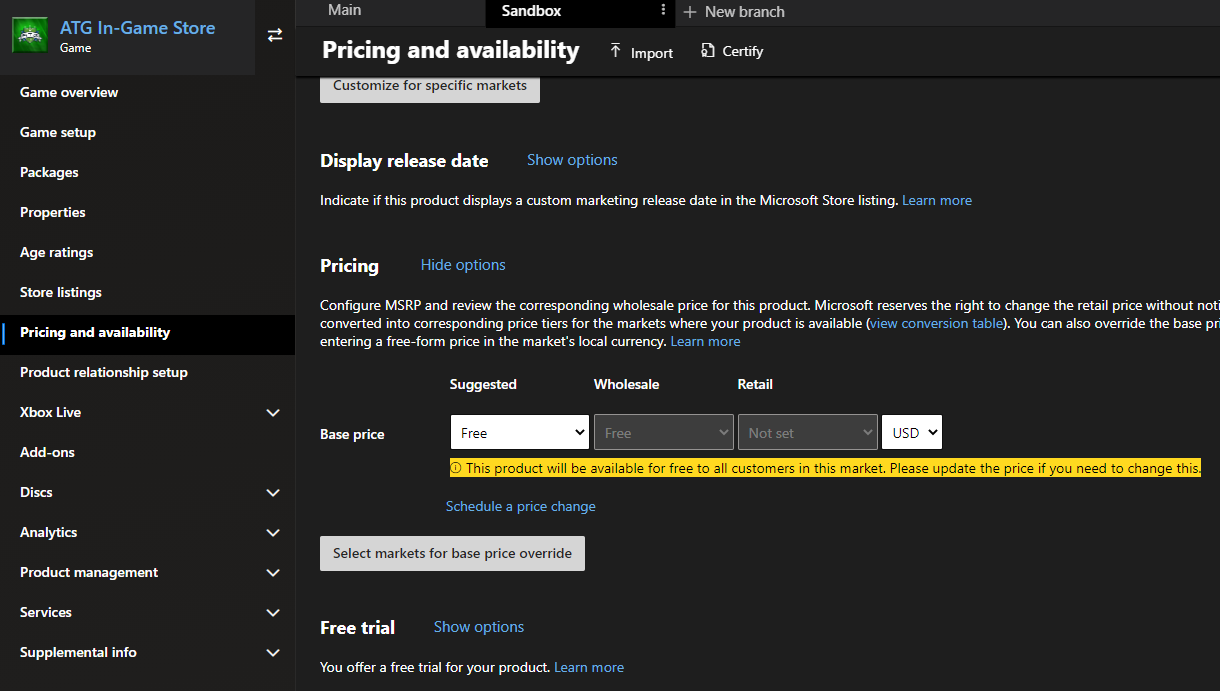
8. Set up pricing and availability
In order to be able to test commerce scenarios, each test account must be able to acquire an entitlement to the game in order to be able to license it. This will always involve "purchasing" it from the Microsoft Store, whether it's on Xbox or PC, and in order to facilitate this during development, the price should be set to free.
Use branches to manage free and actual retail prices so that sandboxes can always be assigned the free price while not interfering with retail pricing.
Below shows a product's pricing and availability being configured in two branches, with the "Sandbox" branch's price set to Free.
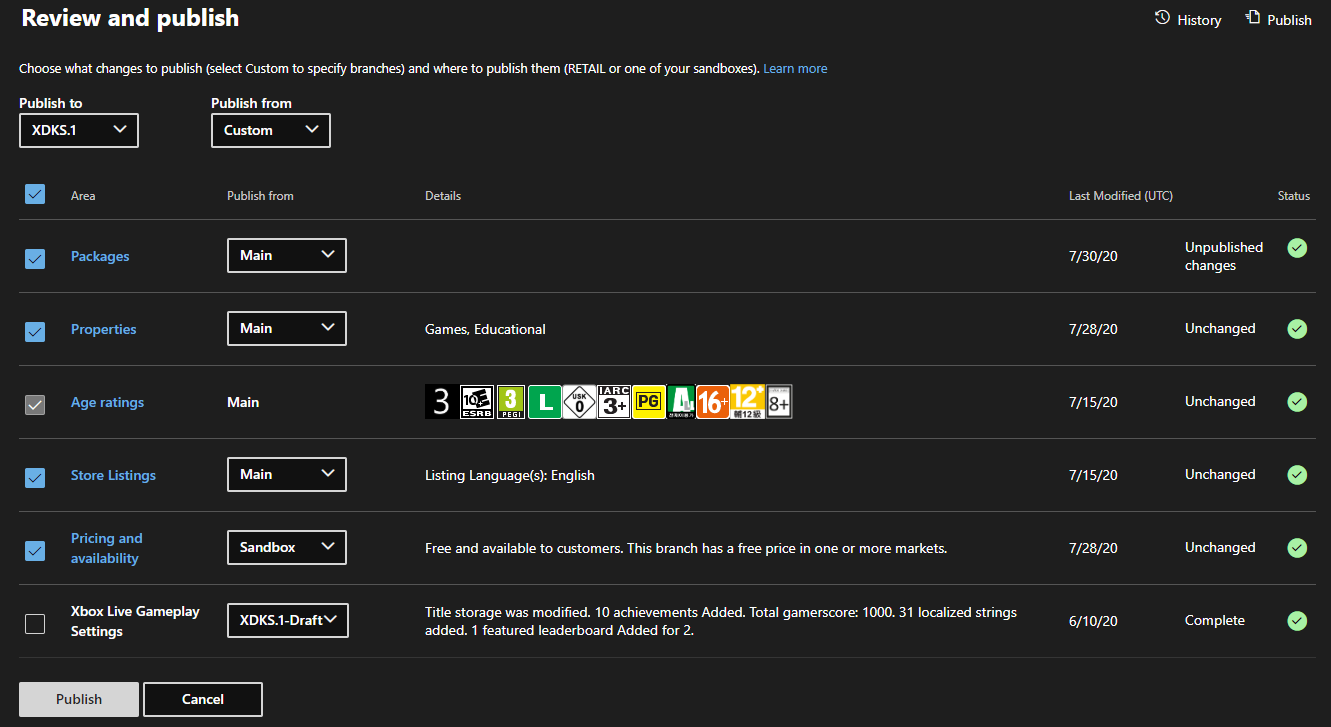
9. Publishing to sandbox
Once all of the above are configured, which by no means needs to represent anything final, select Review and publish to the developer sandbox. An initial publish may take up to eight hours or more to become live, depending on the size of the package. Subsequent publishes may be live quicker and can involve selecting specific areas to publish, depending on what has been changed.
Publishing add-ons
These steps are mostly similar when creating add-ons. Durables with packages will require a package upload as indicated in Uploading one or more packages; all other product types will not. Consumable product types will require a quantity.
Conclusion
Once the game has been published, it's time to verify by going to the Microsoft Store page for the product to see if it is acquirable and installable. See Xbox services Sandboxes overview and Switching sandboxes properly for Store operations for information on how to switch your sandbox properly to reach the Microsoft Store page.
Once this is verified as working, now move on to the Enabling XStore development and testing to learn about how to set up your build to actually be able to test commerce features using XStore API.
See also
Setting up an app or game at Partner Center