Authenticating your service with the Microsoft Store APIs
This topic describes how to get and use either delegated authentication XSTS tokens or User Store IDs to authenticate with Microsoft Store Services.
You can authenticate with the Microsoft Store APIs in the following two ways.
- User Store IDs and Microsoft Entra ID: Ties authentication and results to the user account that's signed in to the Microsoft Store app.
- Delegated Authentication XSTS tokens: Ties authentication and results to the Xbox services account of the user who's currently playing the game.
We recommend that new titles and services use the User Store ID authentication method for both PC titles and Xbox titles. XSTS tokens are scoped to the user who's playing the game, and in some cases on PC, might not be the account that's performing the purchase transactions. (For more information, see Handling mismatched store account scenarios on PC.) In addition, XSTS tokens aren't supported with some Microsoft Store Services such as the Recurrence and Purchase services. Future services and development for Microsoft Store will use User Store IDs and not XSTS tokens.
Titles that are planning on cross-platform commerce solutions or services should be using User Store IDs because they can be renewed without a client interaction. The XSTS authentication flow for services has a maximum lifetime of 30 days before a connection to an active client is required again.
Following are configuration and resources about how to get the proper authorization from the previously mentioned types.
Authenticating through delegated authentication XSTS tokens
A delegated authentication XSTS token can be used to authenticate the service-to-service calls by adding the Authorization header of the request in the following format.
Authorization: XBL3.0 x=<user hash>;<XSTS token>
The target relying party for the XSTS token must be https://licensing.xboxlive.com, the same as the legacy Xbox Inventory service. If your previous services were set up to call Xbox Inventory, you can reuse the same token with this endpoint. A signature header is also required where the signature that's generated matches the signature policy of the specified endpoint.
For more information about how to get, manage, and use a delegated authentication XSTS token and signature, see the following resources.
- Game Service Sample: A comprehensive web service sample that demonstrates validation and handling of XSTS tokens from the client, server-to-server authentication, commerce services, and more. Download the latest version from the GDK download site. Download the latest release of All Samples. Game Service Samples is under samples\Live\GameService in the downloaded .zip file.
- Xfest 2019 - XSTS Auth and Server to Server made Easy: Overview and explanation of XSTS tokens and how the Game Service Sample can help begin your own effort for service-to-service authentication. To download the presentation information, select GDK Track Downloads on the archive site.
- Xbox services authentication and service-to-service calls (NDA topic)Authorization required: More detailed documentation on authentication, XSTS tokens, and the required steps and calls to make service-to-service calls to Xbox services.
Additional configuration required to view and manage products with delegated authentication XSTS tokens
Because delegated authentication XSTS tokens are tied to a Business Partner from Partner Center, the products that you want to view or manage need to be linked to the Business Partner that your XSTS tokens are also tied to. This is done by configuring the items into a product and ensuring your target Business Partner is selected under the Game's Xbox Settings page in Partner Center. The product group is tied to a Studio ID that's defined in Partner Center. The Studio ID must have the same ID as the Business Partner that your XSTS tokens will be tied to.
The most common symptom for when your products aren't properly linked to the Business Partner ID in the XSTS tokens is that the calls to Collections will succeed, but there will be no items in the results. (For more information, see the forum post B2B call to Collections LicensePreview service returns empty results (Partner Center configured game).)
To properly configure your products and web services in Partner Center
Create a Business Partner Certificate by using the Generate Certificate link of the web service. (Select Developer Settings > Xbox Live > Web Services.) Choose the link in the row of the web service that your relying party is tied to.
Go to the Business Partner management UI (Select Developer Settings > Xbox Live > Business Partner) and copy the Business Partner ID that matches the one from the web service you used above. (Example Business Partner ID: 12345678-9012-3456-7890-123456789012)
From the Partner Center Overview page of your products, select Create a new and then select Product group.
Assign this product group to a Dev Studio, or select Create a new developer studio if you don't have one yet.
The Dev Studio that you selected or created must have its Studio ID match your Business Partner ID that you retrieved from step 2 in these instructions. Copy this value into the Dev Studio ID (optional) text box. If there's already a value in this box, we recommend that you create a new Dev Studio and not change the existing value. If the value is changed but is already being used by existing titles, this change might cause existing services and business-to-business calls to fail.
After the Dev Studio is configured with the matching ID of the Business Partner, return to your created Product Group. Add your game and all the products into the Included in this product group list.
Select Save to finish creating the product group.
Go to your game's Xbox Settings UI and ensure the linked Business Partner is the same one used from the steps above.
Republish all the items in the product group to Microsoft Store in your sandbox or developer environment.
After the publishing process has been completed, you should see proper items being returned from the service calls.
Authenticating through Microsoft Entra ID and User Store IDs
All Microsoft Store service APIs support authentication through Microsoft Entra ID (formerly called Azure Active Directory) and User Store IDs. To use this authentication type, you (or your organization) must have a Microsoft Entra ID tenant and register an application ID under it. To register an application your account will need the Global administrator role under your tenant. If you already use Microsoft Office 365 or other business services from Microsoft, you already have a Microsoft Entra ID tenant that can be managed in your Azure portal.
For guidance about getting the needed User Store IDs for this authentication type, see Requesting a User Store ID for service-to-service authentication.
Note
On PC, entitlements are associated with the user who's signed in to the Microsoft Store app, instead of the user who's currently playing a title. Because of this and the accounts may be different, PC titles are encouraged to review the information in Handling mismatched store account scenarios on PC.
When you call the Microsoft Store APIs with the Entra ID flow, an Entra access token is used in the Authorization header of your request as follows.
Authorization: Bearer <Entra ID access token>
If you're working in a sandbox, you must specify which sandbox by adding the following claim to the JSON body of the request. Without this value, the sandbox scope of the results defaults to RETAIL.
Example:
"sbx": "XDKS.1"
You must also add the parameters as shown in the following table to the JSON body of the request with the User Store ID that you got from the client.
| Parameter | Type | Description | Required |
|---|---|---|---|
identityType |
string |
Specify the string value b2b. |
Yes |
identityValue |
string |
The User Store ID key that represents the identity of the user for whom you want to report a consumable product as fulfilled. | Yes |
localTicketReference |
string |
The requested identifier for the returned response. We recommend that you use the same value as the userId claim in the User Store ID key. | Yes |
Example:
  "beneficiaries": [
    {
        "identitytype" : "b2b",
        "identityValue" : "eyJ0eXAiOiJ...",
        "localTicketReference" : "testReference"
    }
  ],
For more information about how to get, manage, and use User Store ID authentication, see the following resources.
- Microsoft.StoreServices (GitHub): Source code and library to help simplify the process for authenticating with and calling Microsoft Store Services from your own back-end services. With these services, you can verify and manage user purchases that are made for your app or game within Microsoft Store (including Xbox consoles).
- Microsoft.StoreServices Sample (GitHub): A web service sample that highlights the use of the
Microsoft.StoreServiceslibrary to simplify the process of authenticating with and calling Microsoft Store Services from your own back-end services. This sample also provides example logic for managing consumable products and reconciling refunded purchases with the Clawback service. - Requesting a User Store ID for service-to-service authentication
- Renewing a User Store ID key
- Manage product entitlements from a service
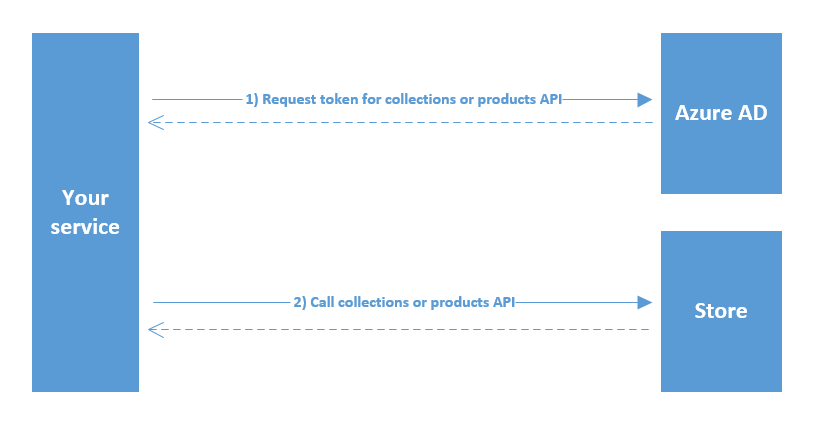
Diagram of calling a Microsoft Store API
The following diagram describes the process of calling a Microsoft Store API by using the User Store ID from your service.
Additional configuration required to view and manage products with a User Store ID / Microsoft Entra ID Auth
When setting up your service to use Microsoft Entra ID auth and User Store ID's, you need to add your Entra application client ID to your game's Product collections and purchases list in Partner Center. You are able to set two individual Client App IDs that will be able to see the product and its add-ons when calling the Collections and Purchase services. The most common symptom for when your products are not properly linked to your Entra application client ID is that the calls to Collections will succeed, but there will be no items in the results.
Configure your products to be visible to your service through Microsoft Entra ID and User Store IDs
From the Partner Center page of your game, select Product collections and purchases from the left panel.
Enter the Entra application's client ID that you are using to authenticate your service.
Click the Save button.
Republish the game product and all add-ons under the product to the Microsoft Store in your sandbox or developer environment.
After the publishing process has been completed, you should see proper items being returned from the service calls.
See also
Requesting a User Store ID for service-to-service authentication