Note
Access to this page requires authorization. You can try signing in or changing directories.
Access to this page requires authorization. You can try changing directories.
This simple guide shows you how to setup your organization in Partner Center with a free Microsoft Entra ID to ensure that members of your organization can access secure Xbox resources, such as documentation, downloads, and forums.
If you have an existing Microsoft Entra tenant, you can associate that with your Partner Center account by following the instructions at Associate Microsoft Entra ID with your Partner Center account.
Prerequisites
- A Partner Center account that has been onboarded for Xbox development.
Set up your organization
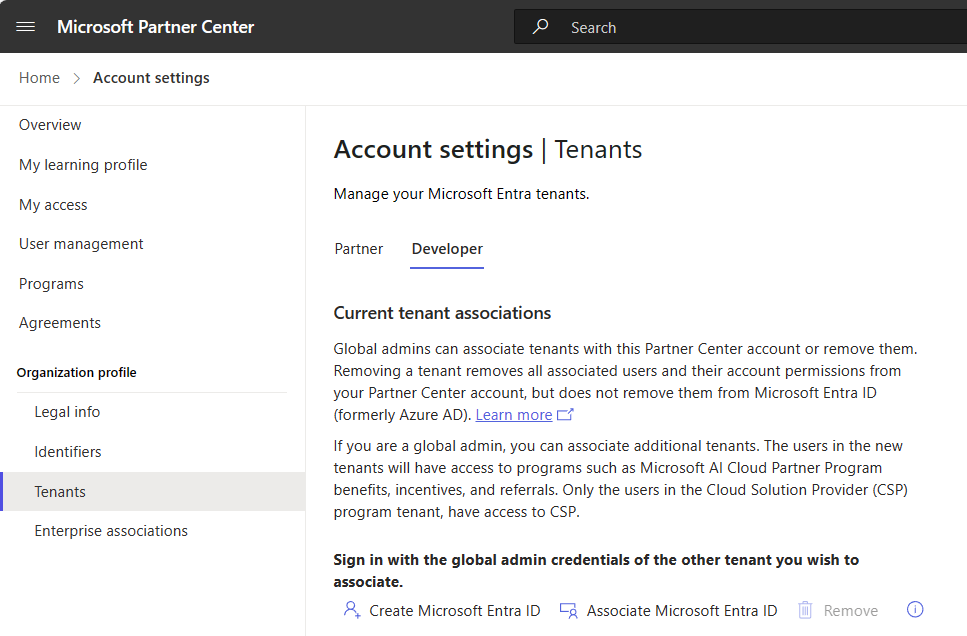
Sign into Partner Center as the account owner and visit your Account Settings (top right Cog menu).
Select Organization Profile -> Tenants under both the Partner and Developer tabs to see if a Microsoft Entra tenant has already been configured.
If no Microsoft Entra tenant has been associated with your account, then you can select Create Microsoft Entra ID button to create one, free of charge.
Fill out the details to create a Microsoft Entra ID under the yourOrganization.onmicrosoft.com domain name.
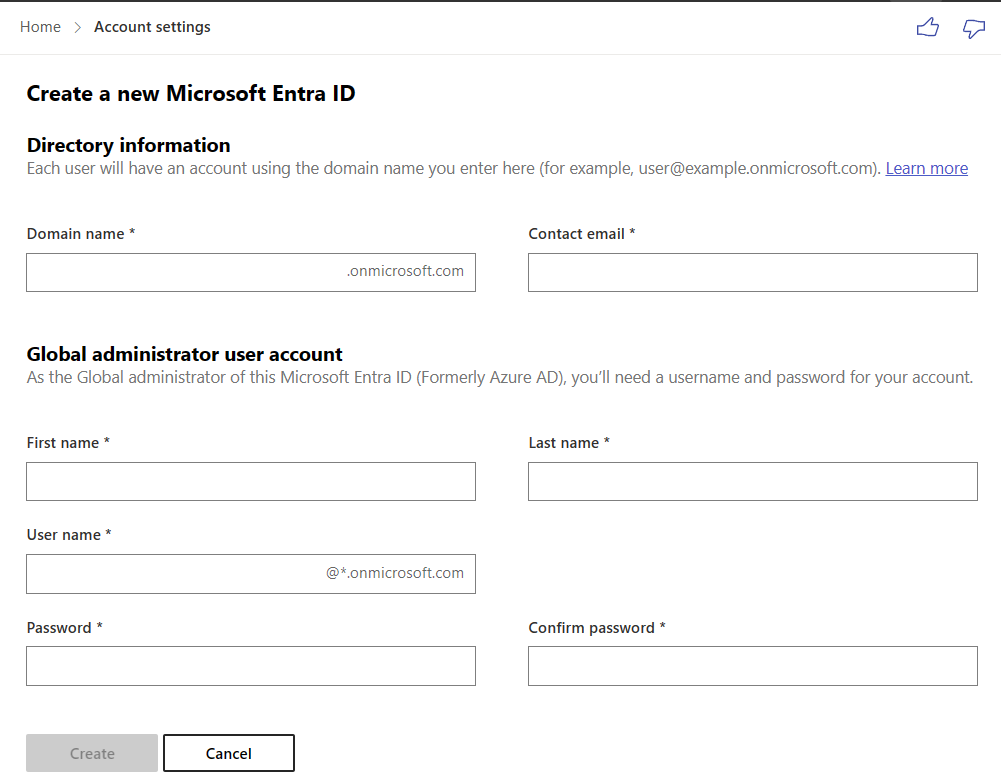
The Global Administrator is a user account created specifically to manage the Microsoft Entra ID.
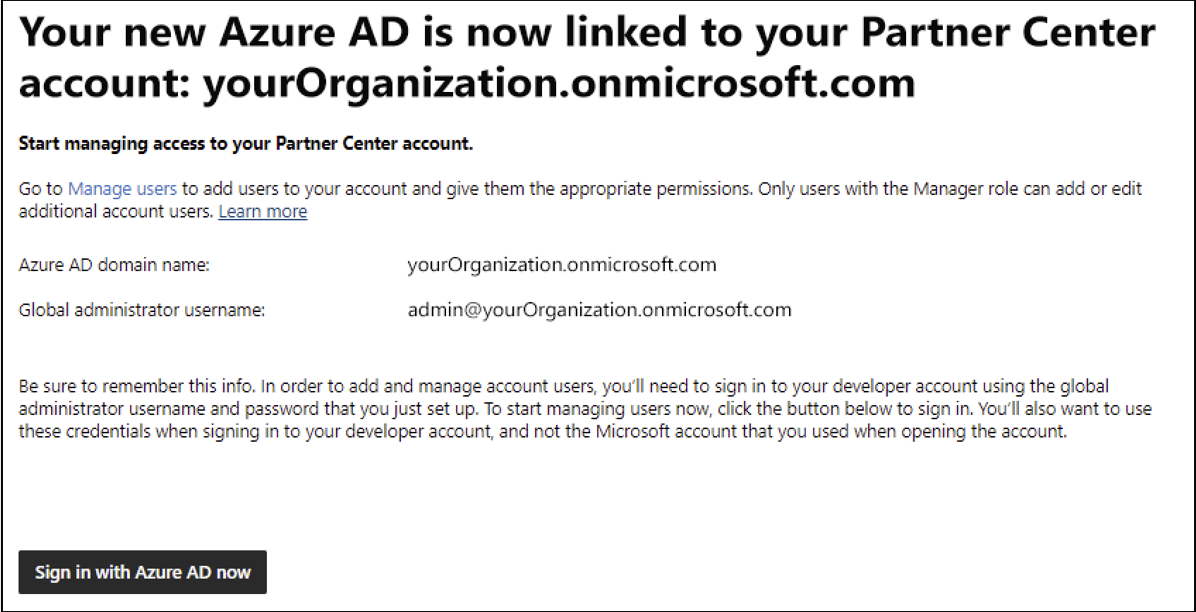
You can add users directly through Partner Center by signing in as the Partner Center account owner, viewing the account details, and select 'Add User'.
You have several options to add users to your Partner Center account. See the Manage users section below to choose the best option.
Have the user verify that they can access secure resources, such as the Xbox Game Development Home.
Manage users
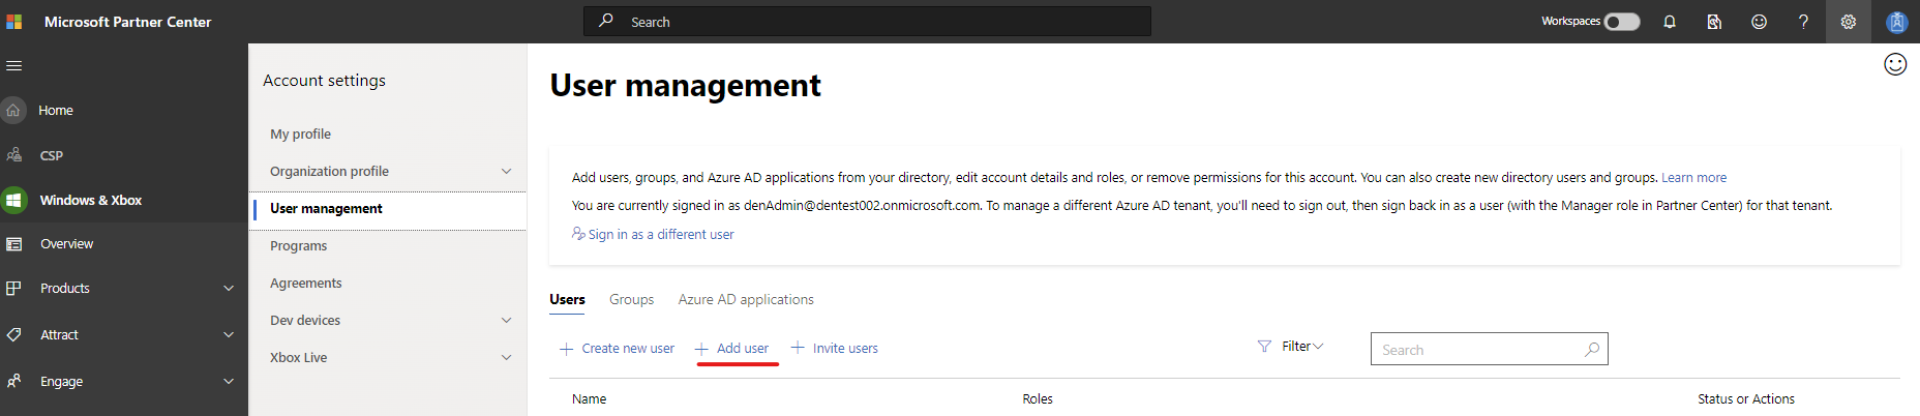
To manage users to your Partner Center account, go to the User management page in Account settings. You must be signed in with a Manager account for the Microsoft Entra tenant that you want to work in.
If you are signed in with a Manager account which also has global administrator permissions for the Microsoft Entra tenant you're working in, you will have the following options to add users to your Partner Center account:
- Add existing users: Choose users who already exist in your organization's directory and give them access to your Partner Center account, using the method described above.
- Create new users: Create brand new user accounts to add to both your organization's directory and your Partner Center account
- Invite outside users: Send email invites to users who are not currently in your organization's directory. They will be invited to access your Partner Center account, and a new guest user account will be created for them in your Microsoft Entra tenant.
You must either create the new user (or invite them as a guest from another tenant) within Partner Center or use the Partner Center UI to Add user if the user already exists in your Microsoft Entra tenant (as a native account or as a guest).
If the user already exists in the Microsoft Entra tenant, you can verify if they already have access by selecting Add existing users and ensuring that the check box next to their name is checked.
Otherwise you can select either Create new users or Invite outside users to make a new account native to the Microsoft Entra tenant associated with the Partner Center account, or to invite someone from another Microsoft Entra tenant to the associated tenant and Partner Center account as a guest. Both of these options will add the new user to both your associated Microsoft Entra tenant and to the Partner Center account.
Add existing users
You can select users who already exist in your organization's tenant and give them access to your Partner Center account.
If the user already exists in your Microsoft Entra tenant, you can choose this option to verify that
- From the User management page, select Add existing users.
- Select one or more users from the list that appears. You can use the search box to search for specific users.
Tip
If you select more than one user to add to your Partner Center account, you must assign them the same role or set of custom permissions. To add multiple users with different roles/permissions, repeat the steps below for each role or set of custom permissions.
- When you are finished selecting users, click Add selected.
Note
It is important to understand what each Partner Center Role has permission to do before assigning it to a user. To learn more, see Set roles or custom permissions for account users. Many organizations set their users up with the Developer role.
- In the Roles section, specify the role(s) or customized permissions for the selected user(s).
- Click Save.
Create new users
Important
You must be signed in with a global administrator account in your Microsoft Entra tenant in order to create new users.
- From the Users page (under Account settings), select Add users, then choose Create new users.
- Enter the first name, last name, and username for the new user.
- If you want the new user to have a global administrator account in your organization's directory, check the box labeled Make this user a Global administrator in your Microsoft Entra ID, with full control over all directory resources. This will give the user full access to all administrative features in your company's Microsoft Entra ID. They'll be able to add and manage users in your organization's directory (though not in Partner Center, unless you grant the account the appropriate role/permissions). If you check this box, you'll need to provide a Password recovery email for the user.
- If you checked the box to Make this user a Global administrator in your Microsoft Entra ID, enter an email that the user can use if they need to recover their password.
- In the Group membership section, select any groups to which you want the new user to belong.
- In the Roles section, specify the role(s) or customized permissions for the user.
- Click Save.
- On the confirmation page, you'll see login info for the new user, including a temporary password. Be sure to note this info and provide it to the new user, as you won't be able to access the temporary password after you leave this page.
Invite outside users
Important
You must be signed in with a global administrator account in your Microsoft Entra tenant in order to invite outside users.
- From the Users page (under Account settings), select Add users, then choose Invite users by email.
- Enter one or more email addresses (up to ten), separated by commas or semicolons.
- In the Roles section, specify the role(s) or customized permissions for the user.
- Click Save.
The users you invited will get an email invitation to join your account, and a new guest user account will be created for them in your Microsoft Entra tenant. Each user will need to accept their invitation before they can access your account.
If you need to resend an invitation, find the user on your Users page and select their email address (or the text that says Invitation pending). Then, at the bottom of the page, click Resend invitation.
Important
Outside users that you invite to join your Partner Center account can be assigned the same roles and permissions as other users. However, outside users will not be able to perform certain tasks in Visual Studio, such as associating an app with the Store, or creating packages to upload to the Store. If a user needs to perform those tasks, choose Create new users instead of Invite outside users. (If you don't want to add these users to your existing Microsoft Entra tenant, you can create a new tenant, then create new user accounts for them in that tenant.)
Troubleshooting user access issues
If a member of your organization is having trouble accessing secure resources, and they have verified that they are using the correct account and Microsoft Entra ID, you can try the following:
Avoid using nested groups
A nested group is a group inside of another group. While groups are supported within our permissions model, nested groups are not. If you added a user via a group in another group, their permissions will not be recognized.
Delete the user and re-add them
Unfortunately, there is no way to tell if someone was added correctly or not. If you are unsure if someone was added correctly you can remove them by clicking the Delete link next to their name on the User management page and selecting Delete from account. You can then re-add them the correct way. Be sure to re-apply any roles that they had before deletion when you re-add them.
Next steps
For more information about managing your Partner Center account, see the following links: