Use app-only authentication with the Microsoft Graph CLI
The Microsoft Graph command-line interface (CLI) supports two types of authentication: delegated access, and app-only access. This topic describes the configuration needed to enable app-only access.
Note
App-only access grants permissions directly to an application, and requires an administrator to consent to the required permission scopes. For more information, see Microsoft identity platform and the OAuth 2.0 client credentials flow.
In this topic, you'll configure app-only access for a simple script to list users and groups in your Microsoft 365 tenant.
Configuration
Before you can use app-only access with the SDK, you need the following:
- A certificate to use as a credential for the application. This can be a self-signed certificate or a certificate from an authority. For details about how to create a self-signed certificate, see the Related content section.
- Register an application in Microsoft Entra ID, configure it with the permission scopes your scenario requires, and share the public key for your certificate.
Certificate
You'll need an X.509 certificate installed in your user's trusted store on the machine where you'll run the script. You'll also need the certificate's public key exported in .cer, .pem, or .crt format. You'll need the value of the certificate subject or its thumbprint.
Register the application
You can register the application in the Microsoft Entra admin center.
Sign in to the Microsoft Entra admin center.
Expand the Identity menu > select Applications > App registrations > New registration.
On the Register an application page, set the values as follows.
- Set Name to
Graph CLI App-Only. - Set Supported account types to Accounts in this organizational directory only.
- Leave Redirect URI blank.
- Set Name to
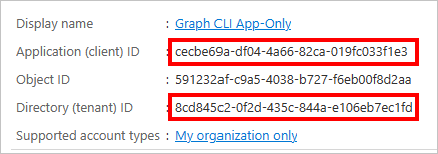
Select Register. On the Graph CLI App-Only page, copy the values of the Application (client) ID and Directory (tenant) ID and save them.
Under Manage, select API Permissions. Choose Add a permission.
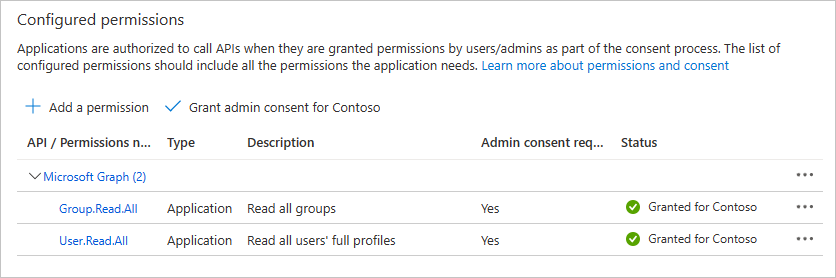
Select Microsoft Graph, then Application Permissions. Add User.Read.All and Group.Read.All, then select Add permissions.
In the Configured permissions, remove the delegated User.Read permission under Microsoft Graph by selecting the ... to the right of the permission and selecting Remove permission. Select Yes, remove to confirm.
Select the Grant admin consent for... button, then select Yes to grant admin consent for the configured application permissions. The Status column in the Configured permissions table changes to Granted for ....
Under Manage, select Certificates & secrets, then select the Certificates tab. Select the Upload certificate button. Browse to your certificate's public key file and select Add.
Authenticate
You should have three pieces of information after completing the previous configuration steps:
- Certificate subject or thumbprint of the certificate uploaded to your Microsoft Entra app registration.
- Application ID for your app registration.
- Your tenant ID.
You'll use this information to test authentication. Open PowerShell and run the following command, replacing the placeholders with your information.
mgc login --client-id YOUR_APP_ID --tenant-id YOUR_TENANT_ID --certificate-name "YOUR_CERT_SUBJECT" --strategy ClientCertificate
Alternatively, you can use the certificate thumbprint instead of the subject.
mgc login --client-id YOUR_APP_ID --tenant-id YOUR_TENANT_ID --certificate-thumb-print "YOUR_CERT_THUMBPRINT" --strategy ClientCertificate
List users and groups
Run the following command to list the first 50 users in your tenant, formatted as a table.
mgc users list --select displayName,id --top 50 --output TABLE
The command returns users' display names and IDs in a table.
┌────────────────────────────────────┬──────────────────────────────────────────────────┐
│ displayName                        │ id                                               │
├────────────────────────────────────┼──────────────────────────────────────────────────┤
│ Conf Room Adams                    │ 70214bd8-c3eb-4ec4-8c3e-9027b2764c52             │
│ Adele Vance                        │ 05fb57bf-2653-4396-846d-2f210a91d9cf             │
│ MOD Administrator                  │ 965d30b5-f1ba-4f59-90f0-4d81dfb1aa42             │
│ Alex Wilber                        │ a36fe267-a437-4d24-b39e-7344774d606c             │
│ Allan Deyoung                      │ 54cebbaa-2c56-47ec-b878-c8ff309746b0             │
└────────────────────────────────────┴──────────────────────────────────────────────────┘
Run the following command to list the first 50 groups in your tenant, formatted as JSON.
mgc groups list --select displayName,id --top 50
The command returns groups' display names and IDs in JSON format.
{
  "@odata.context": "https://graph.microsoft.com/v1.0/$metadata#groups(displayName,id)",
  "value": [
    {
      "displayName": "Parents of Contoso",
      "id": "1a0405b3-57d1-48fc-ad18-6cb63b350826"
    },
    {
      "displayName": "Digital Initiative Public Relations",
      "id": "22cf3814-dbef-4eb0-abe3-759b320b7d76"
    },
    {
      "displayName": "Communications",
      "id": "268360c5-ad3a-44c0-b35c-cef473609d9d"
    },
    {
      "displayName": "Paralegals",
      "id": "2fb31b50-4c46-4ae9-8177-19347e68ce8e"
    },
    {
      "displayName": "Leadership",
      "id": "364fad81-7c37-455d-94bb-7d5a209c42fe"
    },
  ]
}
Sign out
Finally, sign out of the CLI.
mgc logout