Microsoft Entra ID Protection offers organizations insights into identity-based risks and methods to investigate and automatically remediate these risks. This tutorial guides you through using ID Protection APIs to identify risks and set up workflows for confirming compromises or enabling remediation.
In this tutorial, you learn how to use ID Protection APIs to:
- Generate a risky sign-in.
- Allow users with risky sign-ins to remediate the risk status with a Conditional Access policy that requires multi-factor authentication (MFA).
- Block a user from signing in using a Conditional Access policy.
- Dismiss a user risk.
Prerequisites
To complete this tutorial, ensure you have:
- A Microsoft Entra tenant with a Microsoft Entra ID P1 or P2 license.
- Access to an API client like Graph Explorer, signed in with an account that has the Conditional Access Administrator role.
- The following delegated permissions: IdentityRiskEvent.Read.All, IdentityRiskyUser.ReadWrite.All, Policy.Read.All, Policy.ReadWrite.ConditionalAccess, and User.ReadWrite.All.
- A test user account to sign in to an anonymous session to trigger a risk detection. Use a private browsing session or the Tor browser. In this tutorial, the test user mail nickname is
MyTestUser1.
Step 1: Trigger a risk detection
In the anonymous browser session, sign in to the Microsoft Entra admin centre as MyTestUser1.
Step 2: List risk detections
When MyTestUser1 signed in to the Microsoft Entra admin center using the anonymous browser, an anonymizedIPAddress risk event was detected. You can use the $filter query parameter to get only the risk detections that are associated with the MyTestUser1 user account. It might take a few minutes for the event to be returned.
Request
GET https://graph.microsoft.com/v1.0/identityProtection/riskDetections?$filter=userDisplayName eq 'MyTestUser1'
// Code snippets are only available for the latest version. Current version is 5.x

// To initialize your graphClient, see https://learn.microsoft.com/en-us/graph/sdks/create-client?from=snippets&tabs=csharp
var result = await graphClient.IdentityProtection.RiskDetections.GetAsync((requestConfiguration) =>
{
	requestConfiguration.QueryParameters.Filter = "userDisplayName eq 'MyTestUser1'";
});
Read the SDK documentation for details on how to add the SDK to your project and create an authProvider instance.
// Code snippets are only available for the latest major version. Current major version is $v1.*

// Dependencies
import (
	  "context"
	  msgraphsdk "github.com/microsoftgraph/msgraph-sdk-go"
	  graphidentityprotection "github.com/microsoftgraph/msgraph-sdk-go/identityprotection"
	  //other-imports
)


requestFilter := "userDisplayName eq 'MyTestUser1'"

requestParameters := &graphidentityprotection.IdentityProtectionRiskDetectionsRequestBuilderGetQueryParameters{
	Filter: &requestFilter,
}
configuration := &graphidentityprotection.IdentityProtectionRiskDetectionsRequestBuilderGetRequestConfiguration{
	QueryParameters: requestParameters,
}

// To initialize your graphClient, see https://learn.microsoft.com/en-us/graph/sdks/create-client?from=snippets&tabs=go
riskDetections, err := graphClient.IdentityProtection().RiskDetections().Get(context.Background(), configuration)
Read the SDK documentation for details on how to add the SDK to your project and create an authProvider instance.
// Code snippets are only available for the latest version. Current version is 6.x

GraphServiceClient graphClient = new GraphServiceClient(requestAdapter);

RiskDetectionCollectionResponse result = graphClient.identityProtection().riskDetections().get(requestConfiguration -> {
	requestConfiguration.queryParameters.filter = "userDisplayName eq 'MyTestUser1'";
});
Read the SDK documentation for details on how to add the SDK to your project and create an authProvider instance.
const options = {
	authProvider,
};

const client = Client.init(options);

let riskDetections = await client.api('/identityProtection/riskDetections')
	.filter('userDisplayName eq \'MyTestUser1\'')
	.get();
Read the SDK documentation for details on how to add the SDK to your project and create an authProvider instance.
<?php
use Microsoft\Graph\GraphServiceClient;
use Microsoft\Graph\Generated\IdentityProtection\RiskDetections\RiskDetectionsRequestBuilderGetRequestConfiguration;


$graphServiceClient = new GraphServiceClient($tokenRequestContext, $scopes);

$requestConfiguration = new RiskDetectionsRequestBuilderGetRequestConfiguration();
$queryParameters = RiskDetectionsRequestBuilderGetRequestConfiguration::createQueryParameters();
$queryParameters->filter = "userDisplayName eq 'MyTestUser1'";
$requestConfiguration->queryParameters = $queryParameters;


$result = $graphServiceClient->identityProtection()->riskDetections()->get($requestConfiguration)->wait();
Read the SDK documentation for details on how to add the SDK to your project and create an authProvider instance.
# Code snippets are only available for the latest version. Current version is 1.x
from msgraph import GraphServiceClient
from msgraph.generated.identity_protection.risk_detections.risk_detections_request_builder import RiskDetectionsRequestBuilder
from kiota_abstractions.base_request_configuration import RequestConfiguration
# To initialize your graph_client, see https://learn.microsoft.com/en-us/graph/sdks/create-client?from=snippets&tabs=python
query_params = RiskDetectionsRequestBuilder.RiskDetectionsRequestBuilderGetQueryParameters(
		filter = "userDisplayName eq 'MyTestUser1'",
)

request_configuration = RequestConfiguration(
query_parameters = query_params,
)

result = await graph_client.identity_protection.risk_detections.get(request_configuration = request_configuration)
Read the SDK documentation for details on how to add the SDK to your project and create an authProvider instance.
Response
HTTP/1.1 20O OK
Content-type: application/json

{
  "@odata.context": "https://graph.microsoft.com/v1.0/$metadata#riskDetections",
  "value": [
    {
      "id": "d52a631815aaa527bf642b196715da5cf0f35b6879204ea5b5c99b21bd4c16f4",
      "requestId": "06f7fd18-b8f1-407d-86a3-f6cbe3a4be00",
      "correlationId": "2a38abff-5701-4073-a81e-fd3aac09cba3",
      "riskType": "anonymizedIPAddress",
      "riskEventType": "anonymizedIPAddress",
      "riskState": "atRisk",
      "riskLevel": "medium",
      "riskDetail": "none",
      "source": "IdentityProtection",
      "detectionTimingType": "realtime",
      "activity": "signin",
      "tokenIssuerType": "AzureAD",
      "ipAddress": "178.17.170.23",
      "activityDateTime": "2020-11-03T20:51:34.6245276Z",
      "detectedDateTime": "2020-11-03T20:51:34.6245276Z",
      "lastUpdatedDateTime": "2020-11-03T20:53:12.1984203Z",
      "userId": "4628e7df-dff3-407c-a08f-75f08c0806dc",
      "userDisplayName": "MyTestUser1",
      "userPrincipalName": "MyTestUser1@contoso.com",
      "additionalInfo": "[{\"Key\":\"userAgent\",\"Value\":\"Mozilla/5.0 (Windows NT 10.0; rv:78.0) Gecko/20100101 Firefox/78.0\"}]",
      "location": {
        "city": "Chisinau",
        "state": "Chisinau",
        "countryOrRegion": "MD",
        "geoCoordinates": {
          "latitude": 47.0269,
          "longitude": 28.8416
        }
      }
    }
  ]
}
Step 3: Create a Conditional Access policy
Conditional Access policies allow users to self-remediate when a risk is detected, enabling them to securely access resources after completing the policy prompt. In this step, you'll create a Conditional Access policy that requires users to sign in using MFA if a medium or high-risk detection occurs.
Set up multifactor authentication
When setting up an account for MFA, choose the best authentication method for your situation.
- Sign in to the keep your account secure site using the MyTestUser1 account.
- Complete the MFA setup procedure using the appropriate method for your situation, such as using the Microsoft Authenticator app.
Create the Conditional Access policy
The Conditional Access policy lets you set conditions to identify sign-in risk levels. Risk levels can be low, medium, high, or none. The following example shows how to require MFA for sign-ins with medium and high risk levels.
Request
POST https://graph.microsoft.com/v1.0/identity/conditionalAccess/policies
Content-type: application/json

{
  "displayName": "Policy for risky sign-in",
  "state": "enabled",
  "conditions": {
    "signInRiskLevels": [
      "high",
      "medium"
    ],
    "applications": {
      "includeApplications": ["All"]
    },
    "users": {
      "includeUsers": [
        "4628e7df-dff3-407c-a08f-75f08c0806dc"
      ]
    }
  },
  "grantControls": {
    "operator": "OR",
    "builtInControls": [
      "mfa"
    ]
  }
}
// Code snippets are only available for the latest version. Current version is 5.x

// Dependencies
using Microsoft.Graph.Models;

var requestBody = new ConditionalAccessPolicy
{
	DisplayName = "Policy for risky sign-in",
	State = ConditionalAccessPolicyState.Enabled,
	Conditions = new ConditionalAccessConditionSet
	{
		SignInRiskLevels = new List<RiskLevel?>
		{
			RiskLevel.High,
			RiskLevel.Medium,
		},
		Applications = new ConditionalAccessApplications
		{
			IncludeApplications = new List<string>
			{
				"All",
			},
		},
		Users = new ConditionalAccessUsers
		{
			IncludeUsers = new List<string>
			{
				"4628e7df-dff3-407c-a08f-75f08c0806dc",
			},
		},
	},
	GrantControls = new ConditionalAccessGrantControls
	{
		Operator = "OR",
		BuiltInControls = new List<ConditionalAccessGrantControl?>
		{
			ConditionalAccessGrantControl.Mfa,
		},
	},
};

// To initialize your graphClient, see https://learn.microsoft.com/en-us/graph/sdks/create-client?from=snippets&tabs=csharp
var result = await graphClient.Identity.ConditionalAccess.Policies.PostAsync(requestBody);
Read the SDK documentation for details on how to add the SDK to your project and create an authProvider instance.
// Code snippets are only available for the latest major version. Current major version is $v1.*

// Dependencies
import (
	  "context"
	  msgraphsdk "github.com/microsoftgraph/msgraph-sdk-go"
	  graphmodels "github.com/microsoftgraph/msgraph-sdk-go/models"
	  //other-imports
)

requestBody := graphmodels.NewConditionalAccessPolicy()
displayName := "Policy for risky sign-in"
requestBody.SetDisplayName(&displayName)
state := graphmodels.ENABLED_CONDITIONALACCESSPOLICYSTATE
requestBody.SetState(&state)
conditions := graphmodels.NewConditionalAccessConditionSet()
signInRiskLevels := []graphmodels.RiskLevelable {
	riskLevel := graphmodels.HIGH_RISKLEVEL
	conditions.SetRiskLevel(&riskLevel)
	riskLevel := graphmodels.MEDIUM_RISKLEVEL
	conditions.SetRiskLevel(&riskLevel)
}
conditions.SetSignInRiskLevels(signInRiskLevels)
applications := graphmodels.NewConditionalAccessApplications()
includeApplications := []string {
	"All",
}
applications.SetIncludeApplications(includeApplications)
conditions.SetApplications(applications)
users := graphmodels.NewConditionalAccessUsers()
includeUsers := []string {
	"4628e7df-dff3-407c-a08f-75f08c0806dc",
}
users.SetIncludeUsers(includeUsers)
conditions.SetUsers(users)
requestBody.SetConditions(conditions)
grantControls := graphmodels.NewConditionalAccessGrantControls()
operator := "OR"
grantControls.SetOperator(&operator)
builtInControls := []graphmodels.ConditionalAccessGrantControlable {
	conditionalAccessGrantControl := graphmodels.MFA_CONDITIONALACCESSGRANTCONTROL
	grantControls.SetConditionalAccessGrantControl(&conditionalAccessGrantControl)
}
grantControls.SetBuiltInControls(builtInControls)
requestBody.SetGrantControls(grantControls)

// To initialize your graphClient, see https://learn.microsoft.com/en-us/graph/sdks/create-client?from=snippets&tabs=go
policies, err := graphClient.Identity().ConditionalAccess().Policies().Post(context.Background(), requestBody, nil)
Read the SDK documentation for details on how to add the SDK to your project and create an authProvider instance.
// Code snippets are only available for the latest version. Current version is 6.x

GraphServiceClient graphClient = new GraphServiceClient(requestAdapter);

ConditionalAccessPolicy conditionalAccessPolicy = new ConditionalAccessPolicy();
conditionalAccessPolicy.setDisplayName("Policy for risky sign-in");
conditionalAccessPolicy.setState(ConditionalAccessPolicyState.Enabled);
ConditionalAccessConditionSet conditions = new ConditionalAccessConditionSet();
LinkedList<RiskLevel> signInRiskLevels = new LinkedList<RiskLevel>();
signInRiskLevels.add(RiskLevel.High);
signInRiskLevels.add(RiskLevel.Medium);
conditions.setSignInRiskLevels(signInRiskLevels);
ConditionalAccessApplications applications = new ConditionalAccessApplications();
LinkedList<String> includeApplications = new LinkedList<String>();
includeApplications.add("All");
applications.setIncludeApplications(includeApplications);
conditions.setApplications(applications);
ConditionalAccessUsers users = new ConditionalAccessUsers();
LinkedList<String> includeUsers = new LinkedList<String>();
includeUsers.add("4628e7df-dff3-407c-a08f-75f08c0806dc");
users.setIncludeUsers(includeUsers);
conditions.setUsers(users);
conditionalAccessPolicy.setConditions(conditions);
ConditionalAccessGrantControls grantControls = new ConditionalAccessGrantControls();
grantControls.setOperator("OR");
LinkedList<ConditionalAccessGrantControl> builtInControls = new LinkedList<ConditionalAccessGrantControl>();
builtInControls.add(ConditionalAccessGrantControl.Mfa);
grantControls.setBuiltInControls(builtInControls);
conditionalAccessPolicy.setGrantControls(grantControls);
ConditionalAccessPolicy result = graphClient.identity().conditionalAccess().policies().post(conditionalAccessPolicy);
Read the SDK documentation for details on how to add the SDK to your project and create an authProvider instance.
const options = {
	authProvider,
};

const client = Client.init(options);

const conditionalAccessPolicy = {
  displayName: 'Policy for risky sign-in',
  state: 'enabled',
  conditions: {
    signInRiskLevels: [
      'high',
      'medium'
    ],
    applications: {
      includeApplications: ['All']
    },
    users: {
      includeUsers: [
        '4628e7df-dff3-407c-a08f-75f08c0806dc'
      ]
    }
  },
  grantControls: {
    operator: 'OR',
    builtInControls: [
      'mfa'
    ]
  }
};

await client.api('/identity/conditionalAccess/policies')
	.post(conditionalAccessPolicy);
Read the SDK documentation for details on how to add the SDK to your project and create an authProvider instance.
<?php
use Microsoft\Graph\GraphServiceClient;
use Microsoft\Graph\Generated\Models\ConditionalAccessPolicy;
use Microsoft\Graph\Generated\Models\ConditionalAccessPolicyState;
use Microsoft\Graph\Generated\Models\ConditionalAccessConditionSet;
use Microsoft\Graph\Generated\Models\RiskLevel;
use Microsoft\Graph\Generated\Models\ConditionalAccessApplications;
use Microsoft\Graph\Generated\Models\ConditionalAccessUsers;
use Microsoft\Graph\Generated\Models\ConditionalAccessGrantControls;
use Microsoft\Graph\Generated\Models\ConditionalAccessGrantControl;


$graphServiceClient = new GraphServiceClient($tokenRequestContext, $scopes);

$requestBody = new ConditionalAccessPolicy();
$requestBody->setDisplayName('Policy for risky sign-in');
$requestBody->setState(new ConditionalAccessPolicyState('enabled'));
$conditions = new ConditionalAccessConditionSet();
$conditions->setSignInRiskLevels([new RiskLevel('high'),new RiskLevel('medium'),	]);
$conditionsApplications = new ConditionalAccessApplications();
$conditionsApplications->setIncludeApplications(['All', 	]);
$conditions->setApplications($conditionsApplications);
$conditionsUsers = new ConditionalAccessUsers();
$conditionsUsers->setIncludeUsers(['4628e7df-dff3-407c-a08f-75f08c0806dc', 	]);
$conditions->setUsers($conditionsUsers);
$requestBody->setConditions($conditions);
$grantControls = new ConditionalAccessGrantControls();
$grantControls->setOperator('OR');
$grantControls->setBuiltInControls([new ConditionalAccessGrantControl('mfa'),	]);
$requestBody->setGrantControls($grantControls);

$result = $graphServiceClient->identity()->conditionalAccess()->policies()->post($requestBody)->wait();
Read the SDK documentation for details on how to add the SDK to your project and create an authProvider instance.
Import-Module Microsoft.Graph.Identity.SignIns

$params = @{
	displayName = "Policy for risky sign-in"
	state = "enabled"
	conditions = @{
		signInRiskLevels = @(
		"high"
	"medium"
)
applications = @{
	includeApplications = @(
	"All"
)
}
users = @{
includeUsers = @(
"4628e7df-dff3-407c-a08f-75f08c0806dc"
)
}
}
grantControls = @{
operator = "OR"
builtInControls = @(
"mfa"
)
}
}

New-MgIdentityConditionalAccessPolicy -BodyParameter $params
Read the SDK documentation for details on how to add the SDK to your project and create an authProvider instance.
# Code snippets are only available for the latest version. Current version is 1.x
from msgraph import GraphServiceClient
from msgraph.generated.models.conditional_access_policy import ConditionalAccessPolicy
from msgraph.generated.models.conditional_access_policy_state import ConditionalAccessPolicyState
from msgraph.generated.models.conditional_access_condition_set import ConditionalAccessConditionSet
from msgraph.generated.models.risk_level import RiskLevel
from msgraph.generated.models.conditional_access_applications import ConditionalAccessApplications
from msgraph.generated.models.conditional_access_users import ConditionalAccessUsers
from msgraph.generated.models.conditional_access_grant_controls import ConditionalAccessGrantControls
from msgraph.generated.models.conditional_access_grant_control import ConditionalAccessGrantControl
# To initialize your graph_client, see https://learn.microsoft.com/en-us/graph/sdks/create-client?from=snippets&tabs=python
request_body = ConditionalAccessPolicy(
	display_name = "Policy for risky sign-in",
	state = ConditionalAccessPolicyState.Enabled,
	conditions = ConditionalAccessConditionSet(
		sign_in_risk_levels = [
			RiskLevel.High,
			RiskLevel.Medium,
		],
		applications = ConditionalAccessApplications(
			include_applications = [
				"All",
			],
		),
		users = ConditionalAccessUsers(
			include_users = [
				"4628e7df-dff3-407c-a08f-75f08c0806dc",
			],
		),
	),
	grant_controls = ConditionalAccessGrantControls(
		operator = "OR",
		built_in_controls = [
			ConditionalAccessGrantControl.Mfa,
		],
	),
)

result = await graph_client.identity.conditional_access.policies.post(request_body)
Read the SDK documentation for details on how to add the SDK to your project and create an authProvider instance.
Response
HTTP/1.1 201 Created
Content-type: application/json

{
  "@odata.context": "https://graph.microsoft.com/v1.0/$metadata#identity/conditionalAccess/policies/$entity",
  "id": "9ad78153-b1f8-4714-adc1-1445727678a8",
  "displayName": "Policy for risky sign-in",
  "createdDateTime": "2020-11-03T20:56:38.6210843Z",
  "modifiedDateTime": null,
  "state": "enabled",
  "sessionControls": null,
  "conditions": {
    "signInRiskLevels": [
      "high",
      "medium"
    ],
    "clientAppTypes": [
      "all"
    ],
    "platforms": null,
    "locations": null,
    "applications": {
      "includeApplications": [
        "All"
      ],
      "excludeApplications": [],
      "includeUserActions": []
    },
    "users": {
      "includeUsers": [
        "4628e7df-dff3-407c-a08f-75f08c0806dc"
      ],
      "excludeUsers": [],
      "includeGroups": [],
      "excludeGroups": [],
      "includeRoles": [],
      "excludeRoles": []
    }
  },
  "grantControls": {
    "operator": "OR",
    "builtInControls": [
      "mfa"
    ],
    "customAuthenticationFactors": [],
    "termsOfUse": []
  }
}
Step 4: Trigger another risky sign in but complete multifactor authentication
By signing in to the anonymous browser, a risk is detected, but you remediate it by completing MFA.
Sign in to entra.microsoft.com using the MyTestUser1 account and complete the MFA process.
Step 5: List risk detections
Rerun the request in Step 2 to get the latest risk detection for the MyTestUser1 user account. Because MFA was completed in Step 4, the riskState for this latest sign in event is now remediated.
[Optional] Block the user from signing in
If you prefer to block users associated with risky sign-ins instead of allowing self-remediation, create a new Conditional Access policy. This policy will block users from signing in if a medium or high-risk detection occurs. The key difference from the policy in Step 3 is that the builtInControls is now set to block.
Request
POST https://graph.microsoft.com/v1.0/identity/conditionalAccess/policies
Content-type: application/json

{
  "displayName": "Policy for risky sign-in block access",
  "state": "enabled",
  "conditions": {
    "signInRiskLevels": [
      "high",
      "medium"
    ],
    "applications": {
      "includeApplications": ["All"]
    },
    "users": {
      "includeUsers": [
        "4628e7df-dff3-407c-a08f-75f08c0806dc"
      ]
    }
  },
  "grantControls": {
    "operator": "OR",
    "builtInControls": [
      "block"
    ]
  }
}
// Code snippets are only available for the latest version. Current version is 5.x

// Dependencies
using Microsoft.Graph.Models;

var requestBody = new ConditionalAccessPolicy
{
	DisplayName = "Policy for risky sign-in block access",
	State = ConditionalAccessPolicyState.Enabled,
	Conditions = new ConditionalAccessConditionSet
	{
		SignInRiskLevels = new List<RiskLevel?>
		{
			RiskLevel.High,
			RiskLevel.Medium,
		},
		Applications = new ConditionalAccessApplications
		{
			IncludeApplications = new List<string>
			{
				"All",
			},
		},
		Users = new ConditionalAccessUsers
		{
			IncludeUsers = new List<string>
			{
				"4628e7df-dff3-407c-a08f-75f08c0806dc",
			},
		},
	},
	GrantControls = new ConditionalAccessGrantControls
	{
		Operator = "OR",
		BuiltInControls = new List<ConditionalAccessGrantControl?>
		{
			ConditionalAccessGrantControl.Block,
		},
	},
};

// To initialize your graphClient, see https://learn.microsoft.com/en-us/graph/sdks/create-client?from=snippets&tabs=csharp
var result = await graphClient.Identity.ConditionalAccess.Policies.PostAsync(requestBody);
Read the SDK documentation for details on how to add the SDK to your project and create an authProvider instance.
// Code snippets are only available for the latest major version. Current major version is $v1.*

// Dependencies
import (
	  "context"
	  msgraphsdk "github.com/microsoftgraph/msgraph-sdk-go"
	  graphmodels "github.com/microsoftgraph/msgraph-sdk-go/models"
	  //other-imports
)

requestBody := graphmodels.NewConditionalAccessPolicy()
displayName := "Policy for risky sign-in block access"
requestBody.SetDisplayName(&displayName)
state := graphmodels.ENABLED_CONDITIONALACCESSPOLICYSTATE
requestBody.SetState(&state)
conditions := graphmodels.NewConditionalAccessConditionSet()
signInRiskLevels := []graphmodels.RiskLevelable {
	riskLevel := graphmodels.HIGH_RISKLEVEL
	conditions.SetRiskLevel(&riskLevel)
	riskLevel := graphmodels.MEDIUM_RISKLEVEL
	conditions.SetRiskLevel(&riskLevel)
}
conditions.SetSignInRiskLevels(signInRiskLevels)
applications := graphmodels.NewConditionalAccessApplications()
includeApplications := []string {
	"All",
}
applications.SetIncludeApplications(includeApplications)
conditions.SetApplications(applications)
users := graphmodels.NewConditionalAccessUsers()
includeUsers := []string {
	"4628e7df-dff3-407c-a08f-75f08c0806dc",
}
users.SetIncludeUsers(includeUsers)
conditions.SetUsers(users)
requestBody.SetConditions(conditions)
grantControls := graphmodels.NewConditionalAccessGrantControls()
operator := "OR"
grantControls.SetOperator(&operator)
builtInControls := []graphmodels.ConditionalAccessGrantControlable {
	conditionalAccessGrantControl := graphmodels.BLOCK_CONDITIONALACCESSGRANTCONTROL
	grantControls.SetConditionalAccessGrantControl(&conditionalAccessGrantControl)
}
grantControls.SetBuiltInControls(builtInControls)
requestBody.SetGrantControls(grantControls)

// To initialize your graphClient, see https://learn.microsoft.com/en-us/graph/sdks/create-client?from=snippets&tabs=go
policies, err := graphClient.Identity().ConditionalAccess().Policies().Post(context.Background(), requestBody, nil)
Read the SDK documentation for details on how to add the SDK to your project and create an authProvider instance.
// Code snippets are only available for the latest version. Current version is 6.x

GraphServiceClient graphClient = new GraphServiceClient(requestAdapter);

ConditionalAccessPolicy conditionalAccessPolicy = new ConditionalAccessPolicy();
conditionalAccessPolicy.setDisplayName("Policy for risky sign-in block access");
conditionalAccessPolicy.setState(ConditionalAccessPolicyState.Enabled);
ConditionalAccessConditionSet conditions = new ConditionalAccessConditionSet();
LinkedList<RiskLevel> signInRiskLevels = new LinkedList<RiskLevel>();
signInRiskLevels.add(RiskLevel.High);
signInRiskLevels.add(RiskLevel.Medium);
conditions.setSignInRiskLevels(signInRiskLevels);
ConditionalAccessApplications applications = new ConditionalAccessApplications();
LinkedList<String> includeApplications = new LinkedList<String>();
includeApplications.add("All");
applications.setIncludeApplications(includeApplications);
conditions.setApplications(applications);
ConditionalAccessUsers users = new ConditionalAccessUsers();
LinkedList<String> includeUsers = new LinkedList<String>();
includeUsers.add("4628e7df-dff3-407c-a08f-75f08c0806dc");
users.setIncludeUsers(includeUsers);
conditions.setUsers(users);
conditionalAccessPolicy.setConditions(conditions);
ConditionalAccessGrantControls grantControls = new ConditionalAccessGrantControls();
grantControls.setOperator("OR");
LinkedList<ConditionalAccessGrantControl> builtInControls = new LinkedList<ConditionalAccessGrantControl>();
builtInControls.add(ConditionalAccessGrantControl.Block);
grantControls.setBuiltInControls(builtInControls);
conditionalAccessPolicy.setGrantControls(grantControls);
ConditionalAccessPolicy result = graphClient.identity().conditionalAccess().policies().post(conditionalAccessPolicy);
Read the SDK documentation for details on how to add the SDK to your project and create an authProvider instance.
const options = {
	authProvider,
};

const client = Client.init(options);

const conditionalAccessPolicy = {
  displayName: 'Policy for risky sign-in block access',
  state: 'enabled',
  conditions: {
    signInRiskLevels: [
      'high',
      'medium'
    ],
    applications: {
      includeApplications: ['All']
    },
    users: {
      includeUsers: [
        '4628e7df-dff3-407c-a08f-75f08c0806dc'
      ]
    }
  },
  grantControls: {
    operator: 'OR',
    builtInControls: [
      'block'
    ]
  }
};

await client.api('/identity/conditionalAccess/policies')
	.post(conditionalAccessPolicy);
Read the SDK documentation for details on how to add the SDK to your project and create an authProvider instance.
<?php
use Microsoft\Graph\GraphServiceClient;
use Microsoft\Graph\Generated\Models\ConditionalAccessPolicy;
use Microsoft\Graph\Generated\Models\ConditionalAccessPolicyState;
use Microsoft\Graph\Generated\Models\ConditionalAccessConditionSet;
use Microsoft\Graph\Generated\Models\RiskLevel;
use Microsoft\Graph\Generated\Models\ConditionalAccessApplications;
use Microsoft\Graph\Generated\Models\ConditionalAccessUsers;
use Microsoft\Graph\Generated\Models\ConditionalAccessGrantControls;
use Microsoft\Graph\Generated\Models\ConditionalAccessGrantControl;


$graphServiceClient = new GraphServiceClient($tokenRequestContext, $scopes);

$requestBody = new ConditionalAccessPolicy();
$requestBody->setDisplayName('Policy for risky sign-in block access');
$requestBody->setState(new ConditionalAccessPolicyState('enabled'));
$conditions = new ConditionalAccessConditionSet();
$conditions->setSignInRiskLevels([new RiskLevel('high'),new RiskLevel('medium'),	]);
$conditionsApplications = new ConditionalAccessApplications();
$conditionsApplications->setIncludeApplications(['All', 	]);
$conditions->setApplications($conditionsApplications);
$conditionsUsers = new ConditionalAccessUsers();
$conditionsUsers->setIncludeUsers(['4628e7df-dff3-407c-a08f-75f08c0806dc', 	]);
$conditions->setUsers($conditionsUsers);
$requestBody->setConditions($conditions);
$grantControls = new ConditionalAccessGrantControls();
$grantControls->setOperator('OR');
$grantControls->setBuiltInControls([new ConditionalAccessGrantControl('block'),	]);
$requestBody->setGrantControls($grantControls);

$result = $graphServiceClient->identity()->conditionalAccess()->policies()->post($requestBody)->wait();
Read the SDK documentation for details on how to add the SDK to your project and create an authProvider instance.
Import-Module Microsoft.Graph.Identity.SignIns

$params = @{
	displayName = "Policy for risky sign-in block access"
	state = "enabled"
	conditions = @{
		signInRiskLevels = @(
		"high"
	"medium"
)
applications = @{
	includeApplications = @(
	"All"
)
}
users = @{
includeUsers = @(
"4628e7df-dff3-407c-a08f-75f08c0806dc"
)
}
}
grantControls = @{
operator = "OR"
builtInControls = @(
"block"
)
}
}

New-MgIdentityConditionalAccessPolicy -BodyParameter $params
Read the SDK documentation for details on how to add the SDK to your project and create an authProvider instance.
# Code snippets are only available for the latest version. Current version is 1.x
from msgraph import GraphServiceClient
from msgraph.generated.models.conditional_access_policy import ConditionalAccessPolicy
from msgraph.generated.models.conditional_access_policy_state import ConditionalAccessPolicyState
from msgraph.generated.models.conditional_access_condition_set import ConditionalAccessConditionSet
from msgraph.generated.models.risk_level import RiskLevel
from msgraph.generated.models.conditional_access_applications import ConditionalAccessApplications
from msgraph.generated.models.conditional_access_users import ConditionalAccessUsers
from msgraph.generated.models.conditional_access_grant_controls import ConditionalAccessGrantControls
from msgraph.generated.models.conditional_access_grant_control import ConditionalAccessGrantControl
# To initialize your graph_client, see https://learn.microsoft.com/en-us/graph/sdks/create-client?from=snippets&tabs=python
request_body = ConditionalAccessPolicy(
	display_name = "Policy for risky sign-in block access",
	state = ConditionalAccessPolicyState.Enabled,
	conditions = ConditionalAccessConditionSet(
		sign_in_risk_levels = [
			RiskLevel.High,
			RiskLevel.Medium,
		],
		applications = ConditionalAccessApplications(
			include_applications = [
				"All",
			],
		),
		users = ConditionalAccessUsers(
			include_users = [
				"4628e7df-dff3-407c-a08f-75f08c0806dc",
			],
		),
	),
	grant_controls = ConditionalAccessGrantControls(
		operator = "OR",
		built_in_controls = [
			ConditionalAccessGrantControl.Block,
		],
	),
)

result = await graph_client.identity.conditional_access.policies.post(request_body)
Read the SDK documentation for details on how to add the SDK to your project and create an authProvider instance.
Response
HTTP/1.1 201 Created
Content-type: application/json

{
  "@odata.context": "https://graph.microsoft.com/v1.0/$metadata#identity/conditionalAccess/policies/$entity",
  "id": "9ad78153-b1f8-4714-adc1-1445727678a8",
  "displayName": "Policy for risky sign-in block access",
  "createdDateTime": "2020-11-03T20:56:38.6210843Z",
  "modifiedDateTime": null,
  "state": "enabled",
  "sessionControls": null,
  "conditions": {
    "signInRiskLevels": [
      "high",
      "medium"
    ],
    "clientAppTypes": [
      "all"
    ],
    "platforms": null,
    "locations": null,
    "applications": {
      "includeApplications": [
        "All"
      ],
      "excludeApplications": [],
      "includeUserActions": []
    },
    "users": {
      "includeUsers": [
        "4628e7df-dff3-407c-a08f-75f08c0806dc"
      ],
      "excludeUsers": [],
      "includeGroups": [],
      "excludeGroups": [],
      "includeRoles": [],
      "excludeRoles": []
    }
  },
  "grantControls": {
    "operator": "OR",
    "builtInControls": [
      "block"
    ],
    "customAuthenticationFactors": [],
    "termsOfUse": []
  }
}
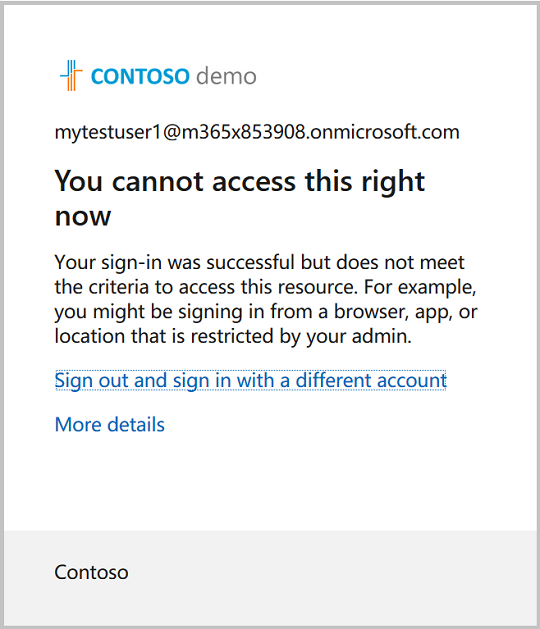
With this Conditional Access policy in place, MyTestUser1 account is now blocked from signing in due to a medium or high sign-in risk level.
Step 6: Dismiss risky users
If you believe the user isn't at risk and don't want to enforce a Conditional Access policy, manually dismiss the risky user as shown in the following request. The request returns a 204 No Content response.
Request
POST https://graph.microsoft.com/v1.0/identityProtection/riskyUsers/dismiss
Content-Type: application/json

{
  "userIds": [
    "4628e7df-dff3-407c-a08f-75f08c0806dc"
  ]
}
// Code snippets are only available for the latest version. Current version is 5.x

// Dependencies
using Microsoft.Graph.IdentityProtection.RiskyUsers.Dismiss;

var requestBody = new DismissPostRequestBody
{
	UserIds = new List<string>
	{
		"4628e7df-dff3-407c-a08f-75f08c0806dc",
	},
};

// To initialize your graphClient, see https://learn.microsoft.com/en-us/graph/sdks/create-client?from=snippets&tabs=csharp
await graphClient.IdentityProtection.RiskyUsers.Dismiss.PostAsync(requestBody);
Read the SDK documentation for details on how to add the SDK to your project and create an authProvider instance.
// Code snippets are only available for the latest major version. Current major version is $v1.*

// Dependencies
import (
	  "context"
	  msgraphsdk "github.com/microsoftgraph/msgraph-sdk-go"
	  graphidentityprotection "github.com/microsoftgraph/msgraph-sdk-go/identityprotection"
	  //other-imports
)

requestBody := graphidentityprotection.NewDismissPostRequestBody()
userIds := []string {
	"4628e7df-dff3-407c-a08f-75f08c0806dc",
}
requestBody.SetUserIds(userIds)

// To initialize your graphClient, see https://learn.microsoft.com/en-us/graph/sdks/create-client?from=snippets&tabs=go
graphClient.IdentityProtection().RiskyUsers().Dismiss().Post(context.Background(), requestBody, nil)
Read the SDK documentation for details on how to add the SDK to your project and create an authProvider instance.
// Code snippets are only available for the latest version. Current version is 6.x

GraphServiceClient graphClient = new GraphServiceClient(requestAdapter);

com.microsoft.graph.identityprotection.riskyusers.dismiss.DismissPostRequestBody dismissPostRequestBody = new com.microsoft.graph.identityprotection.riskyusers.dismiss.DismissPostRequestBody();
LinkedList<String> userIds = new LinkedList<String>();
userIds.add("4628e7df-dff3-407c-a08f-75f08c0806dc");
dismissPostRequestBody.setUserIds(userIds);
graphClient.identityProtection().riskyUsers().dismiss().post(dismissPostRequestBody);
Read the SDK documentation for details on how to add the SDK to your project and create an authProvider instance.
const options = {
	authProvider,
};

const client = Client.init(options);

const dismiss = {
  userIds: [
    '4628e7df-dff3-407c-a08f-75f08c0806dc'
  ]
};

await client.api('/identityProtection/riskyUsers/dismiss')
	.post(dismiss);
Read the SDK documentation for details on how to add the SDK to your project and create an authProvider instance.
<?php
use Microsoft\Graph\GraphServiceClient;
use Microsoft\Graph\Generated\IdentityProtection\RiskyUsers\Dismiss\DismissPostRequestBody;


$graphServiceClient = new GraphServiceClient($tokenRequestContext, $scopes);

$requestBody = new DismissPostRequestBody();
$requestBody->setUserIds(['4628e7df-dff3-407c-a08f-75f08c0806dc', 	]);

$graphServiceClient->identityProtection()->riskyUsers()->dismiss()->post($requestBody)->wait();
Read the SDK documentation for details on how to add the SDK to your project and create an authProvider instance.
Import-Module Microsoft.Graph.Identity.SignIns

$params = @{
	userIds = @(
	"4628e7df-dff3-407c-a08f-75f08c0806dc"
)
}

Invoke-MgDismissRiskyUser -BodyParameter $params
Read the SDK documentation for details on how to add the SDK to your project and create an authProvider instance.
# Code snippets are only available for the latest version. Current version is 1.x
from msgraph import GraphServiceClient
from msgraph.generated.identityprotection.riskyusers.dismiss.dismiss_post_request_body import DismissPostRequestBody
# To initialize your graph_client, see https://learn.microsoft.com/en-us/graph/sdks/create-client?from=snippets&tabs=python
request_body = DismissPostRequestBody(
	user_ids = [
		"4628e7df-dff3-407c-a08f-75f08c0806dc",
	],
)

await graph_client.identity_protection.risky_users.dismiss.post(request_body)
Read the SDK documentation for details on how to add the SDK to your project and create an authProvider instance.
After dismissing the risk user, you can rerun the request in Step 2 and will notice that the MyTestUser1 user account now has a risk level of none and a riskState of dismissed.
Step 7: Clean up resources
In this step, delete the two Conditional Access policies you created. The request returns a 204 No Content response.
DELETE https://graph.microsoft.com/v1.0/identity/conditionalAccess/policies/9ad78153-b1f8-4714-adc1-1445727678a8
// Code snippets are only available for the latest version. Current version is 5.x

// To initialize your graphClient, see https://learn.microsoft.com/en-us/graph/sdks/create-client?from=snippets&tabs=csharp
await graphClient.Identity.ConditionalAccess.Policies["{conditionalAccessPolicy-id}"].DeleteAsync();
Read the SDK documentation for details on how to add the SDK to your project and create an authProvider instance.
// Code snippets are only available for the latest major version. Current major version is $v1.*

// Dependencies
import (
	  "context"
	  msgraphsdk "github.com/microsoftgraph/msgraph-sdk-go"
	  //other-imports
)


// To initialize your graphClient, see https://learn.microsoft.com/en-us/graph/sdks/create-client?from=snippets&tabs=go
graphClient.Identity().ConditionalAccess().Policies().ByConditionalAccessPolicyId("conditionalAccessPolicy-id").Delete(context.Background(), nil)
Read the SDK documentation for details on how to add the SDK to your project and create an authProvider instance.
// Code snippets are only available for the latest version. Current version is 6.x

GraphServiceClient graphClient = new GraphServiceClient(requestAdapter);

graphClient.identity().conditionalAccess().policies().byConditionalAccessPolicyId("{conditionalAccessPolicy-id}").delete();
Read the SDK documentation for details on how to add the SDK to your project and create an authProvider instance.
const options = {
	authProvider,
};

const client = Client.init(options);

await client.api('/identity/conditionalAccess/policies/9ad78153-b1f8-4714-adc1-1445727678a8')
	.delete();
Read the SDK documentation for details on how to add the SDK to your project and create an authProvider instance.
<?php
use Microsoft\Graph\GraphServiceClient;


$graphServiceClient = new GraphServiceClient($tokenRequestContext, $scopes);


$graphServiceClient->identity()->conditionalAccess()->policies()->byConditionalAccessPolicyId('conditionalAccessPolicy-id')->delete()->wait();
Read the SDK documentation for details on how to add the SDK to your project and create an authProvider instance.
Import-Module Microsoft.Graph.Identity.SignIns

Remove-MgIdentityConditionalAccessPolicy -ConditionalAccessPolicyId $conditionalAccessPolicyId
Read the SDK documentation for details on how to add the SDK to your project and create an authProvider instance.
# Code snippets are only available for the latest version. Current version is 1.x
from msgraph import GraphServiceClient
# To initialize your graph_client, see https://learn.microsoft.com/en-us/graph/sdks/create-client?from=snippets&tabs=python

await graph_client.identity.conditional_access.policies.by_conditional_access_policy_id('conditionalAccessPolicy-id').delete()
Read the SDK documentation for details on how to add the SDK to your project and create an authProvider instance.
Related content