Build JavaScript apps with Microsoft Graph
This tutorial teaches you how to build a JavaScript console app that uses the Microsoft Graph API to access data on behalf of a user.
Note
To learn how to use Microsoft Graph to access data using app-only authentication, see this app-only authentication tutorial.
In this tutorial, you will:
Tip
As an alternative to following this tutorial, you can download the completed code through the quick start tool, which automates app registration and configuration. The downloaded code works without any modifications required.
You can also download or clone the GitHub repository and follow the instructions in the README to register an application and configure the project.
Prerequisites
Before you start this tutorial, you should have Node.js installed on your development machine.
You should also have a Microsoft work or school account with an Exchange Online mailbox. If you don't have a Microsoft 365 tenant, you might qualify for one through the Microsoft 365 Developer Program; for details, see the FAQ. Alternatively, you can sign up for a 1-month free trial or purchase a Microsoft 365 plan.
Note
This tutorial was written with Node.js version 16.14.2. The steps in this guide may work with other versions, but that has not been tested.
Register the app in the portal
In this exercise you will register a new application in Azure Active Directory to enable user authentication. You can register an application using the Microsoft Entra admin center, or by using the Microsoft Graph PowerShell SDK.
Register application for user authentication
In this section you will register an application that supports user authentication using device code flow.
Open a browser and navigate to the Microsoft Entra admin center and login using a Global administrator account.
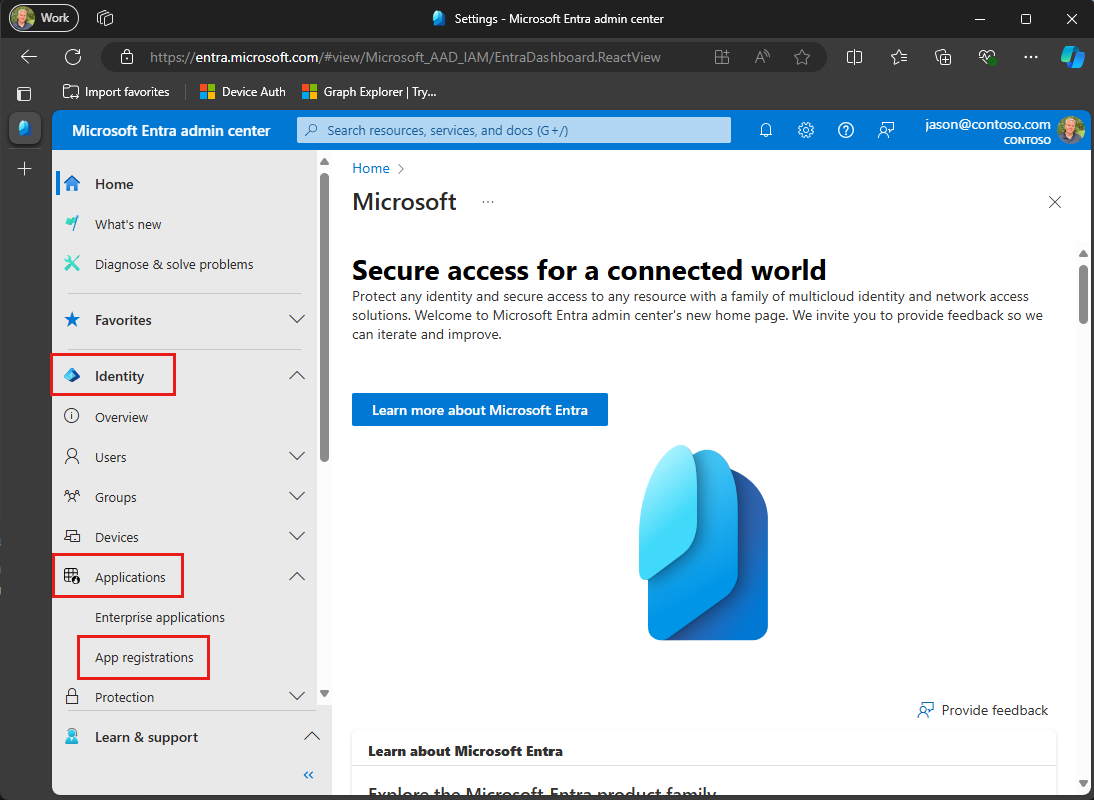
Select Microsoft Entra ID in the left-hand navigation, expand Identity, expand Applications, then select App registrations.
Select New registration. Enter a name for your application, for example,
Graph User Auth Tutorial
.Set Supported account types as desired. The options are:
Option Who can sign in? Accounts in this organizational directory only Only users in your Microsoft 365 organization Accounts in any organizational directory Users in any Microsoft 365 organization (work or school accounts) Accounts in any organizational directory ... and personal Microsoft accounts Users in any Microsoft 365 organization (work or school accounts) and personal Microsoft accounts Leave Redirect URI empty.
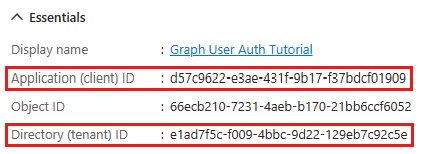
Select Register. On the application's Overview page, copy the value of the Application (client) ID and save it, you will need it in the next step. If you chose Accounts in this organizational directory only for Supported account types, also copy the Directory (tenant) ID and save it.
Select Authentication under Manage. Locate the Advanced settings section and change the Allow public client flows toggle to Yes, then choose Save.
Note
Notice that you did not configure any Microsoft Graph permissions on the app registration. This is because the sample uses dynamic consent to request specific permissions for user authentication.
Create a JavaScript console app
Begin by creating a new Node.js project. Open your command-line interface (CLI) in a directory where you want to create the project. Run the following command.
npm init
Answer the prompts by either supplying your own values or accepting the defaults.
Install dependencies
Before moving on, add some additional dependencies that you will use later.
- Azure Identity client library for JavaScript to authenticate the user and acquire access tokens.
- Microsoft Graph JavaScript client library to make calls to the Microsoft Graph.
- isomorphic-fetch to add
fetch
API to Node.js. This is a dependency for the Microsoft Graph JavaScript client library. - readline-sync for prompting the user for input.
Run the following commands in your CLI to install the dependencies.
npm install @azure/identity @microsoft/microsoft-graph-client isomorphic-fetch readline-sync
Load application settings
In this section you'll add the details of your app registration to the project.
Create a file in the root of your project named appSettings.js and add the following code.
const settings = { clientId: 'YOUR_CLIENT_ID_HERE', tenantId: 'common', graphUserScopes: ['user.read', 'mail.read', 'mail.send'], }; export default settings;
Update the values in
settings
according to the following table.Setting Value clientId
The client ID of your app registration tenantId
If you chose the option to only allow users in your organization to sign in, change this value to your tenant ID. Otherwise leave as common
.
Design the app
In this section you will create a simple console-based menu.
Create a file in the root of your project named graphHelper.js and add the following placeholder code. You'll add more code this file in later steps.
module.exports = {};
Create a file in the root of your project named index.js and add the following code.
import { keyInSelect } from 'readline-sync'; import settings from './appSettings.js'; import { initializeGraphForUserAuth, getUserAsync, getUserTokenAsync, getInboxAsync, sendMailAsync, makeGraphCallAsync, } from './graphHelper.js'; async function main() { console.log('JavaScript Graph Tutorial'); let choice = 0; // Initialize Graph initializeGraph(settings); // Greet the user by name await greetUserAsync(); const choices = [ 'Display access token', 'List my inbox', 'Send mail', 'Make a Graph call', ]; while (choice != -1) { choice = keyInSelect(choices, 'Select an option', { cancel: 'Exit' }); switch (choice) { case -1: // Exit console.log('Goodbye...'); break; case 0: // Display access token await displayAccessTokenAsync(); break; case 1: // List emails from user's inbox await listInboxAsync(); break; case 2: // Send an email message await sendMailToSelfAsync(); break; case 3: // Run any Graph code await doGraphCallAsync(); break; default: console.log('Invalid choice! Please try again.'); } } } main();
Add the following placeholder methods at the end of the file. You'll implement them in later steps.
function initializeGraph(settings) { // TODO } async function greetUserAsync() { // TODO } async function displayAccessTokenAsync() { // TODO } async function listInboxAsync() { // TODO } async function sendMailToSelfAsync() { // TODO } async function doGraphCallAsync() { // TODO }
This implements a basic menu and reads the user's choice from the command line.
Add user authentication
In this section you will extend the application from the previous exercise to support authentication with Azure AD. This is required to obtain the necessary OAuth access token to call the Microsoft Graph. In this step you will integrate the Azure Identity client library for JavaScript into the application and configure authentication for the Microsoft Graph JavaScript client library.
The Azure Identity library provides a number of TokenCredential
classes that implement OAuth2 token flows. The Microsoft Graph client library uses those classes to authenticate calls to Microsoft Graph.
Configure Graph client for user authentication
In this section you will use the DeviceCodeCredential
class to request an access token by using the device code flow.
Open graphHelper.js and replace its contents with the following.
import 'isomorphic-fetch'; import { DeviceCodeCredential } from '@azure/identity'; import { Client } from '@microsoft/microsoft-graph-client'; // prettier-ignore import { TokenCredentialAuthenticationProvider } from '@microsoft/microsoft-graph-client/authProviders/azureTokenCredentials/index.js'; let _settings = undefined; let _deviceCodeCredential = undefined; let _userClient = undefined; export function initializeGraphForUserAuth(settings, deviceCodePrompt) { // Ensure settings isn't null if (!settings) { throw new Error('Settings cannot be undefined'); } _settings = settings; _deviceCodeCredential = new DeviceCodeCredential({ clientId: settings.clientId, tenantId: settings.tenantId, userPromptCallback: deviceCodePrompt, }); const authProvider = new TokenCredentialAuthenticationProvider( _deviceCodeCredential, { scopes: settings.graphUserScopes, }, ); _userClient = Client.initWithMiddleware({ authProvider: authProvider, }); }
Replace the empty
initializeGraph
function in index.js with the following.function initializeGraph(settings) { initializeGraphForUserAuth(settings, (info) => { // Display the device code message to // the user. This tells them // where to go to sign in and provides the // code to use. console.log(info.message); }); }
This code declares two private properties, a DeviceCodeCredential
object and a Client
object. The initializeGraphForUserAuth
function creates a new instance of DeviceCodeCredential
, then uses that instance to create a new instance of Client
. Every time an API call is made to Microsoft Graph through the _userClient
, it will use the provided credential to get an access token.
Test the DeviceCodeCredential
Next, add code to get an access token from the DeviceCodeCredential
.
Add the following function to graphHelper.js.
export async function getUserTokenAsync() { // Ensure credential isn't undefined if (!_deviceCodeCredential) { throw new Error('Graph has not been initialized for user auth'); } // Ensure scopes isn't undefined if (!_settings?.graphUserScopes) { throw new Error('Setting "scopes" cannot be undefined'); } // Request token with given scopes const response = await _deviceCodeCredential.getToken( _settings?.graphUserScopes, ); return response.token; }
Replace the empty
displayAccessTokenAsync
function in index.js with the following.async function displayAccessTokenAsync() { try { const userToken = await getUserTokenAsync(); console.log(`User token: ${userToken}`); } catch (err) { console.log(`Error getting user access token: ${err}`); } }
Run the following command in your CLI in the root of your project.
node index.js
Enter
1
when prompted for an option. The application displays a URL and device code.JavaScript Graph Tutorial [1] Display access token [2] List my inbox [3] Send mail [4] Make a Graph call [0] Exit Select an option [1...4 / 0]: 1 To sign in, use a web browser to open the page https://microsoft.com/devicelogin and enter the code RK987NX32 to authenticate.
Open a browser and browse to the URL displayed. Enter the provided code and sign in.
Important
Be mindful of any existing Microsoft 365 accounts that are logged into your browser when browsing to
https://microsoft.com/devicelogin
. Use browser features such as profiles, guest mode, or private mode to ensure that you authenticate as the account you intend to use for testing.Once completed, return to the application to see the access token.
Tip
For validation and debugging purposes only, you can decode user access tokens (for work or school accounts only) using Microsoft's online token parser at https://jwt.ms. This can be useful if you encounter token errors when calling Microsoft Graph. For example, verifying that the
scp
claim in the token contains the expected Microsoft Graph permission scopes.
Get user
In this section you will incorporate the Microsoft Graph into the application. You will use the Microsoft Graph JavaScript client library to make calls to Microsoft Graph.
Open graphHelper.js and add the following function.
export async function getUserAsync() { // Ensure client isn't undefined if (!_userClient) { throw new Error('Graph has not been initialized for user auth'); } // Only request specific properties with .select() return _userClient .api('/me') .select(['displayName', 'mail', 'userPrincipalName']) .get(); }
Replace the empty
greetUserAsync
function in index.js with the following.async function greetUserAsync() { try { const user = await getUserAsync(); console.log(`Hello, ${user?.displayName}!`); // For Work/school accounts, email is in mail property // Personal accounts, email is in userPrincipalName console.log(`Email: ${user?.mail ?? user?.userPrincipalName ?? ''}`); } catch (err) { console.log(`Error getting user: ${err}`); } }
If you run the app now, after you log in the app welcomes you by name.
Hello, Megan Bowen!
Email: MeganB@contoso.com
Code explained
Consider the code in the getUserAsync
function. It's only a few lines, but there are some key details to notice.
Accessing 'me'
The function passes /me
to the _userClient.api
request builder, which builds a request to the Get user API. This API is accessible two ways:
GET /me
GET /users/{user-id}
In this case, the code will call the GET /me
API endpoint. This is a shortcut method to get the authenticated user without knowing their user ID.
Note
Because the GET /me
API endpoint gets the authenticated user, it is only available to apps that use user authentication. App-only authentication apps cannot access this endpoint.
Requesting specific properties
The function uses the select
method on the request to specify the set of properties it needs. This adds the $select query parameter to the API call.
Strongly-typed return type
The function returns a User
object deserialized from the JSON response from the API. Because the code uses select
, only the requested properties will have values in the returned User
object. All other properties will have default values.
List inbox
In this section you will add the ability to list messages in the user's email inbox.
Open graphHelper.js and add the following function.
export async function getInboxAsync() { // Ensure client isn't undefined if (!_userClient) { throw new Error('Graph has not been initialized for user auth'); } return _userClient .api('/me/mailFolders/inbox/messages') .select(['from', 'isRead', 'receivedDateTime', 'subject']) .top(25) .orderby('receivedDateTime DESC') .get(); }
Replace the empty
ListInboxAsync
function in index.js with the following.async function listInboxAsync() { try { const messagePage = await getInboxAsync(); const messages = messagePage.value; // Output each message's details for (const message of messages) { console.log(`Message: ${message.subject ?? 'NO SUBJECT'}`); console.log(` From: ${message.from?.emailAddress?.name ?? 'UNKNOWN'}`); console.log(` Status: ${message.isRead ? 'Read' : 'Unread'}`); console.log(` Received: ${message.receivedDateTime}`); } // If @odata.nextLink is not undefined, there are more messages // available on the server const moreAvailable = messagePage['@odata.nextLink'] != undefined; console.log(`\nMore messages available? ${moreAvailable}`); } catch (err) { console.log(`Error getting user's inbox: ${err}`); } }
Run the app, sign in, and choose option 2 to list your inbox.
[1] Display access token [2] List my inbox [3] Send mail [4] Make a Graph call [0] Exit Select an option [1...4 / 0]: 2 Message: Updates from Ask HR and other communities From: Contoso Demo on Yammer Status: Read Received: 12/30/2021 4:54:54 AM -05:00 Message: Employee Initiative Thoughts From: Patti Fernandez Status: Read Received: 12/28/2021 5:01:10 PM -05:00 Message: Voice Mail (11 seconds) From: Alex Wilber Status: Unread Received: 12/28/2021 5:00:46 PM -05:00 Message: Our Spring Blog Update From: Alex Wilber Status: Unread Received: 12/28/2021 4:49:46 PM -05:00 Message: Atlanta Flight Reservation From: Alex Wilber Status: Unread Received: 12/28/2021 4:35:42 PM -05:00 Message: Atlanta Trip Itinerary - down time From: Alex Wilber Status: Unread Received: 12/28/2021 4:22:04 PM -05:00 ... More messages available? true
Code explained
Consider the code in the getInboxAsync
function.
Accessing well-known mail folders
The function passes /me/mailFolders/inbox/messages
to the _userClient.api
request builder, which builds a request to the List messages API. Because it includes the /mailFolders/inbox
portion of the API endpoint, the API will only return messages in the requested mail folder. In this case, because the inbox is a default, well-known folder inside a user's mailbox, it's accessible via its well-known name. Non-default folders are accessed the same way, by replacing the well-known name with the mail folder's ID property. For details on the available well-known folder names, see mailFolder resource type.
Accessing a collection
Unlike the getUserAsync
function from the previous section, which returns a single object, this method returns a collection of messages. Most APIs in Microsoft Graph that return a collection do not return all available results in a single response. Instead, they use paging to return a portion of the results while providing a method for clients to request the next "page".
Default page sizes
APIs that use paging implement a default page size. For messages, the default value is 10. Clients can request more (or less) by using the $top query parameter. In getInboxAsync
, this is accomplished with the .top(25)
method.
Note
The value passed to .top()
is an upper-bound, not an explicit number. The API returns a number of messages up to the specified value.
Getting subsequent pages
If there are more results available on the server, collection responses include an @odata.nextLink
property with an API URL to access the next page. The JavaScript client library exposes this property on PageCollection
objects. If this property is not undefined, there are more results available.
The value of @odata.nextLink
can be passed to _userClient.api
to get the next page of results. Alternatively, you can use the PageIterator
object from the client library to iterate over all available pages.
Sorting collections
The function uses the orderby
method on the request to request results sorted by the time the message is received (receivedDateTime
property). It includes the DESC
keyword so that messages received more recently are listed first. This adds the $orderby query parameter to the API call.
Send mail
In this section you will add the ability to send an email message as the authenticated user.
Open graphHelper.js and add the following function.
export async function sendMailAsync(subject, body, recipient) { // Ensure client isn't undefined if (!_userClient) { throw new Error('Graph has not been initialized for user auth'); } // Create a new message const message = { subject: subject, body: { content: body, contentType: 'text', }, toRecipients: [ { emailAddress: { address: recipient, }, }, ], }; // Send the message return _userClient.api('me/sendMail').post({ message: message, }); }
Replace the empty
sendMailAsync
function in index.js with the following.async function sendMailToSelfAsync() { try { // Send mail to the signed-in user // Get the user for their email address const user = await getUserAsync(); const userEmail = user?.mail ?? user?.userPrincipalName; if (!userEmail) { console.log("Couldn't get your email address, canceling..."); return; } await sendMailAsync('Testing Microsoft Graph', 'Hello world!', userEmail); console.log('Mail sent.'); } catch (err) { console.log(`Error sending mail: ${err}`); } }
Run the app, sign in, and choose option 3 to send an email to yourself.
[1] Display access token [2] List my inbox [3] Send mail [4] Make a Graph call [0] Exit Select an option [1...4 / 0]: 3 Mail sent.
Note
If you are testing with a developer tenant from the Microsoft 365 Developer Program, the email you send might not be delivered, and you might receive a non-delivery report. If this happens to you, please contact support via the Microsoft 365 admin center.
To verify the message was received, choose option 2 to list your inbox.
Code explained
Consider the code in the sendMailAsync
function.
Sending mail
The function passes /me/sendMail
to the _userClient.api
request builder, which builds a request to the Send mail API. The request builder takes a Message
object representing the message to send.
Creating objects
Unlike the previous calls to Microsoft Graph that only read data, this call creates data. To do this with the client library you create an instance of the class representing the data (in this case, Message
), set the desired properties, then send it in the API call. Because the call is sending data, the post
method is used instead of get
.
Optional: add your own code
In this section you will add your own Microsoft Graph capabilities to the application. This could be a code snippet from Microsoft Graph documentation or Graph Explorer, or code that you created. This section is optional.
Update the app
Open graphHelper.js and add the following function.
// This function serves as a playground for testing Graph snippets // or other code export async function makeGraphCallAsync() { // INSERT YOUR CODE HERE }
Replace the empty
makeGraphCallAsync
function in index.js with the following.async function doGraphCallAsync() { try { await makeGraphCallAsync(); } catch (err) { console.log(`Error making Graph call: ${err}`); } }
Choose an API
Find an API in Microsoft Graph you'd like to try. For example, the Create event API. You can use one of the examples in the API documentation, or you can customize an API request in Graph Explorer and use the generated snippet.
Configure permissions
Check the Permissions section of the reference documentation for your chosen API to see which authentication methods are supported. Some APIs don't support app-only, or personal Microsoft accounts, for example.
- To call an API with user authentication (if the API supports user (delegated) authentication), add the required permission scope in appSettings.js.
- To call an API with app-only authentication see the app-only authentication tutorial.
Add your code
Copy your code into the makeGraphCallAsync
function in graphHelper.js. If you're copying a snippet from documentation or Graph Explorer, be sure to rename the client
to _userClient
.
Congratulations!
You've completed the JavaScript Microsoft Graph tutorial. Now that you have a working app that calls Microsoft Graph, you can experiment and add new features.
- Learn how to use app-only authentication with the Microsoft Graph JavaScript SDK.
- Visit the Overview of Microsoft Graph to see all of the data you can access with Microsoft Graph.
Microsoft Graph Toolkit
If you are building JavaScript apps with UI, the Microsoft Graph Toolkit offers a collection of components that can simplify development.
TypeScript/JavaScript samples
Have an issue with this section? If so, please give us some feedback so we can improve this section.